Category: IP Cameras

IP or Network Cameras

  • Hikvision vs. Lorex – The Most Popular IP Cameras Compared

    Hikvision vs. Lorex – The Most Popular IP Cameras Compared

    Hikvision and Dahua are the two most common brands that DIY IP camera enthusiasts flock to. But for those who are more budget conscious, there are other brands such as Lorex, Swann, Amcrest, Reolink. These are also some of the IP camera brands that I get the most questions about.

    In this second post of the IP camera brand comparison series, I am going to do an in-depth comparison of Hikvision vs. Lorex. In case you missed the first post in this comparison series where I compared Hikvision vs. Dahua, do go and check that out too.

    Lorex has a complex history of shifting strategies when it comes to IP cameras. For the longest time, their IP cameras were intended to be used only with their own NVRs. In other words, you were not allowed to venture outside their ecosystem. This was totally against the ethos of openness and inter-operability that I champion here at VueVille. That’s why I never recommended them in our best outdoor and indoor IP camera roundups.

    Then in February 2018, Dahua acquired Lorex and soon afterwards Lorex cameras started supporting ONVIF and RTSP protocols. But recently they removed that support just as Dahua sold Lorex to Skywatch, a Taiwanese company.

    So we have a somewhat strange comparison on our hands – Hikvision with their IP cameras that are compatible with other brands, and Lorex with their proprietary IP cameras that work only with their own NVRs.

    [wpsm_titlebox title=”Contents” style=”main”][contents h2 h3][/wpsm_titlebox]

    A quick note: This article may contain affiliate links. If you click on one of these links and then purchase something, we may receive a fee. This does not cost you anything extra. Also note that Hikvision and Dahua do not consider certain platforms including Amazon as an authorized seller platform. So if you need warranty support please purchase from authorized resellers of Hikvision and Dahua products in your country.

    Hikvision vs Lorex - The Most Popular IP Cameras Compared - VueVille

    Hikvision vs. Lorex – the Stories behind the Brands

    Hikvision

    Unlike Lorex, Hikvision is not a retail brand. They are an OEM and primarily cater to professional installers. They are not really interested in retailing to the general public. But their affordable DIY IP cameras with powerful motion detection features and great build quality attracted DIY-ers like crazy. That’s also the reason I bought my first IP camera, the Hikvision DS-2CD2032-I back in 2015.

    A couple of years ago, they launched their retail brand EZVIZ. Confusingly, EZVIZ used to be the name of their cloud app as well. Anyway the EZVIZ models are dumbed down versions of the Hikvision cameras and are not worth spending any money on. What about HiLook? Same story. That’s why I am focusing on the main Hikvision brand.

    The biggest concern I have with Hikvision is not so much about their cameras, but who owns the company. The Chinese government owns at least a partial stake in Hikvision. This creates a few ethical and moral quandaries that I won’t go into here – you know what I’m talking about.

    If you live in the USA, there’s one more reason to avoid Hikvision cameras – the US government has recently banned the sale and import of new Hikvision products into the USA unless certain conditions are met. They are still being sold by their authorized retail seller BH Photo though. Of course, you can always get them from AliExpress as most of us have always done.

    From a technical standpoint, you should treat any security camera the same way – with maximum suspicion that they may be ‘dialing home’ to their manufacturer’s own servers and leaking your data. So lock them down using Virtual LANs (VLAN) and strict firewall rules like I have in my DIY home security camera system.

    Lorex

    Lorex was founded in 1993 and has head offices in Markham, Ontario, Canada and in Linthicum, Maryland, USA. They have product warehouses in Markham, Indiana and California.

    But first let’s start with the company FLIR, better known as the high-end camera manufacturer who revolutionized thermal imaging for the military and industrial markets. They acquired Lorex in 2012 for around $60 million seeking to lower the cost of thermal imaging and open it up to the retail market.

    So for the next 6 years they tried to penetrate the DIY and SMB markets. During this period, their main OEM supplier was Dahua. In February 2018, however, FLIR exited the DIY security camera space by selling Lorex to Dahua. Until November 2022, they operated as a subsidiary of Dahua. So effectively, Lorex was a Dahua brand between February 2018 and November 2022.

    As mentioned in my intro above, Dahua has now sold Lorex to Skytech, a Taiwanese cloud services company. The disappearance of ONVIF and RTSP support from recent Lorex models is probably a sign of things to come.

    8MP 4K IP Camera Duel – Hikvision DS-2CD2085G1-I vs. Lorex E892ABW

    Before we go any further, I need to point out that the biggest difference between Hikvision and Lorex is this: Hikvision cameras can work in standalone mode, or with Hikvision NVRs, or even any 3rd party NVR that is ONVIF compliant.

    On the other hand, Lorex cameras will work only with Lorex NVRs and that too select Lorex NVRs. Simply put, Lorex cameras work only within the Lorex eco-system.

    Hikvision cameras on the other hand which will work with any 3rd party ONVIF/RTSP compliant system. Okay now let’s get into the details.

    Hardware features

    The Hikvision camera I’ve selected has the term ‘Darkfighter’ in its marketing material and what gives it strong low light performance. This is really due to the 1/2″ sized CMOS sensor whereas the Lorex has a 1/2.8″ CMOS sensor. The Lorex is simply outclassed here by the much better Hikvision sensor.

    The size of the sensor has a huge bearing on the low light ability of a camera, whether it be a camcorder or a security camera. The larger the sensor, the greater its ability to gather light and so do well in low light conditions. But as you cram in more and more pixels into the same size sensor, they get smaller and smaller, which adds noise. Noise is the bane of low light video and reduces the detail that you can get out of your video.

    So while security camera manufacturers have pushed pixel count to 8MP and beyond, they have not always increased the sensor size proportionally. While the Hikvision has true 120dB Wide Dynamic Range (WDR) to help improve video quality, the Lorex doesn’t. This leaves the Lorex at somewhat of a disadvantage, even as it claims HDR support.

    When it comes to minimum illumination required, again we see divergence. Hikvision can do a minimum illumination of 0.01 lux and 0 lux with IR on. Lorex doesn’t provide this information. Both cameras have an automatic IR cut filter that will switch to black and white infrared vision when it gets dark. So far, that’s standard IP camera behaviour.

    However, Lorex claims a ‘colour night vision’ feature whereby you still get colour video under low light conditions. So this feature still requires external illumination. So I fail to see how this is something special – the Hikvision has a much larger sensor and probably even better low light colour vision ability! I see this so-called feature as a marketing gimmick and nothing more.

    What about the Lorex’s LED lights though? They look like LED spotlights that you can leave permanently on through the night, but actually they are only warning LEDs that are motion-activated or activated on-demand in the mobile app. If these lights were at least proper spotlights, then Lorex’s colour night vision claim would make more sense (Hikvision has such models).

    The Lorex has 2-way audio using an onboard microphone and speaker combo, with the speaker doubling up as a siren deterrent. This Hikvision model however has neither.

    Both cameras have on-board SD card for local storage of video clips and snapshots.

    Winner: Hikvision

    Software features

    The three most important software features that the Hikvision has are ONVIF support, the built-in NVR feature, and the advanced motion detection features that help reduce false alerts.

    Hikvision cameras support ONVIF & RTSP. Lorex however has recently removed all mentions of ONVIF support on their product pages (their datasheets never mentioned it anyway). Lorex has also confirmed in their website Q&A section that this camera doesn’t support ONVIF.

    Why is ONVIF support important? ONVIF support ensures that your camera will work with ONVIF-compliant equipment from 3rd party manufacturers. ONVIF ensures that your camera will work with standards-compliant equipment from 3rd party manufacturers. This is why you can add a Hikvision camera to your ONVIF-compatible NVR or DIY NAS NVR.

    RTSP allows even non-ONVIF equipment (such as software) to access the security camera’s video stream. Examples are video players like the popular VLC player, and Blue Iris PC NVR software.

    So this is a slam dunk for Hikvision.

    Both Hikvision and Lorex have on-board storage but only Hikvision cameras have the built-in NVR feature – because Hikvision cameras are designed for standalone operation (don’t need an NVR).

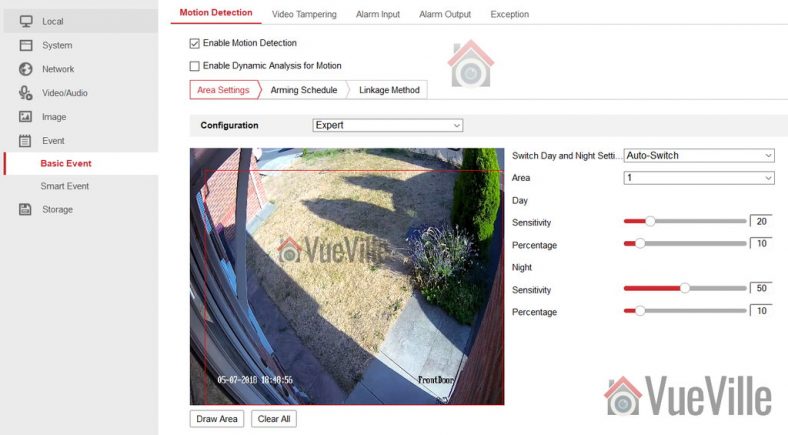
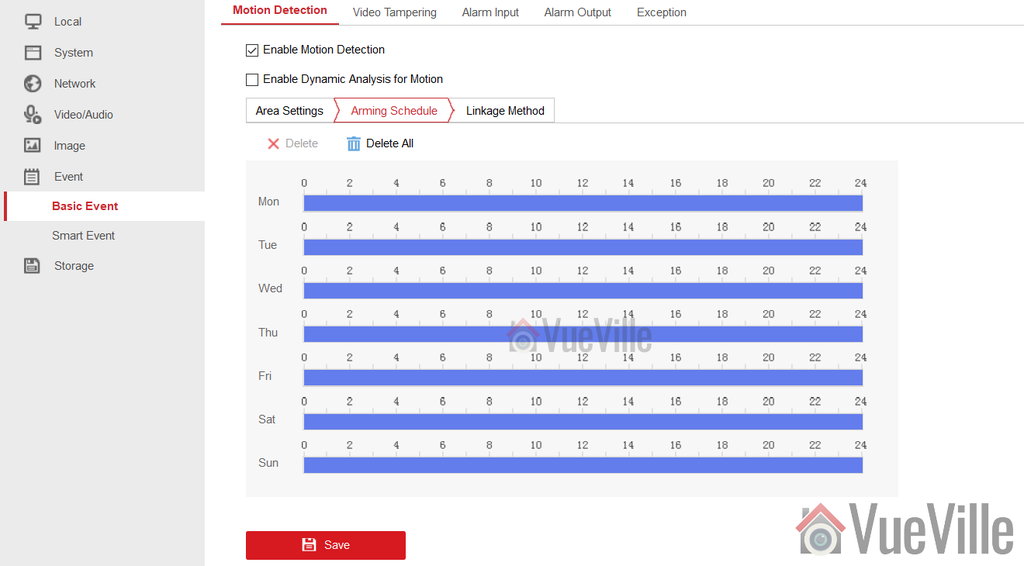
    The Hikvsion IP cameras can do basic motion detection, advanced motion detection, dace detection and can send email/push alerts – all without an NVR. This is local processing in action. The Lorex cameras cannot do any of this on its own. It is just an IP camera with no smart features unless its connected to an NVR.

    Motion Detection ability

    I classify motion detection ability into three categories:

    1. Basic motion detection – this is detecting just simple pixel changes, results in false alerts.
    2. Advanced motion detection – like line crossing, intrusion detection, which result in fewer false alerts.
    3. Smart detection – person / face / vehicle / pet detection, the best method for eliminating false alerts.

    Hikvision supports basic, advanced and 1 single smart motion detection method of face detection.

    The Lorex doesn’t have the wide array of advanced motion detection alerts that Hikvision has, such as line crossing, intrusion detection etc. which are all great for reducing false motion detection alerts But it does have person and vehicle detection. These are equally effective at reducing false alerts.

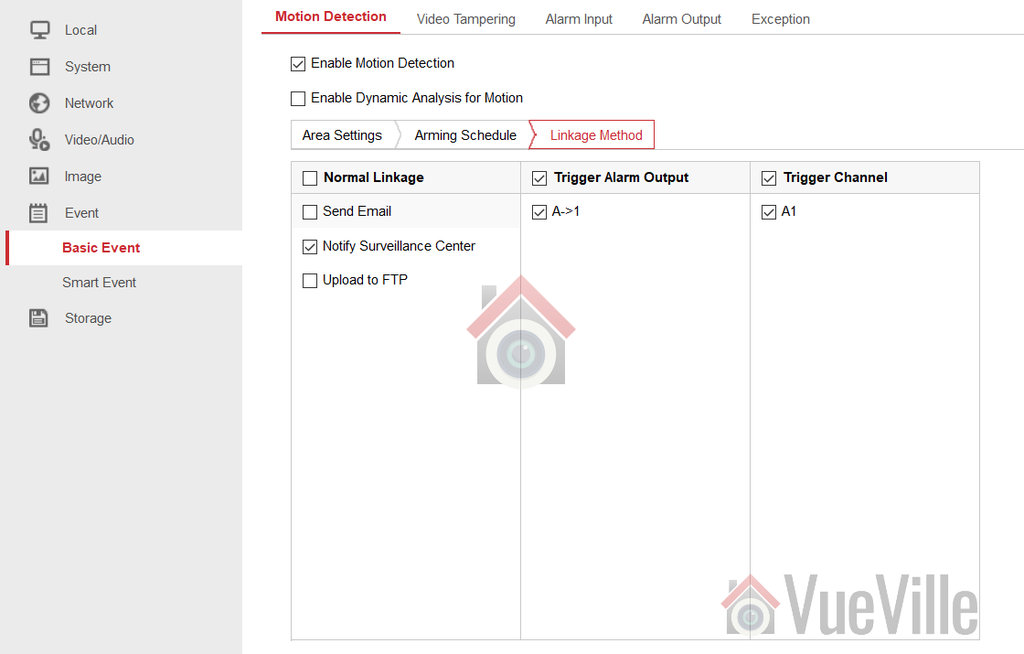
    But as mentioned earlier, the Hikvision is capable of standalone operation. It can record motion detection triggered clips, take snapshots, and send out email alerts and push notifications to the Hikvision app on mobile devices without an NVR or PC.

    The Lorex can do none of this by itself, you have to buy a compatible Lorex NVR.

    The Hikvision camera I have selected doesn’t have the AcuSense feature which reduces false alarms by ignoring birds, animals, lights and movement of trees.

    As part of a DIY NVR system that uses QNAP QVR Pro, Blue Iris or Home Assistant, only Hikvision fits the bill.

    Winner: Hikvision

    Warranty

    Hikvision products come with a 3-Year Warranty from authorized dealers only. Lorex has a 2 year warranty as standard, but can be extended to 3 years or 5 years for an extra fee.

    Detailed Comparison Table

    Here’s a summary in a nice and easy table:

    [table id=54 responsive=”scroll” /]

    Verdict – Hikvision vs. Lorex

    The Hikvision handily beats the Lorex thanks to its flexibility of operation modes in a DIY CCTV system – standalone, with a Hikvision NVR, or with any 3rd party NVR system. It also has advanced motion detection methods that Lorex doesn’t have.

    Also check out the other recommendations on our best outdoor IP cameras list.

    Where to buy

    • Hikvision DS-2CD2085G1-I at BH Photo (authorized retailer).
    • Lorex E892ABW at [easyazon_link identifier=”B086BXC2R4″ locale=”US” tag=”vueville.com-eaz-20″]Amazon[/easyazon_link]

    (* = affiliate link / image source: Amazon Associates Program)

    Related Comparisons

  • Best 20 Megapixel CCTV Cameras

    Best 20 Megapixel CCTV Cameras

    Looking for the best 20 Megapixel CCTV cameras on the market? We have rounded up the best IP cameras on the market that offer both incredible daytime detail and outstanding night time performance with no compromises.

    The Best 20 Megapixel CCTV Cameras

    [toc]

    What to look for

    Here are the most important features to look for in a high-pixel count CCTV camera:

    • Indoor or Outdoor – Outdoor cameras should have at least an IP66 rating for weather protection
    • Wired connections – At 20 Megapixel resolution, you have to use a wired connection. PoE is fine but an SFP fibre-optic slot is even better due to its ability to cover long distances that fibre can cover.
    • Local storage or Cloud Storage – Local storage is more reliable vs. using only cloud storage in case of an Internet fault.
    • Smart home compatibility – Make sure the camera has ONVIF support for inter-operability

    Sony SNC-VM772R – The Outdoor Champion with Optical Zoom

    [easyazon_image align=”center” height=”500″ identifier=”B01350CKNQ” locale=”US” src=”https://m.media-amazon.com/images/I/31ScrSxxPkL.jpg” tag=”vueville.com-eaz-20″ width=”500″]

    httpv://www.youtube.com/watch?v=tuXuZ5K_b8Y
    [wpsm_divider top=”20px” bottom=”20px” style=”clear”]
    Sony’s IP cameras are legendary for their low light performance and the SNC-VM772R is no exception. This IP camera sports a large, highly sensitive 1.0-type back-illuminated Exmor R CMOS image sensor with 20 Megapixels and a minimum illumination level of 0.06 lux in full-colour. Although Sony bills it as a 4K camera that can do 3,840 x 2,160, you can go up to 5472 x 3648 resolution.

    Want a 20 Megapixel camera but with optical zoom? The SNC-VM772R has a motorized optical zoom lens with focal length from 8.8 mm to 25.7 mm. This is an effective 2.9x zoom. The f-stop varies from F1.8 at the wide end to F2.8 at the tele end. The viewing angle ranges from 70.7° to 27.5°.

    One feature frequently missing from high MP cameras is an on-board IR illuminator. Fear not, this Sony has 30x 850nm IR LEDs giving it a night vision range of 50m.

    I always prefer cameras with advanced motion detection ability. This Sony supports intrusion, passing, existing, disappearance, capacity, abandoned object, and removed object detection. So its on par with Dahua, Axis and Vivotek. Another interesting feature is a PTZ-like virtual tracking feature of up to 4 moving targets.

    Local storage of images and motion detection clips is supported with an SD card slot that takes up to 128GB cards. For cameras with such high pixel counts, the SD card is more suited as a failover video recording destination in case of network outage.

    What about connectivity? IEEE 802.3af PoE is present, as is microphone and line input. 2x alarm inputs and 2x alarm outputs are generous by IP camera standards. An HDMI port is a very unusual inclusion, but very welcome.

    [wpsm_divider top=”20px” bottom=”20px” style=”clear”][wpsm_column size=”one-half”]Features:

    • 20MP Exmor R CMOS image sensor
    • Optical zoom, 8.8 mm to 25.7 mm
    • Automatic IR cut filter
    • PoE support, 12V DC, or 24V AC
    • 2x alarm in/out ports
    • microSD card for Edge recording
    • IP66 and IK10 impact resistant housing
    • Works from -40 °C to +50 °C (-40 °F to +122 °F)
    • Dimensions – φ190 x 146.7 mm

    [/wpsm_column][wpsm_column size=”one-half” position=”last”]Verdict:

    • Local storage available: Yes
    • Cloud reliant: No
    • Battery backup: No
    • Smart home compatibility: ONVIF Profile S

    [/wpsm_column]

    [easyazon_link identifier=”B01350CKNQ” locale=”US” tag=”vueville.com-eaz-20″]View on Amazon[/easyazon_link]

    AXIS Q1659 – The Indoor Choice with DSLR features

    The Axis Q1659 is the perfect marriage of DSLR-level image quality from the Canon APS-C sensor and the surveillance prowess that Axis is famous for. The 22.4 x 15.0 mm CMOS sensor allows for a maximum resolution of 5472×3648 and a shutter speed down to 1/8000 seconds.

    Since the camera uses a Canon mount, you can use any Canon EF/EF-S lens with this camera.

    AXIS Q1659 - Best 20MP CCTV IP Cameras - VueVille

    Axis sells the camera with the following lenses:

    • AXIS Q1659 24 mm, f/2.8
    • AXIS Q1659 35 mm, f/2a
    • AXIS Q1659 50 mm, f/1.4a
    • AXIS Q1659 85 mm, f/1.2La
    • AXIS Q1659 100 mm, f/2.8L
    • AXIS Q1659 10–22 mm, f/3.5-4.5
    • AXIS Q1659 70–200 mm, f/2.8L
    • AXIS Q1659 55–250 mm f/4-5.6

    A major highlight is the Lightfinder technology which capture full-colour video in very low level light. Check out the video below to learn more:
    httpv://www.youtube.com/watch?v=77cN3LHdBQQ
    [wpsm_divider top=”20px” bottom=”20px” style=”clear”]

    The camera can be powered over conventional PoE. But on a high-end camera like this, it’s no surprise to find an SFP slot which allows you to connect the camera using a fibre optic cable. The main advantage is low latency and the ability to carry data over long distances. This gives you immense flexibility in camera installation. Axis also has a technilogy called ZipStream which lowers the bandwidth needed by up to 50%.

    The camera is not light on audio features – it support 2-way audio and has an external microphone input and audio line out. It can operate in freezing temperatures.

    [wpsm_divider top=”20px” bottom=”20px” style=”clear”][wpsm_column size=”one-half”]Features:

    • 20MP APS-C CMOS image sensor
    • Canon mount and EF/EF-S lenses
    • Automatic IR cut filter
    • PoE and SFP fibre-optic port
    • microSD/microSDHC/microSDXC card and NAS support
    • Works from 0 °C to 45 °C (32 °F to 122 °F)
    • Two-way talk with mic-input and line-out
    • Dimensions – Camera body: 176 x 102 x 75 mm (7 x 4 x 3 in)

    [/wpsm_column][wpsm_column size=”one-half” position=”last”]Verdict:

    • Local storage available: Yes
    • Cloud reliant: No
    • Battery backup: No
    • Smart home compatibility: Open API including VAPIX® and AXIS Camera Application Platform, AXIS Video Hosting System (AVHS), ONVIF Profile S and G

    [/wpsm_column]
    B073RC8R2B

    Arecont Vision AV20175DN-28 – The Surround Video star with WDR

    [easyazon_image align=”center” height=”500″ identifier=”B00ODB5FS4″ locale=”US” src=”https://m.media-amazon.com/images/I/41bUYJXw6lL.jpg” tag=”vueville.com-eaz-20″ width=”500″]

    Arecont Vision is a California-based company that specialises in video surveillance and machine vision tech. The AV20175DN-28 is a very unique multi-sensor camera that provides ‘surround’ video. The 4 independently controllable 5MP sensors have M12 lens mounts. Each mount can take a lens of 2.1mm, 2.8mm, 4mm, 6mm, 8mm, 12mm or 16mm focal length. The AV20175DN-28 model comes with 2.8mm lens and the AV20175DN-08 comes with 8 mm lens.

    The 360° track together with these 4 sensors means you get superb flexibility in defining the camera’s scene coverage, with up to 270° field of view. In case you are wondering the resolution this camera pushes out is an incredible 10240×1920 at 3.5 fps. At 5120×960, you can get 11 fps.

    The very high 20 Megapixel count allows for an intriguing feature – you can zoom into a recorded video and still maintain Full HD 1080p resolution. This virtually eliminates the need for PTZ cameras which anyway have the downside of missing out on details outside the zoomed in view.

    There is no audio support but there is alarm in/out support. The camera can be powered over PoE, via 12–48V DC or 24V AC. It is also IP66 outdoor rated with an IK-10 impact resistant housing. Did we say the camera is made in the USA?
    [wpsm_divider top=”20px” bottom=”20px” style=”clear”][wpsm_column size=”one-half”]Features:

    • 20MP total, 4x5MP CMOS image sensor
    • Multiple lens options from 2.1mm up to 16mm
    • Enhanced 100dB WDR
    • Automatic IR cut filter
    • PoE support, or 12–48V DC/24V AC
    • Alarm in/out ports
    • IP66 and IK-10 impact resistant housing
    • Works from -40°C (-40°F) to +50°C (122°F)
    • Dimensions – Ø 7.7″ (196mm) x 3.1″ H (78.5mm)

    [/wpsm_column][wpsm_column size=”one-half” position=”last”]Verdict:

    • Local storage available: No
    • Cloud reliant: No
    • Battery backup: No
    • Smart home compatibility: ONVIF Profile S

    [/wpsm_column]

    [easyazon_link identifier=”B00ODB5FS4″ locale=”US” tag=”vueville.com-eaz-20″]View on Amazon[/easyazon_link]

    Conclusion

    IP cameras with super high resolutions are great when you have a large area to cover, but need to be able to zoom in and make a positive ID. Be it day or night. With 20 Megapixels, you can have full 4K resolution even when zoomed in. So these cameras a great choice for DIY enthusiasts who want the best in CCTV technology.

    [text-blocks id=”5527″ slug=”earning-disclaimer”]

  • Best Budget IP Cameras – 2019 Recommendations

    Best Budget IP Cameras – 2019 Recommendations

    Best Budget IP Cameras - VueVille

    Looking for an affordable budget IP camera that won’t fall apart after a few months, doesn’t spy on your family and doesn’t cost a bomb in ‘subscription’ fees every month? Yes I have been there too.

    The market is awash with cheap generic Chinese IP cameras that are super cheap but are probably more trouble than they are worth.

    If you have just started researching and already feel like giving up, don’t worry we have got you covered. Your time is valuable, so we have separated the wheat from the chaff for you. Here’s our hand-picked list of the best budget IP cameras for 2019.

    Best Budget IP Cameras – 2019 Recommendations

    [wpsm_toplist]

    Best Budget Outdoor Bullet IP Camera: Reolink RLC-410 (PoE) & 410W (Wi-Fi)

    [wpsm_column size=”one-half”][easyazon_image align=”center” height=”500″ identifier=”B010LH48F4″ locale=”US” src=”https://images-na.ssl-images-amazon.com/images/I/416viZoNy7L.jpg” tag=”vueville.com-eaz-20″ width=”500″]
    [/wpsm_column]
    [wpsm_column size=”one-half” position=”last”][wpsm_titlebox title=”Features” style=”3″]

    • 4MP or 5MP models available, CMOS image sensor
    • 80° Viewing Angle
    • Infrared LEDs for night vision with 30m range
    • Power over Ethernet (PoE) on RLC-410
    • Dual band WiFi with 2T2R MIMO antenna (802.11ac 2.4 and 5.0 GHz) on RLC-410W
    • ONVIF and RTSP protocols supported
    • IP66 weatherproof rating

    [/wpsm_titlebox][/wpsm_column]
    Reolink is a solid mainstream brand that makes both budget and advanced IP cameras. The RLC-410 is a tried and tested model that is now in its third year. The RLC-410 and 410W variant are entry-level outdoor IP camera models. Unlike most cheap IP cameras which are made of plastic, these cameras have a full metal body. Both have on-board microphones and local storage by way of the on-board SD card slot. The only difference between them is that 410 is PoE-only and 410W is WiFi-only.

    The camera can be easily ceiling mounted and comes with elbow joints. There is a true IR cut removable filter (ICR) to ensure excellent night time videos and faithful colour reproduction during the day. Noise reduction and back-light compensation are also available. Wide Dynamic Range (WDR) which is a premium feature is predictably absent on these cameras.

    One of the features that budget IP cameras miss out on is our beloved built-in NVR feature. I am happy to report that both the RLC-410 and RLC-410W have the built-in NVR feature. This feature is great if you are just starting out and have a single camera or do not have a dedicated NVR. So you can set up the camera to do basic motion detection, and it will overwrite older videos automatically. But do note that Reolink cameras do not support advanced motion detection methods.

    However the camera doesn’t support continuous recording to the on-board SD card, which is fine because its not something I recommend anyway. You will just end up wearing out the SD card sooner. SD cards are best suited to intermittent motion detection clips being written, rather than continuous data recording. The cameras can instead record to a Reolink NVR or any 3rd party NVR or software that supports the ONVIF standard and RTSP protocol.

    [wpsm_column size=”one-half”][wpsm_pros title=”PROS:”]

    • 4MP or 5MP, very good image quality
    • On-board storage and built-in NVR features
    • Email notifications and push alerts
    • Great value for money
    • Works with any 3rd party ONVIF-compliant device such as Synology and QNAP NAS

    [/wpsm_pros]
    [/wpsm_column][wpsm_column size=”one-half” position=”last”][wpsm_cons title=”CONS:”]

    • No audio/alarm connections
    • Viewing angle of 80° is low
    • Ethernet connection needed for initial setup
    • No WDR
    • Lacks advanced motion detection methods
    • Can’t have both PoE and Wi-Fi

    [/wpsm_cons][/wpsm_column]

    Smart Home Checklist

    • Local storage available: Yes
    • Cloud reliant: No
    • Battery backup: No
    • Smart home compatibility: ONVIF, RTSP
    • Subscription fees: None

    [easyazon_link identifier=”B010LH48F4″ locale=”US” tag=”vueville.com-eaz-20″]Check price on Amazon[/easyazon_link]

    Best Budget Outdoor Dome IP Camera: Reolink RLC-422 (PoE) & 422W (Wi-Fi)

    [wpsm_column size=”one-half”][easyazon_image align=”center” height=”500″ identifier=”B076HLT53N” locale=”US” src=”https://images-na.ssl-images-amazon.com/images/I/41aJLUKg9rL.jpg” tag=”vueville.com-eaz-20″ width=”500″]
    [/wpsm_column]

    [wpsm_column size=”one-half” position=”last”][wpsm_titlebox title=”Features” style=”3″]

    • 5MP CMOS sensor
    • 33-98° Viewing Angle with 2.7-12mm Motorized Zoom
    • 30m IR night vision
    • SD card slot, Power over Ethernet (PoE)
    • Wi-Fi model available: RLC-422W
    • IP66 weatherproof rating

    [/wpsm_titlebox]
    [/wpsm_column]
    The RLC-422 has been continuously improved by Reolink and took the crown of best value dome IP camera in our annual IP camera rankings.

    Belying its budget-friendly pricing, the RLC-422 sports a 4x motorized vari-focal lens, which is really a premium feature. The camera also has a built-in NVR feature and together with the SD card slot, you can forego an NVR if you wish.

    The motion detection feature is a bit lacking as it supports only simple MD, but it does support zones and you can adjust the sensitivity in each zone. However advanced motion detection methods that would help cut down false alerts are not available. The Reolink mobile app is stable and lets you live view all your Reolink cameras simultaneously and access the built-in NVR feature of the timeline. The mobile app is a high quality affair and I use it daily as one of our baby monitor apps.

    The camera has a metal body and is IP66 weatherproof and IK10 vandal proof. In case you cannot conveniently wire the camera up at your installation location, you can get the Wi-Fi version – the RLC-422W which supports both 2.4 and 5 GHz bands. Unfortunately, Reolink does not make a model with both PoE and Wi-Fi features.
    [wpsm_column size=”one-half”][wpsm_pros title=”PROS:”]

    • 5MP sensor, good image quality
    • Easy to use with clear setup process
    • Great value

    [/wpsm_pros][/wpsm_column][wpsm_column size=”one-half” position=”last”][wpsm_cons title=”CONS:”]

    • No audio support at all
    • No WDR
    • Lacks advanced motion detection methods

    [/wpsm_cons][/wpsm_column]
    Smart Home Checklist

    • Local storage available: Yes
    • Cloud reliant: No
    • Battery backup: No
    • Smart home compatibility: ONVIF, RTSP
    • Subscription fees: None

    [easyazon_link identifier=”B076HLT53N” locale=”US” tag=”vueville.com-eaz-20″]Check price on Amazon[/easyazon_link]

    Best Budget Outdoor Turret IP Camera: Dahua IPC-HDW4431 (PoE)

    [wpsm_column size=”one-half”][easyazon_image align=”center” height=”500″ identifier=”B07BNP9T8M” locale=”US” src=”https://images-na.ssl-images-amazon.com/images/I/31X2YJIe-bL.jpg” tag=”vueville.com-ref-20″ width=”500″]
    [/wpsm_column]
    [wpsm_column size=”one-half” position=”last”][wpsm_titlebox title=”Features” style=”3″]

    • 4MP CMOS sensor with WDR
    • 104° Viewing Angle
    • 30m IR Range
    • True hardware WDR
    • Power over Ethernet (PoE)
    • IP67 weatherproof, IK10 vandal-proof rating
    • SD card slot on-board
    • Audio & alarm in/out on mini-dome model

    [/wpsm_titlebox]
    [/wpsm_column]
    The Dahua IPC-HDW4431 family comes is many different variants but all of them have the same core specifications of 4MP sensor, 104° field of view, PoE, SD card slot, great weatherproofing, H.265 encoding, and advanced motion detection. How do they differ? Only in their size and shape, IR range, and audio features:

    • Dahua IPC-HDBW4431E-AS: Mini-dome with audio and alarm in/out and 30 metres IR range
    • Dahua IPC-HDW4431EM-AS: Turret with onboard mic but no audio or alarm in/out and 30 metres IR range
    • Dahua IPC-HDBW4431F-AS: A smaller mini-dome with onboard mic but no audio or alarm in/out and 20 metres IR range
    • Dahua IPC-HDB4431C-AS: An even smaller mini-dome with onboard mic but no audio or alarm in/out and 20 metres IR range

    So depending on whether you need the audio and alarm in/out connections or prefer an on-board mic, and the available space you have, choose one of the models above. If you don’t want audio features at all, check out the IPC-HDW4431M model.
    [wpsm_column size=”one-half”][wpsm_pros title=”PROS:”]

    • Very good image quality
    • Good value for money
    • Advanced motion detection
    • Its quite rare to find a turret with local storage and a mic onboard

    [/wpsm_pros][/wpsm_column][wpsm_column size=”one-half” position=”last”][wpsm_cons title=”CONS:”]

    • No audio/alarm connections on the turrets
    • No full duplex 2-way audio support

    [/wpsm_cons][/wpsm_column]
    Smart Home Checklist

    • Local storage available: Yes
    • Cloud reliant: No
    • Battery backup: No
    • Smart home compatibility: ONVIF, RTSP
    • Subscription fees: None

    [easyazon_link identifier=”B01F9CP490″ locale=”US” tag=”vueville.com-ref-20″]Check price on Amazon[/easyazon_link]

    Best Budget Outdoor PTZ IP Camera: Reolink RLC-423 (PoE)

    [wpsm_column size=”one-half”][easyazon_image align=”center” height=”500″ identifier=”B016UCNP08″ locale=”US” src=”https://images-na.ssl-images-amazon.com/images/I/41pEQx9SW4L.jpg” tag=”vueville.com-eaz-20″ width=”500″]
    [/wpsm_column]

    [wpsm_column size=”one-half” position=”last”][wpsm_titlebox title=”Features” style=”3″]

    • 5MP CMOS sensor
    • 2.8-12mm motorized vari-focal lens
    • 33°-98° Viewing Angle
    • 60m IR Range
    • Power over Ethernet (PoE 802.3at)
    • IP66 weatherproof rating

    [/wpsm_titlebox]
    [/wpsm_column]

    The 4MP Reolink RLC-423 of 2017 has been upgraded to 5MP for 2019. When we first reviewed it, we were very impressed with the quality and features that Reolink managed to cram into this PTZ at a very affordable price.

    But this is a budget PTZ camera – it doesn’t have auto tracking or advanced motion detection, on-board storage/SD card, alarm connections or WiFi. But for the asking price, these are not deal-breakers at all.

    Check out our review of the 4MP RLC-423 PTZ here:

    [wpsm_top postid=4255]

    [wpsm_column size=”one-half”][wpsm_pros title=”PROS:”]

    • Very good image quality
    • Fast panning/slewing speed of up to 180°/second
    • Great value for money
    • 30 fps is available at 4MP resolution
    • There is an audio in socket

    [/wpsm_pros][/wpsm_column][wpsm_column size=”one-half” position=”last”][wpsm_cons title=”CONS:”]

    • No alarm connections
    • No SD card slot for local storage
    • No Wi-Fi option
    • Slow focus speed relative to PTZ speed
    • No advanced motion detection methods

    [/wpsm_cons][/wpsm_column]
    Smart Home Checklist

    • Local storage available: No
    • Cloud reliant: No
    • Battery backup: No
    • Smart home compatibility: ONVIF, RTSP
    • Subscription fees: None

    [easyazon_link identifier=”B016UCNP08″ locale=”US” tag=”vueville.com-eaz-20″]Check price on Amazon[/easyazon_link]

    Best Budget Indoor IP Camera: Amcrest ProHD IP3M-941B (Wi-Fi)

    [wpsm_column size=”one-half”]
    [easyazon_image align=”center” height=”500″ identifier=”B01M15WH9C” locale=”US” src=”https://images-na.ssl-images-amazon.com/images/I/71u%2B1vRRQBL._SL500_.jpg” tag=”vueville.com-eaz-20″ width=”500″]
    [/wpsm_column]
    [wpsm_column size=”one-half” position=”last”]
    [wpsm_titlebox title=”Features” style=”3″]

    • 3MP CMOS image sensor
    • 90° Viewing Angle, Pan-Tilt
    • 10m IR range
    • Built-in mic and speaker, half-duplex
    • Ethernet port, Wi-Fi
    • Audio and alarm in/out
    • SD card slot

    [/wpsm_titlebox]

    [easyazon_link identifier=”B01M15WH9C” locale=”US” tag=”vueville.com-eaz-20″]Read Amazon user reviews[/easyazon_link]

    [/wpsm_column]
    While Amcrest’s outdoor IP cameras are decent yet uninspiring, their indoor IP cameras such as the Amcrest ProHD 1080p Pan-Tilt WiFi Camera (IP2M-841B) are very reasonably-priced and well-made. Amcrest has this unique blend of high-quality hardware, reliable software, and great after-sales support.

    The IP2M-841B that I still use as one of our baby monitors has now been succeeded by the IP3M-941B. It has an Ethernet port, WiFi, built-in InfraRed LEDs for very good night vision, clear 2-way audio with mic and speaker, built-in SD card local storage, and on top of all this, very good low-light performance. One downside is that the pan-tilt motion is not super quiet.

    Amcrest has smartphone apps for both iOS and Android. 4 hours of free cloud storage comes free with every Amcrest camera, with more storage available on the purchase of a subscription. The camera does not need an Internet connection to be set up or for functioning normally.
    [wpsm_column size=”one-half”]
    [wpsm_pros title=”PROS:”]

    • Great image quality and 3MP resolution
    • 90 degree viewing angle, with Pan-Tilt
    • Very clear and loud two-way audio with mic and speaker built-in
    • WiFi and RJ-45 Ethernet port, so can use a PoE injector
    • IR LEDs provide night vision capability
    • Built-in NVR feature, support for SD card, NAS, NVR, FTP and Cloud storage locations
    • Home Automation compatible with ONVIF and RTSP support, works with any NVR also
    • Audio and alarm in/out connections
    • Very good value for money

    [/wpsm_pros][/wpsm_column]
    [wpsm_column size=”one-half” position=”last”]
    [wpsm_cons title=”CONS:”]

    • Audio is half-duplex only, you cannot hear and speak simultaneously
    • Smartphone apps could be better – free Amcrest apps lack basic features such as push notifications
    • Still no model with both PoE and Wi-Fi, unlike Hikvision

    [/wpsm_cons][/wpsm_column]
    Smart Home Checklist

    • Local storage available: No
    • Cloud reliant: No
    • Battery backup: No
    • Smart home compatibility: ONVIF, RTSP
    • Subscription fees: None

    [easyazon_link identifier=”B01M15WH9C” locale=”US” tag=”vueville.com-eaz-20″]Check Price on Amazon[/easyazon_link]

    Best Budget Indoor PTZ IP Camera: Amcrest IP2M-846E (PoE) & Amcrest IP2M-846 (Wi-Fi)

    [wpsm_column size=”one-half”]
    [easyazon_image align=”center” height=”500″ identifier=”B01MU0CU17″ locale=”US” src=”https://images-na.ssl-images-amazon.com/images/I/816VvKJcPIL._SL500_.jpg” tag=”vueville.com-eaz-20″ width=”500″]
    [/wpsm_column]
    [wpsm_column size=”one-half” position=”last”]
    [wpsm_titlebox title=”Features” style=”3″]

    • 2MP 1080p CMOS image sensor
    • 34.5°-116.5° Viewing Angle, Pan-Tilt-Zoom
    • 30m IR range
    • Ethernet port, PoE or Wi-Fi models
    • SD card slot
    • ONVIF and RTSP protocols supported

    [/wpsm_titlebox]
    [/wpsm_column]
    You can use outdoor PTZs indoors, but they have one major drawback: size. Indoor cameras should be discreet and unobtrusive, outdoor PTZs are anything but this. That’s why the Amcrest IP2M-846 is so brilliant – its a small indoor PTZ camera that you can tuck away in a corner of any room.

    Armed with a 2MP sensor, it has a motorized varifocal lens with 34.5°-116.5° viewing angle. Night vision is provided by EXIR LEDs that have a 30m range. It also has an SD card slot that works will with the built-in NVR feature.

    The Amcrest IP2M-846E is a PoE-only model and the Amcrest IP2M-846 is only Wi-Fi enabled.
    [wpsm_column size=”one-half”]
    [wpsm_pros title=”PROS:”]

    • Very good image and audio quality, PTZ
    • PoE or Wi-Fi available
    • Built-in NVR feature
    • Support for ONVIF & RTSP
    • On-board microSD storage, pre-record and post-record feature

    [/wpsm_pros][/wpsm_column]

    [wpsm_column size=”one-half” position=”last”]
    [wpsm_cons title=”CONS:”]

    • No audio or alarm connections
    • No PIR sensor
    • No model with both PoE and Wi-Fi

    [/wpsm_cons][/wpsm_column]

    Smart Home Checklist

    • Local storage available: No
    • Cloud reliant: No
    • Battery backup: No
    • Smart home compatibility: ONVIF, RTSP
    • Subscription fees: None

    [easyazon_link identifier=”B01MU0CU17″ locale=”US” tag=”vueville.com-eaz-20″]Check Price on Amazon[/easyazon_link]

    What to look for in a budget IP camera

    • Power source – Ethernet port preferable with PoE (Power over Ethernet) support, internal battery good for power backup purposes
    • Wireless – Most cheap IP cameras have only Wi-Fi support. The better IP cameras have an Ethernet port as well. Unless your Wi-Fi camera is very close to your router, you are bound to suffer from drop-outs and poor video/audio. In a bind, you can use Wi-Fi but for security critical purposes, do not use Wi-Fi. PoE make Ethernet an even better choice as you can run just one cable to the camera.
    • Continuous Video Recording instead of just automatic event triggered or manual recording. This requires a storage medium though, like an NVR which adds to the cost.
    • Software features – Built-in NVR feature, advanced motion detection methods to reduce false alerts, push notifications to smartphone apps
    • Local storage – A microSD card slot is great for recording motion detection clips in addition to continuous recording to an NVR or DIY NAS NVR.
    • Audio – Microphone built-in would be a nice to have, full-duplex capability is superb but hard to find in a budget IP camera
    • Advanced features:
      • API available for interfacing with home automation controllers such as the Vera Plus or Fibaro Home Centre
      • Full duplex 2-way audio support, built-in mic or audio and alarm connections
      • PIR sensor to reduce false alerts

    [text-blocks id=”4426″ slug=”earnings-disclaimer-incl-hivision-dahua”]

  • Arlo vs. Arlo Pro 2 – What’s the difference?

    Arlo vs. Arlo Pro 2 – What’s the difference?

    Is the Arlo Pro 2 worth getting over the plain vanilla Arlo? Let’s find out as we compare them in our detailed head-to-head.

    Arlo HD vs Arlo Pro 2 - VueVille

    [wpsm_titlebox title=”Contents” style=”main”][contents h2][/wpsm_titlebox]

    Arlo vs. Arlo Pro 2 – Comparison Table

    [table id=50 responsive=scroll /]

    Video Quality

    This is perhaps the single biggest difference between the entry-level Arlo and the range-topping Arlo Pro 2. The baby Arlo has only a 720p max video resolution, but the Arlo Pro 2 does Full HD.

    Arlo Pro vs. Arlo HD - Arlo Wire-Free - VueVille

    Full HD or 1080p is the minimum resolution you should go for. This is because 720p just doesn’t give you enough detail, especially at night time. So the Arlo Pro 2 has the edge here.

    Audio Quality

    The Arlo doesn’t have audio support at all. But the Arlo Pro 2 has both a mic and speaker, so it has 2-way audio capability.

    But note that the 2-way audio on offer here is only half-duplex, not full-duplex. So you cannot have a natural conversation. Rather you are limited to a walkie-talkie style of taking turns talking and listening.

    If you are wondering which cameras do support full-duplex audio, even most wired cameras do not have this feature. But there is one wire-free camera that does have full duplex audio – the Reolink Argus.

    Motion Detection

    There are a few different ways cameras do motion detection:

    • PIR based: Passive Infrared is the most reliable method of motion detection and the only one that the baby Arlo model supports. Its also easier on the camera’s processor.Arlo Pro vs. Arlo HD - PIR detection range - VueVillePIR motion detection works by detecting the warmer parts of a scene such as a moving person or animal. So clouds, shadows or moving vehicles will not trigger the motion detection.

      While this is typically a more accurate motion detection method, you cannot define zones to restrict motion detection to. So any motion in the whole scene will trigger an alert.

      Both the Arlo and the Arlo Pro 2 support PIR motion detection.

    • Software based motion detection: While this can lead to false alerts if not properly configured, you do gain the ability to specify motion detection zones. Only the Arlo Pro 2 supports this method.In fact, the Arlo Pro 2 has a smart system. On battery power it uses only PIR based motion detection. But if plugged into AC power, it will use zone-based motion detection.

    httpv://www.youtube.com/watch?v=h-7mkPxQ8EQ

    Alert Notifications

    Since the Arlo Pro 2 has audio capabilities, you can get not just motion but sound triggered alerts also. These alerts can be in the form of emails or push notifications to the mobile app.

    The Arlo can do only motion detection alerts.

    Weatherproofing

    Both the Arlo Pro 2 and the Arlo Pro have an IP65 rating for weatherproofing. So you can use these cameras outdoors with confidence.

    Arlo Pro vs. Arlo HD - Arlo Pro - VueVille

    Battery life

    This is another major difference between the Arlo Pro 2 and the Arlo. The Arlo Pro 2 has a rechargeable battery whereas the Arlo Pro runs on four non-rechargeable CR123A batteries.

    Rechargeable batteries are more convenient but do they last longer than the CR123s of the Arlo?

    Let’s compare the energy capacities of the two cameras. The Arlo Pro 2’s rechargeable battery has 2440 mAh capacity whereas the Arlo’s four CR123A batteries will give it 6000 mAh (1500 mAh per battery). That is a huge difference in total energy capacity, so definitely something to keep in mind.

    Smart Home Compatibility

    Arlo Pro vs. Arlo HD - Arlo Wire-Free Inside - VueVille

    The Arlos range of cameras are cloud reliant and have little in the way of local processing capabilities. Amazon Alexa, IFTTT and Stringify are supported, but these are all Internet-reliant platforms.

    If you want battery powered cameras with local data processing, well we can but hope. At least we have battery powered cameras with local data storage like the Reolink Argus.

    Arlo vs. Arlo Pro 2 – The VueVille Verdict

    If you need 24/7 recording and are able to keep the camera plugged in, go for the Arlo Pro 2.
    Another reason to get the Arlo Pro 2 is for its audio support.

    If you don’t need the above features, the Arlo HD will do the job.

  • Secure Remote Viewing of Home Security Cameras – Port forwarding vs. P2P vs. VPN

    Secure Remote Viewing of Home Security Cameras – Port forwarding vs. P2P vs. VPN

    So you have bought security cameras to watch your home while you are away. You followed the manufacturer’s instructions to set up the camera. Voila, you are now able to view your cameras from anywhere in the world. Job done.

    Or is it?

    Most security camera manufacturers now use Peer-to-Peer (P2P) technology to make it very easy to set up their cameras. Of course, the beauty of this method is that you don’t even realise you are using P2P technology. But then you also may not be aware of the extent to which you are trusting the strength of the camera manufacturer’s network security.

    Let’s take a step back and look at the 3 different ways you can view your home security cameras remotely:

    1. Port Forwarding
    2. P2P
    3. VPN connection
    Securely view security camera remotely - Port forwarding vs P2P vs VPN - VueVille

    [wpsm_toplist]

    Port forwarding

    This is the oldest and most common way of remotely connecting to devices on your home network. This is how it works – an external port is opened on your router and forwarded to the device in question, like a security camera. So these ports are always open on your network and your router is listening to incoming connections.

    In other words, it is like leaving the doors of your house not just unlocked, but wide open. Not the best strategy for security.

    Whenever the router detects an incoming connection on these opened ports, it routes the request straight to the security camera specified by the port forwarding rule active for that port.

    Since manually configuring port forwarding can be difficult for most home security camera users, manufacturers started using Universal Plug-n-Play (uPNP) to automatically do it for them. And this is where things start getting dicey.

    Poorly or maliciously written software running on dodgy no-name security cameras often open unnecessary ports on your router. If malicious, these open ports are a backdoor for 3rd parties or the government to monitor your camera. Unscrupulous camera makers may also program their cameras to make active connections to their own servers to keep tabs on how you are using your camera. This is called ‘dialing home’.

    Even if they only open ports and do not download anything to your network, unnecessarily open ports are great targets for hackers and botnet attacks. Just see what’s been going on recently:

    [wpsm_column size=”one-half”][wpsm_pros title=”PROS:”]

    • uPNP makes it easy for manufacturers to automatically set up port forwarding

    [/wpsm_pros][/wpsm_column]

    [wpsm_column size=”one-half” position=”last”][wpsm_cons title=”CONS:”]

    • Downright dangerous and nobody should be using it

    [/wpsm_cons][/wpsm_column]

    So in summary, do not forward ports from your security cameras to the Internet. It is simply not safe enough.

    P2P

    This is now the default way for most security cameras to let users remotely access them and live-stream video footage. It usually involves using the mobile app to scan a QR code on the camera and then everything is set up automatically.

    P2P is like closing the doors of your house and locking them, but with a guard who has the key and can let themselves or anybody else in at any time. You trust your guard not to do that though.

    So how does P2P work? P2P stands for peer-to-peer. There are two devices or peers that need to connect to each other – your security camera at home, and your remote mobile device. This may happen either directly using P2P and port forwarding OR using just P2P and a third-party server that negotiates the connection.

    If uPNP is enabled on your security cameras, watch out. The camera may still use port forwarding in combination with P2P. But disable uPNP and then the security camera is forced to rely on a method called NAT Traversal. Here’s how it all works in simple English:

    Your security camera makes an outgoing connection to the manufacturer’s P2P server and informs the server what your home network’s public IP address on the Internet is. This way, the P2P server knows exactly where your security camera can be found. If your router supports NAT (Network Address Translation), no port forwarding or special permissions are required. Most NAT routers allow all outgoing connections by default. So that’s the security camera side sorted.

    What about your mobile device which may be on a 3G or 4G wireless network? When you first set up the mobile app on your mobile device, you may have scanned the camera’s QR code. So the app knows the unique id of your camera and remembers this. So now the app connects to the manufacturer’s P2P server and does two things:

    1. It tells the P2P server your mobile device’s IP address, i.e. where the mobile app can be found, and
    2. It fetches your camera’s address from the P2P server using its unique id

    Now the mobile app knows everything it needs to connect to the security camera directly. No port forwarding occurs anywhere.

    [wpsm_column size=”one-half”][wpsm_pros title=”PROS:”]

    • Super easy to use

    [/wpsm_pros][/wpsm_column]

    [wpsm_column size=”one-half” position=”last”][wpsm_cons title=”CONS:”]

    • Only as secure as your manufacturer is

    [/wpsm_cons][/wpsm_column]

    VPN Connection

    Now we are talking. This is the most secure way to remotely connect to your security cameras and therefore my chosen method. There’s no middleman in this method, you connect directly to your home network.

    Using a VPN connection to connect to your home is like having just one door into your house, locking it when you leave and only you have the key. Nobody else. Makes sense doesn’t it?

    So how does this method work? For every VPN connection, you need a server and a client. So to dial into your home network, a device on your network has to act as the server. This device needs to be online 24/7. It also needs to be very secure because it will be exposed to the Internet.

    While I have used my DIY NAS NVR as the VPN server also in the past, this approach is no longer recommended due to security risks. Instead I recommend using a dedicated device on your network such as a Raspberry Pi4 or OrangePi Zero running PiVPN (my choice) to serve as the VPN server.

    So a small low-power Pi will act as your VPN server, and you have to forward just one UDP port from your router to your Pi. Yes you can’t avoid some port forwarding but its better to use it for a VPN and expose your PiVPN server to the Internet instead of your NAS or security cameras.

    The next choice you need to make is the VPN protocol to use. This one is easy – just use Wireguard. Most other the other common VPN protocols have been compromised either by hackers or governments. If you have a low-power device like the PiZero, Wireguard is ideal because it performs well on such low-power devices. But if you are using a Pi4 or better, you could choose OpenVPN also.

    When you set up the Wireguard server on your Pi, you will get a client configuration file that you need to load on your OpenVPN client apps. We have written a step-by-step tutorial on setting this up (currently outdated but will be updated soon).

    So you have set up your Wireguard server, but you need to know how to connect to it when you are away from home. You could use the public IP address of your router, but most ISPs use dynamic IP addresses which change every few days. You could pay for a static IP address to overcome this issue. But there’s a cheaper way – Dynamic DNS or DDNS. With DDNS, you can connect to your home network using a custom web address like mynetwork.ddns.net instead of the constantly changing dynamic IP address. How does DDNS work? A device on your network has to periodically update a third party DDNS server with your home network’s public IP address. The DDNS service will associate your selected web address with your home network’s public address.

    Your router may be able to perform the function of keeping your DDNS service updated with your home public IP address. My Unifi USG router has this feature.

    So you find yourself far away from home. Just fire up the Wireguard client app on your laptop or mobile, connect to your PiVPN server and that’s it. You are now virtually at home. All your apps including IP camera apps will think that you are at home and just work. You can also access other devices on your home network.

    Conclusion

    I personally use the Wireguard method to connect to my home network when I am out and about – I recommend this method as it is the most secure.

  • 15 Biggest Mistakes when buying DIY Home Security Cameras

    15 Biggest Mistakes when buying DIY Home Security Cameras

    Common Mistakes to Avoid while Buying DIY Home Security Cameras - VueVille

    Its not easy to decide which security camera to buy, is it? So many specs to understand and compare, so many brands to choose from, and so many watch outs. So its wise to take a little time to do your research. This is, after all, something that concerns your family’s safety and well-being.

    If you are brand new to security cameras or have been out of the game for a few years, there’s a lot to catch up on. But the key is to keep things simple – the core purpose of a security camera has not changed. You need to find something that is affordable, works reliably 24/7, and is well-made.

    So what are the biggest mistakes commonly made when buying DIY home security cameras?

    [wpsm_toplist]

    15 Biggest Mistakes to avoid when Buying DIY Home Security Cameras - Pinterest - VueVille

    Buying the cheapest security camera

    The temptation to cheap out and buy the cheapest security camera is very strong, what with the hundreds of generic no-name Chinese brands around.

    Don’t do this – not only do these cameras generally have a poor feature set but most of them also have poor security. They may compromise your home network by opening ports on your router (port forwarding), connecting to unknown servers on the Internet(dialing home), or serving as a backdoor for hackers or foreign governments.

    Solution: Stick with the trusted brands and know what to look for when buying a security camera.

    Buying the best-selling security camera

    Another equally common mistake is to base purchase decisions off your favourite online retailer’s best-sellers list. The cheap cameras mentioned above make up the bulk of these lists. Unsurprisingly people think they can save a buck by skimping, but you really get what you pay for.

    Solution: A far better way is to assess your needs, decide what features you want, and buy from a trusted brand. Check out our IP camera guide here.

    Picking a cloud-reliant security camera

    The latest trend is to strip a camera’s features right down to the bone, and sell it as a cloud camera. We can’t think of anything worse than this.

    These cameras are the very antithesis of security. The worst of the lot will simply not work unless there is an active connection to the manufacturer’s cloud servers. This is because they do not have local storage at all (for example, the Nest Cam Outdoor camera).

    So if an intruder has disabled your Internet or if the manufacturer’s servers are down, it cannot record the motion triggered clip anywhere. Absolutely useless.

    Ever so slightly better are the cameras that have a local recording backup but won’t let you access them – it is merely a temporary holding place in case the cloud server connection is lost (Netgear Arlo Security Camera System with Base Station).

    Solution: Refuse to buy a security camera that becomes an expensive paperweight without an Internet connection.

    Picking a security camera with no local storage

    Continuing in the same vein as cloud-reliance, cameras without local storage are totally useless if the cloud server is unreachable!

    Most DIY security cameras from the serious brands such as Hikvision, Dahua, Bosch, Sony, Canon, Axis, Vivotek, Amcrest and Reolink have on-board SD card slots. These are great for stand-alone use or as a backup location for motion recorded clips.

    Solution: Even if you believe your Internet connection and your cloud camera provider’s servers are infallible, get a camera with an SD card storage as a backup.

    Deciding to pay a monthly fee for cloud-recording

    Consumer behaviour has changed significantly with the advent of easy credit. People have fallen for the ‘pay a lower price upfront and then a little more every month’ instead of a one-off purchase price. This may sometimes make sense for leasing cars, but very rarely does for a security camera.

    A particularly egregious example is selling security cameras that are cloud-reliant, have no local storage, and do not have ONVIF or RTSP support. So you can’t connect them to a standards-compliant 3rd party NVR.

    They then force you to purchase a monthly cloud recording plan so that your neutered camera can actually do what it was supposed to. Oh and don’t forget the regular price increases.

    Solution: Say no to cameras that try to flog you a monthly payment. They are simply not needed and are a total rip-off. What you buy should be 100% yours, not for the manufacturer to cripple and hold you hostage as and when they feel like it.

    Picking only Wi-Fi cameras vs. wired cameras

    This is a big one – a surprisingly large number of people do not realise that Wi-Fi is not 100% reliable. Yes it has come a long way since the early 2000s when your laptop would struggle to maintain a Wi-Fi connection. But it is still nowhere near the reliability required for something as critical as protecting your family.

    Its easy to think why Wi-Fi is great if you are just thinking of browsing the net. But use it for real-time data transfer 24/7 at some distance from the router and it won’t be so reliable.

    The right way of doing it is to use wired cameras by default unless you have a location that you cannot run cables to and you use a wireless camera with on-board storage.

    Now, this may be the far end of your garden or some other similarly inaccessible location. Even so, if the location is a critical entry/exit point, it should be covered by a wired camera as well just in case you can’t access it remotely due to Wi-Fi failure.

    Solution: Use a mix of wired and wireless cameras, and wireless cameras should have on-board storage for the eventual Wi-Fi connection failure.

    Buying a low resolution security camera

    We recommend only security cameras with 1080p or 2 Megapixel resolution. Any lower and you are not going to get enough detail to identify faces.

    For this reason, 720p cameras have virtually disappeared from most security camera’s lineups. So imagine my surprise when we recently found a 720p camera in the best-sellers list.

    Solution: Go for at least 1080p (2 MP) resolution, 3 MP is even better.

    Choosing a camera with poor night vision

    Almost every IP camera these days has night vision, but the brightness and range of the InfraRed LEDs varies wildly. There are two types of IR LED systems:

    • the very common but inferior ring-type LED arrangement which is made of a few dozen small IR LEDs arranged in a ring around the camera lens
    • the superior EXIR LEDs which are fewer in number but brighter and do not have a flashlight effect

    Also make sure the camera has a true IR cut filter to avoid false colour during daytime. Automatic day/night switching is a standard feature, but in more expensive cameras you can control the switching behaviour.

    Not installing enough security cameras to cover your property

    A common mistake is to put up cameras only in areas around the house you want to watch. Instead, think about every entry/exit point into your property and cover those areas.

    Also consider covering the perimeter so that you can spot intruders scaling perimeter walls or fences.

    Not using an NVR

    So you have realised that you need more than one security camera. But now how do you view the feeds from all the cameras in one place?

    How can you record the footage from the cameras 24/7, and keep a 14 day history for example? You need an NVR.

    If you want to do it the simple way without getting into the nitty-gritties, do it the EasyDIY way of getting an all-in-one security camera package. Or if you like to customise and set up a smart home automation system, check out how we did it.

    Choosing the wrong type of camera for the installation location

    There are a wide range of IP camera form factors – bullets, domes, mini-domes, turrets, PTZs, indoor cube cameras and so on. Each one is designed for a specific use case.

    For example you should use a dome with a vandal-protection rating like IK10 in an area with high traffic and where the risk of vandalism is high.

    Bullets are a bit cheaper but are prone to being knocked off target by a projectile, so are better for locations where they are well out of reach.

    There are also motorized cameras, these can be a Pan-Tilt-Zoom (PTZ), a Pan-Tilt camera or one with just motorized zoom.

    Outdoor cameras with motorized zoom are great for narrow alleys or sides of the property. Pan-tilts are usually found on indoor IP cameras.  A PTZ is great for doing automatic tours of the scene, especially one where there is a large area to cover.

    Of course you should also have some non-zoomed in IP cameras covering the same scene so that the PTZ doesn’t miss anything while touring.

    Choosing a camera with narrow viewing angle

    The viewing angle of a camera depends on the focal length of its lens. The widest angle cameras have a 2.8mm lens which equates to a viewing angle of around 90-110 degrees.

    But some cameras have even wider viewing angles but this might introduce distortion to the recorded video. Of course you could choose a camera with a motorized lens to retain flexibility.

    Positioning the camera too high

    An incredibly common error is to place your security camera on the 2nd floor of the house, and then either pointed down over the driveway or just watching the whole neighbourhood.

    Remember, the main purpose of the camera is to record clearly the faces of people approaching the camera or entering the scene. For this to work, the camera has to be slightly above the average person’s head height.

    Not optimising installation location for motion detection

    Sticking with the theme of security camera installation, the bane of a security camera enthusiast’s life are false motion detection alerts. You want to get these alerts only where there is a real movement in places that you do not expect at times you do not expect.

    This is where a smart definition of motion detection rules come in. By carefully assessing the entry and exit points, the direction in which intruders can move, the way the shadows from clouds fall etc., you can virtually eliminate false motion detection alerts.

    Not having a plan for your home security

    We strongly recommend thinking about the following points before buying anything:

    • How many cameras will you need?
    • Do you need motion detection alerts?
    • Do you need 24/7 recording?
    • How will you view the camera recordings?
    • Do you want to view all your security cameras live feeds simultaneously on a single screen?
    • Do you want to playback all your security cameras simultaneously on a single screen?
    • Do you want push notifications, or will email alerts do?
    • Do you want to set up a smart home? Say, for viewing your cameras on any device around the house if motion is detected outside? Sounds good right?

    So once you have decided what you want, then start thinking of which security camera to buy. Check out our smart home strategy guide to guide you.

    Conclusion

    Security cameras are simply great, but it takes a little bit of work to learn about them. The benefit is that you can avoid the common mistakes we talked about and get the best bang for your buck!

    More resources

    Here are some starting points for your security camera research:

  • Best Hidden Outdoor Security Camera 2019

    Best Hidden Outdoor Security Camera 2019

    Visible outdoor security cameras are a great deterrent against would-be burglars. That’s why I have got prominently positioned cameras around my home. But there are two very valid objections to doing this.

    “Won’t burglars just smash the cameras?” and “Won’t burglars just hide their faces?”

    Its true, security cameras are not the be all and end all of home security and you need a well-planned strategy to protect your home. But placing hidden outdoor security cameras in unexpected places may lead to catching the act of the burglar destroying the visible cameras. You may even catch the burglar unmasking themselves because they do not see a camera around.

    Or you could go the other way and just use hidden cameras only – that way you reduce the risk of the burglar masking themselves in the first place.

    Check out this video caught by a hidden outdoor security camera:
    httpv://www.youtube.com/watch?v=4sy2OCWYePg
    [wpsm_divider top=”20px” bottom=”20px” style=”clear”]
    [wpsm_toplist]

    Best Hidden Outdoor Security Camera 2024 - VueVille

    What are the different types of Hidden Outdoor Security Cameras?

    Depending on how they are powered and how they are connected, we can group them into the following categories:

    • Wirefree hidden outdoor security camera
      • These are totally wireless battery-powered cameras. They usually cannot be connected to mains power, but may have solar panel accessories. Ideal for locations where you can’t get power, Internet connectivity or both. Wi-Fi and/or 4G LTE connectivity.
    • Wireless hidden outdoor security camera with WiFi
      • AC powered, WiFi connectivity
    • Wireless PoE hidden outdoor security camera with WiFi
      • AC powered, WiFi and Power over Ethernet (PoE) connectivity

    [text-blocks id=”5527″ slug=”earning-disclaimer”]

    Best Wire-free Hidden Outdoor Security Camera

    Panasonic Homehawk Home Monitoring Kit

    [easyazon_image align=”center” height=”500″ identifier=”B078J2MH5X” locale=”US” src=”https://images-na.ssl-images-amazon.com/images/I/41aZWRQPG6L.jpg” tag=”vueville.com-eaz-20″ width=”500″]
    Panasonic has also joined the wire-free security camera wagon with its latest Homehawk DIY home monitoring range. The product consists of a base station (just like Arlo) but with a microSD card slot, a wireless battery powered front door camera unit and a wireless battery powered peripheral camera. Both cameras are IP65 rated weatherproof and run on rechargeable Panasonic batteries.

    There are many positives to talk about here. This is a high quality product from a reputable brand. There is no cloud or Internet reliance here. All footage is stored locally on the microSD card. This means your data is truly yours. I am very happy to see Panasonic take this route instead of crippling their cameras unless you pay through the nose for a paid cloud subscription. Colour night vision is a recent innovation and is something I really recommend going for.

    Full specs:

    • 720P HD camera (172 degrees diagonal field of view)
    • Local storage and local processing
    • Day/night sensor
    • 2-way intercom with built-in microphone, speaker.
    • Livestream video feed to mobile app
    • Smart motion detection with zones
    • Android, iPhone and tablet apps available
    • IP65 weatherproof

    [easyazon_link identifier=”B078J2MH5X” locale=”US” tag=”vueville.com-eaz-20″]View on Amazon[/easyazon_link]

    Reolink Argus 2

    [easyazon_image align=”center” height=”500″ identifier=”B0786XGM8M” locale=”US” src=”https://images-na.ssl-images-amazon.com/images/I/510o0tsUglL.jpg” tag=”vueville.com-eaz-20″ width=”500″]

    We reviewed the Reolink Argus last year and really liked it. It was the only non-cloud reliant wirefree camera at the time. The fact that it was a well-built full-HD camera only made the deal even better! The Reolink Argus 2 improves on the original Argus by adding a rechargeable battery and solar panel charging options.

    Full specs:

    • 1080P Full HD camera (120 degrees diagonal field of view)
    • Local microSD storage and local processing
    • Day/night sensor
    • 2-way intercom with built-in microphone, speaker.
    • Livestream video feed to mobile app
    • PIR motion detection
    • Android, iPhone and tablet apps available
    • 802.11b/g/n Wi-Fi
    • IP65 weatherproof

    [wpsm_column size=”one-half”]

    [easyazon_link identifier=”B0786XGM8M” locale=”US” tag=”vueville.com-eaz-bnvr17-20″]Check Price on Amazon[/easyazon_link]

    [/wpsm_column]

    [wpsm_column size=”one-half” position=”last”]

    Check Price on Reolink.com

    [/wpsm_column]

    [wpsm_divider top=”20px” bottom=”20px” style=”solid”]

    Best Wireless Hidden Outdoor Security Camera with WiFi

    Kuna Maximus Video Security Camera and Outdoor Light

    [easyazon_image align=”center” height=”500″ identifier=”B010FWU62E” locale=”US” src=”https://images-na.ssl-images-amazon.com/images/I/41IU0UHKfDL.jpg” tag=”vueville.com-eaz-20″ width=”500″]

    The Kuna camera is the original big-daddy of the outdoor camera and light combination. This hidden camera looks like any other outdoor lamp and works just like one too. But look very closely and you just might see a hidden camera lurking within! This smart light with hidden camera can be fully controlled from your smartphone too.

    However there are a few downsides. One key omission is night vision as there are no Infrared LEDs. Like most mainstream security cameras, this hidden camera is a closed system and is reliant on the cloud. The free plan lers you look back only 2 hours of video and allows only 3 video downloads per month. It also does not let you access its live video stream from any app other than the official Kuna app. You cannot use Blue Iris on other ONVIF recorders with this camera because there is no RTSP stream. There is no API either, so home automation control is limited to Alexa support.

    Full specs:

    • 720P HD camera (116 degree diagonal field of view)
    • Day/night sensor
    • 2-way intercom with built-in microphone, speaker.
    • Loud alarm siren
    • PIR motion sensor
    • Livestream video feed to mobile app
    • Smart motion event detection
    • 3 colour status LED (can be switched off)
    • Comes with a 16 watt LED bulb (colour temperature is 3000K)
    • Android, iPhone and tablet apps available
    • Weatherproof

    [easyazon_link identifier=”B010FWU62E” locale=”US” tag=”vueville.com-eaz-20″]View on Amazon[/easyazon_link]

    [wpsm_divider top=”20px” bottom=”20px” style=”solid”]

    Best Wireless Hidden Outdoor Security Camera with PoE and WiFi

    PHYLINK PLC-128PW 720p HD PoE Pinhole Camera

    [easyazon_image align=”center” height=”300″ identifier=”B00N8DOAWA” locale=”US” src=”https://images-na.ssl-images-amazon.com/images/I/41k0ycAUchL._SX300_.jpg” width=”300″ tag=”vueville.com-eaz-20″]

    The Phylink covert camera is a small wonder. It is an IP camera that packs 720p HD resolution, WiFi, Power over Ethernet(PoE), and a microSD card slot. The camera sensor is separated from the rest of the camera which allows you to easily position the sensor unit in the desired position.

    Full specs:
    – 720P HD video, H.264, MPEG4, MJPEG configurable streams
    – Windows and Mac compatible, Free software for PC
    – Free Apps for iOS and Android, view and hear remotely from anywhere
    – Quick setup within minutes, no complicated settings needed
    – Micro SD DVR supports cards up to 128GB (SD Card not included)
    – Motion record/alerts via Push Notifications/Email/FTP
    – Fully compatible connectivity, works over Wi-Fi, Ethernet, or Power over Ethernet (PoE).

    [easyazon_link identifier=”B00N8DOAWA” locale=”US” tag=”vueville.com-eaz-20″]View on Amazon[/easyazon_link]

    Titathink TT520PW 720P HD Wireless Micro Hidden PoE Pinhole Camera

    [easyazon_image align=”center” height=”500″ identifier=”B01N11BR7Z” locale=”US” src=”https://images-na.ssl-images-amazon.com/images/I/51Sz%2BcEtrXL.jpg” tag=”vueville.com-eaz-20″ width=”500″]

    The Titathink is a more polished version of the Phylink and has an external antenna. A generous 20ft long cable links the camera image sensor to the main unit.

    Main specs:
    – Image Sensor Dimensions Φ 0.74 x 1 in
    – Main Unit Dimensions(W x D x H mm) 3.7 x 2.87 x 0.94 in
    – Cable lengths: 28ft From sensor to main unit.
    – High-Resolution 720P HD video streaming, H.264, MPEG4, MJPEG configurable stream.
    – 3-D Digital Noise Reduction (3-D DNR), Get exceptional image quality and video with less noise.
    – Works over Wi-Fi b/g/n, LAN or POE. WPS for easy wireless setup.
    – One Audio Line-in port for sound monitoring.
    – General I/O ports to connect external alarm devices.
    – Multi-zone Motion Detection, Email, Ftp, Push alarms to your phone.
    – MicroSD card slot up to 128GB, playback via our app or software.
    – ONVIF compliant, works with NVR, NAS or PC with surveillance software.
    – Free app for iOS & Android smartphones/tablets.

    [easyazon_link identifier=”B01N11BR7Z” locale=”US” tag=”vueville.com-eaz-20″]View on Amazon[/easyazon_link]

    Conclusion

    Using a smart combination of the wired, wireless and wire-free outdoor hidden security cameras listed above, you have a far better chance of outsmarting a burglar. Why not share with us how you are using hidden cameras in your home?

  • How-to: Hikvision Motion Detection Setup

    How-to: Hikvision Motion Detection Setup

    Got a Hikvision camera because you have heard of its legendary motion detection features? Looking for a quick and easy guide to set it up? You are in the right place – here’s the VueVille tutorial on Hikvision motion detection setup.

    In this tutorial, I assume you are using your Hikvision camera in standalone mode (using a microSD card) or with a NAS as the NVR.

    If you are using a dedicated NVR from Hikvision, the setup should be done on the NVR, not from the camera’s web interface. The steps are very similar to this tutorial.

    If you are using [easyazon_link identifier=”B00CE1F3NM” locale=”US” tag=”vueville.com-eaz-20″]BlueIris[/easyazon_link] or similar NVR software running on a PC, you can either follow the below steps on each Hikvision camera OR make BlueIris do motion detection. The cameras can send the basic ONVIF motion detection event to any ONVIF-compliant NVR.

    [wpsm_titlebox title=”Contents” style=”3″][contents h2][/wpsm_titlebox]

    How Hikvision Motion Detection works

    Hikvision has separated motion detection recording into two halves – 1) events, and 2) actions triggered by those events. You activate and configure the events first, and then setup the actions the camera should take including recording.

    Hikvision motion detection is very powerful and extremely customizable. That’s why they are great cameras for reducing false alerts due to shadows, clouds, insects, bugs, flies etc.

    To cater to both beginners and advanced users, Hikvision have categorized motion detection as follows in most of their IP camera models:

    • Basic Event
      • Motion Detection
        • Normal Mode
        • Expert Mode
    • Smart Event (or advanced events)
      • Intrusion Detection
      • Line Crossing Detection

    The above events become active only when you tick the ‘Enable’ checkbox at the top of each event’s page and configure them by setting at least the sensitivity.

    The basic event is what most people have in mind when they think of motion detection. Here the camera uses software methods to compare video frames and thus detect motion. The smart or advanced events also compare frames but check whether certain virtual boundaries like a line, tripwire or area has been breached in addition to various conditions like direction of motion and dwell time.

    Hikvision cameras that are equipped with a PIR motion sensor have true motion detection abilities and will fall under the basic event category.

    In this tutorial we will look at setting up a basic motion detection event.

    Hikvision Motion Detection – Basic Event

    Login to your camera admin page and navigate to Configuration > Event > Basic Event. I will be using my DS-2CD2542FWD-IWS for this tutorial, but depending on your firmware and camera model the menus may be slightly different.

    Enable Dynamic Analysis for Motion

    If you want the recorded video to show the areas that triggered the motion detection event, tick this checkbox. I do not use this feature as it is fairly pointless.

    STEP 1: Area Settings Tab

    Hikvision Motion Detection Setup - Basic Event - Normal mode - VueVille

    Within the basic event under the ‘Area Settings’ tab, you have a normal mode and expert mode. In both normal mode and expert modes, you can draw an ‘area’ or motion detection zone that the camera should monitor.

    In normal mode the only other setting you can adjust is a simple sensitivity percentage slider. This controls the threshold of differences between subsequent video frames which triggers a motion detection event and subsequent alert.

    Hikvision Motion Detection Setup - Basic Event - Expert mode - VueVille

    In expert mode, you are able to control sensitivity settings separately for daytime and night-time. You can also draw more than one area – my camera supports up to 8 distinct areas. Furthermore, you can either let the camera automatically switch between day and night according to light levels or create a schedule for daytime and night time. You can also define how large an object has to be for it to trigger a motion detection event. These are all great features and if you do not want to use the advanced methods (line crossing & intrusion detection) I strongly recommend using the expert mode of basic motion detection.

    If you are using a 3rd party NVR or a NAS NVR such as QNAP or Synology, the only motion detection method you can use will be the basic events. I use a QNAP TS-253A NAS and the QNAP Surveillance Station app to integrate my security cameras with HomeSeer3. So I am forced to use the basic motion detection events only. You can see my settings above which minimize the number of false alerts massively.

    Don’t forget to press the Save button before moving to the next step.

    Hikvision Motion Detection Sensitivity

    In my experience, you need a lower sensitivity percentage setting during the day time. I suggest 20% as a starting point. For night-time, increase the sensitivity so that movement in the shadows is not missed. I suggest 50% as a starting point for the night setting.

    Hikvision Motion Detection Percentage

    As I mentioned earlier, what Hikvision calls the ‘percentage’ setting actually means ‘how big should the object be to trigger the motion detection event’. It is calculated as the area covered by the object in the video frame divided by the total area of the video frame. This is why it is expressed as a % from 0 to 100, and also why Hikvision rather calls this setting ‘percentage’.

    STEP 2: Arming Schedule

    Hikvision Motion Detection Setup - Basic Event - Arming Schedule - VueVille

    When you save the settings in step 1, the arming schedule should be automatically created for you. You can set it to be ‘armed’ during particular times of the day or night if you wish.

    STEP 3: Linkage Method

    Hikvision Motion Detection Setup - Basic Event - Linkage Method - VueVille

    This is where you can activate email alerts, and other actions such as uploading to FTP or triggering an external alarm if you have connected one to the camera. Hit Save when you are done and the basic motion detection event is now active.

    Smart Motion Detection Events

    You can have both basic and smart motion detection events active at the same time. My post on how to reduce false alerts using these advanced smart methods such as line crossing will show you how to set this up.