When was the last time you backed up your data? 66% of us do it just once a year or less! If you are part of this group, this means all your precious data is stored in just one place on this planet. Hard drives are known to fail after all, and flash drives get misplaced, so you are taking a huge risk if you are not regularly backing up your hard drives (read weekly).
Now most people, including me, are quite lazy in our downtime and can’t be bothered to do something so dull as taking backups. This is where a Network Attached Storage (NAS) device comes into the picture – thanks to its redundant storage technology, all your data can be automatically backed up onto a second drive and even uploaded to a cloud storage provider if you so desire. Monthly backups become a breeze, as you just need to plug in an external USB (like my WD Studio) and hit the one-touch USB backup button. A few hours later, you have an offline backup of all your data too! Simply brilliant!
NAS servers have other advantages too. They can fulfil 24/7 file and media server duties reliably without driving up your electricity bills. In fact these little display-less (or headless in computer speak) computers can do a whole lot more, such as: be a CCTV Surveillance NVR, VPN client/servers, DLNA servers, FTP servers, web or mail servers, run virtual machines, take automatic mobile phone and laptop backups, even act as home automation controllers, the possibilities are endless.
So let’s take a detailed look at the 4GB RAM version of the 2-bay QNAP TS-253A NAS that I purchased recently. QNAP calls it a QTS-Linux Combo NAS that can help you create a private cloud. I will also compare it to my previous NAS, the QNAP TS-231+ it replaced.
A quick note: As an Amazon Associate I earn from qualifying purchases. This post contains affiliate link(s). An affiliate link means I may earn advertising or referral fees if you make a purchase through my link, at no extra cost to you.

What’s in the box
The TS-253A comes in a fairly unassuming brown retail box with a sticker detailing its features and tech specs.

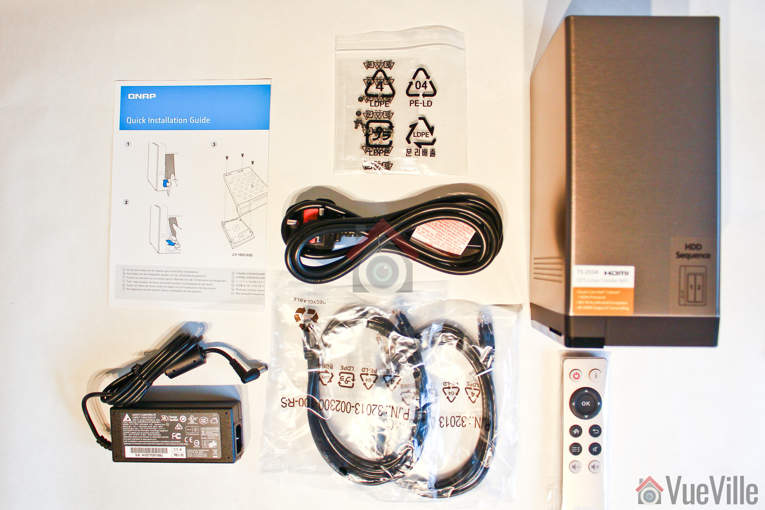
Opening up the box reveals the following kit:
- TS-253A NAS
- 2x Ethernet Cable
- 65W AC Adapter (Model SP-2BAY-ADAPTOR)
- Power cord
- 8x Flat head screw (for 3.5″ HDD)
- 6x Flat head screw (for 2.5″ HDD)
- Quick Installation Guide (QIG)
- Infrared (IR) Remote Control (Model RM-IR002)
Of course we shouldn’t forget one other thing that QNAP has generously provided with this NAS: 4 IP camera licences whereas the standard at this price point is just 2 if you look at the competition. For those of use looking to use the NAS as an NVR also, this coupled with the 2x HDMI ports is a great addition and increases the value of this NAS.
TS-253A Specifications
The most obvious feature is that the TS-253A is a 2-bay NAS. But it can also work with just 1 hard drive. My previous NAS was powered by a dual-core ARM processor, and so was a bit limited in the range of applications it could run. For example it did not have the power to run virtual machines. Nor did it have an HDMI output. But it did have very low power consumption due to the super-efficient ARM chip. So I decided I wanted an x86 based NAS that had more processing power but was still reasonable when it came to energy needs.
The TS-253A hits the sweet spot with its 14 nm lithography based Intel Celeron N3150 processor. This quad-core chip normally runs at 1.6GHz, but has a burst speed of 2.08 GHz, but needs only a cool 6W of power at 100% load! Just the type of chip you need for a NAS that runs 24/7. The N3150 chip is a 64-bit processor and supports Secure Boot, HD Audio & Intel Virtualization technology. The N3150 chip also supports Intel AES-NI hardware-accelerated encryption which prevents transfer speeds slowing down when dealing with AES 256-bit drive encryption. QNAP claims that the NAS can transfer data at up to 224 MB/s on a drive encrypted in this manner.
Lower spec NAS can perform only offline transcoding but the on-board graphics of the N3150 processor supports real-time 4K (H.264) and 1080p video transcoding. This allows the NAS to store 4K video content that it can convert on-demand in real-time to universal formats for playback on PCs, mobile devices and Smart TVs. The TS-253A comes in two flavours of DDR3L-1600 RAM: 4GB or 8GB. The RAM is user-upgradeable, so you can start with 4GB like I did and expand to 8GB later on.
Here are the full specs of the TS-253A:
| Hardware | |
| CPU | 14 nm Intel® Celeron® N3150/N3160 1.6 GHz quad-core processor |
| Hardware Encryption | Yes, AES-NI |
| GPU | 8th generation Intel HD Graphics |
| System memory | TS-253A-4G: 4GB (2 x 2GB) TS-253A-8G: 8GB (2 x 4GB) |
| Memory Expandable Up To | 8 GB, 2x SODIMM DDR3L-1600 |
| Hard Disk Drive | Maximum 2x Hot-swappable 3.5″ or 2.5″ SATA 6Gb/s, SATA 3Gb/s hard drive or SSD |
| LAN Port | 2 x Gigabit RJ-45 Ethernet port |
| USB | 4 x USB 3.0 port (Front:1, Rear:3), supports USB printer, pen drive, and USB UPS etc. |
| Video Output | 2 x HDMI, up to 4K 2160P 30Hz Ultra HD support |
| Audio Input | 2 x 6.3mm microphone jacks (dynamic microphones only) |
| Audio Output | Line Out Jack (for amplifier or headphone amplifier) |
| LED Indicators | Status, USB, HDD 1-2 |
| Buttons | System: Power button, USB one-touch-backup button, Reset button |
| IR Receiver | Yes |
| Other Interfaces | Kensington security slot, console port (system maintenance) |
| Dimensions | 150(H) x 102(W) x 216(D) mm 5.91(H) x 4.02(W) x 8.5(D) inch |
| Weight | Net: 1.74 kg (3.84 lbs) Gross: 2.92 kg (6.44 lbs) |
| Power Consumption (W) | System sleep mode: 1.18W HDD standby: 8.38W In operation: 14.43W |
| Sound Level* | Sound pressure (LpAm) :18.3 dB(A) |
| Temperature | 0-40˚C |
| Power Supply | 65W AC adapter, 100-240V |
| Fan | 7cm quiet cooling fan (12V DC) |
| Software | |
| OS | QTS 4.2 Embedded Linux |
| Surveillance Station | 4 IP Camera licences |
| File system | Internal Hard Drive: EXT4 External Hard Drive: EXT3, EXT4, NTFS, FAT32, HFS+ |
| Encryption | AES 256-bit external drive encryption |
| Disk volume types | RAID 0,1, JBOD, single |
| Snapshots | Yes |
| Virualization | Yes, VM display through HDMI |
Design
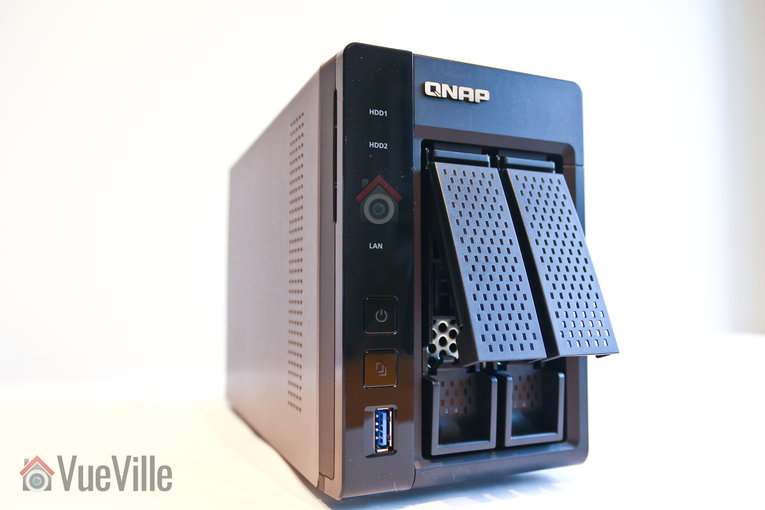
While the lower models in the QNAP portfolio come in an unattractive white, the TS-253A is dressed in a striking glossy and matte black combo. The case is mostly metallic except for the plastic front face that surrounds the drive bays.
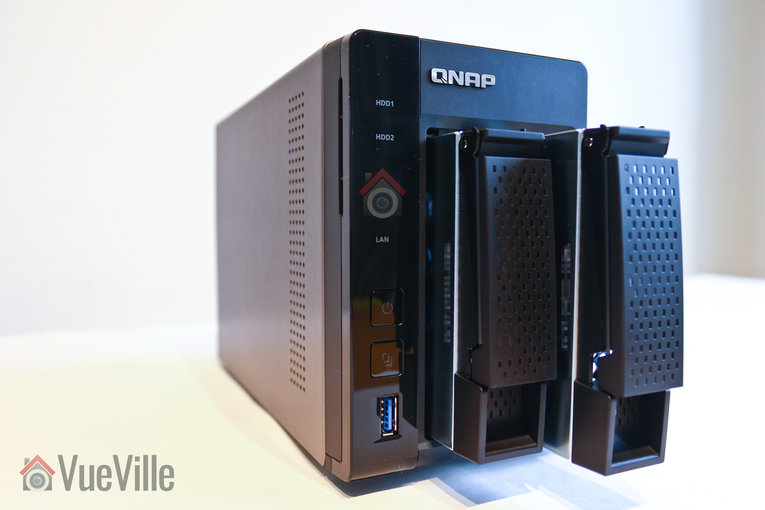
The front of the unit houses the two disk bays, LED indicators for each HDD that blink on activity, a LAN activity LED, a power button, the USB one-touch copy button and a front USB 3.0 port. The USB port can be configured to automatically start a copy action to the NAS or a backup from the NAS to an external USB drive such as a WD Studio drive.

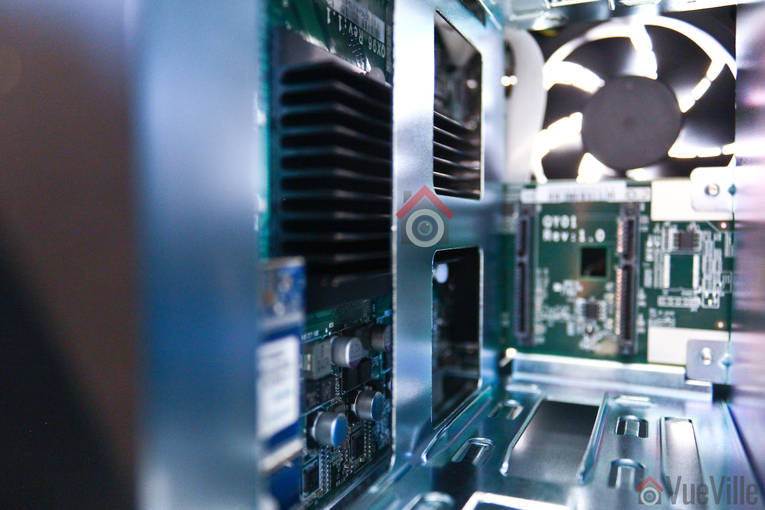
With the hard disk caddies out, you can see the innards of the NAS. The electronics are housed on one side and at the back.

There is a sizable heatsink on the Intel N3150 processor and a 7 inch fan pushing hot air out the back.
The rear of the NAS has the reset button, two HDMI ports, 4 USB 3.0 ports, two Gigabit LAN ports, the power socket, two microphone inputs for the karaoke feature, an audio out, and a Kensington security lock.


The NAS feels well-made and looks to be built to last. The 2-year warranty is also something I appreciate, considering that this is a device that’s going to be running 24/7.
Installation and Setup
The included Quick Installation Guide splits the setup process into two – hardware setup and software setup. Nice and logical, so let’s stick to that structure.
Hardware setup
Installing the hard drives is the first step. Now you don’t have to use 2 drives, you can start with one hard drive and then later on add another hard drive to set up a mirrored RAID system (RAID 1). But I strongly recommend adding another drive at the same time to benefit from redundant storage. Check out my top recommended NAS hard drives here.
The Quick Installation Guide has nice visuals walking you through installing each drive:
- Open the drive bay
- Pull it out
- Place the hard drive in the caddy and use the provided 4 screws (for 3.5″ drives) or 3 screws (for 2.5″ drives) to scure the hard drive
- Insert the drive caddy back into the bay
- Plug in the power cord and hook up the NAS to your router through one of the LAN ports, and hit the power button.
Software setup
Once the NAS powers on, visit start.qnap.com to continue the setup process and install the latest firmware. This is the best method for beginners but if you are a more advanced user, you can also use the Qfinder app which lets you setup the NAS without an Internet connection.
My previous NAS, the QNAP TS-231+ had a hardware issue and was refunded by QNAP under the standard 2-year warranty as I mentioned in my quick review of the TS-253A. This left me with two 3TB WD RED hard drives that I wanted to use with my new TS-253A. I didn’t think it would be as simple as popping my existing drives into the new NAS and it would all work – I was right. I installed the two drives and turned on the NAS but sadly the QTS operating system did not recognise my hard drives as drives with data on them. So I proceeded with the setup process as if they were brand new empty drives. I chose RAID 1 as my drive volume type – so disk 1 is mirrored on to disk 2 in realtime. If one of the drives should fail, the other one would still have a copy of my data.
There are two steps you should do that the setup process doesn’t tell you to:
- Create ‘shares’ or folders on your NAS drive: Have a real deep think about how you want to structure your data. Don’t just start creating hundreds of folders and files in the root folder. I always create a few shares: Documents, Photos, Videos, Backup and CCTV. You can choose to share these ‘shares’ with each user on your network, they just need to map each share to a drive letter on their computers and you have easily accessible network storage that simply works.
- Create one user per family member on your NAS, and use the same login details as they do on their computers. This lets their computers seamlessly login to the NAS and reconnect the mapped network drives automatically whenever they turn on their computers. Practically this means the network folders behave like local folders on their computers, and not like a remote folder they have to log into each time they want to access it. This little trick revolutionised my family’s experience of network storage.
Now I said the TS-253A didn’t recognise my hard drives as used drives. So it couldn’t access the data that was already on it. This is where my weekly backups of the NAS to an external USB drive (WD Studio 4TB drive) paid off. Once the setup process was completed, I manually re-created the shares I had on my old NAS and copied over the data one by one into each share. A bit time consuming but my weekly backup schedule was a true life-saver.
QTS Software
Linux is a far superior operating system to Windows. That’s why the majority of web servers (like the one that powers this website) run on Linux. What about supercomputers? Shockingly, the top 500 supercomputers in the world all run on Linux. Yep, every single one of them. Linux is just a beautiful efficient operating system that can scale from a humble Raspeberry Pi to supercomputers. No wonder then, that most NAS manufacturers build their OS on Linux.
QNAP’s customisation of Linux is called QTS and the latest version 4.2.2 is now available for all their current models. QNAP has been continuously improving the QTS OS and it come across as a polished unified interface that effectively hides the tons of features it packs. Let’s look at the main features:
- Storage Management and Data Protection
- File Station
- Local Snapshot and Snapshot Replica
- Backup from PC, MAC, mobile to NAS
- Backup from NAS to cloud
- Storage Manager (SSD/HDD tiered storage)
- Network and Virtual Switch – Bridge Ethernet ports or dedicate ports to specific applications for network trunking
- User accounts and access limits
- Data Security
- Connection blacklist/whitelist
- Account security and push notifications
- VPN server and client
- Proxy server
- Anti-virus
- Data Encryption
- Hard drive-level or folder level
- App Center – Houses all the apps available for QTS
- Virtualization Station – Install any OS in a VM with dedicated CPU cores, RAM, disk storage, dedicated Ethernet port, HDMI output etc.
- Container Station – A one-click-install turnkey Linux VM with dedicated CPU cores, RAM, disk storage, dedicated Ethernet port, HDMI output etc.
- QIoT Container – helps developers build an IoT environment, integrate sensors, and make use of development kits (Raspberry Pi, etc.) with the NAS’s Ponte (data receiver), Node-RED (data analysis), MongoDB (data storage), Freeboard (data presentation) to construct a comprehensive IoT architecture.
- QNAP QvPC – Use your NAS like a PC
- Surveillance Station 5.1
- QUSBCam2
- Multimedia Center
- Video Station 2.5
- Music Station 4.8
- HD Station 3.1
- OceanKTV Karaoke
- Download Station 4.2
- Plex Media Server
- Kodi Media Player
- Productivity Tools such as NAS management, myQNAPcloud and Notes Station
- Signage Station
Okay so which of the above features of QTS do I actually use?
- File Station – This is akin to Windows Explorer but a much more powerful way to browse your NAS drive contents and connected hard drives
- Anti-virus to keep my NAS and network safe
- Surveillance Station 5.1 – One of the main reasons I got the NAS was for the surveillance feature and the 4 included IP camera licences
- Container Station – I used this feature to easily set up an Ubuntu virtual machine that I use to primarily test Linux apps
- VPN Server – I have explained in detail how I use the QNAP’s VPN server feature to remotely access my home network in a safe and secure manner
- DDNS update – This feature periodically updates my DDNS service with my home network’s IP address
- DLNA server (Twonky) – Lets me stream all my media across the home network
- USB One-touch backup – I take a weekly backup of my NAS to the WD Studio 4TB
Surveillance Station
Since this is a blog about home security, I think we should take a closer look at Surveillance Station which is one of the apps included with the QTS OS. Here are the features of Surveillance Station:
- Live View
- Live view of up to 64 channels on a single screen
- Monitor on TV via HDMI port
- Instant playback feature which rewinds the last few seconds
- Supports PTZ cameras
- Supports camera audio
- Preset positions and auto-cruising
- E-map feature which lets you visually show cameras on a layout overlay
- Push, E-mail, and SMS notifications
- Recording
- H.264, MPEG-4, M-JPEG, and MxPEG formats
- 24/7 recording mode
- Event-based recording: 5 types of events (motion detection, alarm input, connection failure, recording failure and user-defined events) that can initiate 7 types of event actions (recording, PTZ Control, alarm output, email notification, SMS notification, buzzer notification, and user-defined actions).
- Manual recording
- Smart recording which records at a higher bitrate only when the camera alarm is triggered
- Playback
- Timeline view, synchronised playback of all cameras
- Preview recordings by thumbnail
- Playback speed control
- Digital zoom
- Intelligent Video Analytics (IVA) which can scan footage for missing objects
- Real-time watermarking
- Web-based user interface
- QVR Client desktop app
- Vmobile – iOS and Android app
- 3000 IP camera models supported
- Up to 32 user accounts
There are two ways you can access the web UI of Surveillance Station – log into the NAS admin and click on the Surveillance Station app or just go directly to the Surveillance Station app URL. In either case, what I dislike is having to log into the app even if I have logged into the NAS admin page. Why don’t I have Single Sign-On in 2018 QNAP?
The QNAP TS-253A is one of the rare 2-bay models on the market that come with 4 IP camera licences. To test the software, I added the following cameras at these resolutions:
- Hikvivison DS-2CD2132F-IWS Dome camera
- 1920×1080 at 15fps, PoE
- Hikvision DS-2CD2532FWD-IWS Mini-dome camera
- 1920×1080 at 15fps, PoE
- Reolink RLC 422 Dome camera with motorised zoom
- 2560×1440 at 15fps, PoE
- Reolink C1 Pro
- 2560×1440 at fps, WiFi
Surveillance Station auto-detected all the cameras either fully along with model number or as ONVIF models in the case of the newer Reolink C1 Pro. Even though the RLC-422 was a 5MP camera, Surveillance Station wouldn’t record higher than 4MP. Check out my detailed how-to article on setting up the QNAP surveillance station app with your cameras.
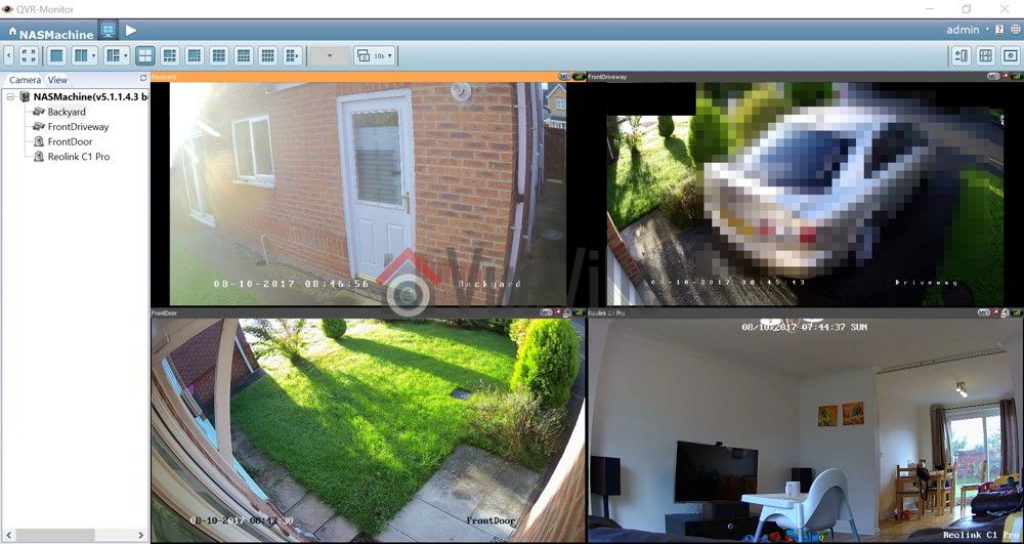
The app’s web-UI is not the new modern HTML5 style but relies on a plugin that has to be installed. For this reason, I prefer to use the far better QVR Client desktop app to monitor live-view and playback recorded video. Here’s a screenshot of the QVR client in action:
Performance
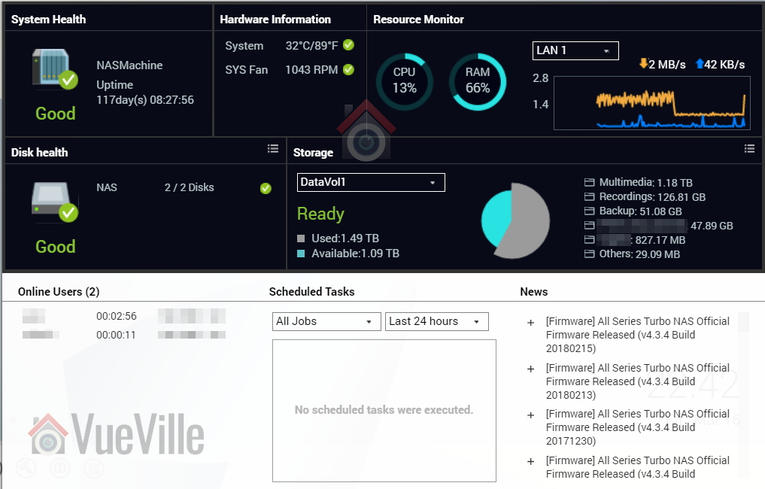
Okay so how does the NAS deal with recording 4 cameras at these high resolutions along with all the other things I ask of the NAS such as running a full Ubuntu VM? Without breaking a sweat, I am happy to report. CPU load hovered at around 13% and RAM usage was a steady 66%.
Verdict
NAS servers these days are versatile gadgets that can protect not just your data but also your home through its NAS NVR and VPN server features. I am amazed at the incredible level of functionality these devices pack for so little money.
The TS-253A is one of the best value NAS servers you can pick up right now that has an Intel processor, oodles of RAM, can run virtual machines and has 4 IP camera licences. If you have been dithering on getting a NAS for whatever reason, this is one NAS that is worth checking out.
Where to buy
Check Price on your local Amazon site
(* = affiliate link / image source: Amazon Associates Program)



Daniel, I was about to pull the trigger on an off-the-shelf security system with cameras before I found your blog. thanks. Now I want to build a security/home automation system replicating your system since the bugs have been worked out in your system. I am a MAc person but will purchase a small windows laptop. I see you purchased the QNAP TS-253A in 2019. What would you recommend to update this product and other products if you were building your system today? I saw the equipment list broken out on another page but do you have a list that can be used to check off the required pieces to make sure I have all the products needed? I am attempting to avoid the weeds of frustration since I have a limited background in technology. Thanks
Have a look at this article: Best NAS for Home Surveillance