I often get questions from friends, family and colleagues about our cloud-free DIY Smart Home and how they can also get something like it. I have already written a detailed technology guide to home automation but this blog post is about how I put my smart home together and how you can do the same without breaking the bank.
Home automation is so affordable and accessible these days. Gone are the days when you had to shell out thousands for your own smart home, and even then the end result was far from impressive! You can get fully wireless smart home lighting or security kits for $100-$200 today, instead of the thousands it used to cost! And you don’t need an army of technicians to install it either.
The focus of my blog is DIY smart home solutions, and you can get your smart home set up yourself for the most part – but you may need a certified electrician if you are not confident enough or your country’s codes require you to use one.
A quick note: As an Amazon Associate I earn from qualifying purchases. This post contains affiliate link(s). An affiliate link means I may earn advertising or referral fees if you make a purchase through my link, at no extra cost to you.
What does my Home Automation System do?
When I first started documenting my smart home adventures here on VueVille, we were in an early 2000s home centrally heated by a gas boiler and radiators. But this year we moved to a new sustainable home that is 100% self-sufficient for energy (using solar panels) and meets Passivhaus standards of air tightness! Gone is the gas boiler, and in comes a heat pump and air handling unit to retain all that precious heat (or cool air in summer)!
So this post will be a running commentary on my progress in making our new home a smart home.
- Add sensors to each room in the house – WIP
- Setup a Zigbee network for lights and sensors in addition to my Z-Wave network – WIP, see my review of the Sonoff ZBDongle-P
- Install Shelly relays (Z-Wave and Wi-Fi) for making dumb switches and lights smart – WIP
- Integrate solar inverter into Home Assistant – DONE
- Ethernet cabling for outdoor security cameras – DONE
- Install outdoor security cameras – WIP, Reolink Duo Floodlight PoE review coming soon!
- Integrate Samsung heat pump into Home Assistant, mainly for monitoring – Not started
- Integrate SystemAir SAVE VSR-500 air handling unit to retain heat/cooling and maintain air quality – Not started
Eventually, these are the things I would like it to do:
- Turn on/off lights around the house according to the time of the day and the weather OR on demand via smartphone or wall-mounted tablet (no mind-control yet!)
- At night, turn the corridor lights on when motion is detected (someone going to the toilet). Switch it off a few minutes after motion is no longer detected.
- Automatically turn on/off the humidifier in the baby’s nursery based on the measured humidity in the room.
- Interface with the home alarm system so that I can arm it or disarm it from anywhere in the world.
- Monitor all my security cameras.
- If motion is detected when the alarm system is armed, turn on QNAP QVR Pro camera recording and turn on the nearest outside lights.
- Take snaps/record camera security videos based on different triggers such as new post or a doorbell push.
- Send me email alerts when anything unusual happens in the house or if the alarm system is triggered.
Of course there’s a lot more it can do. Even with my current setup, there are probably hundreds of different scenarios I could set up to make my life more comfortable and increase the security of my home – this is what gets me really excited about home automation!
What I wish I knew when I started on Home Automation
As discussed in detail in my home automation technology guide, think of different functions in your home as sub-systems. For example, lighting is a sub-system, so are heating, water management, and fire safety. Ultimately you need all your sub-systems to be aware of each other and interact well so that you can actually automate your home, not end up with an expensive collection of stuff that gives you headaches!
Choose your HA platforms carefully – I chose Home Assistant with Wi-Fi, Z-Wave & Zigbee
As I say again and again, you have to think long and hard about the basic technology platform that your home automation is built on. If you start buying stuff without considering how they will interact with each other, you will end up wasting your money on kit that works poorly as a whole. With home automation, the attitude has to be ‘set-and-forget’. Your time is precious and should be spent doing what you love with those you love, NOT troubleshooting your smart home all the time. Your smart home should always be working away in the background, doing what you have asked it to quietly and efficiently. It should make its presence felt only when needed.
What are your options? Even though modern wireless home automation is still in its infancy, there is a bewildering array of home automation platforms:
- DIY platforms
- Proprietary cloud-based platforms that allow unrelated smart devices to work together
- Amazon’s Alexa-powered smart speakers
- Apple Homekit
- Google Home
- IFTTT
- Cloud-based platforms based on open standards such as Z-Wave and Zigbee
- Eg. Samsung SmartThings
- Pros: Cheap, but basic in capabilities
- Cons: Won’t work without the cloud, not much control in your hands, your data is not yours really
- Consumer level DIY platforms that are not reliant on the cloud/Internet<- I recommend these
- Eg. Home Assistant, Hubitat, HomeSeer HS4
- Pros: Affordable (even free like Home Assistant) and can be very powerful with optional plugins
- Cons: Varying levels of complexity
- Proprietary cloud-based platforms that allow unrelated smart devices to work together
- Professional platforms such as Control4
- Very costly, very advanced and will need professional installation & support.
- Managed platforms such as Vivint and ADT
- Installed and maintained by a 3rd party, costly.
So what did I go for? As shown in red above, Home Assistant which is a DIY open-source software that is not cloud-reliant, but at the same time is very powerful yet flexible.
For my sensors and smart home devices, I chose a mix of Wi-Fi, Z-Wave and Zigbee protocols as the foundation of my smart home
- Z-Wave for critical gear such as in-wall relays controlling dumb switches and dumb lights.
- Zigbee for smart bulbs, and battery powered sensors.
- Wi-Fi for certain devices such as my ESPHome DIY sensors, Mi Humidifiers & in-wall relays like Shellys controlling smart lights and dumb switches in detached mode (also called smart bulb mode).
I mainly use 5GHz Wi-Fi for media, surfing etc. I keep the 2.4 GHz for some Wi-Fi smart stuff (like the Mi Humidifiers), and for Zigbee.
There are quite a few reasons for choosing Z-Wave and Zigbee wherever possible:
- They are not one manufacturer’s proprietary standard – means I am not tied into one single company’s products or eco-system (no, I am not an Apple person). Wi-fi devices usually work only with the maker’s cloud apps (the notable exceptions are Shelly & Sonoff flashed with ESPHome).
- Z-Wave is the industry leading standard with solid reliability and high performance, Zigbee excels at having the best prices.
- I don’t think Z-Wave & Zigbee are going away anytime soon due to their sizeable ecosystems today.
My Home Assistant based Smart Home Layout
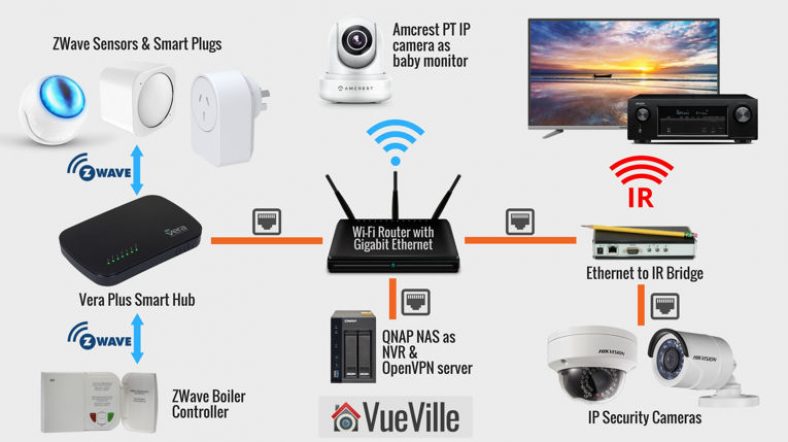
Long-time readers may be aware that I started out around 8 years ago with the Vera Plus from Vera Controls as my smart home hub. However as the time available to work on my HA system has reduced (I am a father of 2 young kids) and my HA needs have grown, I outgrew the Vera Plus.
The stock Vera could handle basic to medium-level complexity scenes. So actions such as turning my hot water on according to a schedule was handled fine by the default Vera. But my fully automated central heating control was way too complex for the default Vera scene editor, so I used the PLEG plugin from the community instead. While I was able to create a single-zone automatic heating system using PLEG, the PLEG plugin was clunky and had a very workman-like archaic approach to workflow. This became impossible to deal with as my second child arrived – I simply did not have the luxury of time or the patience.
After much dithering about the higher cost of HomeSeer software and a laptop to run it vs. my Vera Plus, I finally decided to switch to the HomeSeer HS3 software a few years ago.
While HS3 was easy to set up and use and extremely reliable, it didn’t have integrations for some newer smart devices I bought such as the Mi Air Purifier and Mi Humidifier. So I moved to the versatile yet powerful Home Assistant software last year.
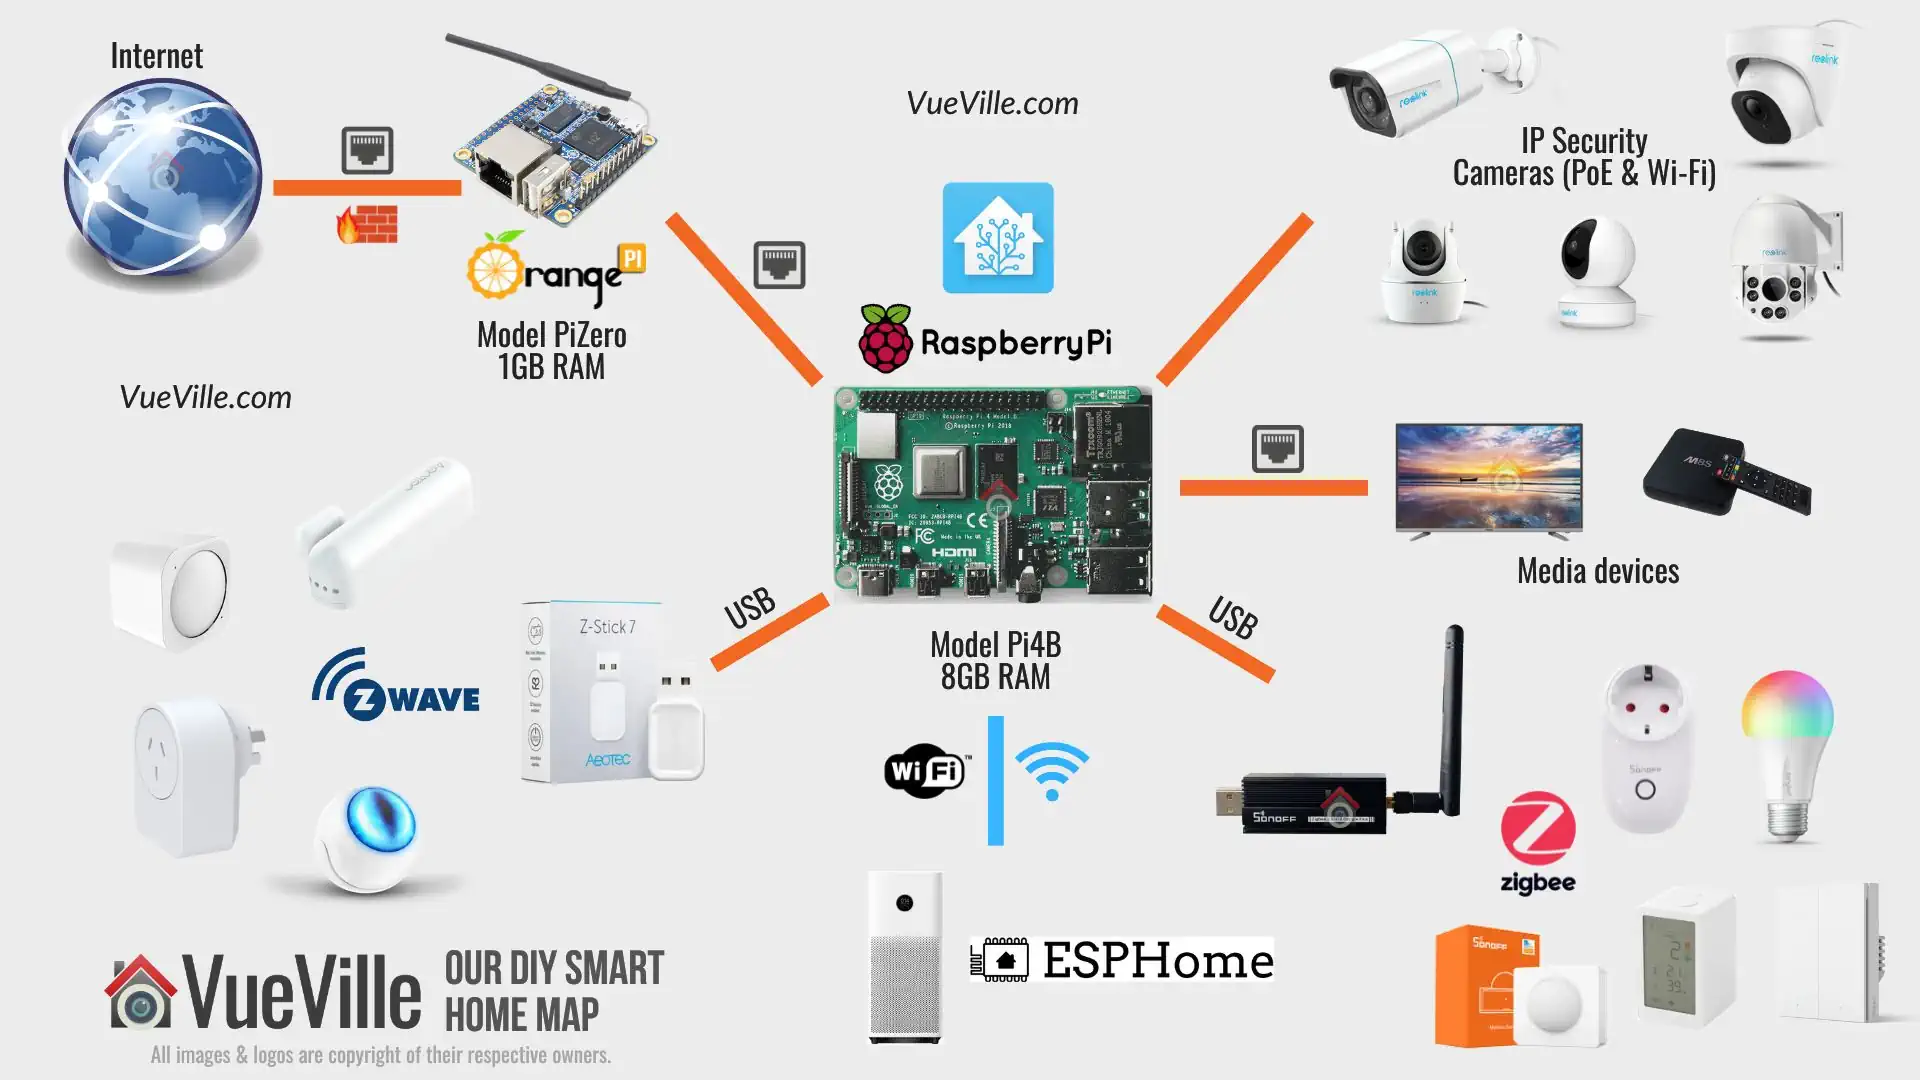
Home Assistant is an amazing piece of open source software – it works with nearly any protocol or standard you can think of: Wi-Fi, Z-Wave, Zigbee, Bluetooth, NFC tags, Ethernet devices, Homekit, voice assistants….. there’s an integration for nearly every smart platform you can think of. And what also captured my attention was the fact that I could build my own cheap ESP8266 based sensors such as air quality, temperature and humidity sensors (using ESPHome).
Home Assistant running on a Raspberry Pi 4 – My Smart Home Hub
So the heart of my DIY home automation system today is the Home Assistant software running on a Raspberry Pi 4 using an Aeotec Z-Stick 7 Plus USB stick.
This is a very powerful Z-Wave based solution that connects to a wide variety of devices such as my:
- Z-Wave in-wall relays such as the Shelly Wave 1PM
- Z-Wave multi-sensors and Z-Wave smart plugs around the house
- QNAP NAS NVR security camera system which makes it aware of my cameras’ motion detection status
- Mi Smart air purifiers & Mi Smart Humidifier
- Denon home theatre system through an Ethernet-to-IR bridge
- Tablets and mobile phones which run the Home Assistant dashboard to control my smart home
Z-Wave Interface
I added a Z-Wave radio to the Pi4 with the Aeotec Z-Stick 7 Plus. This is one of the best Z-Wave USB adaptors I have used and I have had absolutely zero issues with it over the last 3 years. It is fully supported by Z-Wave JS integration in Home Assistant. Highly recommended.
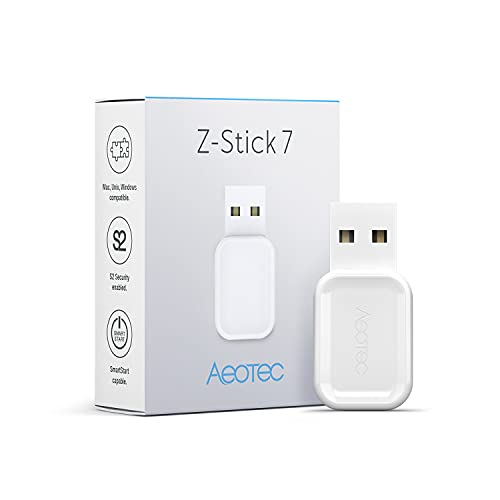
Aeotec Z-Stick 7 Plus
(* = affiliate link / image source: Amazon Associates Program)
Zigbee Interface
I use a SONOFF ZigBee 3.0 USB Dongle Plus (ZBDongle-P) as the coordinator of my Zigbee mesh network. I have written an extensive hands-on review of the adaptor including my experience of flashing the firmware to the latest version for improved mesh network quality.

SONOFF ZigBee 3.0 USB Dongle Plus (ZBDongle-P)
(* = affiliate link / image source: Amazon Associates Program)
An alternative is the new Aeotec Zi-Stick that I reviewed, this is ideal if you want to use the Home Assistant ZHA integration instead of Zigbee2MQTT.
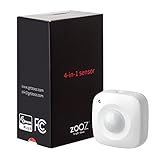
Z-Wave Sensors
I just love these amazing little devices that can sense everything you may want to monitor in your house. Temperature, humidity, light levels, motion detection, vibrations, UV rays – you name it, there’s a sensor for it.
Based on the readings of the sensor, you can make your Smart home hub heat up or cool down a particular room, switch on lights, open the blinds, send you a text alert, etc.
These sensors are battery powered so you can place them anywhere in your house. But hey won’t the batteries run out quickly? The beauty of Z-Wave technology is that it’s mesh-based and is ultra low-power, unlike Wi-Fi which requires much more power. So the batteries will last for at least a year.
I use the Aeotec MultiSensor 7, the Aeotec TriSensor, the older Aeotec MultiSensor 6 and Fibaro Gen 5 MultiSensor – I am very pleased with all of these sensors and would recommend them in a heartbeat.


(* = affiliate link / image source: Amazon Associates Program)
Z-Wave Wi-Fi Relays
I have a variety of Shelly relays around the home, both Wi-fi such as the Shelly 1PM, Shelly 2.5 and the new Z-Wave based Shelly Qubino Wave 1PM that I reviewed recently.
Z-Wave & Zigbee Smart Plugs
Everyone’s heard about Belkin’s WeMo which popularised the idea of making dumb appliances smart by putting a smart plug between the wall and the appliance. Z-Wave smart plugs are similar, but they just work on the far more reliable Z-Wave & Zigbee mesh wireless technology instead of Wi-Fi like the WeMo.
I currently use the Aeotec Smart Switch 7 to automate my bedside lamps, floor-stander lamps, humidifiers and air purifiers.
Ethernet-to-IR bridge
There are a few ways you can control your home theatre devices – gold old infrared which is supported by any device, or sending http commands via a network connection. But I didn’t know that I could make my Smart Home Hub control an infrared emitter to mimic an IR remote control!
So my first attempt was the http API route. While my Denon AVR fully supported http API commands, my Panasonic Viera LCD TV had a limited http API command set. So this was a no go. Some quick research led me to a plugin for the HomeSeer HS4 that could control an InfraRed emitter from a company called Global Cache. I managed to score one of these Global Cache Ethernet to IR devices on eBay.

(* = affiliate link / image source: Amazon Associates Program)
This is a brilliant device which plugs into a network switch using its ethernet port and will take properly formatted TCP/IP commands and convert it into InfraRed commands that it beams out of one of its three IR emitters.
They also have a WiFi-to-IR model but I haven’t tried it.
For these older devices that work very well with the HomeSeer HS4 software, it made sense to stick with the setup. So HS4 continues to run on an old laptop and is integrated with the Home Assistant system using a plug-in.
Stuff I don’t use since moving to my new self-sufficient sustainable home
This year we moved to a modern home built to passive home standards. We use only electricity – no gas or solid fuels are used! We are also fully self-sufficient thanks to the 12 kW solar panels on our roof. I am in the process of integrating these into my smart home and will update this post with more details soon!
Since we no longer use gas, there’s no need of a boiler controller. But in our previous home we had a gas-powered boiler which I had fully automated using the below product.
Z-Wave Boiler Controller
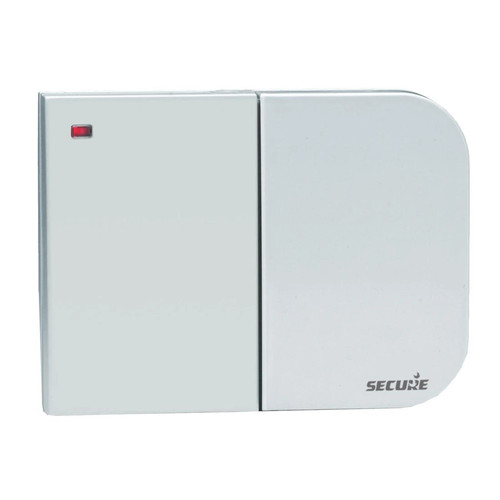
In a sense my home automation journey started with my boiler controller. When we moved into our new home, I quickly found that the existing boiler controller was outdated and didn’t even have a holiday mode! So instead of replacing it with a new ‘dumb’ controller, I got my first Z-Wave device, the Secure 2-channel boiler receiver.
In the UK you can get this receiver from Vesternet.
QNAP NAS as NVR
My first foray into the world of Network Attached Storage (NAS) was the QNAP TS-231+ many years ago, and was the inspiration behind starting my DIY home surveillance system. Later I upgraded to the much more powerful QNAP TS-253A NAS.
The TS-253A is my network storage, my NVR (using QVR Pro), and my media streaming server using DLNA. In the past I have used the NAS as my OpenVPN server, but due to security concerns I have moved to using an OrangePi running PiVPN as my VPN server. I use the excellent Wireguard protocol on PiVPN mainly because it has a much lower overhead compared to OpenVPN. This suits a low-power device like the OrangePi.


(* = affiliate link / image source: Amazon Associates Program)
Conclusion
So these are all the various bits of kit that I have added to my Home Automation System right now.
Got any questions, comments or feedback? Leave a comment below!
Leave a Reply