So you have bought security cameras to watch your home while you are away. You followed the manufacturer’s instructions to set up the camera. Voila, you are now able to view your cameras from anywhere in the world. Job done.
Or is it?
Most security camera manufacturers now use Peer-to-Peer (P2P) technology to make it very easy to set up their cameras. Of course, the beauty of this method is that you don’t even realise you are using P2P technology. But then you also may not be aware of the extent to which you are trusting the strength of the camera manufacturer’s network security.
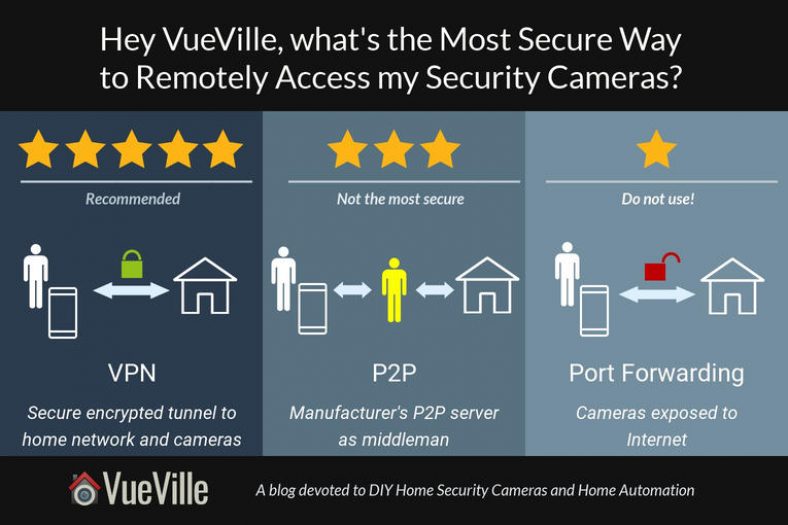
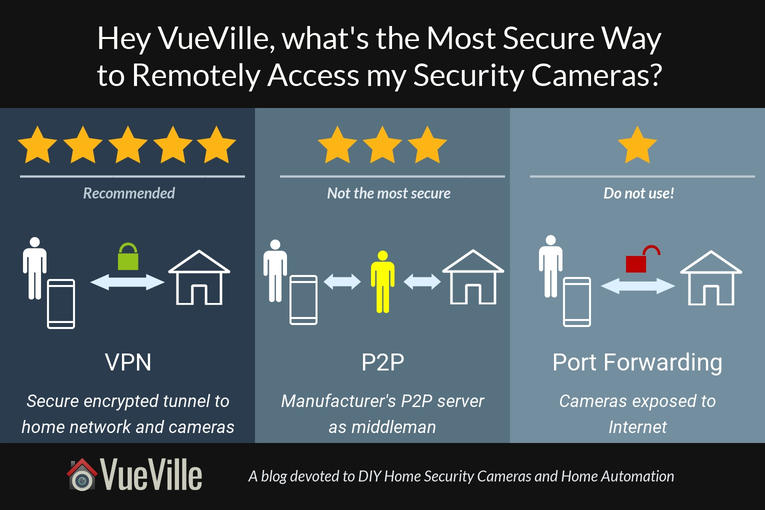
Let’s take a step back and look at the 3 different ways you can view your home security cameras remotely:
- Port Forwarding
- P2P
- VPN connection
[wpsm_toplist]
Port forwarding
This is the oldest and most common way of remotely connecting to devices on your home network. This is how it works – an external port is opened on your router and forwarded to the device in question, like a security camera. So these ports are always open on your network and your router is listening to incoming connections.
In other words, it is like leaving the doors of your house not just unlocked, but wide open. Not the best strategy for security.
Whenever the router detects an incoming connection on these opened ports, it routes the request straight to the security camera specified by the port forwarding rule active for that port.
Since manually configuring port forwarding can be difficult for most home security camera users, manufacturers started using Universal Plug-n-Play (uPNP) to automatically do it for them. And this is where things start getting dicey.
Poorly or maliciously written software running on dodgy no-name security cameras often open unnecessary ports on your router. If malicious, these open ports are a backdoor for 3rd parties or the government to monitor your camera. Unscrupulous camera makers may also program their cameras to make active connections to their own servers to keep tabs on how you are using your camera. This is called ‘dialing home’.
Even if they only open ports and do not download anything to your network, unnecessarily open ports are great targets for hackers and botnet attacks. Just see what’s been going on recently:
- Over nine million cameras and DVRs open to APTs, botnet herders, and voyeurs
- Millions of Baby Monitors, Security Cameras Easy to Hack
[wpsm_column size=”one-half”][wpsm_pros title=”PROS:”]
- uPNP makes it easy for manufacturers to automatically set up port forwarding
[/wpsm_pros][/wpsm_column]
[wpsm_column size=”one-half” position=”last”][wpsm_cons title=”CONS:”]
- Downright dangerous and nobody should be using it
[/wpsm_cons][/wpsm_column]
So in summary, do not forward ports from your security cameras to the Internet. It is simply not safe enough.
P2P
This is now the default way for most security cameras to let users remotely access them and live-stream video footage. It usually involves using the mobile app to scan a QR code on the camera and then everything is set up automatically.
P2P is like closing the doors of your house and locking them, but with a guard who has the key and can let themselves or anybody else in at any time. You trust your guard not to do that though.
So how does P2P work? P2P stands for peer-to-peer. There are two devices or peers that need to connect to each other – your security camera at home, and your remote mobile device. This may happen either directly using P2P and port forwarding OR using just P2P and a third-party server that negotiates the connection.
If uPNP is enabled on your security cameras, watch out. The camera may still use port forwarding in combination with P2P. But disable uPNP and then the security camera is forced to rely on a method called NAT Traversal. Here’s how it all works in simple English:
Your security camera makes an outgoing connection to the manufacturer’s P2P server and informs the server what your home network’s public IP address on the Internet is. This way, the P2P server knows exactly where your security camera can be found. If your router supports NAT (Network Address Translation), no port forwarding or special permissions are required. Most NAT routers allow all outgoing connections by default. So that’s the security camera side sorted.
What about your mobile device which may be on a 3G or 4G wireless network? When you first set up the mobile app on your mobile device, you may have scanned the camera’s QR code. So the app knows the unique id of your camera and remembers this. So now the app connects to the manufacturer’s P2P server and does two things:
- It tells the P2P server your mobile device’s IP address, i.e. where the mobile app can be found, and
- It fetches your camera’s address from the P2P server using its unique id
Now the mobile app knows everything it needs to connect to the security camera directly. No port forwarding occurs anywhere.
[wpsm_column size=”one-half”][wpsm_pros title=”PROS:”]
- Super easy to use
[/wpsm_pros][/wpsm_column]
[wpsm_column size=”one-half” position=”last”][wpsm_cons title=”CONS:”]
- Only as secure as your manufacturer is
[/wpsm_cons][/wpsm_column]
VPN Connection
Now we are talking. This is the most secure way to remotely connect to your security cameras and therefore my chosen method. There’s no middleman in this method, you connect directly to your home network.
Using a VPN connection to connect to your home is like having just one door into your house, locking it when you leave and only you have the key. Nobody else. Makes sense doesn’t it?
So how does this method work? For every VPN connection, you need a server and a client. So to dial into your home network, a device on your network has to act as the server. This device needs to be online 24/7. It also needs to be very secure because it will be exposed to the Internet.
While I have used my DIY NAS NVR as the VPN server also in the past, this approach is no longer recommended due to security risks. Instead I recommend using a dedicated device on your network such as a Raspberry Pi4 or OrangePi Zero running PiVPN (my choice) to serve as the VPN server.
So a small low-power Pi will act as your VPN server, and you have to forward just one UDP port from your router to your Pi. Yes you can’t avoid some port forwarding but its better to use it for a VPN and expose your PiVPN server to the Internet instead of your NAS or security cameras.
The next choice you need to make is the VPN protocol to use. This one is easy – just use Wireguard. Most other the other common VPN protocols have been compromised either by hackers or governments. If you have a low-power device like the PiZero, Wireguard is ideal because it performs well on such low-power devices. But if you are using a Pi4 or better, you could choose OpenVPN also.
When you set up the Wireguard server on your Pi, you will get a client configuration file that you need to load on your OpenVPN client apps. We have written a step-by-step tutorial on setting this up (currently outdated but will be updated soon).
So you have set up your Wireguard server, but you need to know how to connect to it when you are away from home. You could use the public IP address of your router, but most ISPs use dynamic IP addresses which change every few days. You could pay for a static IP address to overcome this issue. But there’s a cheaper way – Dynamic DNS or DDNS. With DDNS, you can connect to your home network using a custom web address like mynetwork.ddns.net instead of the constantly changing dynamic IP address. How does DDNS work? A device on your network has to periodically update a third party DDNS server with your home network’s public IP address. The DDNS service will associate your selected web address with your home network’s public address.
Your router may be able to perform the function of keeping your DDNS service updated with your home public IP address. My Unifi USG router has this feature.
So you find yourself far away from home. Just fire up the Wireguard client app on your laptop or mobile, connect to your PiVPN server and that’s it. You are now virtually at home. All your apps including IP camera apps will think that you are at home and just work. You can also access other devices on your home network.
Conclusion
I personally use the Wireguard method to connect to my home network when I am out and about – I recommend this method as it is the most secure.
Leave a Reply