

IP cameras for DIY home security these days are pretty impressive devices. Like the [easyazon_link identifier=”B099ZPF3B2″ locale=”US” tag=”vueville.com-eaz-20″]Reolink RLC-824A[/easyazon_link] that I am reviewing today: it has 8 Megapixel (4K) resolution, smart motion detection for persons, vehicles and pets, colour night vision using LED spotlights & 2-way audio. I have been looking forward to review the new breed of Reolink 8MP cameras and this is a great model to start off with.
Current Reolink spotlight cameras like this RLC-824A do not have Infrared LEDs, so this camera is ideally suited for well-lit areas with sufficient ambient light or you will have to leave the LEDs turned on all night (this is the default setting).
Reolink kindly provided us with a retail sample RLC-824A for this hands-on review. As always, we are going to look at the features, setting up the camera, motion detection performance, video quality and how well it works with the VueVille DIY Home CCTV system and our DIY Smart Home Automation System!
[text-blocks id=”earning-disclaimer”]
Video Review
Here’s a quick video review, and the detailed written review continues below:
How to use this camera
Most of our readers who are interested in this camera will either want to add it to an existing DIY IP Camera system like ours, or add it to a Reolink NVR with spare channels. The RLC-824A supports the industry-standard ONVIF and RTSP protocols, so it should work with any system that supports these standards.
What’s in the box
The RLC-824A is a turret style camera and so doesn’t need a massive box package. The retail box looks very upscale and sets itself apart from first sight. The camera’s main features are highlighted, as are the mobile app and the 2-year limited warranty.
The RLC-824A comes very well-protected in its packaging with the right amount of padding to protect it during shipping.

Box contents:
- RLC-824A Zoom IP camera
- Screws, rawl plugs
- Waterproof sleeve/lid for Ethernet cable
- 1 metre network cable
- Installation guide with photos
- Mounting hole template
- Surveillance sign
- UK and EU regulatory compliance certificates
Specifications
Design & Features
The RLC-824A is a turret-style camera with a metal body construction. It feels like a camera that is far more expensive than it is, as I have noted before this is a common trait of Reolink cameras.
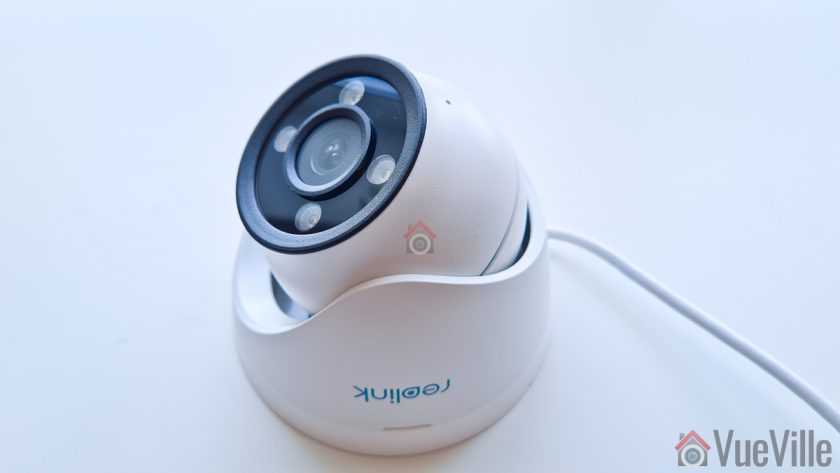
The base of the camera that attached to the mounting plant is called the mount in the manual. This mount is connected to the camera body but is free to rotate at all times. So you can adjust the horizontal positioning of the camera even after the camera is installed on the mounting plate. Nice touch.
The lens ‘eye-ball’ is housed in the metal body and can be moved in any direction to point it exactly where you want. There’s a decent freedom of movement available. The back of the lens eye-ball houses the microSD card slot, secured by two screws. The slot can be accessed at any time before or after camera installation. I inserted a 16GB Sandisk Ultra microSD card, you can use up to a 256GB card.

The speaker is also placed on one side of the eye-ball, but in such a way that it faces the inside of the mount. This is perfect as its then protected from the elements. We also find the microphone placed just below the lens.

The fixed lens on the RLC-824A has a fixed focal length of 4 mm, and does not have any physical zoom capability. The 1/2.5″ 8 Megapixel Progressive Scan CMOS sensor can produce a 4K resolution of 3840 x 2160 pixels.
There are no IR LEDs on-board, rather this camera has 4 spotlight LEDs that turn on at night to give you colour night vision. I would have preferred both infrared and spotlight LEDs, so that I have the best of both worlds – IR LEDs for clear black and white footage and the spotlight only for when, say motion is detected. That way I wouldn’t need to have ambient lights or the camera’s own spotlight turned on all night to get useable footage in the dark. I hope Reolink looks into this mode of operation for their spotlight cameras in the future.
The day/night sensor for the auto switch between day and night mode is placed right below the lens.
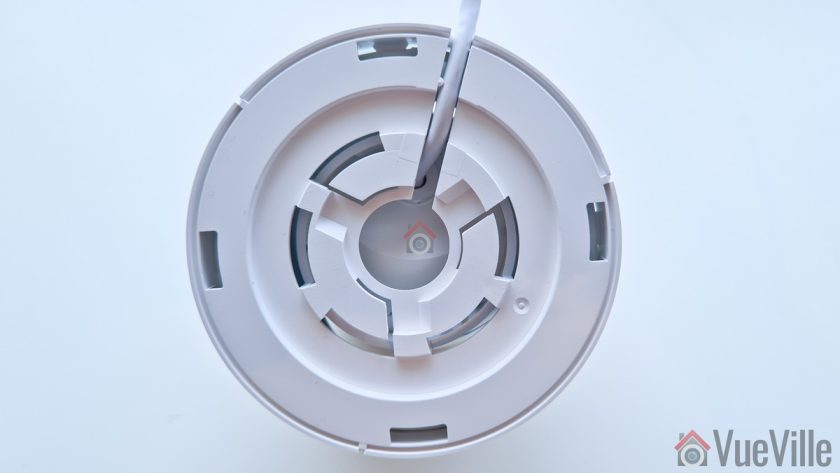
All the cabling comes out of the base and can go conveniently into a junction box or through the wall. As usual with Reolink cameras, the cabling consists of a pigtail with the following connectors:
- RJ-45 ethernet port
- 12V 1A power input jack
- A reset push button

As usual, the reset button of the RLC-824A is not on the main body of the camera. Apart from eliminating an ingress point, this means nobody can reset the camera unless they get to the hidden reset button which is probably inside the wall or your roof soffit! This is much better than many other cameras such as Hikvision’s which have the reset button externally on the camera body itself.
A sticker with the QR code for the mobile app setup and login details is pasted on the camera housing. I recommend removing these stickers before installing the camera outdoors for security purposes. Otherwise anyone will be able to load up the camera web admin page, and if you haven’t changed the default admin and password shown next to it, you are in big trouble!
Installation & Setup
Turret cameras can be a trifle more difficult to install than bullet cameras, but Reolink makes the installation process very easy.
First I removed the mounting plate from the top of the camera by turning it anticlockwise. I then used the included mounting plate hole template to mark off the holes for 4 screws.
I then used the included screws to fix the RLC-824A to my usual test location. Then came the important bit – I used the marked points to align the camera with the mounting plate and turned it clockwise to lock in place.
The last thing to do was to fine-tune the camera’s surveillance angle. I adjusted the lens eye-ball & unlike many other turret cameras I could the camera body rotation also. This is a great feature and not a very obvious one.
Hardware setup
The RLC-824A supports Power over Ethernet (PoE) which is always my recommended method to power IP cameras. Using just a single Ethernet cable, you can send both data and power to the camera. You just need a PoE switch or a PoE injector [easyazon_link identifier=”B001PS9E5I” locale=”US” tag=”vueville.com-eaz-20″]like this TP-link model[/easyazon_link].
The camera is 802.3af PoE certified, so both my [easyazon_link identifier=”B00BP0SSAS” locale=”US” tag=”vueville.com-eaz-20″]TP-Link PoE switch[/easyazon_link] and [easyazon_link identifier=”B01DKXT4CI” locale=”US” tag=”vueville.com-eaz-20″]Unifi Switch 8[/easyazon_link] are up to the task of powering the camera over PoE.
If you want to use the included waterproofing connector, you will have to remove the RJ-45 plug on the Ethernet cable and re-crimp it once it has been passed through the waterproofing connector. My install location is sheltered from the elements, so I didn’t bother with this.
Software setup
Most manufacturers ship their cameras with static IPs by default – for example Hikvision and Dahua. In most cases the camera will not have the same network settings (like sub-domain) as your network.
This means that you cannot access the camera unless you change the camera network settings to that of your network. You are expected to do this using the manufacturer’s camera finder tool, like SADP in the case of Hikvision.
While this static IP method has a lot of security benefits, most home users would find it much easier if the camera manufacturer used DHCP as default. This way, the camera would automatically be configured to use your network settings and be ready to use.
As with all the Reolink cameras I have tested, this is exactly the case with the RLC-824A: Reolink has DHCP enabled by default. So adding this camera to your network setup should be a breeze.
One of the most important things I look for in a camera is the ability to work in a fully local mode, without requiring Internet access at all. Of course, this extends to initial setup as well. Ideally, the camera should not require an Internet connection to get it up and running.
In my home network, the VLAN that I place cameras in is blocked off from the Internet and even the rest of the network. I do not want to temporarily allow internet access to the camera evn for setup, because that might be just enough time for a camera to phone home to its servers in China or wherever and leak my data. Of course, a reputed company like Reolink would never do anything like that, but for security sake I apply the same firewall rules to all cameras in my home.
As I will be detailing below, all Reolink cameras I have tested so far are capable of 100% local operation and the RLC-824A is no exception. It didn’t complain about no Internet or that it could not create new outgoing connections from the VLAN to then rest of the network or the Internet. Awesome!
There are quite a few ways to setup the RLC-824A:
- Use the Reolink mobile app
- Use the Reolink desktop client software
- Use the built-in web-based admin page
The Reolink setup guide for this camera suggests the first two methods – Access the camera by smartphone OR access the camera by computer.
The smartphone method is great for simple network setups but will use the P2P mode of setup. However I would like to add the camera to my dedicated VLAN for CCTV which is fully local – it is isolated from the rest of the network and from the Internet. So I will detail the 2nd method of using the Reolink desktop client software.
Step 1: I downloaded the Reolink desktop client from the URL as the manual suggested: https://reolink.com/software-and-manual/
Step 2: Installed the Reolink Desktop Client and ran it. Windows Defender identified it as a new app and asked me if I want to allow it Internet and LAN access. I allowed it to proceed.
Step 3: I connected the RLC-824A to my VLAN network through the TP-Link PoE switch. Quick reminder that the TP-Link PoE switch is connected to a port on my Unifi managed switch that is isolated to just the CCTV VLAN.
Step 4: The Reolink app cannot detect cameras on subnets other than the one it is in. So I found the IP address of the camera manually from my Unifi router. As I mentioned earlier, the camera has DHCP enabled by default but I like to assign my cameras static IP addresses. The main reason is that its easier to set up and access the camera form other devices without having to check each time what the IP address is.
Step 5: Armed with the IP address, I went back to the Reolink app and clicked on ‘Add device’. I entered the IP address, kept the default 9000 port and hit ‘Add’.
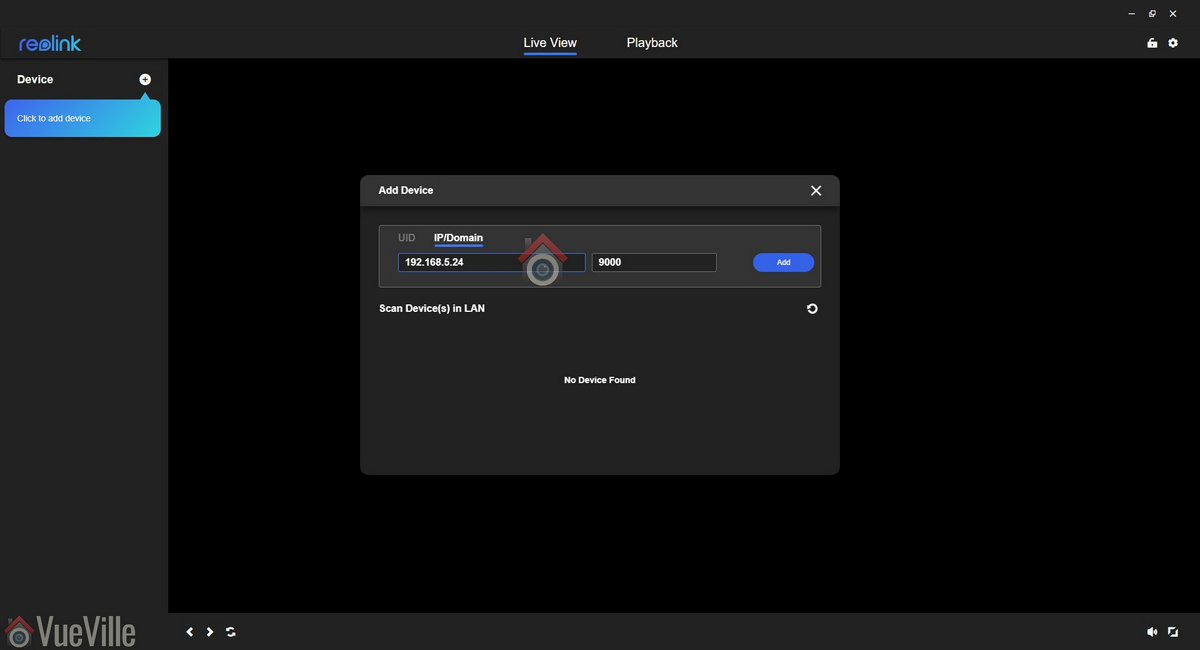
I was asked to enter a new password for the default admin account, a name for the camera (shown on the OSD, can be hidden), and immediately the camera live view stream appeared on screen.

Step 6: Clicking the gear icon next to the camera name brings up the camera settings. Of course, you can simply pop the IP address into any browser to directly access the web-based admin page and adjust camera settings as well.
You should change the password of the camera as soon as you can, especially worth noting as the camera doesn’t require you to nor remind you to do it.
Using the camera
Live-viewing the camera stream
Typically I use the tinyCam Monitor Pro app on my Android phones to view all the cameras in one place.
Live-viewing is also possible via the Reolink desktop app or the built-in web-based admin page of the camera. Let’s explore the web admin page of the camera, as this is a very convenient way to both live-view and tweak camera settings. In case you are wondering, the camera settings section of both interfaces are identical.
So entering the camera’s IP address into any modern browser will take you to the nice HTML5 interface that Reolink now uses instead of the older Flash based interface.
At the login screen, you can choose the video stream quality you want to see, ‘Channel 1’ is called Clear and is actually the 8 Megapixel stream (unless you have changed the default camera encoding settings). The other options are Balanced (medium quality) and Fluent (sub-stream).

Reolink calls the landing page the Preview page, but I like to call it the Live View page. On the left hand side you have the live view stream, and at the bottom clicking the play button lets you select between the video quality by switching between the Clear, Balanced and Fluent streams.
Quick camera configuration
On the right hand side of the live-view screen, there are 2 panels – Basic settings and Advanced settings. The basic and advanced settings sections are like a quick access area that duplicates the settings on the actual configuration page (accessed by clicking on the gear button at the top right).
The Basic Settings section includes OSD settings, video stream encoding and image settings. Remember you can also change all of these settings in the configuration pages. So The OSD page is pretty standard and lets you choose whether and where to show the OSD information such as day, date and time.
The Image section lets you adjust the usual image settings such as brightness, contrast, saturation, sharpness and also mirroring and image rotation.
I didn’t see an option to change the i-frame interval. This is a bit strange as it is a setting that I would have expected to find. Why is it important? The i-frame setting specifies how often the entire frame is captured and not just what has changed from the previous i-frame. So being able to control it is important for getting the right balance between network bandwidth utilisation and a high quality non-blurry video.
Detailed camera configuration
The full camera settings configuration page is accessed by clicking the gear icon at the top right of the Live View page. This lets you access video resolution, network, motion detection, email and push notifications, user control, and system maintenance settings.
Under the camera section, there are a few tabs of interest – stream, detection alarm, and audio-light.

The stream section is dedicated to resolution settings. The default for the main stream is 3840*2160 and for the sub-stream it is 640*360. The default bitrate is 6144 Kbps and 256 Kbps respectively. These are more than fine for home security purposes. You can go up to 8Mbps for the main stream if you prefer.
Moving on to motion detection, we find the new smart motion detection settings under the section “Detection alarm”. These include person, vehicle and even a pet feature which is in beta currently. Simple detection and smart detection of Person and vehicle detection are always ON – you cannot disable the detection of these events. What you can control is the sensitivity of detection, and the camera actions when these events are detected. So you can control the camera recording (SD card, FTP, or NAS), and the alerts that are fired (such as email or push).
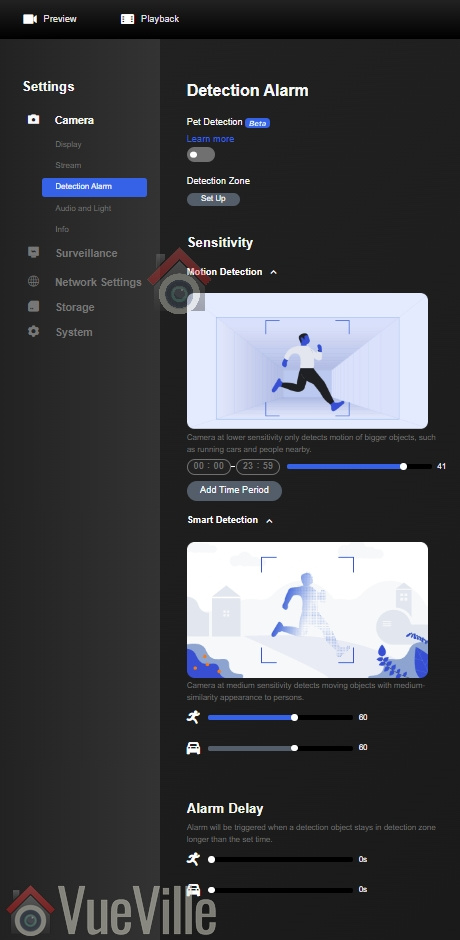
The screen also lets you set up the motion detection zone and sensitivity of person, vehicle and pet detection separately.
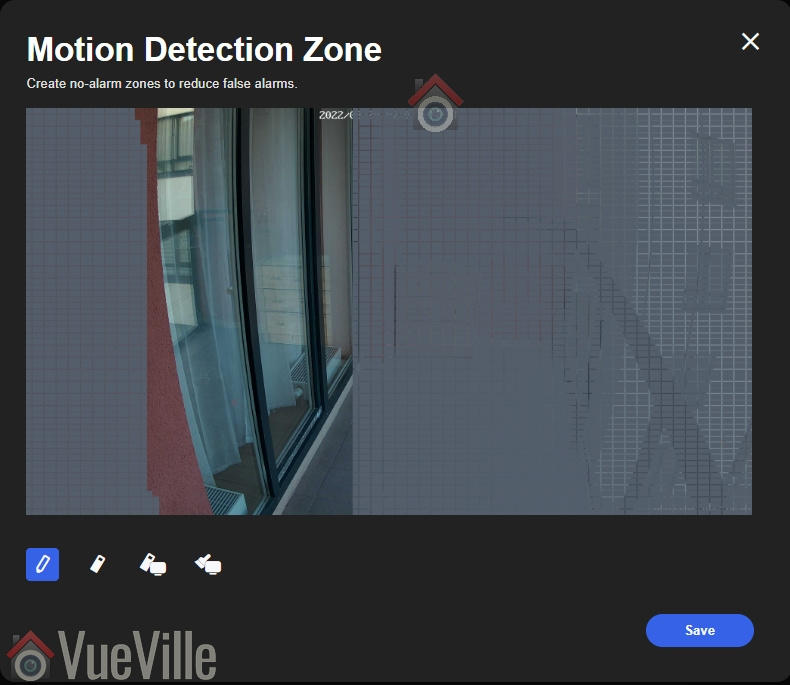
Another new feature I really like is the ‘Alarm delay’ – which is really more like the ‘intrusion detection’ of Hikivision or ‘Dwell period’ of other brands. You can set the number of seconds an object has to be present in the motion detection zone to trigger the alarm. This can help eliminate false alerts from things like insects flying across your screen at night.
You can adjust the motion sensitivity for the time of the day. For example, you can have a higher sensitivity during the daytime and a lower sensitivity at night to avoid false alerts.
Finally you can specify the minimum size of an object or vehicle that an object needs to meet to be classified as one of these.
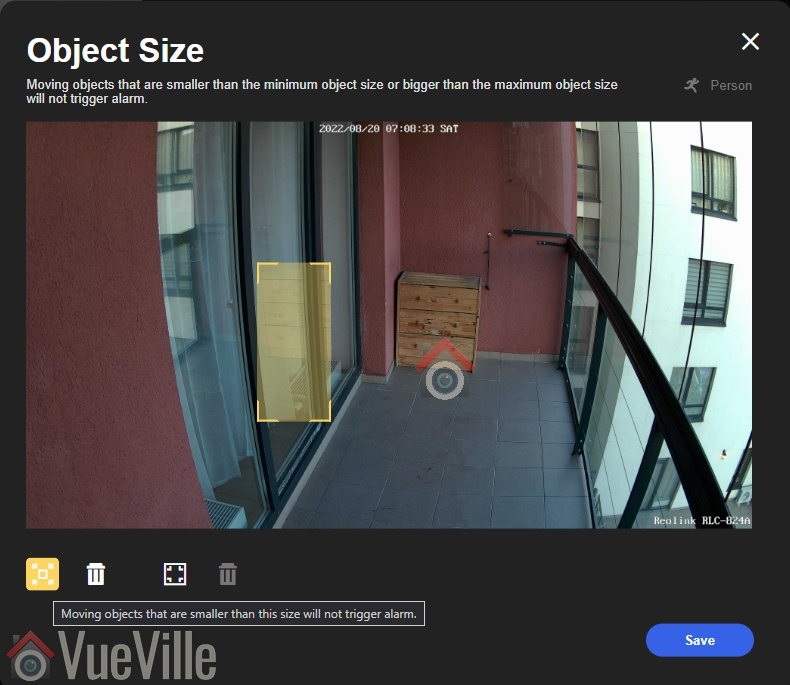
If you are using the mobile app, you also get this helpful tip on setting the minimum and maximum object sizes:

Moving on to the Audio-light section, you can control the behaviour of the spotlight. The default mode of operation is for the spotlight LEDs to stay on all night. This is because the camera doesn’t have IR LEDs for getting clear videos in total darkness. But I believe such cameras are best used in areas where there is already plenty of ambient light.
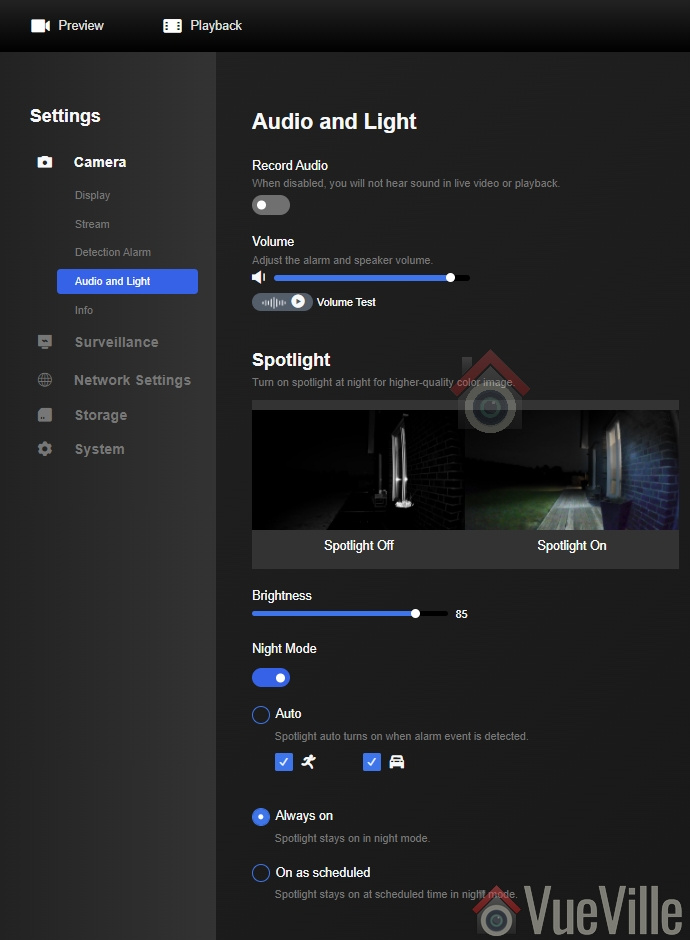
So I recommend using the Auto setting instead, where the spotlight only turns on when the smart detection feature detects a person or vehicle.
So that’s the camera tab. The Surveillance tab contains the settings for recording motion detection clips, setting the recording schedule, FTP, email, and push notification settings. You can also set the siren to sound when motion is detected.


For the push notification feature to work, you need to separately turn it on in the Reolink mobile app. Also note that you will need to provide the camera access to the Internet for push notifications to work.
The network tab is worth checking out as some security related settings are found here. I was very happy to see uPNP off by default, but UID was on. I’d recommend keeping this off too.

While you are here, click on Port settings to enable the RTSP and ONVIF ports. For some reason, RTSP and ONVIF are disabled by default. It took me a few minutes to figure this out when my tinyCAM Monitor Pro app couldn’t find the RTSP port of the RLC-824A!

Also if you want to use this camera with your NAS or any 3rd party NVR, enable HTTP at port 80. But please ensure your camera is properly firewalled from the Internet if you do this!
Playback tab
Clicking on the ‘Playback’ link at the top left of any page takes you to the built-in NVR feature. So the camera can record motion detection clips to the on-board SD card, and even 24/7 a network/NAS drive.
However you cannot view clips on the web-based admin page at full 8MP resolution, so I recommend using the Reolink Desktop Client instead.
Video Quality and Motion detection
The camera was installed in a balcony with minimal ambient light at night. I tested the RLC-824A at its default settings of 8MP resolution, 25fps and 6144Kbps bitrate.
Technical settings:
Primary Stream: 8MP (3840*2160), 6144 Kbps bitrate @ 25 fps.
Secondary stream: 640×360, 256 Kbps bitrate @ 6 fps.
LED spotlight: Turn on for Person detection only
Record action: Person detection only, write to SD card, pre-record and post-record activated
Siren: Off
Push notifications: Send for Person detection only
As described earlier, I had already marked the motion zone for person detection around the doorway of the test scene.
Reolink mobile app
The Reolink mobile app is one of the best apps I have seen from any IP camera maker. Its miles ahead of Hikvision’s extremely poor efforts and runs circles around other brands’ apps.
I was able to easily add the RLC-824A to the Reolink app on my phone using its IP address, activate the LED spotlights & siren, 2-way talk, and use the built-in NVR feature to access the recorded clips on the on-board SD card. The only thing I didn’t like about the app is that push notificaitons use the Reolink P2P server and so I had to allow the camera to access the Internet. This is not a scenario I find myslef in personally because I use Home Assistant and its unofficial Reolink integration to get 100% local push notifications.


The RLC-824A works great with my favourite mobile CCTV app, tinyCAM monitor Pro. I set the model to RLC-410 camera as most of the newer models are not present in the dropdown list.
More on push notifications below in my day & night testing.
Video quality & Motion detection
The RLC-824A CMOS sensor at 1/2.5″ is larger than the usual 1/3″ sensors I have seen in previous Reolink models. This makes sense as the camera does not have IR LEDs for night vision, and has to rely on ambient light or the spotlight LEDs for illumination.
Check out the video review below for actual 4K full resolution test footage at day and night:
In my daytime testing I found the daytime video to be similar to my 8MP Hikvision. Crisp and sharp video with very good detail and no noise at all.
In my testing, the camera fired off a ‘person detected’ push notification as soon as the test subject entered this defined motion zone. The pre-record and post-record feature made sure that the critical moments before and after motion detection was captured.

As dusk fell, the only ambient light available was from the indoor lights of the home. I wanted to test the limits of the camera, so I set the the LED spotlight to turn on only when motion from a person was detected. This is the most challenging scenario for a camera with no IR LEDs or IR cut filter onboard. So how did it fare? There was a lot of noise as expected and detail was low in the darker areas. But there was enough ambient light at the motion detection zone. So the camera was able to quickly detect the test subject, turn on the LED spotlight, send push notification to the Reolink mobile app, and record the clip to the SD card.
In conclusion, you really do need a well-lit area for this camera to work well, or you will have to turn on the spotlight LEDs at night. This camera cannot work in total darkness.
Reviewing recorded clips
While you can use the mobile app or the web admin panel for reviewing recorded clips, the Reolink Desktop app is in my opinion the best place to view your recorded clips.

It works very well, can be used to live-view, adjust camera settings, playback recorded clips and export them. The typical feature of different colour timeline markers for different events is very useful. But there are also some handy features such as searching the timeline for specific smart detection alerts such as person, vehicle or pets.


Compatibility with QNAP QVR Pro
I also tested the RLC-824A with the QNAP QVR Pro NVR software. Adding the camera to QVR Pro was super smooth because QNAP officially supports all the latest Reolink camera models.

I created a motion detection trigger and event to test the reliability of the trigger and the pre-record and post-record features. The event trigger for QVR Pro is the same as the ones the camera generates internally for its own alarm events.

Motion detection recording by QVR Pro was reliable – the NAS NVR received the triggers correctly and promptly form the RLC-824A. You can also set up event recording of the main stream at the same time as 24/7 continuous recording of either the main or sub stream. This is great for getting those pretty pink markers on the timeline that you can jump to quickly.
Compatibility with Home Assistant
I am in the process of moving my home automation system to Home Assistant, and there is a great community integration for Reolink cameras. So you can set up custom actions for person detection or vehicle detection triggers received from the camera.
Verdict
For an 8MP 4K camera with bright LED spotlights, the RLC-824A is excellent value for money. Image quality is great as expected. The standout feature is smart detection of persons, vehicles and pets along with colour night vision. The smart detection methods are a great addition and help in creating actionable alerts in Home Assistant. You can define motion detection zones with variable sensitivity. This goes a long way in eliminating false motion alerts. As you saw earlier in the night time testing, the LEDs can turn on automatically when a person is detected.
The built-in speaker and mic give you 2-way audio and a built-in siren. If you prefer standalone operation, the microSD card slot enables the built-in NVR mode. For those who need a 24/7 recording turret camera, the ONVIF and RTSP support makes the camera very easy to integrate with compatible NVRs or a DIY NAS NVR. BlueIris users note the lack of fixed frame rate or an iframe setting – this makes it tricky to get the camera to work as desired in BlueIris. This does not affect the clips recorded to the onboard SD card. Still I expect Reolink will address this in a future firmware revision just as they have for many other 800 series cameras in their product lineup.
The camera does not require the Internet to function and is perfect for a 100% local-only self-hosted smart home like our VueVille home. To round it off, a great mobile app with quick & reliable push notifications.
On the other hand, you don’t get Infrared LEDs for true night vision. You can only use the camera in a well-lit area with enough ambient light OR have the spotlight LEDs turn automatically at night & switch off at dawn. The spotlight LEDs are very bright even at the default 85% brightness so this is acceptable. However, I would have really liked the option of using IR LEDs in total darkness areas and have the spotlight LEDs & turn on only when motion is detected. This is available in Hikvision ColorVu cameras but at a much higher price.
A minor quibble is the lack of audio and alarm connections for home automation integration, but these are becoming increasingly hard to find these days. Push notifications require the Internet but Home Assistant or Blue Iris can be used to overcome this limitation.
So in summary the RLC-824A is a fine choice for an 8MP IP camera with LED spotlights with 2-way audio and siren. It continues in the tradition of high-quality well-made DIY security cameras that can be used in a 100% local self-hosted smart home.
[review]
Where to buy
[easyazon_link identifier=”B099ZPF3B2″ locale=”US” tag=”vueville.com-eaz-20″]Check Price on your local Amazon site[/easyazon_link]
Leave a Reply