I have always wanted a 4K Power over Ethernet (PoE) security camera with built-in LED floodlights. It’s possible to install separate smart floodlights for my existing cameras, but you just can’t beat the convenience of a single package that works on Power over Ethernet (PoE). No extra power supply or wiring needed!
Reolink sent me the Duo Floodlight PoE to review and I have been putting it through its paces. There are 2 versions of this security camera – this PoE model we are reviewing today and a Wi-Fi model. Apart from having 4K resolution, 2 bright floodlight LEDs, it also has dual lenses with 180º field of view and smart detection that can turn on the floodlights whenever a person, animal or vehicle is detected. It can also work fully locally with any ONVIF-compliant NVR, Home Assistant or Frigate NVR. No cloud reliance & no subscription!
Sounds too good to be true? Well, we are going to look at the features of this camera, setting up with the Reolink app, Home Assistant, Frigate NVR, floodlight and motion detection performance, video & audio quality and how well it works with our VueVille DIY Home CCTV system and our DIY Smart Home Automation System! Let’s get started!
A quick note: As an Amazon Associate I earn from qualifying purchases. This post contains affiliate link(s). An affiliate link means I may earn advertising or referral fees if you make a purchase through my link, at no extra cost to you.
Video Review
If you’d prefer this post in video format, here’s an in-depth video review:
How to use this camera and my setup
There are several ways to use the Reolink Duo Floodlight camera:
- It can work as a fully standalone security camera. If you use its built-in microSD card you can also enjoy the built-in NVR feature accessible through the Reolink mobile app or desktop app.
- Since the camera supports ONVIF and RTSP, you can also use the camera with any ONVIF compliant NVR or PC or NAS-based NVRs (like Frigate NVR) but not all features may be supported.
- Of course you can always connect it to Reolink’s own NVR models and all the camera’s special features such as floodlight control will be available too.
- If you prefer, you can always set the camera to save clips to an FTP server, but the built-in NVR feature will not be available in the Reolink mobile and desktop apps.
- The camera will also work with Home Assistant using the Reolink Integration.
Personally I have the Duo Floodlight connected to Home Assistant and to Frigate NVR which does AI object detection. I also have the Duo Floodlight configured to upload smart motion detection clips to an FTP server on my local network. More on that in the Frigate and FTP sections below.
What’s in the box

The box contents list of the Reolink Duo Floodlight:
- Reolink Duo Flodlight 4K IP camera
- Floodlights
- Mounting plate
- Mounting hole template
- Installation and operation guide with photos
- 1 metre Ethernet cable
- Screws, rawl plugs
- Surveillance sign
- UK and EU regulatory compliance certificates
Specifications
[table id=89 responsive=scroll /]
Design & Features
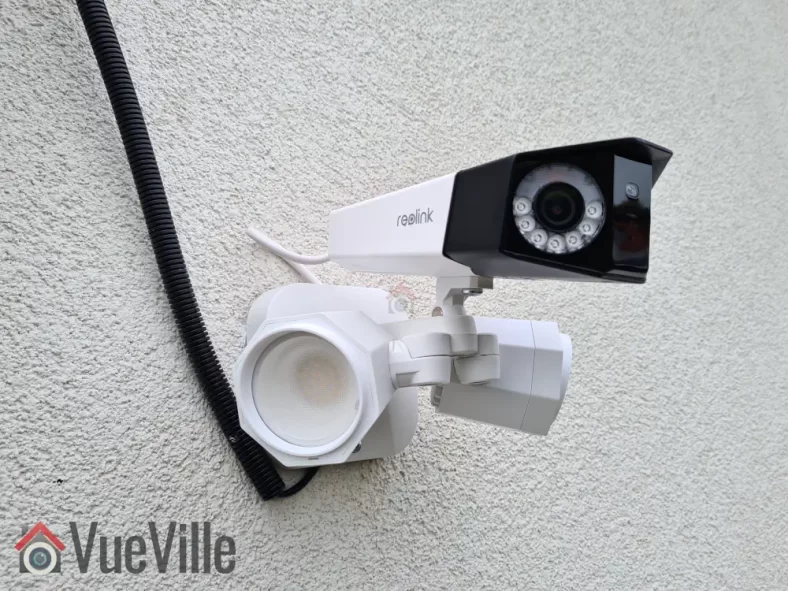
The Reolink Duo Floodlight looks exactly like what you would imagine if you have seen the regular Duo camera before. Basically it’s the Duo dual-lens camera that is attached to the floodlight accessory that is also available for purchase.
Indeed, it has been possible to buy the regular Duo camera and the Floodlight separately and link them to with each other through the Reolink app. However the floodlight was not controllable through 3rd party interfaces like the Home Assistant integration or any other smart home system. So the Duo Floodlight addresses a very relevant use case where you can trigger the floodlight by any other sensor or device in your smart home, or any other Reolink camera, not just the Duo camera it is attached to.

In the box, the camera and the floodlight come packaged separately. Everything that you need to mount & install the camera on a masonry wall is included in the box, there’s even an Ethernet cable!

Let’s take a closer look at the camera now. The body is the same as the regular Reolink Duo camera with a dual-tone black and white metallic casing. The camera has a smart image stitching feature whereby it automatically seamlessly stitches the streams from each lens to produce a single 4K stream with 180-degree field of view.
Unlike the previous generation Duo, this camera will not let you access each lens’ 2K stream individually. So whatever you plan to do with the video stream, make sure your hardware can handle a very wide resolution of 4608 x 1728. I use the Duo Floodlight with Frigate NVR and as long as you don’t place the camera too high up which distorts the camera view, Frigate object detection works very well even at this ultra-wide resolution (more on that in the Frigate section below).
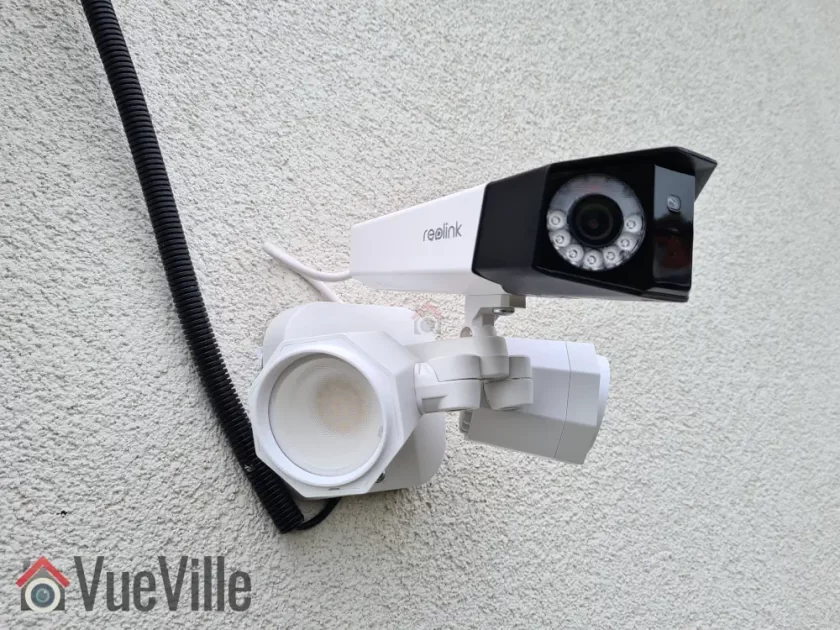
For night vision, each of the 2K lens have 7 IR LEDs around it (850nm type). The 14 IR LEDs together give a black and white night vision range of 30 metres (98 feet).
The day/night light sensor for the auto IR cut filter is placed between the two lenses. This lets the camera automatically switch between day-time colour vision and night-time IR. The microphone is placed just below the day/night sensor.
On the top of the camera, there is only a mounting point in case you want to place the camera below the floodlights for some reason (the recommendation from the manual is to place the camera over the floodlights instead).


On the underside of the camera, we see a removable cover for the microSD card slot and the reset button, the mounting point for attaching the camera to the floodlights and the down-firing speaker. Together with the mic, the speaker lets you have a 2-way conversation with anybody near the camera.
The microSD slot takes cards of up to 256 GB in capacity, which is pretty standard these days. If you don’t have an NVR or don’t need one, the camera has built-in NVR feature using the microSD card slot. Since the Reolink Duo Floodlight supports only H.265, make sure your browser can handle this format for playing back video clips etc.

So how do we connect the camera to the floodlight? That’s where the adapter fixed permanently to the camera comes in. It has a DC power port, LAN port and a two prong LED connector port.
Let’s take a look at the floodlight now. The 40 LEDs together provide 1800 lumens of illumination with a colour temperature of 4200K which is cold white. The LEDs consume 15W of power by themselves. That’s why the camera and floodlights together are rated at 24W power consumption. So you can see why this camera needs a PoE switch that offers the 802.3 at standard (and not just 803.3af PoE). 802.3at provides up to 25W of power whereas 802.3af can do only 15W.
Each of the floodlights are individually adjustable so that you can point them anywhere you want. The camera can also be adjusted up, down, left and right using the included Allen key. You can also adjust the tilt angle of the camera.
When assembled together and plugged into the LED port, this is what the end product looks like:


Camera Mounting
The recommended height for installing security cameras is between 8 – 10 feet. If you have ever tried installing a large camera at that height while on a ladder, you know its difficult. Thankfully Reolink has thought this through properly and mounting the camera can be done in stages.
- Screw the camera and the floodlight together as shown earlier
- Connect the cable from the LED to the camera adapter
- Mark the screw holes using the provided drill template
- Drill and install the mounting bracket. My house is a North European new build, it has a thin façade with 25 centimetres of insulation block behind it. So I have to use special anchors & screws that are not included with the camera.
- Hook the safety clip
- Connect the Ethernet cable from your PoE switch, and the DC cable (if not using PoE)
- Place the camera on the bracket
- Screw in the final screw and you’re done!
Make sure your switch can provide enough power for the camera to work, that’s up to 24 Watts at night when the floodlights are on. I use a Lanberg 802.3at PoE switch which can provide up to 30W per port. That’s plenty of power for the camera.
Reolink Duo Floodlight PoE Setup
By default when you plug it into your network, it will accept an IP address provided by your DHCP server. As the Reolink Duo Floodlight is capable of fully local standalone operation, an Internet connection is not required for either camera setup or operation (except push notifications).
So you are not forced to follow a software installation process but several methods are available for adjusting the camera and for using the advanced features such as AI motion detection, floodlight control, clip playback etc.
I connected the Reolink Duo Floodlight PoE to my VLAN dedicated to security cameras. This VLAN allows me to block Internet access to security cameras, and optionally allow Internet access on a per-device basis if necessary for say push notifications.
Setup using the Reolink Web Admin Page
This is my preferred method of managing the camera settings. Since the camera admin page uses HTML5, you can use any modern web browser such as Safari, Chrome, Firefox or Brave.
With the Reolink Duo Floodlight, I had to adjust the image stitching settings slightly to get the images from the two lenses to line up perfectly. This is found under the image stitching setting on the live view landing page. I also set the privacy mask feature to mask off some houses in the background.

However, the web admin page wouldn’t allow me to live-view the main 4K stream in my browser complaining that the system was not powerful enough. This is definitely not true, its a pretty powerful gaming PC with a Ryzen 12 core CPU, tons of RAM, NVMe drive, and an NVIDIA 1660 Super video card.
There is a button to control the floodlights but it didn’t work. Neither did the audio alarm button work. You also cannot access the 2-way talk feature from here.
Setup using the Reolink Desktop App
The Reolink Desktop app is ideal for live-viewing the main stream (4K resolution), and for using the built-in NVR feature of the camera.
The live-view feature is especially useful if you use only Reolink cameras and would like a multi-camera view – the software can display up to 36 cameras simultaneously.

Also there is a very nice toolbar at the bottom of the app that enables 2-way talk, controls the floodlight, sound the siren, take snapshots, or record clips.
However there are some oddities – I couldn’t find the image stitching settings in the Reolink desktop app, which was available in the web admin page.
If you are using the camera for motion detection, it is worth adjusting the smart detection sensitivity and setting up the features such as minimum object size and motion masks.
Both the desktop and mobile apps allow you to set these up. Reolink calls motion masks No-Detection Zones. So you don’t need to rely on privacy masks if you don’t want the camera to detect motion in one area. This is very useful for areas like the footpath or road in front of your driveway, because you are not interested in the people or cars on the road, just the ones that enter your driveway. All of these adjustments will help reduce false alerts massively.
The floodlight behaviour can be controlled in detail – I like to leave it at the default Night Smart Mode setting where it turns on only at night when it detects a person. You can record audio on your clips if you like. As usual, the recording behaviour and schedule can be customized. And you can scare people away by automatically sounding the siren along with the floodlights turning on.
Setup using the Reolink Mobile App
The Reolink mobile app is needed if you want Reolink’s push notifications to work. You will also need to turn on the UID (P2P) feature and give the camera internet access.
Personally I do not use the Reolink mobile app in my setup because I use the excellent Frigate NVR lovelace card which works beautifully in my HA dashboard and Home Assistant mobile app for actionable notifications. However for the purpose of testing the app for this review, I enabled the camera’s UID feature and gave it Internet access.
The mobile app is pretty good and very easy to use. It never crashed over the many months I have been using it on my Samsung S20.
There’s also a new beta feature in the mobile app called MotionMark which will draw a bounding box around the object that has triggered the motion alert. Very useful for troubleshooting false alerts etc.
Setup Reolink Duo Floodlight PoE in Home Assistant
Personally I use the Reolink integration to control all aspects of the camera, after using the web admin page for adjusting things such as image stitching, stream settings such as fps, privacy masks etc.
Since this was the first Reolink camera I was installing that was supported by the official Reolink Integration, I had to add the camera as part of the installation process of that integration in Home Assistant:
- Ensure your firewall allows your Reolink camera to reach the Home Assistant server
- Ensure the user you create in the camera interface for the integration to use is an administrator account
- Enable the http port option under the camera’s network settings (its off by default)
- Install the Reolink integration from Settings>Devices>Integrations
- Enter an admin username, password and the IP address of the Reolink Duo Floodlight PoE
- Wait a couple of minutes until you get the message saying the camera configuration has been successful.
Head on over to the device page from Settings>Devices>Integrations and treat yourself to this amazing integration that gives local access to the whole camera. All the important settings and sensors are available so that you can control them manually or programmatically through Home Assistant!

You will need to enable the main stream entity manually if you need it. Regarding performance, I didn’t notice any delays while controlling the camera through this integration. Any camera switch or setting you change through any other method will be reflected in the integration as well. Just make sure the http and https ports are enabled in the camera config.
Setup Reolink Duo Floodlight PoE in Frigate NVR
I have Frigate NVR set up on a NUC11 mini-pc and an M.2 Coral Edge TPU, and I use the H.265 streams for detection and recording whenever possible. Here are the host system specs in case you are interested:
- Intel NUC11TNKi5 with Iris XE integrated graphics
- 32 GB RAM
- 2 TB Samsung 970 Evo NVMe SSD
- Coral Edge TPU (M.2)
- Frigate 0.12 configuration: Coral as detector,
preset-vaapifor hardware acceleration (hwaccel argument) - Detection streams: Main streams resized to 1080p (I don’t use sub streams because they are generally not detailed enough to detect small animals like cats)
The Frigate docs do recommend using a Reolink specific configuration but I thought I would try it with just the standard setup above. I was very pleased to see that everything worked well out of the box.
For the detection stream, I set Frigate to resize the main stream to half of 4K resolution. I am using the main stream for detection because I found that the sub stream resolution is not high enough for accurate detection of small objects like cats. Not surprising because the camera has 4K resolution over 180 degree field of view, instead of say 110 degrees like a single lens camera.
Because my system is powerful enough to handle on the fly resizing, I am not forced to use the sub stream for detection. I also enabled the constant FPS option in the Reolink settings and set the i-frame interval (Interframe Space as Reolink calls it) to once every frame.
Here’s the configuration I use for ffmpeg in Frigate:
ffmpeg:
  global_args: -hide_banner -loglevel warning -threads 2
  hwaccel_args: preset-vaapi
  input_args: preset-rtsp-generic
  output_args:
    detect: -threads 2 -f rawvideo -pix_fmt yuv420p
    record: preset-record-generic-audio-copy
And here’s the configuration for the camera in Frigate:
cameras:
  backyard_duo:
    enabled: True
    ffmpeg:
      inputs:
        - path: rtsp://username:password@192.168.X.X:554/Preview_01_main
          roles:
            - detect
        - path: rtsp://username:password@192.168.X.X:554/Preview_01_main
          roles:
            - record
    detect:
      width: 2304
      height: 864
      stationary:
        interval: 0
        threshold: 100

    best_image_timeout: 60

    record:
      enabled: True
      expire_interval: 0
      retain:
        days: 30
        mode: motion
Setup Reolink Duo Floodlight PoE to upload clips to an FTP server
I have the Duo Floodlight configured to upload smart motion detection clips to my FTP server on my local network (not the Internet). Here’s how I have it configured using the mobile app (you can use the web admin page or desktop app also):

Don’t forget to specify the remote directory – in my case it is ‘upload’. This is because the default directory I have set for the camera’s FTP account is ‘/home/backyard_duo/ftp’ and I want the camera to place clips inside a folder called ‘upload’.
Secure FTP is supported by the camera.
Performance Testing
With a camera that has so many different features, it is a challenge to address every single use case. So I have decided to focus on those things that most people buying the Reolink Duo Floodlight PoE will care about.
- During the daytime it should be able to quickly and accurately detect a person/animal/vehicle who is entering my property, send me push notifications, record a video clip to the SD card/FTP server/NVR.
- During the night time, it should also turn on the floodlights whenever a person/animal/vehicle is detected.
- Use the siren feature to scare away intruders/animals.
- Use the 2-way talk feature to talk to the person/shout at the intruder when I am not at home.
- It should not fail to detect people during the day or night!
- No false alerts (even at the highest sensitivity for smart motion detection)
- Advanced features: Home Assistant integration hat works well & Frigate NVR compatibility for accurate object detection without any fuss
Test Setup
I increased the sensitivity of the person detection to maximum so that we are fully testing how powerful the smart detection algorithms are.
For the daytime tests, I set the siren to sound so that we can see the precise moment at which the person is detected. Similarly for the night-time tests, the floodlights turning on indicate the precise moment of person detection occurring.
The test scene:
- 15 metres from the camera to the fence straight ahead
- 30 metres from the camera to the fence on the left of the camera
- 20 metres from the camera to the fence on the right of the camera
Smart Motion Detection, Floodlights & Video Quality
Our test scenarios comprised of a person walking across my 500 metre sq. backyard:
- Entry from right (20 metres from the camera) and walking across the camera to the left,
- Entry from left (30 metres from the camera) and walking across the camera to the right, and
- Approaching the camera head on from the centre of the scene.
We conducted the above tests during the day and the night with no other camera’s IR or illumination present.
In the first 2 test scenarios during the daytime, the camera detected the person within 2 seconds of entering the scene. This was evident from the siren turning on & the push notification being sent. So we can confidently say that the camera can detect persons at a distance of 30 metres when the person is walking across the scene. In the final scenario of the person approaching the camera head-on, the person was detected at a distance of 10 metres (33 feet).
We then carried out the same tests at night-time. This is the real test of any camera’s motion detection as it has to rely purely on its Infra-Red LED for night vision. The moment of person detection was observed by noting when the floodlights turned on. Once again the person was detected within 2 seconds of entering the scene. So very similar to the daytime test results. In the final scenario of the person approaching the camera head-on, detection occurred at a slightly lesser distance of 7 metres (23 feet).
I tested the Reolink Floodlight Duo PoE extensively over a month and had only a single instance of an adult person being mis-categorized as a pet instead of person. The camera didn’t create any false positives nor did it fail to detect a person.
So in summary, the daytime smart detection is excellent and night-time smart detection is pretty good. The video quality is excellent during the daytime as one would expect from a 4K camera. Night-time video quality is more than acceptable especially with colour night vision thanks to the floodlights. Adding external IR illuminators will further improve motion detection.
Audio Quality (2-way talk)
We tested the Reolink Duo Floodlight PoE’s 2-way talk feature through the Reolink mobile app, both over Wi-Fi and 4G mobile data. I stood around 6 feet away from the camera and my wife was at the other end on the Reolink mobile app. Pressing the ‘tap to talk’ button on the app enables the feature.
My wife could hear me clearly and my voice was also clearly recorded on the motion detected clip that the camera recorded to my FTP server. My voice came through at a good volume at her end. Her voice was audible on the the camera’s down-firing loudspeaker but it was not as loud as I expected.
There was only a slight lag similar to other cameras we have tested but it was not an issue at all for carrying on a conversation.
So the 2-way talk feature is acceptable for talking to someone at the door, but I would have liked the speaker to be a bit louder.
Mobile notifications with Reolink mobile app
As you can see in the video review, mobile notifications were reliable and instantaneous locally over Wi-fi and remotely over 4G mobile networks. Tapping on the notification took me straight to the live-stream and I was able to immediately start watching the live stream with the person still on screen. So an excellent result here.
The only thing I miss here is rich actionable notifications such as the one Frigate sends me through Home Assistant.
In Home Assistant
As we saw earlier the Reolink integration creates binary switches and sensors for almost everything that you can think of. To test how responsive the camera is through the Reolink integration, I compared the delay in turning on the Floodlight from HA vs. the Reolink desktop and mobile apps. In all 3 cases, performance was identical – the floodlight turns on within 1 second of the button being tapped in both HA and the Reolink app.
The common issue people have faced in the past with some cameras in HA is the RTSP stream in Home Assistant not being real-time, and lagging behind by several seconds. Of course there are several alternatives such as using WebRTC but I wanted to see if this is still an issue.
The Reolink integration creates an entity for each stream from the camera. By default only the sub stream (896 x 512 resolution) called camera.duo_floodlight_poe_sub is active. I personally dont want anything other than the sub stream on my dashboards because the extra resolution of the main stream is lost on the mobile or tablet devices I use. But for the sake of testing, I enabled the main stream also and embedded both of them into an HA dashboard as a picture card with the live option enabled:
- The sub-stream view was an actual video and the lag vs. the Reolink RTSP stream on the web admin page was 1 second
- The main-stream view was a still image that updated every 10 seconds (not live!), and the lag vs. the Reolink Desktop app 4K stream was 2 seconds
In Frigate NVR
Frigate is my NVR for AI object detection, and with the settings mentioned earlier in the setup section, I have very reliable person detection in the defined zones. I’d say its comparable to that of the Duo Floodlight PoE’s own smart motion detection system.
One common issue that people experienced in the past with Reolink cameras is glitching and tearing while using the RTSP streams. But with the i-frame interval and constant fps settings, I experience no such anomalies. The 4K mainstream and 0.5MP sub streams were smooth and Frigate had no complaints either. Finally the Frigate Lovelace card shows the camera sub-stream with a lag of only 1 second.
The VueVille Verdict
So what’s the verdict? Overall I am very happy with the Duo Floodlight and how well it integrates with my smart home using Home Assistant and Frigate NVR. If you want a high quality 180 degree panoramic 4K camera with smart floodlights, the Duo Floodlight PoE is a great choice.
So what do you think about the Duo Floodlight PoE? Which camera would you like me to review next? Leave your comment below!
Where to Buy


(* = affiliate link / image source: Amazon Associates Program)
Leave a Reply