For quite some now, I have been looking for an IP camera to watch my front door. I already have a Hikvision DS-2CD2132F-IS dome camera on my front driveway, so a more discreet mini-dome type camera seemed perfect for the job. So when Hikvision announced their new 4 Megapixel [easyazon_link identifier=”B017DB3CZ8″ locale=”US” tag=”vueville.com-ref-20″]DS-2CD2542FWD-IWS[/easyazon_link] with 120dB Wide Dynamic Range (WDR), I was very keen on getting my hands on it and putting it through its paces.
So here’s my hands-on review after living with the camera for a month. The HomeDefense subreddit on Reddit helped me out with what they would like to see in the review, and I have tried to cover as many requests as I could.
[wpsm_toplist]
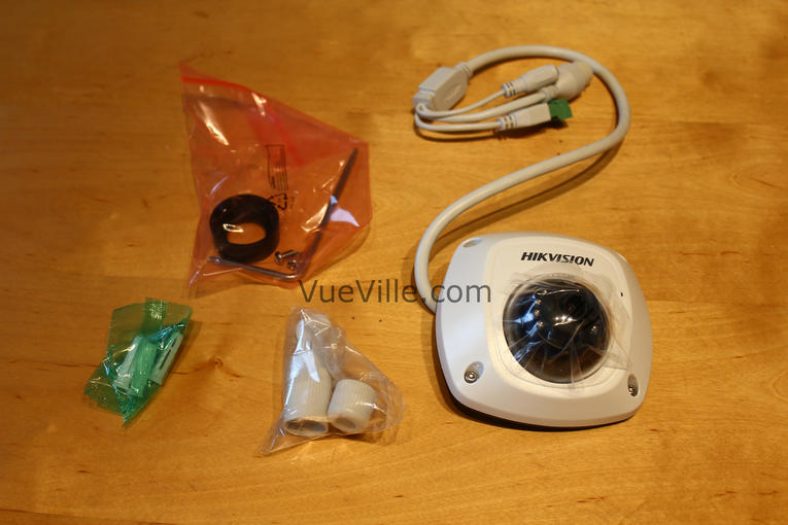
What’s in the box
[wpsm_quick_slider ids=”2582,2583″]
[wpsm_list type=”arrow”]
- Hikvision DS-2CD2542FWD-IWS 4MP Mini-Dome IP Camera
- Waterproofing kit
- Base for fixing camera
- Screws and Rawl plugs
- Lens adjustment tool
- Drill template
- Instruction booklet
- Software CD
- EZVIZ booklet
[/wpsm_list]
Design and Appearance
Design
The DS-2CD2542FWD-IWS is much smaller in size than most other Hikvision cameras. It has a low-profile form that lends itself to being fixed unobtrusively. The fully metal body gives the camera a very solid feel. Here’s a photo with the dome-cover off.
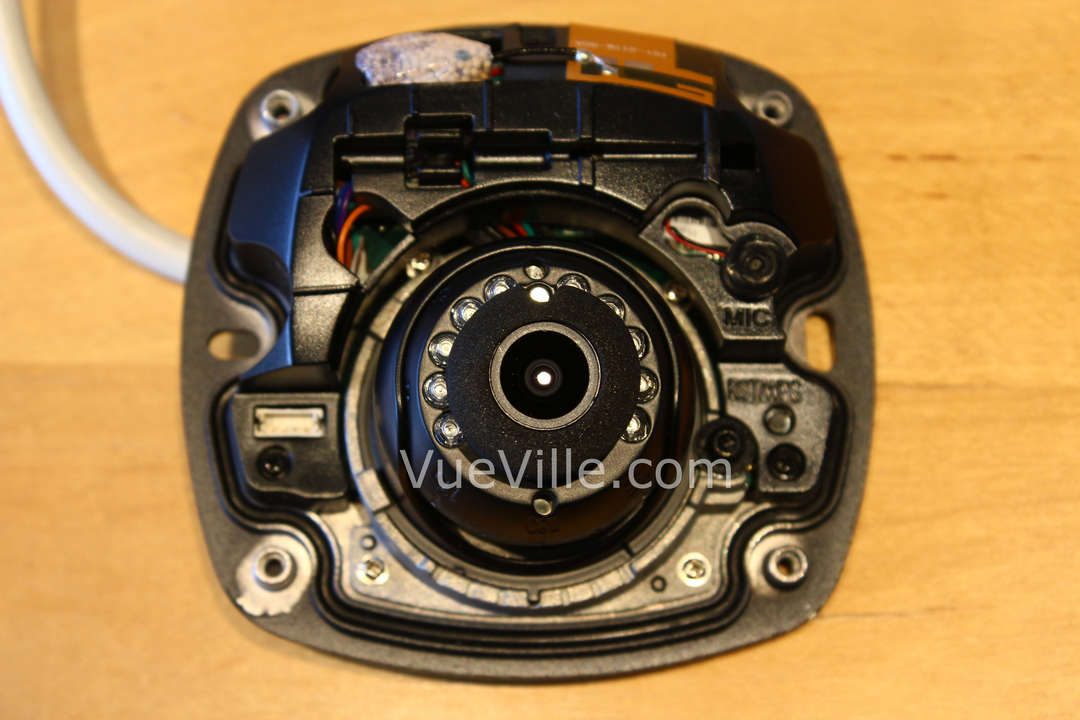
You can see the on-board microphone which is labelled MIC, the button that does double duty as the RESET and WPS for quick WiFi setup.
There are only 10 Infrared LEDs placed in a semi-circle around the lens. Its worth noting that the LEDs seem to be half the size of the standard camera IR LEDs. One potential issue is that the LEDs seem to be partially obstructed by the soft foam around the lens. The purpose of the foam is to prevent the Infrared illumination from intruding into the lens. But in this case, the foam seems to be doing too well a job, and limiting the output of the LEDs. Could this be the reason for the weak IR output illumination I observed? More on that later.

The DS-2CD2542FWD-IWS is a Power-over-Ethernet (PoE) camera. But the PoE module is outside the camera. So bear this in mind while deciding how to install the camera. There is a separate power input plug if you do not have PoE in your installation location. The cable with the green connector block is the input/output for the alarm triggers and the audio.
Main Specifications
The standout feature of this camera is the true Wide Dynamic Range (WDR) feature indicated by the ‘WD’ in its model number DS-2CD2542FWD-IWS. Other key features are the 4MP sensor, on-board WiFi, on-board microphone and SD card support for local storage.
For a key to deciphering the rather cryptic Hikvision model naming system, refer to our Hikvision IP Camera Guide.
[table id=21 /]Setting up the camera
Physical setup
The camera comes with two instruction manuals – one is a 41 page quick start guide booklet and the other is a booklet that shows you how to set up the camera on EZVIZ. EZVIZ is Hikvision’s cloud P2P service which lets you use your camera locally and remotely without have to port forward.
Since I wanted to set up the camera without using EZVIZ, I opted for the 41 page quick start guide. There are clear illustrated instructions for mounting the camera in a variety of ways – ceiling mounting, ceiling mounting with a gang box, pendent mounting and wall mounting. You can see an extended 165 page manual online.
I followed the ceiling mounting instructions and also added the 64 GB Sandisk SD Card that I purchased at the appropriate step mentioned in the guide. I opted not to use the included water proofing jacket for the cables because I didn’t want to cut the Ethernet cable and crimp it, plus I was going to install it well away from the elements.
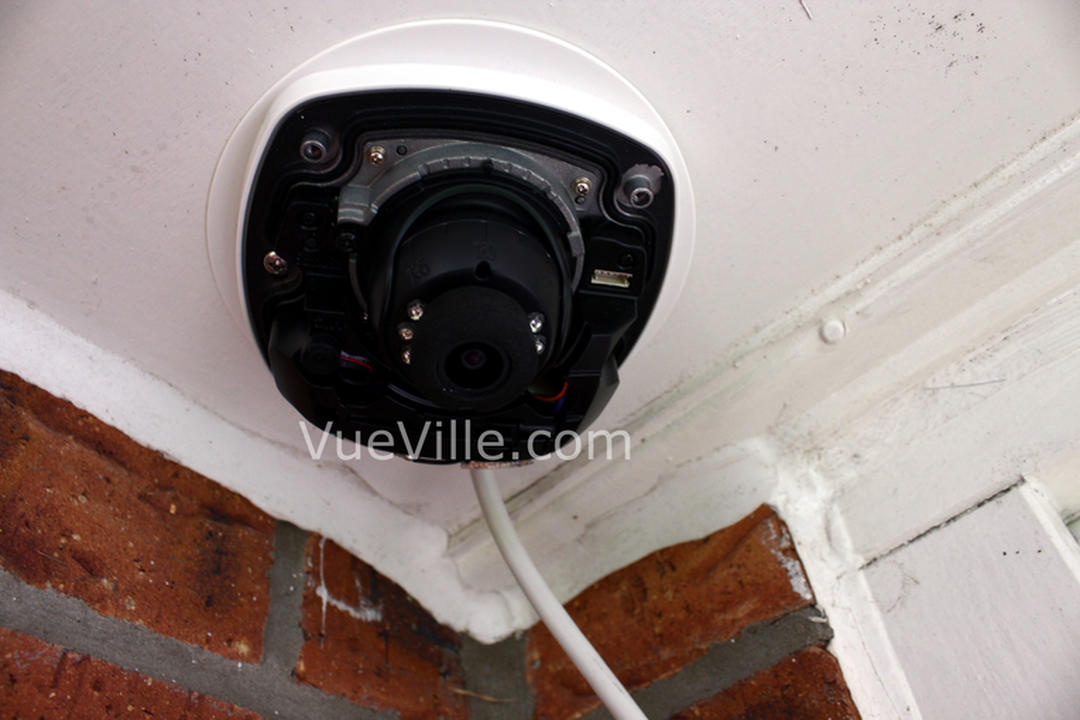
I connected the camera to a free PoE port on my TP-Link PoE switch.
Equipment used for this step:
- RJ-45 crimping tool
- Sandisk 64GB SDXC card
Camera initial setup
In the quick start guide, only one way of continuing the setup is described – “Setting the Network Camera over the LAN”. This is how to setup the camera when it is physically connected to your network. The booklet doesn’t mention setup for a remote camera, but the extended manual I mentioned earlier does. However, there is no way of setting up the camera on WiFi right from the start – you have to set it up through a wired connection and then switch to using WiFi if needed.
Now I had two choices for continuing the setup:
- Setup the camera using a web browser
- Setup the camera using the SADP software
Since the camera comes pre-configured with an IP address of 192.168.1.64 that already matches the IP range in my network, I went with option 1. The default IP address of the camera is mentioned in the quick start guide and is also printed on the outside of the retail package box. The default username of admin is also printed on the outside of the retail packaging box.
If your home network IP is different from 192.168.1.xxx, you will have to use the included SADP program which will find the camera on your network and let you change the IP address. This is quite painless and takes only minutes.
The reason Hikvision chose this particular IP address as the default is that, the 192.168.1.XXX sub-net is the most common [1. http://www.techspot.com/guides/287-default-router-ip-addresses/] default setting in wireless routers. So most people should not have to mess with changing the sub-net, they can simply plug and play.
Since my browser of choice, Chrome, doesn’t support Hikvision’s NPAPI-based plugin anymore, I had to use Firefox. Internet Explorer is the other option but no way was I going to use that!
Interface and Configuration
On pointing Firefox to 192.168.1.64, I was greeted with a popup asking me to set a new password for the default admin account. Now that’s a good security feature as it stops less security-conscious users from just continuing with a default username and password.
On activating the Hikvision plugin, I was asked to update the plugin to the latest version. Clicking OK then downloads a file from the Hikvision web site. It then took me to the Live View screen and I could see the video stream.
What struck me immediately was the clarity of the video and the near lack of digital noise. I was beginning to really like this camera!

The other thing I noticed was the redesigned interface that looked very modern and fresh compared to the web interface on my older 3MP Hikvision cameras.
The slide-out panel with Pan-Tilt-Zoom (PTZ) controls is a nice touch, even though they are useless for this camera which doesn’t have PTZ.
There are four tabs: Live View, Playback, Picture and Configuration.
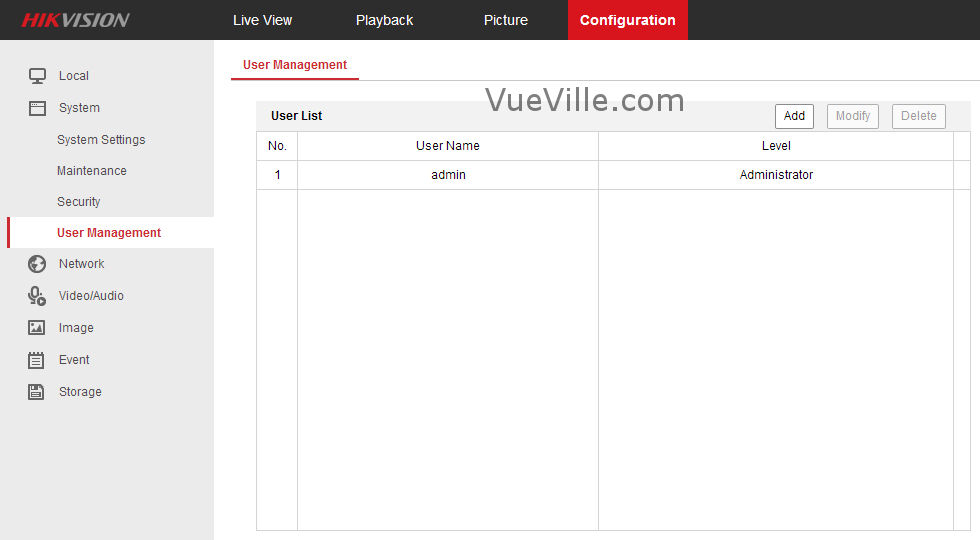
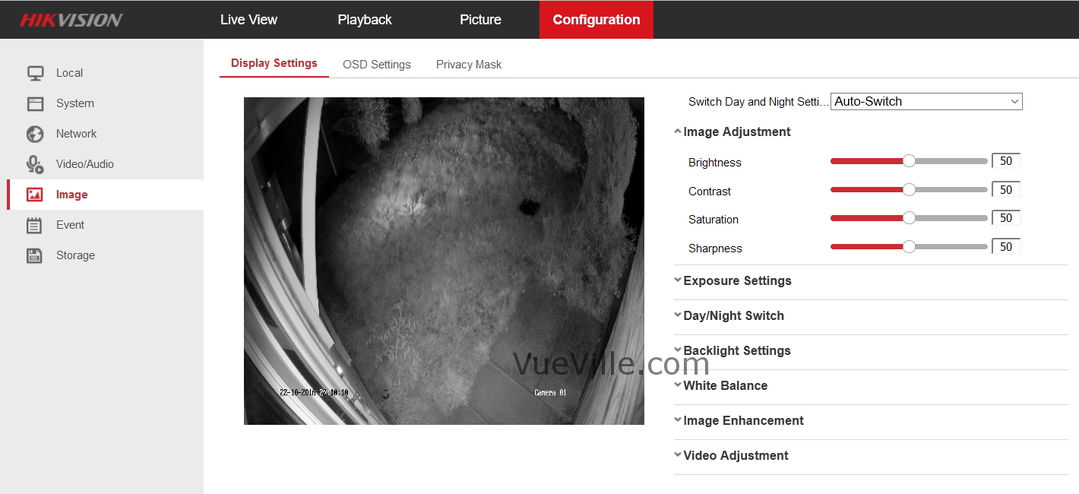
On the configuration page, a menu on the left side neatly categorises the various settings under Local, System, Network, Video/Audio, Image, Event, and Storage.
I took the following steps in the Configuration tab to customise the camera to my liking:
- Network>Basic Settings>TCP/IP>LAN>IPv4 Address: I changed it to match the rest of my IP cameras. There is a helpful button that can test whether your desired IP address is already in use. Changing the static IP address will trigger a reboot of the camera.
- System>System Settings>Time Settings: Even though this is an original Hikvision camera for the US/UK markets, the default time zone was Beijing. I changed this over to GMT and set the correct time.
- System>Maintenance>System Service>Hardware> Enable IR Light check box: It was on by default.
- System>User Management> User List: I created some view-only ‘User’ accounts for my smartphone and tablet. I also created an ‘Operator’ account for my QNAP NAS which I use as my DIY NVR.
Video Stream Settings
When setting up a camera, the areas I am most interested in are the video and image settings.
Hikvision puts all the strictly video stream related settings under the Video section. You may mistake ‘Image Settings’ as the area to configure snapshots, but no, that’s where Hikvision keeps all the video quality settings that affect both video and the snapshots (brightness, contrast, Wide Dynamic Range etc.).

The Hikvision has two streams that you can independently configure. The Main Stream is the default channel 1 of the camera (if you use a third party app to view camera streams, you will recognise this as the primary stream or the High Bandwidth stream). The Sub Stream is channel 2, also referred to as the Low Bandwidth/Secondary/Mobile Device stream by other apps. So hopping over to Video/Audio, I found the default settings to be mostly what I wanted.
The default settings were:
[wpsm_list type=”arrow”]
- Primary Stream: 4MP (2688×1520), variable 6144 Kbps @ 20 fps with an iframe interval of 50.
- Secondary stream: 640×360, variable 1024 Kbps @ 20 fps with an iframe interval of 50.
[/wpsm_list]
Now since I record all my cameras 24/7 on the QNAP, I have to optimise the disk space required by each camera. Of course, I also want to maintain a high level of detail in the video stream. From 2 years of experience with running IP cameras, I settled on the following video settings that give a good level of detail at an acceptable rate of disk space usage.
[wpsm_titlebox title=”Recommended Video Stream Settings” style=”1″]
Primary Stream: 4MP (2688×1520), constant 6144 Kbps @ 10 fps with an iframe interval of 10.
Secondary stream: 640×360, variable 512 Kbps @ 10 fps with an iframe interval of 10.
[/wpsm_titlebox]
Video Quality settings – what Hikvision calls Image settings
This is where we can adjust the settings that affect the picture quality of the video and snapshots.
The default exposure time of 1/25 is fine, I wouldn’t go below that as motion will start to get blurry.
Interestingly Gain was set to 100 by default, the maximum value. On my 3MP cameras, this would have resulted in unacceptable noise, but the DS-2CD2542FWD-IWS image seemed absolutely fine.
Here’s a video of the camera in total darkness inside my garage. The garage door is about 15 feet from the camera. The full 4MP video has a resolution of 2688 x 1520. Even though Youtube only supports videos up to 1440p, you can still see the quality of the video:
[wpsm_video]https://youtu.be/c_3hPAuR5Mc[/wpsm_video]
In my test image, you can see that there is a lot of IR light on the cane furniture placed close to the right of the camera’s field of view. This is great for testing the Smart IR feature. What this does by default is when an object (like a human face) is close to the camera, it will reduce the output power of the onboard IR lights to avoid washing out the image. This is a very useful feature.
However, at first I couldn’t find it. I then realised Hikvision has renamed this to ‘Smart Supplemental Light’ from Smart IR. In any case, turning this on and off didn’t seem to do anything, so I left it off for the rest of my testing.
Under Image Enhancement, Digital Noise Reduction is turned on by default and set to a mid value of 50.
One particular feature that is very useful is the ability to set different settings for day and night. However this is available only if you go for a Scheduled Switch between day and night, not the auto-switch. My older Hikvisions have the same style of working, and I find it quite annoying. Why can’t I have day/night auto-switch and separate settings for day and night? Come on Hikvision, you can do better than this!
Performance
Daytime Video quality
I was very happy with the picture quality of the camera’s daytime videos. Video was sharp with a lot of detail thanks to the 4 MP sensor. The 120dB true Wide Dynamic Range (WDR) which is the key feature of this camera seems to work well in daylight. WDR helps a surveillance camera to deal with images that have high contrast – such as a scene where there is a bright light source in the background. In our residential setting, this could be early morning when the sun comes up full against the camera or late evening when long shadows are cast across a scene.
What WDR does is recover the details lost in areas of the video that are blown out, while at the same time brightening the darker areas such as shadows. Hikvision lets you control the aggressiveness of the WDR algorithm from 0 (OFF) to a maximum of 100. You can see the effect of varying the strength of WDR in the following test videos:
[wpsm_tabgroup]
[wpsm_tab title=”WDR at 0″][wpsm_video]https://youtu.be/zjaE7Fs2BcQ[/wpsm_video][/wpsm_tab]
[wpsm_tab title=”WDR at 20″][wpsm_video]https://youtu.be/x1O2GFy4rNQ[/wpsm_video][/wpsm_tab]
[wpsm_tab title=”WDR at 50″][wpsm_video]https://youtu.be/A8p71V5S_P4[/wpsm_video][/wpsm_tab]
[wpsm_tab title=”WDR at 75″][wpsm_video]https://youtu.be/U5GMxtTNm1s[/wpsm_video][/wpsm_tab]
[wpsm_tab title=”WDR at 100″][wpsm_video]https://youtu.be/nD12ePtBI34[/wpsm_video][/wpsm_tab]
[/wpsm_tabgroup]
Night Video quality
When it comes to night time video quality, the camera really shines. Thanks to its true IR cut filter, daytime colours look very good and at night the camera is super -sensitive to Infrared illumination. Because of the increased pixel count, I expected worse night-time performance than my Hikvision 3MP 2032 bullet. But I was pleasantly surprised with the very clean images produced at the default noise reduction level of 50.
I was curious to see what effect turning on WDR would have on the night time quality, especially as it seemed to be very useful during the day.
In the camera’s Backlight settings, I had noticed that WDR was off by default. And now I could see why. With WDR on at my usual starting point of 20, the brightness in the lit areas increased but in the shadows it got considerably darker. Upping the WDR to level 50 yielded negligible changes. Going from level 20 to 50, and then to 100 again showed very little change in the image brightness.
Here are the videos at WDR values of 0, 20, 50, 75 and the maximum value of 100. Make sure you view it full screen at 1440p quality.
[wpsm_tabgroup]
[wpsm_tab title=”WDR 0″][wpsm_video]https://www.youtube.com/watch?v=nKs8PhpIliY[/wpsm_video][/wpsm_tab]
[wpsm_tab title=”WDR 20″][wpsm_video]https://www.youtube.com/watch?v=z17pEx1M4KM[/wpsm_video][/wpsm_tab]
[wpsm_tab title=”WDR 50″][wpsm_video]https://www.youtube.com/watch?v=ZU6uuBNECFU[/wpsm_video][/wpsm_tab]
[wpsm_tab title=”WDR 75″][wpsm_video]https://www.youtube.com/watch?v=ESF8-6Fvn4w[/wpsm_video][/wpsm_tab]
[wpsm_tab title=”WDR 100″][wpsm_video]https://www.youtube.com/watch?v=KTa-1sfv0PU[/wpsm_video][/wpsm_tab]
[/wpsm_tabgroup]
Also strangely the sharpness of the overall image seemed to reduce whenever WDR was on at night.

So overall, I was quite disappointed by the WDR as it made the otherwise very good image quality considerably worse at any setting.
Another observation is that the on-board IR illumination provided by the mini-LEDs is predictably weak. External IR illumination is very much required if you are going to install this camera in a very dark area with no streetlights. I did experiment with the Smart Supplemental Light feature but I eventually turned it off because it made absolutely no difference at all.
Wireless Performance
Just like most wired IP cameras that also have a wireless function, the camera has two separate network interfaces for the ethenet connection and for the WiFi connection. The manual doesn’t do a very good job of explaining how to configure the WiFi, so here are the steps I took:
- Login to the web admin portal and go to Basic Settings > TCP/IP > Wlan
- If you wish to give your camera a static IP (recommended), uncheck DHCP and enter the IP address here
- Enter the subnet and gateway details.
- Now go to Advanced Settings > Wi-Fi
- Choose your wireless network from the list and select the security of your network as configured in the router.
- Enter the Wi-Fi key and hit Save
- The camera should now connect to your wireless network.
I wanted to check how good the Wi-Fi quality and range are. The camera was installed outside the front door, so it was around 20 feet from my 802.11ac capable BT HomeHub. The camera connected only at 802.11g speeds of 54 Mbps and the signal strength as reported by the camera was 70. I expected it to use the 802.11n protocol but really a max of 54 Mbps was more than enough for my 6Mbps stream.
Viewing the RTSP stream over the wired interface on VLC player for ten minutes, I observed 0 lost frames, and 0 discarded or dropped packets. For a good camera, I expect similar results over Wi-Fi. So I used VLC to connect wirelessly to the camera and pulled the RTSP stream again. I was happy to see no frames were lost, and no packets were dropped or discarded over a 10 minute stream.
So the wireless works well, but your mileage may vary depending on the distance of the camera from your router, the number of walls between them, and the ability of your router to handle multiple wireless clients.
Audio Performance
By default, the audio feature is disabled in the camera settings. To turn it on, go to Configuration > Video/Audio > Video. Then for the main stream and sub-stream, change the video type to “Video & Audio”. If you do not do this and try to access the audio in the Live View screen, you will get a rather unhelpful “Audio On Failed” error.
I tested the built-in mic of the camera and found it to be quite sensitive. Turning on the “Environmental Noise Filter” under Configuration > Video/Audio > Audio reduces the ambient white noise which microphones are very good at picking up.
If you add a speaker using the audio output connection of the camera, you can have 2-way conversations. If I am nitpicking, I did note the lack of an audio detection alerts that Amcrest cameras have. Still, in my state it is illegal to record audio in a public place, so I don’t need this feature. All in all, I am very satisfied with the audio capabilities of this camera.
Motion Detection Alerts
One of my favourite features with the Hikvision cameras is the degree of control you have over the motion detection alerts. Many cameras have very simple motion detection where the most control you have is the parts of the scene that can trigger an alert and the sensitivity to the changes in those areas. Let’s face it, software based motion detection is not great on most cameras simply because any and every change in light levels, clouds, or wind can cause a ‘change’ in the scene and trigger tons of false alerts.
Short of going with external PIR motion detectors, the only real alternative is smarter motion detection algorithms or events. This is where Hikvision IP cameras shine. I almost exclusively use the Line Detection and Intrusion detection events to generate email alerts with snapshots of the images. This vastly reduces the number of false alerts and I would highly recommend trying them instead of the simple motion detection event.
Verdict
The DS-2CD2542FWD-IWS is a very capable IP camera with excellent image quality both during the daytime and at night. The Wi-Fi works well and can help you install the camera where you may not be able to route an ethernet cable. The advanced motion detectiom alerts are very useful and reduce the number of false alerts.
However I was disappointed with the night time WDR performance. It is simply unacceptable that the image quality should degrade to such a degree. However daytime WDR works well and you can turn on WDR just for the daytime. This workaround overcomes the problem but you will lose the auto-switch between day and night feature. I suspect the WDR issue can be fixed through a firmware update, but until then it stops it from being the best it could be.
[review]
Where to buy
Individuals like you and me are not Hikvision’s target market and so they are not widely sold at retail stores. One method is to source them from Amazon which is my preferred route for cost reasons. But note that unless you buy from an authorized reseller, Hikvision will not honour the warranty. At the time of publishing this article, Hikvision doesn’t publish a list of authorized resellers, only that of distributors (who typically will not sell to the public). So the only way to ensure you are getting the genuine article with a warranty that will be honoured by Hikvision is by doing your own research.
[easyazon_link identifier=”B017DB3CZ8″ locale=”US” tag=”vueville.com-ref-20″]Check your local Amazon site[/easyazon_link]
Leave a Reply