Are you wondering how to make your DIY home security camera system and your smart home hub talk to each other? Getting these two important parts of your smart home to communicate effectively is the secret to a truly smart home. So in this article, I am going to show you how I achieved this:
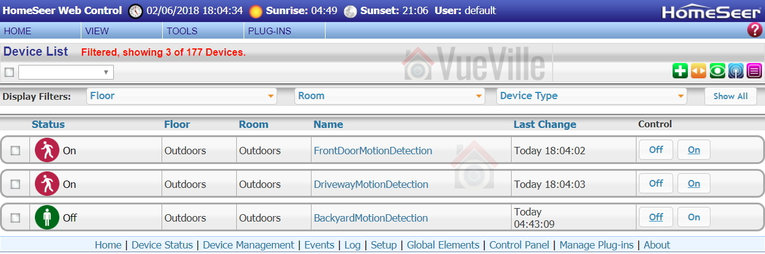
HomeSeer3 interface showing one virtual motion detector device per IP camera
I first started off building my DIY home security camera system. Later on I added a smart home hub to create my DIY home automation system. But there was a problem – the two systems didn’t talk to each other and were oblivious of what the other half was up to. Not a very smart home, then!
There are several things I can now do thanks to the left hand knowing what the right is up to:
Surveillance Station -> HomeSeer HS3
Whenever motion is detected, certain lights turn on at that camera location.
Whenever motion is detected, tablet devices activate and switch to the camera view until the motion stops.
Whenever motion is detected, my smart home hub sends me email snapshots of all the cameras (not just the one that detected motion).
HomeSeer HS3 -> Surveillance Station
Whenever motion is detected by external PIR sensors, my smart home hub can ask my NVR to start recording the camera in that area.
When the doorbell is pushed, Surveillance Station will start recording the front door camera.
When the Neo Coolcam Door/Window sensor attached to my mailbox detects new mail, Surveillance Station will start recording the front door camera.
I can sync the cameras to my house mode. So I can arm the cameras at night or when I am away so that I get notifications only when I am not at home. Throw in geo-fencing and you have a super-smart autonomous CCTV system!
In this guide, I am going to focus on how to get Surveillance Station to talk to HS3. We will look at the reverse process in a later blog post.
What’s the basic principle?
My DIY home security camera system consits of Hikvision and Reolink cameras connected to a QNAP TS-253A NAS that acts as an NVR. This is possible due to the Surveillance Station app on the QNAP that includes 4 free IP camera license with no restrictions, or 8 camera licenses with 14 days recordings (QVR Pro).
My home automation system is controlled by HomeSeer HS3 software running on a fanless low-power Acer notebook. HS3 can accept messages (http requests or more accurately json packets) which can be used to control any and all aspects of HS3. HS3 can also send these http requests to any network device (I use this feature for my smart mailbox and smart front door motion detection).
Thankfully, QNAP Surveillance Pro is also able to send and receive http requests!
So whenever Surveillance Station detects motion, it can send an http request to HS3 and change the status of a timed on/off virtual device. The change in status of this virtual device can then be used to trigger HomeSeer events. I love virtual devices for this very reason, they are so versatile!
How does the QNAP Surveillance Station motion detection work?
When you add a camera and turn on motion detection alerts, the NAS will login to your cameras and attempt to set up motion detection rules in the camera software. Then when the camera sends an alert according to the rules defined by the NAS, Surveillance Station will receive them and then respond accordingly (trigger the cirtual device on HomeSeer3, start recording, put an event marker on the timeline, send email snapshot, send an SMS alert etc.).
So the key takeaway here is that the QNAP NAS actually doesn’t do any motion detection, it relies on the camera to do it. So you wont find any configuration options for those rules in your NAS – you will find it in your camera settings. This is a smart method because your camera will usually have more advanced motion detection methods such as line detection, intrusion detection, PIR motion sensors etc to which the NAS can theoretically respond. I say theoretically because there is a downside – the NAS’s ability to respond to those alerts depends on how well QNAP supports your specific camera make and model. For example with my Hikvision cameras, the NAS will not respond to any motion detection alert other than the basic motion detection one. So it ignores the line detection and intrusion detection alerts that I love because they cut down false alerts massively.
The up side is that the NAS NVR doesn’t have to analyse the video streams to perform motion detection, as the camera does this for the NAS. This also keeps power consumption and heat levels down.
Step-by-step process
Here;s a summary of the 3 step process for connecting QNAP Surveillance Station to the HomeSeer HS3:
Set up HomeSeer3 virtual devices and events
Set up QNAP Surveillance Station
Adjust motion detection settings in your camera
STEP 1: Set up HomeSeer3 virtual devices and events
A virtual device is a device you create in HomeSeer3 instead of it being created by a physical Z-Wave device like a sensor. Virtual devices can have multiple states or multiple values set, so you could create an on/off toggle switch, a multi-state switch (like low/medium/high), a dimmer, or even a slider.
We will create one virtual device for each of your security cameras that you want to use as a motion detection trigger.
First, login to your HomeSeer3 web page and click the ‘Add Device’ button on the right (green plus button).
Click to enlarge
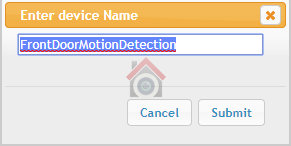
Then enter a device name. I have chosen ‘FrontDoorMotionDetection’ which will be switched to ON by my QNAP NAS whenever the front door camera detects motion.
In the Configuration tab, assign a floor and a room.
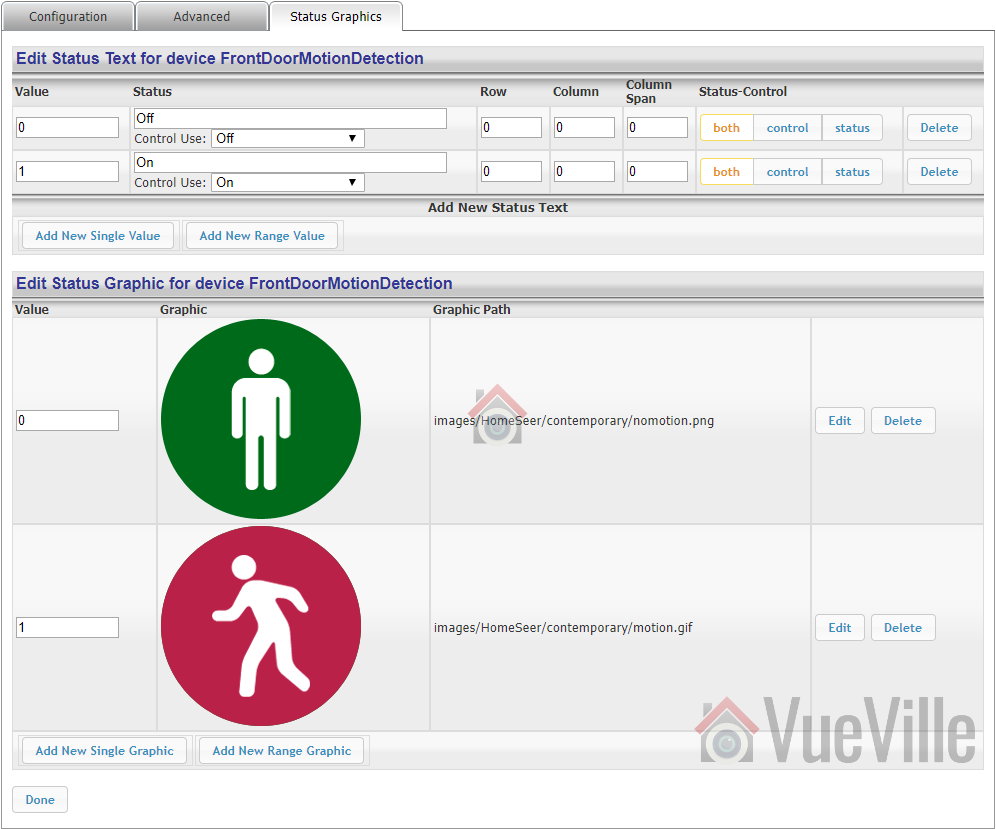
Click on the Status Graphics tab, and edit the Status Text and Status Graphics to match the screenshot below.
Click to enlarge
Click Done to complete setting up the virtual device. Repeat the process for each of your IP cameras.
Now in order to be of any use, the motion detection virtual switch should function like a toggle switch with a time delay. When it is triggered to the on position, it should return to the off position after say 1 minute. We can achieve this by creating an event to reset the virtual switch to off 1 minute after motion is detected:
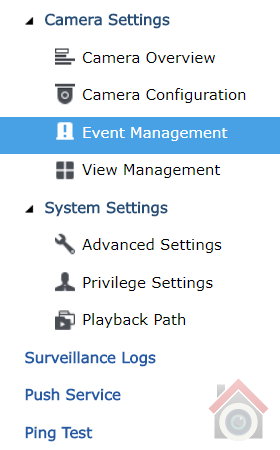
On the left-hand-side navigation menu, go to Camera Settings > Event Management.
The default mode for managing events is ‘Traditional Mode’. Switch to Advanced Mode. Advanced mode lets you create multiple actions whereas the ‘Traditional Mode’ lets you set up only a single action. You will want to create multiple events because whenever a camera detects motion, not only do you want to trigger the corresponding HS3 virtual device but presumably also start recording that camera.
Before you proceed, click Apply and then restart your NAS. I know it sounds weird but without doing this, the changes won’t stick. I don’t know what the QNAP developers were smoking when they thought this was a great workflow.
After restarting, Navigate back to Camera Settings > Event Management in Surveillance Station.
The action we want to set up is the one that triggers the FrontDoorMotionDetection HS3 virtual device we created earlier. Select the ‘Motion Detection’ menu item under your camera name. My front door camera is named ‘FrontDoor’ as can be seen in the screenshot below.
Now click the ‘Add’ button to add a new action. Under Action Type, change the default selection of ‘Recording’ to ‘User-defined Action’.
Click to enlarge
Edit the fields to the values below:
Action Name: You can call it whatever you want, I used ‘TriggerFrontDoorMDVS’, where MDVS is short for Motion Detection Virtual Switch.
IP Address: This is the IP Address of your HS3 device.
Port: The default is 80 and will work unless you have changed the HS3 web server port.
HTTP URL: This is the bit where the magic happens. For HS3, the format of the URL required to change the state of the virtual switch we created earlier is
You can find the Reference ID of your virtual switch under the ‘Advanced’ tab of the device page in HS3.
Click to enlarge
My virtual device’s code is 236, so to change the state of the virtual switch to ON is “/JSON?request=controldevicebyvalue&ref=236&value=1” without the quotes.
User name: Type in blank
Password: Type in blank
This is what it looks like for my action:
Click to enlarge
Now click Apply and then the blue Apply button again at the bottom of the screen. When it has saved the action, exit Surveillance Station and restart your NAS.
You may also want to set up a recording action and a ‘send email snapshot notification’ action. You can see I have done this in the screenshot below. Remember: do not switch between Traditional and Advanced mode and if you do you have to click Apply and restart your NAS for the change to take effect.
Click to enlarge
Now set off the motion detection of your camera and check the status of your virtual switch in HS3. If you have followed the steps above, you should see the virtual switch turning to the On position. Here’s what it looks like on my HS3 front-end:
STEP 3: Adjust motion detection settings in your camera
QNAP Surveillance Station can detect only the basic motion detection events of most IP cameras, including my Hikvision cameras. So its vital that you adjust the motion detection settings to reduce the number of false alerts you get. Trust me, you are going to get false alerts, its only a question of minimizing them.
Wrapping Up
That wasn’t too hard, was it? And just like that, HS3 can now monitor your camera’s software-based motion detection. Couple this with outdoor PIR sensors like the Everspring Outdoor PIR motion sensor and that’s the most reliable low-cost motion detection system you are going to get. In a future post, I will show how you can achieve the reverse: make QNAP Surveillance Station record whenever HomeSeer HS3 detects motion!
If this guide has helped you, please leave a comment below. I would love to know how are you using these sort of interfaces in your smart home.
Got a Hikvision camera because you have heard of its legendary motion detection features? Looking for a quick and easy guide to set it up? You are in the right place – here’s the VueVille tutorial on Hikvision motion detection setup.
In this tutorial, I assume you are using your Hikvision camera in standalone mode (using a microSD card) or with a NAS as the NVR.
If you are using a dedicated NVR from Hikvision, the setup should be done on the NVR, not from the camera’s web interface. The steps are very similar to this tutorial.
If you are using [easyazon_link identifier=”B00CE1F3NM” locale=”US” tag=”vueville.com-eaz-20″]BlueIris[/easyazon_link] or similar NVR software running on a PC, you can either follow the below steps on each Hikvision camera OR make BlueIris do motion detection. The cameras can send the basic ONVIF motion detection event to any ONVIF-compliant NVR.
Hikvision has separated motion detection recording into two halves – 1) events, and 2) actions triggered by those events. You activate and configure the events first, and then setup the actions the camera should take including recording.
Hikvision motion detection is very powerful and extremely customizable. That’s why they are great cameras for reducing false alerts due to shadows, clouds, insects, bugs, flies etc.
To cater to both beginners and advanced users, Hikvision have categorized motion detection as follows in most of their IP camera models:
Basic Event
Motion Detection
Normal Mode
Expert Mode
Smart Event (or advanced events)
Intrusion Detection
Line Crossing Detection
The above events become active only when you tick the ‘Enable’ checkbox at the top of each event’s page and configure them by setting at least the sensitivity.
The basic event is what most people have in mind when they think of motion detection. Here the camera uses software methods to compare video frames and thus detect motion. The smart or advanced events also compare frames but check whether certain virtual boundaries like a line, tripwire or area has been breached in addition to various conditions like direction of motion and dwell time.
Hikvision cameras that are equipped with a PIR motion sensor have true motion detection abilities and will fall under the basic event category.
In this tutorial we will look at setting up a basic motion detection event.
Hikvision Motion Detection – Basic Event
Login to your camera admin page and navigate to Configuration > Event > Basic Event. I will be using my DS-2CD2542FWD-IWS for this tutorial, but depending on your firmware and camera model the menus may be slightly different.
Enable Dynamic Analysis for Motion
If you want the recorded video to show the areas that triggered the motion detection event, tick this checkbox. I do not use this feature as it is fairly pointless.
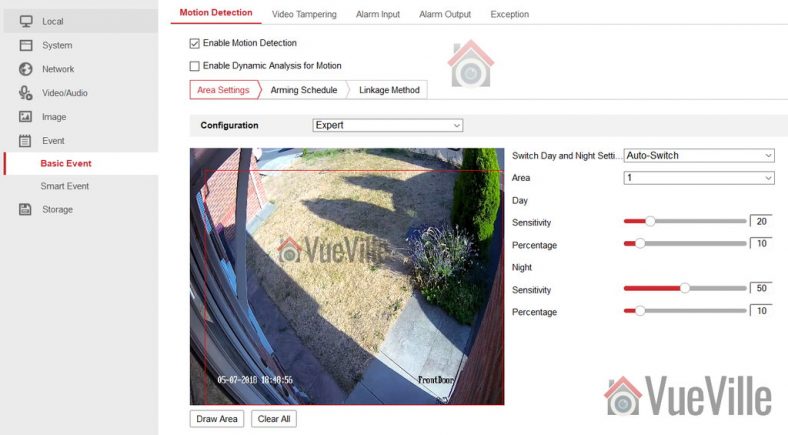
STEP 1: Area Settings Tab
Within the basic event under the ‘Area Settings’ tab, you have a normal mode and expert mode. In both normal mode and expert modes, you can draw an ‘area’ or motion detection zone that the camera should monitor.
In normal mode the only other setting you can adjust is a simple sensitivity percentage slider. This controls the threshold of differences between subsequent video frames which triggers a motion detection event and subsequent alert.
In expert mode, you are able to control sensitivity settings separately for daytime and night-time. You can also draw more than one area – my camera supports up to 8 distinct areas. Furthermore, you can either let the camera automatically switch between day and night according to light levels or create a schedule for daytime and night time. You can also define how large an object has to be for it to trigger a motion detection event. These are all great features and if you do not want to use the advanced methods (line crossing & intrusion detection) I strongly recommend using the expert mode of basic motion detection.
If you are using a 3rd party NVR or a NAS NVR such as QNAP or Synology, the only motion detection method you can use will be the basic events. I use a QNAP TS-253A NAS and the QNAP Surveillance Station app to integrate my security cameras with HomeSeer3. So I am forced to use the basic motion detection events only. You can see my settings above which minimize the number of false alerts massively.
Don’t forget to press the Save button before moving to the next step.
Hikvision Motion Detection Sensitivity
In my experience, you need a lower sensitivity percentage setting during the day time. I suggest 20% as a starting point. For night-time, increase the sensitivity so that movement in the shadows is not missed. I suggest 50% as a starting point for the night setting.
Hikvision Motion Detection Percentage
As I mentioned earlier, what Hikvision calls the ‘percentage’ setting actually means ‘how big should the object be to trigger the motion detection event’. It is calculated as the area covered by the object in the video frame divided by the total area of the video frame. This is why it is expressed as a % from 0 to 100, and also why Hikvision rather calls this setting ‘percentage’.
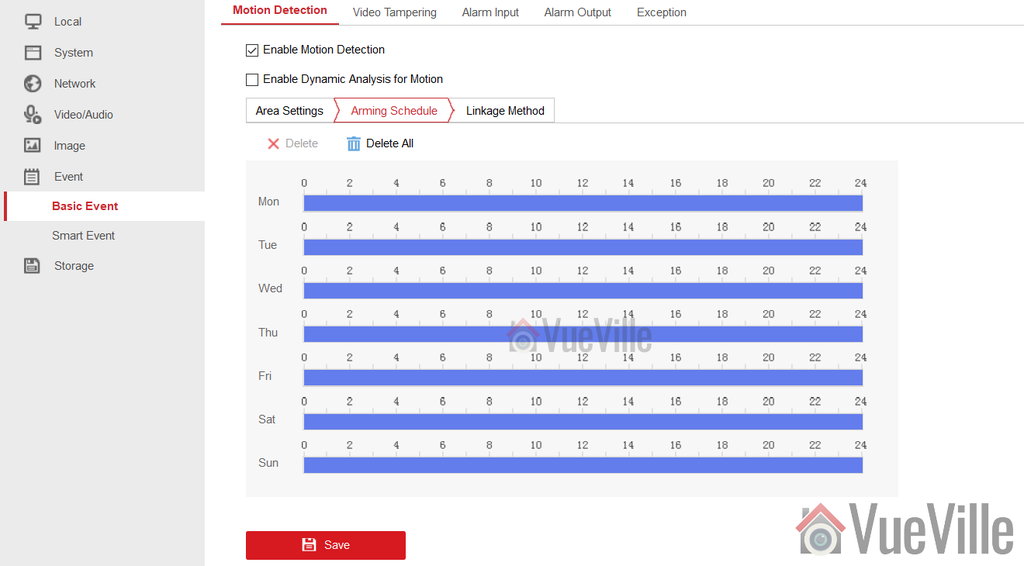
STEP 2: Arming Schedule
When you save the settings in step 1, the arming schedule should be automatically created for you. You can set it to be ‘armed’ during particular times of the day or night if you wish.
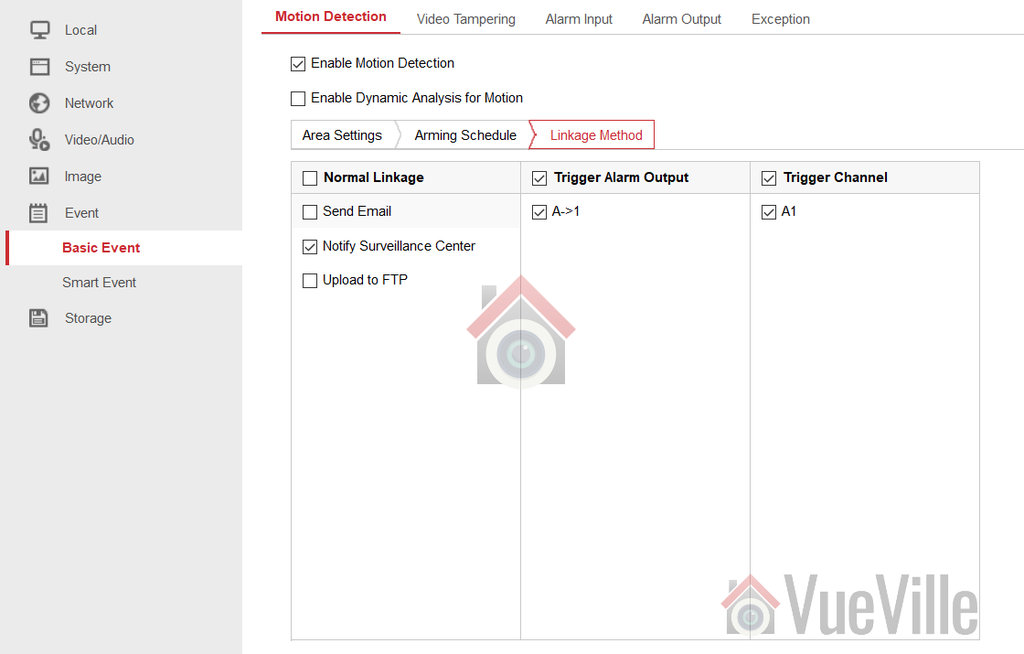
STEP 3: Linkage Method
This is where you can activate email alerts, and other actions such as uploading to FTP or triggering an external alarm if you have connected one to the camera. Hit Save when you are done and the basic motion detection event is now active.
Smart Motion Detection Events
You can have both basic and smart motion detection events active at the same time. My post on how to reduce false alerts using these advanced smart methods such as line crossing will show you how to set this up.
Picking a hidden camera is not easy, is it? There are a ton of brands and models to choose from and no easy way to tell them apart. So we created a quick and easy guide to help you choose the best hidden camera for your needs in 2024!
Please note that our hidden camera recommendations below are only for the purpose of complementing your existing CCTV camera setup, and not for illegal or unethical purposes.
While visible CCTV cameras are a great deterrent for the outside of your home, you may want discreet hidden cameras inside your home to capture the identities of burglars should the worst happen. Strategically placing hidden cameras outside your home to cover the visible security cameras is also a great idea in case burglars attack the more prominent cameras first.
A quick note: As an Amazon Associate I earn from qualifying purchases. This post contains affiliate link(s). An affiliate link means I may earn advertising or referral fees if you make a purchase through my link, at no extra cost to you.
Best Hidden Wireless Cameras with PIR Motion Detection and Night Vision
These cameras are great multi-purpose hidden cameras and can also be used as nanny spy cameras or in nursing homes.
The hidden camera market is filled with hundreds of products from dubious sounding Chinese manufacturers. So its useful to look for something that has been sold for quite some time and has lots of good reviews.
This is one such device – a 1080p digital video camera hidden inside a functional desk clock. It tells the time in a blue font and does a very good job of looking like an ordinary desk clock. Very close inspection can reveal the lens located to the right of the display, but only if you know where to look.
This hidden camera has a ton of features. Load it up with a microSD card and it can record video clips onto it. If the card gets full, it will over-write the oldest clips. Clips can either be recorded 24/7 (loop recording) or whenever the camera detects motion. There is a PIR sensor, so motion detection is accurate and you won’t get lots of useless clips recorded where nothing’s happening.
Night vision is standard with the built-in Infrared LEDs. Since this spy camera has Wi-Fi, you can connect to this camera anytime from anywhere and live-stream or access recorded clips. The mobile app is called HD Live Cam app. You can also add multiple cameras to the app and view them simultaneously like with an NVR! Pretty neat. The app can also send push notifications in real-time using P2P.
Power is provided through a standard 5V USB port, but there is a generously sized 3000 mAh battery that can provide backup power for up to 8 hours. But I suggest keeping it plugged in as much as possible.
What are the down-sides of this camera? There is no RTSP or ONVIF support, so you wont be able to connect it to an NVR, Blue Iris, Synology or QNAP NAS Surveillance Station.
[easyazon_link identifier=”B07GLTW936″ locale=”US” tag=”vueville.com-eaz-20″]Check Price on Amazon[/easyazon_link]
This is a very small 4K digital video camera that makes no effort to hide its true nature. The camera is a cube type with a prominent lens on one side. This is a camera that you will need to well and truly hide!
But what you get in return is a stupendous 160° wide-angle lens and 16 feet of true night vision range.
There’s no wireless connection on offer here, so the only way you can record and view clips is using an SD card. It is designed for quick deployment as evidence by the two dedicated buttons for activation loop recording or motion detection.
This impressive camera packs in not just Infrared LEDs for night vision, but also a PIR sensor for true heat-based motion detection.
Power is as usual provided through a standard 5V USB port, but there is also a large 3000 mAh battery on board giving 18 hours of operation time.
Since there is no wireless connection or Ethernet port on this camera, there is no mobile app, RTSP, or ONVIF support here. This camera is purpose-built for hiding inside an object and then being left alone to do its thing.
[easyazon_link identifier=”B086ZR7CGW” locale=”US” tag=”vueville.com-eaz-20″]Check Price on Amazon[/easyazon_link]
This hidden camera is the tiniest one we have found so far. The compact size doesn’t mean the camera compromises on quality as it sports a 1080p sensor and Wi-Fi! You also get motion detection or continuous recording that overwrites older clips when the microSD card gets full (loop recording).
Using the optional Wi-Fi connection, you can remote view this camera from anywhere in the world!
[easyazon_link identifier=”B09G6SJ64T” locale=”US” tag=”vueville.com-eaz-20″]Check Price on Amazon[/easyazon_link]
If you want to avoid physically accessing your hidden camera once it has been installed and there is no Wi-Fi available at the installation point, get this camera with Wi-Fi hotspot function.
You can use the camera in three ways:
Connect to the camera’s built-in hotspot to view recorded clips
Connect the camera to your Wi-Fi router (if available)
Record clips to an SD card
[easyazon_link identifier=”B09B7R361S” locale=”US” tag=”vueville.com-eaz-20″]Check Price on Amazon[/easyazon_link]
Best Hidden Cameras with Bluetooth
Best Hidden Camera with Bluetooth Speaker, Clock and FM Radio
Its not easy to find a multi-purpose hidden camera that can also do double duty as your FM radio. This 3 inch cube is a mini marvel packing in an invisible camera, night vision, a Bluetooth speaker, digital clock and FM radio. It supports loop recording and motion detection. The camera is AC powered but includes a rechargeable battery for when the power goes down. You can disable the digital clock.
Want a Bluetooth speaker with a hidden camera? Throw in a digital alarm clock & FM radio too! It even has Wi-Fi support and a mobile app for live remote viewing. Great idea and great execution in this product which has a virtually invisible camera hidden inside a fully functioning Bluetooth speaker.
[easyazon_link identifier=”B083SQSDVQ” locale=”US” tag=”vueville.com-eaz-20″]Check Price on Amazon[/easyazon_link]
The camera in this picture frame is designed for remaining hidden for extended periods of time thanks to its massive 10,000 mAh battery and low power requirements. This camera has a 1 year standby period when fully charged and in PIR motion detection mode!
Unusually this camera has Wi-Fi capability and a mobile app. So whenever motion is detected, it immediately sends a push notification to the mobile app. You can then view a live-stream of what the camera sees, from anywhere in the world.
The camera also has infrared LEDs and true night vision with a range of 5-8 metres.
[easyazon_link identifier=”B07ZH6TSJG” locale=”US” tag=”vueville.com-eaz-20″]Check Price on Amazon[/easyazon_link]
We reviewed the original Argus outdoor camera and really liked its design, features and impressive performance. The successor Argus 2 swapped out the CR123A batteries for a rechargeable Samsung battery back with a humongous 5200 mAh capacity. Now the Argus 3 is here with an even bigger 6000 mAh battery, colour night vision with built-in white LED, and smart detection of persons and vehicles.
The camera has a very good 122 degree field of view and a 1/3″ CMOS sensor. These specs set the Argus 3 Pro on a different level compared to most other portable cameras on the market. PIR based motion detection is very good even at night-time, but you also have person and vehicle motion detection available. 2-way audio is supported with the built-in speaker and microphone. Of course, this is a outdoor camera and so is IP65 rated.
Setting up the camera is a doddle and Wi-Fi support means that you can live-stream as well as access recorded clips remotely through the mobile app.
[easyazon_link identifier=”B08S6MMK9F” locale=”US” tag=”vueville.com-eaz-bnvr17-20″]Check Price on Amazon[/easyazon_link]
What if you need to install a hidden camera that has to be 100% self-sufficient and cannot be connected to Wi-Fi? That’s where the new Reolink Go Plus is the best choice. This battery powered waterproof camera has a 4G LTE radio that lets it work anywhere there is an LTE signal. It also supports 3G and WCDMA across Europe, America and Australia.
It shares most of its hardware features with the Reolink Argus 2, but has a beefier 7800 mAh battery to power its cellular radios. The battery should last 2 months or 500 minutes of live-view or PIR motion recording.
[easyazon_link identifier=”B098DWWXLQ” locale=”US” tag=”vueville.com-eaz-bnvr17-20″]Check Price on Amazon[/easyazon_link]
Perhaps the most important factor in choosing a hidden camera is its size. This depends on whether you want to hide the camera or leave it in plain sight because it is already disguised as an everyday object. The larger models tend to have more features.
Video resolution
You should look for 1080p or 2 Megapixel resolution but 720p may be acceptable if your target scene is not too far away from the camera.
SD Card recording
Virtually all hidden cameras have this feature. Just pop in a microSD card and the camera will record video and audio clips to it. Cameras usually let you choose between recording motion detection clips or continuous recording by overwriting old clips (called loop recording).
Motion-activated recording
This is a great feature which conserves both storage space on your SD card and battery life. PIR based motion detection is preferable because it leads to fewer false alerts/recordings than software based detection.
24/7 Recording
Also called loop recording, most hidden cameras can overwrite older clips when the SD card gets full. So the camera will never run out of storage space. The downside is you will have to access the camera frequently to copy off clips before they get overwritten.
Night vision
Infrared LEDs are used to provide true night vision. This is an essential feature that most hidden cameras have. What varies a lot is the range of the LEDs and how bright they get.
Audio support
Note that in some countries it is illegal to record audio without permission and so you may find cameras compliant with local law will not record audio. Make sure you do not break any local laws or regulations while using hidden cameras.
Battery life
Obviously, the larger the battery energy storage capacity expressed in mAh (milli Amp-hour), the longer it is going to last. Motion detection mode has lower power consumption than continuous recording. Disabling night vision will also lengthen battery life.
AC power support
However good the battery is, your hidden camera is not going to last forever. More so if you are placing it outside your home or in the garden where battery life will be negatively affected by low temperatures. That’s why its great if the camera can run on AC power and charge its battery while operating.
Wireless/Wi-Fi/Bluetooth
If you want to live-stream the camera video, you need to get a camera with Wi-Fi support. Bluetooth is usually used only for connecting a smartphone to a camera that has a bluetooth speaker, not to live stream or access recorded clips.
Live Streaming
This is a very useful feature whereby you can view the camera video feed in real time. While setting up the camera, its good to see what the camera is aimed at. If you want to remotely access the camera video feed, once again look for this feature.
Weather-proofing
If your camera is going to spend any time outside the home, make sure it is rated for weather and rain. IP65 is my preferred rating but anything better is great.
Conclusion
There is a hidden camera for every situation under the sun. We hope this guide has been useful in selecting your hidden camera. Let us know what you think – what or who have you caught using your hidden cameras?
Gun crime, shootings, murders, assault… it may seem that the whole country is sinking in crime these days. But that’s not the case and there are still beautiful and safe places that you can choose to live in. How do we know? Because we did the math.
We wanted to find out for ourselves how safe or dangerous each state in the US is. So we crunched the latest data available to paint a complete picture of crime in America. To ensure a comprehensive ranking that covers all aspects of serious crime as defined by the FBI, we looked at statistics for homicide, murder, manslaughter, sexual assault, robbery, aggravated assault, burglary, and motor vehicle crime.
Here’s a visual, easy-to-read and up-to-date crime heat map of America. More pretty infographics and tables can also be found below.
New Hampshire is the safest state in the US overall, coming in 3rd for least violent crime, and 1st for least property crime.
However, New Hampshire has a surprisingly poor ranking of just 32 for rapes.
Ohio best represents the average crime rate (2898 per 100,000 people).
New Mexico is the most unsafe state in the US, coming in second-last for violent crime and last for property crime. Only Alaska beat New Mexico in violent crime.
New Mexico also tops the charts for both burglary and vehicle crime.
Louisiana has the highest murder rate, whereas New Hampshire has the lowest.
Alaska is the most unsafe state for women, whereas New Jersey is the safest for women.
Alaska tops the charts once again for aggravated assault, whereas Maine is the least violent.
Robberies are 21 times more frequent in Nevada than Wyoming which has the lowest robberies per capita (per person).
Safest States to live in – Ranking
Please note that the overall ranking is based on the total number of crimes per capita (per person). So for example New Hampshire might have worse violent crime than Maine, but overall the crime rate per capita is still lower than that of Maine’s.
[table id=49 responsive=scroll /]
Violent Crime
Violent crime includes, murder, crimes against women, robbery and aggravated assault.
Murder
Crimes against Women (Rape)
Robbery
Aggravated Assault
Property Crime
Property crime includes burglary/theft and motor vehicle thefts.
In the info-graphics above, we combined burglary and larceny-theft together under the single heading of burglary/theft as they are very similar.
Conclusion
Crime rates vary wildly across the country as our analysis shows above. But armed with the facts, you can make an informed choice about how to best protect yourself and your family.
Whether you are living in one of the top or bottom-ranked states, its always good to take proper security measures such as a burglar alarm and security camera system.
As you pull into your drive after a long day at work, the porch lights turn on. You unlock the smart lock with a code and open the door. Immediately the lights turn on softly and your smart speaker starts playing your unwind playlist. Sounds good, right? This is what you can do with a modern smart home.
Notice that key point where you open the door and your home comes to life? That right there is possible thanks to door/window sensors. The Neo Coolcam Z-Wave Plus Door/Window wireless sensor is one such device. We have been extensively testing this Z-Wave sensor for the past 6 months in our smart home and our hands-on review will tell you whether its worth your money.
Of course you should not use these door/window sensors for the alarm system. That requires a dedicated alarm panel from the likes of DSC or GE for home security.
A quick note: As an Amazon Associate I earn from qualifying purchases. This post contains affiliate link(s). An affiliate link means I may earn advertising or referral fees if you make a purchase through my link, at no extra cost to you.
What else do you need to use this door sensor?
This is not a standalone device. It is intended to work as part of a Z-Wave based smart home.
So you need a Z-Wave controller such as a Vera Plus or HomeSeer HomeTroller Sel that acts as the smart hub to use this sensor. This is the right way of building a smart home that you can upgrade and enhance as you wish, instead of getting stuck with things that work only with the manufacturer’s other devices or an internet-reliant smart speaker like Alexa.
Unboxing
The Neo Coolcam Door/Window sensor comes in a smart package with a modern design. The Z-Wave Plus logo is prominently featured at the top left.
The back of the box lists the main specifications of the sensor.
Strangely enough, while the box claims the battery life is a highly improbable 2 years, the manual inside claims its only 1 year. Which is it Neo?
Also the standby current of 1uA listed in the manual is half that printed on the box. Doesn’t bother me too much though as long as it lasts at least a year.
Notably absent is tamper detection which would have been a great addition to make this sensor unbeatable when it comes to features.
Opening the box, we find the following:
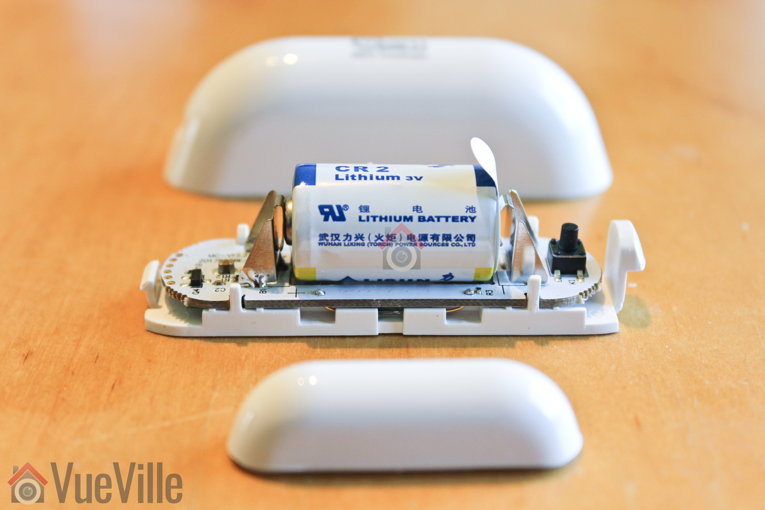
Door/window sensor main body with 1xCR2-3V battery pre-installed
Magnetic counterpart of the sensor
User manual
Screws and rawl plugs
3M stickers
Neo Coolcam Door Sensor Manual
The included user manual is high-quality and unusually for Chinese products, has good quality English. Here’s a link in case you want to check it out before buying.
Specifications
[table id=46 responsive=scroll /]
Design & Features
The Neo Coolcam Door/Window sensor is an all plastic affair and is made of two halves – the main body and the magnetic half. As you can see in our photos below, the sensor has a glossy plastic finish that looks quite good.
When the sensor is activated, a red LED will glow next to the Coolcam logo.
Here’s what the back of the main body looks like. The two holes are for screws to pass through in case you want to fix it permanently to a surface.
Depressing the tab at the bottom releases the back cover of the main body. You will need to apply a significant amount of pressure to pop it open. An unbranded CR2 battery is pre-installed in the sensor which is a nice touch.
The black ‘code’ button is also found here. This button has a few different functions: waking up the sensor so that you can configure it, putting the sensor in inclusion/exclusion mode and for restoring factory defaults.
Installation
I found the whole Z-Wave inclusion or pairing process easy and pretty straight-forward.
Its always best to perform a factory default on a new Z-Wave device before including it in your Z-Wave network. I have found that this one step usually solves any problem I am having with including a new Z-Wave device.
So these are the steps I took to set up the sensor:
I removed the back cover of the sensor’s main body.
I pulled the paper tab to turn on the device as the battery comes pre-installed.
I put HomeSeer into inclusion mode.
I pressed the code button on the Coolcam sensor thrice very quickly (it needs three presses within 1.5 seconds).
The red LED flashed 5 times.
After a few seconds, HomeSeer reported that the sensor had been successfully included and the child devices had been created.
This is what the HomeSeer interface looks like for the Neo Coolcam door window sensor. Note the main device and the 3 child devices:
The first device is the parent device and the one where you configure settings such as the parameters we discussed earlier. The second device is the battery status. The third device called “Access Control Notification” is the main device that I use for monitoring the sensor and has two states – Closed or Open.
You would think for a HomeSeer smart hub setup, the last device called “Sensor Binary Door_Window” is the main device to be used for scenes but I don’t think so. The reason is that this last device is a bit unreliable and sometimes ‘sticks’. But the “Access Control Notification” device is 100% reliable and so I use that in my smart mailbox events.
Configuration Parameters
There’s no need to change any Z-Wave parameters, but if you need to the following are configurable:
[table id=48 responsive=scroll /]
Performance
There are 4 main criteria that define how good a wireless door/window sensor is:
Response time
Reliability
Z-Wave wireless range
Battery life
So I tested the Coolcam sensor extensively for over a month now and as the photo above shows, it is now doing permanent duty as my mailbox open/close sensor.
Response time: Excellent
How quickly does the sensor send the ‘open’ or ‘close’ status change to the smart hub? You do not want a delay at all. I was very pleased to see that the Coolcam sensor’s response was instantaneous with no discernible delay in my Z-Wave smart hub interface whenever the sensor changed states.
Reliability: Excellent
Does the sensor miss open or close actions, especially when they happen very quickly? In my weeks of testing, it never skipped a beat. Every open and close action was faithfully captured and transmitted to the Z-Wave smart hub. No actions were missed.
Z-Wave wireless range: Very good
Since Z-Wave is a mesh network technology, the strength of your Z-Wave network at the point of installation depends on proximity to the smart hub or a repeater device.
All AC powered Z-Wave devices act as repeaters and we have a generous number of Greenwave Powernodes scattered around the house.
So it was no surprise to see that the Coolcam sensor was working perfectly even at the farthest ends of our house.
Battery life: Excellent so far, testing underway
The Coolcam sensor reports it battery status and after a month of extensive use, the battery status is still at a 100%. This is not unusual as Z-Wave devices often report a battery life change only at defined thresholds of 5%.
Verdict
The Neo Coolcam Z-Wave Plus Door/Window sensor is a very reasonably priced sensor that delivers. We are impressed to see such good performance and reliability from a relatively unknown brand.
We are currently reviewing the rest of the Coolcam product range, so stay tuned for more hands-on reviews!
Netgear has now released an updated version of the Arlo Pro, the Arlo Pro 2. Is it worth paying a bit more to get the new model, or will the older model suffice?
We strongly recommend the [easyazon_link identifier=”B077S1YBXS” locale=”US” tag=”vueville.com-eaz-20″]Arlo Pro 2[/easyazon_link] over the Arlo Pro because it has:
higher 1080p resolution,
more accurate PIR based motion detection and
pre-recording for zero-lag motion triggered recording.
Read on for an in-depth comparison of these two high-end Arlo models.
A quick note: As an Amazon Associate I earn from qualifying purchases. This post contains affiliate link(s). An affiliate link means I may earn advertising or referral fees if you make a purchase through my link, at no extra cost to you.
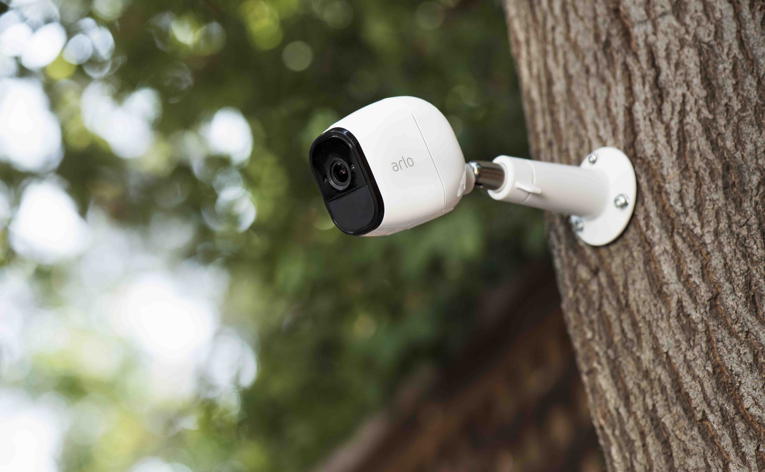
The Arlo Wire-free
Often the most visible elements of a smart home, security cameras are also one of the most difficult to choose and set up. For the longest time, security cameras were not considered mainstream enough by large consumer electronics companies. Very capable cameras were available but setting them up proved too daunting a task for many a DIY amateur.
The Netgear Arlo changed all that. Netgear shook up the home security world with the battery powered 720p Arlo wire-free or as Netgear now calls it, just Arlo. It was soon followed up with the Arlo Pro which had 2-way audio support and optional AC power. The Arlo range of cameras are not standalone devices, they require the base station to function. The Arlo Q family does not need the base station and will connect directly to your router.
We are not the biggest fans of using only battery powered cameras, but as part of a well-planned security camera strategy, battery powered cameras can be invaluable.
Arlo Pro 2 vs. Arlo Pro – Comparison Table
[table id=52 responsive=flip /]
Video quality
This is perhaps the biggest difference between the two. The new Pro 2 model has a Full HD 1080p sensor that is significantly better than the 720p sensor of the Arlo Pro. This alone is reason enough in my mind to go for the Arlo Pro 2 instead of the Pro.
The encoding format is the same for both, H.264 instead of the newer and more efficient H.265 that you tend to find in cameras such as the newer models from Dahua and Hikvision.
Both cameras also feature auto-adaptive white/black balance and exposure adjustment.
Audio Quality
Both models support 2-way audio with a built-in mic and speaker. But here’s the rub: they are half-duplex only, meaning they are like walkie-talkies. Only one person is allowed to speak at a time, so you cannot carry on a conversation using these cameras.
Netgear does advertise the 2-way audio as push-to-talk, so at least they are not trying to hide this fact.
The lack of 2-way audio is disappointing because its such a great feature. The battery-powered Reolink Argus has it, albeit slightly laggy. So does the AC powered Reolink C1 Pro, again a bit laggy though.
Step up to the more expensive cameras such as the Vivotek IP8160 & Vivotek IP8160-W if you want to get true high-quality full-duplex audio.
Motion Detection
There are two kinds of motion detection: true motion detection using an Infrared sensor called a PIR (Passive InfraRed), and software based motion detection that analyses video frames to detect changes in the scene.
The first type, PIR-based, is highly accurate indoors, and the second one, software-based, is reasonably accurate indoors. But there is a measurable difference in accuracy between the two.
This is because the software running on the camera cannot distinguish between moving shadows and a moving person, they are both effectively the same to the camera. This is why you get more false alerts with software-based motion detection than the PIR method.
The Arlo Pro uses software-based motion detection whereas the Arlo Pro 2 has a new motion detection system that’s quite clever. In battery mode, it uses the PIR for detecting motion.
In AC power mode, it uses software based motion detection but you can mark up to 3 separate zones for it to monitor. This makes the motion detection capabilities of the Arlo Pro 2 more powerful.
But the main reason we prefer the Arlo Pro 2 is its 3-second lookback feature, which is a fancy marketing term for pre-recording.
Pre-recording is the feature whereby the camera is constantly recording what it sees and keeps the last few seconds in memory. This means there is virtually no lag between the camera detecting motion and the beginning of the recorded clip. This feature also overcomes the biggest complaint with Arlo cameras – the huge lag between motion and the camera starting to record.
The new Arlo Smart subscription adds the hottest feature right now, person detection. But the issue is that the actual person detection is performed not locally by the camera, but remotely in the cloud.
Notifications
Both Arlos are able to send email alerts with snapshots and push notifications based on motion or audio detection.
Weatherproofing
Both Arlo Pro 2 and the Arlo Pro have the same IP65 rating for water-proofing and dust ingress.
Battery-life
Both Arlos use the same VMA4400 rechargeable battery which has a healthy 2440 mAh rating.
Smart Home Compatibility
All Arlos support IFTTT and while this is not the best platform for smart home inter-connectivity, it is better than nothing.
The Arlo family of cameras are cloud-reliant, Internet-reliant security cameras that need a monthly subscription to work as proper security cameras with 24/7 recording on AC power. Even though they support IFTTT for smart home integration, the lack of local storage and cloud-reliance place them well outside of the VueVille Smart Home DIY Framework and are thus not recommended by us.
If you must have an Arlo, the Arlo Pro 2 is far better than the Arlo Pro. The improved image sensor is the primary difference between the two models and is worth paying the extra for.
Alternatives
We reviewed the Reolink Argus wirefree camera and were impressed with its slick setup, 1080p sensor, 2-way full duplex audio, lack of cloud reliance, and local microSD card storage.
Also consider the newer Argus 2 which adds color night vision (Starlight) and a rechargeable battery pack. Since these are purely battery powered cameras, they do not support any smart home integration such as Z-Wave smart hubs, IFTTT, Alexa, SmartThings etc. But at least they are not cloud-reliant.
If you have a lot of IP cameras in your home, how can you view their video streams all in one place? This is the job of the humble Network Video Recorder, or NVR. An NVR is a central device that can manage all your cameras, and even take a backup automatically in real-time. This is truly invaluable and a critical component of a well-planned smart home strategy.
So how do you choose the right NVR when you have a large number of security cameras, especially if they are from different brands? 32-channel NVRs hit the sweet spot between 8 and 64-channel NVRs. But they often have an incredibly wide range of prices and its not easy to figure out what the real differences are between them. There’s no industry standard way of comparing them and that’s why in typical VueVille fashion, we have done the in-depth objective research leading to recommendations you can trust.
If you are wondering what an NVR is, check out my in-depth NVR buying guide, which will also explain the basic difference between a DVR and an NVR.
I recommend selecting the cameras you want from a single manufacturer like Dahua or Lorex, and then finding a suitable NVR to go with it. This is because you should be picking the cameras you need for the intended installation location.
You may notice that the high-end NVRs in this article do not have PoE. What, Daniel you are cheating you say? 🙂 Well for more advanced installations, you don’t usually power the cameras from the NVR, instead a dedicated PoE switch is better. The advantage is that you avoid the NVR becoming a single point of failure for your cameras.
Best 32-Channel PoE NVR – Summary table
[table id=47 scroll=”responsive” /]
A quick note: This article may contain affiliate links. If you click on one of these links and then purchase something, we may receive a fee. This does not cost you anything extra. Also note that Hikvision and Dahua do not consider certain platforms including Amazon as an authorized seller platform. So if you need warranty support please purchase from authorized resellers of Hikvision and Dahua products in your country.
What to look for in a 32-channel NVR?
Whenever I evaluate an NVR, I look for the following:
Maximum resolution supported when recording 32 cameras: Some NVRs have a headline megapixel capability, but the fine print may reveal that it can achieve this resolution only with 8 cameras, not all 32! So watch out for this one.
Encoding: H.264 is the most common standard, but the more efficient H.265 standard can help reduce the file size of video recordings.
Number of PoE channels: Some NVRs may have on-board PoE ports which is very convenient. But no 32-channel NVR is going to have 32 PoE ports. If you need that many PoE ports, you may have to get a PoE switch and plug that into the NVR.
Advanced motion detection: The best NVRs support not just basic motion detection but advanced methods such as line-crossing or tripwire, intrusion detection and even face detection. You will have to ensure the NVR and camera brand are the same if you need the advanced motion detection methods. For example, Hikvision NVRs cannot access the advanced motion detection abilities of Dahua cameras even though you can plug in a Dahua camera into a Hikvision NVR as they both support the ONVIF standard. If there are no PoE ports, no worries, just get a PoE switch.
Pre-record: All NVRs can start recording after a motion detection event occurs. But what you really need is a pre-record feature where the NVR will also record the precious few seconds before motion was detected.
Storage capacity and disk mirroring (RAID support): Look for the ability to automatically record to mirror the data that is recorded to one hard drive to a second one. This is called redundant storage or RAID. The reason for doing this is so that you will have a copy of the data should one of the hard disks fail. Of course you should take a weekly USB backup to a separate drive that is ideally stored off-site.
3rd party camera support: Not all NVRs allow you to hook up 3rd party cameras. Look for ONVIF support and explicit 3rd party camera support on the specification list of any NVR you are considering.
Alarm in/out: This is essential to connect the NVR to the rest of your smart home, burglar alarm or office security system. You can connect it to the NVR so that it can start recording if the PIR motion sensors detect motion or if a door/window sensor is set off.
Audio in/out: You can use the audio out if you are using the VGA output of the NVR to live-view on a monitor. The audio in port is good for a microphone if you want to record audio other than from a camera source.
32 IP cameras would look great on this house.
How do I use all 32 channels of these NVRs?
No 32-channel NVR is going to have 32 PoE ports, so you have to use a PoE network switch. First plug all your cameras into the PoE ports available on your NVR except one – we will need this for the PoE switch. Plug your remaining cameras into the PoE switch and then the switch into the NVR port you saved for the switch.
If your PoE switch is too far away from the NVR, just connect the switch to your network at any point. This is the beauty of IP camera systems, your NVR will be able to find and add the cameras as long as they are somehow connected on your network. They need not be physically attached to the NVR itself.
[/wpsm_cons][/wpsm_column] Amcrest security cameras and NVR kits are attractively priced good quality products and have become quite popular as a result. They also sell NVRs without any bundled cameras and the NV4432E-HS model is my pick for the best budget 32-channel PoE NVR.
This NVR can record Amcrest’s own security cameras and any ONVIF compatible IP camera from other brands. The maximum resolution supported is 8MP and it can record all 32 channels at this resolution along with audio. You can install up to 4 hard drives with a maximum capacity of 6TB, making a total storage capacity of 24TB. Now you may think this means the NVR supports redundant recording on these internal disks, but that’s not the case. You can assign different cameras to record to different disks, thus spreading the load over multiple hard drives.
You will also find 16 PoE ports on the back of the NVR. Other interfaces available include a serial port (RS-232), an eSATA port, VGA and HDMI out.
The standard recording modes of manual, scheduled and motion detection are available. Its worth noting that the motion detection is of the basic variety. You won’t find those fancy advanced methods such as line-crossing or face detection here. But then at this NVR’s price point, one shouldn’t be surprised. You can draw motion detection zones for each camera. There are a few different actions the NVR can take if it detects motion:
Trigger the 4 alarm channels
Send an email alert, or upload a snapshot to an FTP location
Send a push notification
Set a PTZ camera to a specific preset, or perform a PTZ tour action
Thanks to the 16 alarm in ports, you can also hook up motion detectors or other triggers from various zones too.
This NVR can display all 32 channels simultaneously when live-viewing and playing back recorded footage. Mobile apps are available for both iOS and Android.
Backups have not been forgotten with a backup manager that helps you to take periodic backups to a USB drive. Taking regular backups to a USB drive stored off-site is critical to ensuring your data remains safe and accessible at all times.
[/wpsm_cons][/wpsm_column] If you do not need advanced motion detection methods, but need drive mirroring (RAID), the Lorex is worthy of consideration. Lorex cameras and NVRs are mostly rebranded Hikvision and Dahua products. So quality generally tends to be on the higher side. However they do have an annoying policy of restricting their NVRs to work only with their own cameras. Even Lorex cameras that are just rebranded Dahuas often do not work with Lorex NVRs. So be aware of this before you invest.
The NR8326 model sits within the ‘Extreme Security’ product line and is a step up from their basic models. This model can record all 32 channels at 4MP resolution along with audio without breaking a sweat. Up to 4 internal drives are supported plus an external drive suing the eSATA port. The standout feature of this NVR is its ability to mirror hard drives. Lorex doesn’t call it RAID but practically that’s what it is. Another party trick is the ‘Real-time Backup’ feature which can record the live-view screen to an external USB drive.
There are 16 PoE ports at the rear, pretty standard for a 32-channel NVR. You will find a wealth of interfaces such as HDMI, VGA, audio in/out, serial port, and an additional USB port that can be used to add a mouse.
Let’s look at the software side of things now. The user interface is basic but functional. There is a quick menu which gives you access to the most frequently used actions and settings such as views, PTZ controls, and sequence mode. In live-view mode, you can display up to 16 channels at a time.
The different recording modes available are: continuous, motion, schedule and manual. When the hard drive(s) is full, the NVR will automatically start overwriting the oldest video recordings. However you can also set it to stop recording instead when the disks are full.
Just like the Amcrest above, motion detection is limited to simple motion detection which uses a software algorithm to determine motion in the defined areas of the scene. You can select motion detection zones for each camera. These are the actions the NVR can take when it detects motion in the defined zones:
Trigger the 4 alarm channels
Send an email alert, or upload a snapshot to an FTP location
Send a push notification
A custom display sequence can be activated
Set a PTZ camera to a specific preset, or perform a PTZ tour action
When you want to play back recorded video, you can either pick a point on the timeline or use the smart search feature. The smart search feature lets you define an area of the frame in the recorded clip to analyse for motion. This is a great time-saver if you record in continuous mode and want to check whether there was motion in a specific part of a camera’s scene.
Like any good NVR, the Lorex also supports backup on demand to a USB drive.
Sine FLIR Technology owns Lorex, the FLIR cloud app is used to connect to the NVR remotely. Some additional features are:
Live-view and playback
Event list
Push notifications
A custom display sequence can be activated
PTZ control and e-mapping
Access multiple Lorex and FLIR systems from one single app
[/wpsm_cons][/wpsm_column] So now we move up to the high-end options where you can get not just RAID but advanced motion detection like line crossing and intrusion detection. I have been using Hikvision stuff for many years now and my oldest Hikvision has been running non-stop for 3 years now.
The DS-9632NI-I8 model is a powerhouse of an NVR and is able to record all 32 channels at up to 12 Megapixels. However it can only display or playback 16 channels at a time, at 1080p each. Surprising especially as it has two HDMI outputs. Still being able to drive a 4K display is pretty sweet. You can set the exact order of channels in a multi-channel view.
Hikvision fully supports the ONVIF standard, so you can be sure that your non-Hikvision brand cameras will work with this NVR as long as they are ONVIF compliant. Some examples of supported third party brands are Acti, Arecont, Axis, Bosch, Brickcom, Canon, Panasonic, Pelco, Samsung, Sanyo, SONY, Vivotek and Zavio.
What about storage? Here once again this NVR’s premium nature shines through with up to 8 internal hot-swappable RAID drives and a hot spare option (n+1 mode) to provide fail-over for extreme reliability. RAID0, RAID1, RAID5, RAID6, and RAID10 modes are supported.
The various recording modes supported are: continuous, manual, alarm, motion detection, and scheduled. Hikvision calls the advanced motion detection methods VCA. You can also set 8 different time periods with different recording modes active for each of those 8 time periods. So you could have continuous recording during the night and motion detection recording during the day. Face detection, face recognition, vehicle detection, behaviour analysis (entering, exiting, loitering), people counting, parking detection, missing object, unwanted object and heat map are the fancy events that you just can’t find elsewhere.
Custom motion detection zones can be set for each camera, along with privacy masking to comply with local laws and regulations. The following actions are available whenever motion is detected:
Trigger the 4 alarm channels
Send an email alert, or upload a snapshot to an FTP location
Send a push notification
A custom display sequence can be activated
Set a PTZ camera to a specific preset, or perform a PTZ tour action
When its time to playback video, in addition to the timeline markers you can use the advanced search tools to help you find what you are looking for. These include face search, behaviour search, object search, people counting and heat map. The heat map function is used to analyse presence of people in the scene and how long they linger in a particular area.
Backing up data is handled exactly as you would imagine with USB and eSATA interfaces available.
Hikvision has a confusing range of mobile apps these days, but the one recommended for the DS-9632NI-I8 is the one that has been around the longest, iVMS-4500.
Samsung? Samsung makes NVRs? Yes they do. Well actually they acquired a company called Hanwha Techwin that makes NVRs. And pretty good ones too. So this is a brand to consider if you are venturing into the premium end of the pool.
The XRN-2011 has a very professional looking user interface which is what you would expect from a premium brand like Samsung.
Wrapping up
We hope the round-up above has made what is really a tough decision a bit easier to make. 32-channel NVRs are a significant investment, so if you have any questions please do leave a comment below or contact us on social media and we will try our best to assist you.
A few winters ago, we spotted a hedgehog late one night foraging for food. Now they should be hibernating in the depths of winter, not roaming around.
So we started providing it food and decided to get a security camera to watch our nocturnal guest. I was thinking of making our home smart anyway and a security camera seemed the right place to start.
Simple right? Just go online and buy something with good reviews. Well, easier said than done.
We found a bewildering array of brands, products, technical terms, questionable marketing, and fake reviews. And virtually zero advice on how to set up a smart home on a budget.
As rank beginners to smart homes and home security, we were well and truly in over our heads.
From all of this, one thing we learnt was that not all smart home devices are compatible with each other. The fear of buying something that we wouldn’t be able to use with other smart home gear later on nearly made us give up.
We simply couldn’t make an informed choice with the assurance that we were not throwing money down the drain.
A quick note: As an Amazon Associate I earn from qualifying purchases. This post contains affiliate link(s). An affiliate link means I may earn advertising or referral fees if you make a purchase through my link, at no extra cost to you.
What we needed was a simple and easy to understand guide with honest advice. We searched high and low but couldn’t find anything reputable on the Internet.
Either they were sponsored reviews or hastily written up articles from people who never really understood how to put together a reliable smart home without spending thousands of dollars.
That’s why we decided to document our journey and experiences on this blog.
Both my wife and I enjoy learning new skills and I’ve always had a great love for technology. So from security cameras, we soon progressed to the world of smart homes and home automation.
Ever since then, we have been on the path to building a smart home that seamlessly integrates home security, security cameras and home automation – all working perfectly with each other at a reasonable cost with no monthly fees.
We want VueVille to be the one simple resource which brings together all the information you need to know about creating a DIY smart home the right way.
We can’t emphasize enough the importance of planning: think about what you really want from your security equipment in the long run. Identifying your needs not just now, but thinking about what they may look like a few years into the future will save you a lot of money and hassle.
What is a Smart Home?
Everybody’s heard of smart homes, its become a buzz-word that every major consumer electronics company now uses in all their marketing material.
Using your voice to make Alexa turn on lights is not home automation – its just another remote control.
You’re missing out on so much more if that’s all you are after.
So what does a smart home mean to me? Instead of looking up a dictionary for a technical definition, here’s my take:Our family gets to spend our time doing what we love, while having peace of mind that the house is taking care of everything that can be automated such as heating, lighting, security, entertainment and energy conservation.
Let me give you some examples of these fully automatic scenarios:
Smart Multi-zone Heating
Depending on the time of the day and the weather outside, my home automation (HA) hub automatically decides what the target temperature should be and then controls the boiler and radiator thermostats to achieve it
Smart Boiler Control
Depending on the current weather outside and water temperature of the hot water tank, my HA hub controls the boiler to give the family a constant supply of hot water
Climate Control
Automatically maintain indoor humidity at 50% during the day and 60% at night (using Z-Wave multisensors)
Smart Lighting
Depending on when the sun rises and sets and the outside weather conditions, the HA hub decides when to turn outdoor and indoor lights on or off
At midnight, it turns off all indoor lights that have are still on
Smart Home Security
If nobody’s home and a door or window sensor is tripped or if motion is detected, my HA hub will sound the indoor siren, turn on exterior floodlights, start recording all security cameras on our QNAP NAS, flash certain indoor lights, send me an email notification, and call a designated phone number.
If nobody’s home and motion is detected at the front door, the HA hub will take a snapshot from the front door camera and email it to me. It will also ask my QNAP NAS to make a video recording of that camera.
Smart Security Cameras
If nobody’s home and motion is detected on any of the security cameras, our home automation hub asks our QNAP TS-253A NAS to start recording the camera that sent the motion alert, sends me an email notification with a snapshot, and turns on a random light inside the house.
Smart Mailbox
Whenever I get new post, the HA hub sends me an email notification with snapshots, and asks the QNAP NAS to record a clip from the front door camera.
and there’s so much more going on behind the scenes!
None of the above requires running a powerful server or any programming knowledge. It is all point and click using an ordinary laptop running some amazing home automation software (HomeSeer HS3), and all you need is a clear idea of what to expect from your smart home.
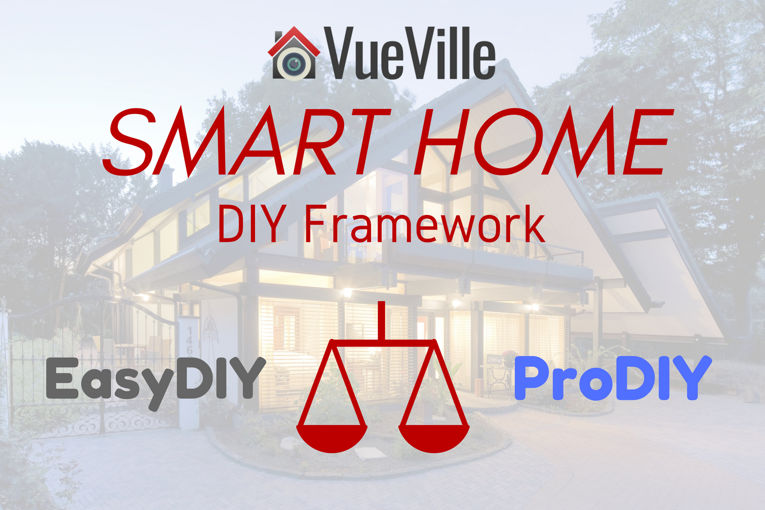
The VueVille DIY Framework
When you are at the beginning of your home security journey, its vital you know what your options are before you start spending your hard-earned cash! There are 2 paths you can take:
Easy-DIY
Pro-DIY
Whichever path you choose, our advice will help you pick equipment that can grow with your family’s needs. That’s because this framework is based on our own journey of starting small and creating our smart home over time.
Which of these you choose depends on:
How much you want to be in control of the selection process
What level of performance you need
Your level of interest and willingness to DIY
Your budget
Intrigued? Let’s dig deeper.
What is a Smart Home made of?
Before we can talk about Easy-DIY or Pro-DIY, let’s define what the various parts or sub-systems of a smart home are:
Smart Home Hub or controller – this is what makes your home smart (and no a smart speaker is a very poor smart home hub)
Burglar Alarm system
Security Camera system
Home Automation system
Heating system
Lighting system
Climate control system
AV and media control
Irrigation/sprinkler control
The Biggest Watch-out
The single most important thing to know is that not all smart home gear works with each other. And even if they do, some manufacturers actually have the audacity to charge a monthly fee for this basic feature of a modern smart home.
So if you are not careful, you may end up with disconnected systems and a dumb home, not a smart home! And lest we forget, the now-ubiquitous monthly subscription fees will remind you of your folly regularly!
How can this happen? A lot of security cameras and tech sold today under the ‘smart home’ moniker simply cannot interface with other brands.
Some manufacturers even try to lock you into a their own ecosystem so that you are forced to keep buying their products and what’s worse, even pay a monthly subscription for making full use of what you have already paid for!
Of course you have no other option but pay up because the Nest camera doesn’t have local storage. Sneaky.
[wpsm_box type=”green” float=”left” text_align=”left”] What’s the solution then? Simply follow our ‘smart home compatibility’ rating for each product featured on this blog, and get something that will be able to talk to other devices from other brands, so that you will be able to grow from EasyDIY to ProDIY if and when you want.
[/wpsm_box]
Easy-DIY – You buy an all-in-one / pre-packaged Smart Home kit
This is recommended for novices or even experts if you don’t have the time or inclination to do the research. Just pick a brand you are comfortable with, look for the specific kit you want and buy it.
Basically, you buy an all-in-one kit which gives you both smart security cameras and smart home security.
Pro-DIY – A fully custom solution where you pick every device in your smart home yourself
With Easy-DIY you pick a specific brand to build your smart home in. This may limit your hardware choices to whatever that brand has to offer, and you may find yourself missing things like high-resolution security cameras that are not reliant on the cloud.
What if you feel hamstrung by these compromises that Easy-DIY requires?
Thankfully, you can separate the smart home security part from the security camera part. This approach also lets you start with just security cameras and add home automation later.
The benefits are maximum security, privacy, flexibility, powerful features and much lower costs.
The downside is having to read up on the essentials and ensuring compatibility between all the different bits (but that’s why I am writing this blog, to help you make sense of it all).
So how do you do it?
For the Security Camera part, you have two options:
Pick individual security cameras (outdoor/indoor) and a separate NVR (either dedicated/NAS/PC-based)
You buy a pre-configured kit such as a security camera and NVR kit. The main advantage is that you don’t have to pick individual components such as security cameras or NVRs or PoE switches. Everything you need comes in one easy-to-set-up package.
For the Smart Home Automation part, you choose a smart home hub.
Having built a smart home from scratch, I would strongly recommend going Pro-DIY. Yes it takes more effort and time initially to research your choices, but with the advice on our blog and tutorials that show you how to set up everything you are in safe hands.
But if you really have no time or interest in making your home truly smart right now but would like the option in the future, by all means choose Easy-DIY.
Next Steps
Hopefully at this point, you have made an informed decision and chosen either Easy-DIY, or Pro-DIY.