VueVille is giving away the new Amazon Echo this March ! One winner will be selected at random at the end of the sweepstakes to win this incredible device.
You must be a USA or UK resident who is 18 or older.
Complete at least one of the given tasks.
You can use your email or login with your Facebook/Twitter/Youtube accounts.
Refer friends to get extra entries.
Come back daily to get more entries until the giveaway ends on 31 March 2018.
The more entries you have, the more chances you can gain to win. All the best!
Full Terms and conditions
GIVEAWAY (“GIVEAWAY”) SPONSORED BY VueVille.com (“SPONSOR”) AND ADMINISTERED BY Gleam.io. (“ADMINISTRATOR”). GIVEAWAY BEGINS ON 2018-03-01 AT 00:00:00 hours AND ENDS ON 2018-03-31 AT 23:59:59 hours (Pacific Time). (“GIVEAWAY PERIOD”). NO PURCHASE NECESSARY TO ENTER OR WIN.
Only the actions specified in the giveaway as entry methods are required. By participating, entrants agree to be bound by these Official Rules and the decisions of the Sponsor and Administrator. Void where prohibited by law. Giveaway is open to legal residents of the United States and the United Kingdom who have reached the age of majority in their respective province or territory of residence at the time of entry. Employees or contractors of the Sponsor(s) and immediate family members of, and any persons domiciled with any such employees or contractors, are not eligible to enter.
1 winner will be chosen at random using the Gleam widget. The odds of winning will depend on the number of entries received. The winner will be sent an email and will have forty-eight hours to respond. If no response is received within forty-eight hours, another winner will be chosen. Administrators are not responsible for prize fulfillment nor for any technical failures. Winning entry will be verified. A list of winners will be displayed on the giveaway widget on the original giveaway post. Prizes will be dispatched within 30 days of the giveaway ending.
Facebook, Instagram, Pinterest, Twitter and/or Google+ are in no way associated with this giveaway. If applicable, social media posts (such as but not limited to tweets and Instagram posts) must be PUBLIC to be eligible. If you sign up for newsletters as entries, you must confirm your subscription for those entries to count.
Administrators and sponsors reserve the right to publish winner’s first name and last initial. Contact information for sponsor(s), if applicable, can be found in the giveaway website links. Retail value of prizes is listed in the giveaway text. Images included in the giveaway post may not depict the exact prize, and are for illustrative purposes only. We reserve the right to change the prize and/or replace it with a cash prize if we are unable to procure the advertised prize. Please contact the Sponsor for any questions using the contact page at VueVille.com
Hikvision has recently been in the news thanks to revelations about its links to the Chinese government and the Communist Party of China. Naturally fears about whether they are compromised ‘by design’ have been raging on the Internet ever since. While there is no doubt that Hikvision is part-owned by the Chinese government, there has been no evidence yet of any backdoor or that Hikvision cameras are ‘dialing back home’ to their maker.
Okay but what could go wrong? Could a backdoor already exist in your Hikvision camera or NVR? Maybe. But so could your WiFi router or even your mobile phone. You are not about to stop using cell phones because the UK government (GHCQ) and the US government (NSA) are known to be able to hack into them, are you? So while its important to be aware that Hikvision is part-owned by the Chinese government, your best course of action is to take sensible precautions and not get too paranoid. Yep be reasonably paranoid but not tin foil hat paranoid!
So if you have Hikvision cameras, what should you do to protect them from hackers, spies or nosy governments? The following steps apply to any security camera, not just Hikvisions by the way:
A quick note: As an Amazon Associate I earn from qualifying purchases. This post contains affiliate link(s). An affiliate link means I may earn advertising or referral fees if you make a purchase through my link, at no extra cost to you.
Isolate all network cameras using Virtual LANs (VLANs)
The best way to achieve network security is by isolating your network cameras by creating Virtual LANs or VLANs.
A VLAN is a virtual group of network devices that physically may or may not be connected to a single network switch, but can be managed as if they are. Think of them as a way to segment your network into logical groups. The idea is to put your insecure network cameras in a virtual network which allows you to connect to the cameras but stops them from sending data out of that VLAN.
Your existing home router may already support VLAN creation. If not, the best way to implement VLANs is using a hardware device running a software firewall.
This could either be a DIY solution like a spare computer running pfSense, or a commercial ready-to-use product such as the [easyazon_link identifier=”B07MTMPXKG” locale=”US” tag=”vueville.com-eaz-20″]Netgate SG-1100[/easyazon_link], or the versatile and powerful [easyazon_link identifier=”B086967C9X” locale=”US” tag=”vueville.com-eaz-20″]Ubiquiti Unifi Dream Machine Pro (UDM Pro)[/easyazon_link].
Here’s my step by step guide for wired cameras and wireless cameras that shows how you can create VLANs with the Unifi gear.
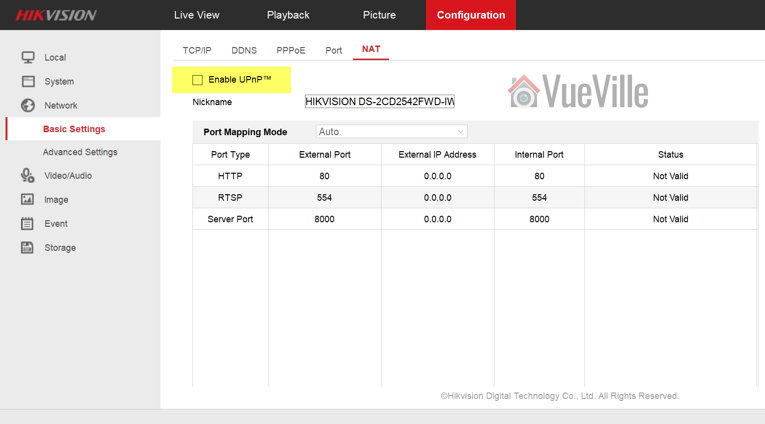
Disable uPNP
uPNP or Universal Plug n Play was created to make life easier for us by letting various devices discover each other on a network and work with each other. Today as we edge into 2018, plug n’ play sounds like no big deal, hey when you plug in anything into a USB port, it just work right? Plug n’ Play. Simples.
Well there was a time, not so long ago, that 11 year old me tried to install a Plug n Play 56 kbps modem and trust me it was anything but Plug n’ Play. Things have come a long way since then and the stuff the uPNP can do is amazing, such as letting your computer automatically configure new printers. The same uPNP can also let security cameras auto-configure your WiFi router for remote access or cloud storage by setting up port forwarding without your help or even without your knowledge.
Hold on, so this very useful uPNP software can let my security cameras make outgoing connections without my explicit permission? uPNP was originally intended to let devices on a local network talk to each other, and that’s why the protocol doesn’t even have an authentication method by default. If all the devices involved were on your local network, this wouldn’t have been an issue. But as uPNP was extended to devices exposed to the Internet and used to automate port forwarding, various security implementations were created. Unfortunately many networking devices such as WiFi routers have flawed security implementations of uPNP and that’s why the US government recommends disabling uPNP altogether.
Here’s how you disable uPNP on Hikvision cameras and NVRs: Log in to your Hikvision’s web admin page and navigate to Configuration > Network > Basic Settings > NAT. Make sure Enable uPnP is not ticked and click Save.
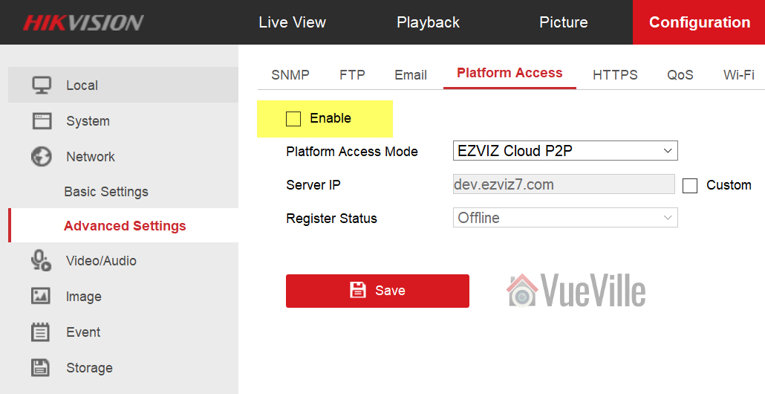
Disable P2P
The next one to disable is P2P. Hikvision calls it Platform Access. You will find this in Configuration > Network > Advanced Settings > Platform Access. Make sure the check box for Enable is not ticked and click Save.
I cut the cord over a year ago, so I don’t watch much of ‘linear’ TV. But back when I used to, there was a British Gas ad that was always on. It had a catchy jingle and went something like “with Hive you can control your heating from your phone”. The product being advertised by British Gas was the Hive automated heating system, and the message was what if you could adjust your thermostat when you are not at home? Of course the cost had to be an expensive monthly subscription on top of the very expensive hardware you had to buy from British Gas.
One of my core principles that I have tried to imbibe in this blog is that I do not like to pay monthly subscription fees. There’s simply no need! So I set out to build my own home automation system which could do not just home heating but a whole lot more! So today let’s see how I automated the heating part of my system.
The main selling point of plug-n-play heating systems like Hive is that you can create zones in your home and selectively control the temperature in each zone. So I set out to replicate this. There are two ways you can do this:
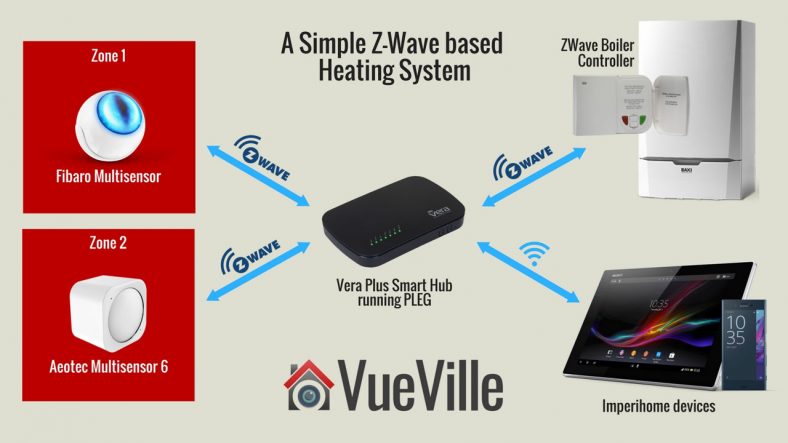
Z-Wave Temperature Sensor method – Z-Wave sensors are used to create zones. While this method is cheaper and easier to implement, the downside is that you cannot control individual radiators. When one zone of your home needs heat, all the zones will get heated (regardless of their actual call for heat status). This is how it works: you set the desired temperature ‘set point’ on your Z-Wave boiler controller. Then the Vera Plus will turn the boiler on if the temperature reported by any one of your Z-Wave sensors is less than the set point. When all the Z-Wave sensors report a temperature higher than the set point, the Vera Plus switches off your boiler. So each room with a Z-Wave sensor in effect becomes a zone.
Z-Wave TRV method – Z-Wave thermostatic radiator valve (TRV) on each radiator are used to create zones. The advantage here is that you can set different set point temperatures for different zones. This is how it works: each radiator equipped with a TRV take the place of the sensor above. So each room controlled by a TRV in effect can be made a zone. You could also group TRVs together to create a zone if you have a large room with multiple radiators. So you set the desired temperature set point for each zone, on the Vera Plus. Let’s consider one of the multiple zones that will exist, and lets assume this zone has only one radiator with a TRV. If the TRV reports a temperature lesser than the set point for that zone, the TRV will send a call for heat to the Vera Plus and open the radiator valve in expectation of hot water from the boiler. The Vera Plus will then turn on your boiler. Assuming all the other TRVs are not sending a call for heat and remain closed, only the zone that needs heating is heated.
I went with the sensor-based method because its more wallet-friendly and easier to set up for beginners. You can always add TRVs later on to upgrade to the second method. I divided my home into two zones – the ground floor and the first floor. Since the ground floor is pretty much open plan, a single Z-Wave temperature sensor worked well enough as the goal was to heat the whole ground floor up to a particular temperature.
On the first floor, I use a single temperature sensor placed in the master bedroom. This means the actual temperature of the other two rooms on the first floor are irrelevant to my heating system. One of them is my office which is usually a bit warmer, so I turned the manual radiator valve down a bit. The guest bedroom is rarely used so I just left the radiator valve in that room at a minimum so as not to waste any heat.
A temperature sensor per zone you want to create, e.g. Fibaro or Aeotec Multisensors.
In the steps below, the Fibaro Multisensor is used in Zone1 and Aeotec Multisensor 6 is used in Zone2.
Optional: A smart phone or tablet to control your heating system and make voice announcements using Imperihome.
Software needed
The default Vera software is good for simple scenes but for something more complex such as an automated heating system, you need a plugin called Program Logic Event Generator or PLEG for short. There is a 30 day free trial but its easily the best plugin I have seen for the Vera, so I strongly recommend paying the very fair one-off license fee of $5.50 + tax.
You will also need the excellent free Multiswitch plugin to create virtual switches that can be used by you and PLEG.
If you want to control your Vera from a smartphone or a tablet, get the Imperihome Pro app (paid app).
Setting up the MultiSwitch plugin
Install the Multiswitch app from the Vera dashboard by going to Apps > Install Apps and search for Multiswitch. Once you install the app and enable it, you can rename the switches you need.
Don’t worry the name you use doesn’t matter as we will be referring to each individual switch using its technical name (Status1, Status 2 etc.).
Setting up Imperihome Pro
Imperihome Pro is great for powering a home automation tablet and for voice announcements for your heating system. For example when the house gets too cold and the boiler is turned on automatically, I have added an action to make my tablet announce that the boiler is being turned on.
Simply follow the steps outlined using the guide here to:
Install Imperihome Pro on your tablet or smartphone and activate the API http server.
Install the Imperihome plugin on your Vera.
You can then include these devices in your PLEG actions and switch to different pages and use Text To Speech (TTS) to make voice announcements.
Setting up PLEG
PLEG requires the Program Logic Core app to work, so install that first under Apps>Install Apps. Then search for and install PLEG the same way. Once the PLEG device has been added to your dashboard, open it and click Edit. This will open the PLEG interface. Under Editor, click Register and click on the Registration portal link to purchase a licence. Pop your licence into the PLEG registration screen and activate your copy of PLEG. Restart your VERA before you proceed.
PLEG uses logic inputs, conditions and actions to work:
Logic Inputs which can be evaluated:
House mode: These can reflect Vera’s default house modes (Home, Away, Night or Vacation Mode) or you can create others.
Device property: This is a measurement or state of a device, say the ambient temperature reported by a Fibaro Sensor in a zone.
Device trigger: This could be something like humidity hits 70% or motion is detected.
Schedules & timers: This lets you perform actions at specified intervals or times.
Counters: This lets you keep track of events that are repetitive in nature.
Conditions need to become true for an action to fire.
Actions fire when specified condition(s) become true.
For our simple heating system, we will make use of device properties, conditions and actions.
House Modes
I do not want my automated heating system to function when I am away or on vacation, so I have to make PLEG aware of the current Vera house mode. This can be achieved by creating PLEG house modes to reflect the current Vera mode.
Create the following modes:
M_HomeMode
M_AwayMode
M_NightMode
M_VacationMode
Now your House modes screen should look like this (click to enlarge):
Device Properties
Create the following properties:
P_MS_AutoCHControl: This is one of the multiswitches and acts like a master switch that lets us turn our entire PLEG heating system on or off easily.
P_BOILER_CH_MODE: This property reflects the current mode of the Central Heating zone of the boiler controller (not to be confused with the physical zones for our heating system). It will be ‘Off’ if the boiler controller is off and ‘HEAT’ if the boiler controller is on.
P_CH_SetPoint: This property will reflect the set point of the Central Heating zone of the boiler controller (not to be confused with the physical zones for our heating system).
P_MS_CallforHeat: This is one of the multiswitches and will show the current overall call for heat status (this switch also drives the animated flame icon in Imperihome)
P_ZONE1_Temp: This property reflects the current temperature reported by the sensor in Zone 1
P_ZONE2_Temp: This property reflects the current temperature reported by the sensor in Zone 2
Now your screen should look like similar to this – click to enlarge (ignore the properties not listed above – they are for my automatic climate control system):
Device Schedules
My Secure 2-channel Boiler Controller has an irritating ‘safety feature’ of shutting down the boiler if it doesn’t hear from the Vera roughly every 20 minutes. So I created a schedule that repeats the current boiler operation instruction every 15 minutes. You may not need this schedule and it is not required for the rest of the logic to work if you have a different boiler controller.
Your screen should look like similar to this – click to enlarge:
Conditions
Create the following conditions: [table id=40 responsive=scroll /]
Now your screen should look like similar to this – click to enlarge (ignore the conditions not listed above – they are for my automatic climate control system):
Actions
PLEG actions don’t have their own names but take the name of the condition that triggers them. Create the following actions, in the following order (they will execute in the order they are created): [table id=41 responsive=scroll /]
Now your screen should look like similar to this – click to enlarge (ignore the actions not listed above – they are for my automatic climate control system):
Here’s an example of how to set up one of the actions above:
So how does it actually work?
So how do all these properties, conditions and actions work together? If you want to keep it simple and are not too bothered about the details, just check out the flowchart I made below – click to enlarge:
Intrigued? Want to know how it actually works? Okay let’s do this. Let’s start from the end action and work backwards.
You see the boiler turns on by itself. How did that happen? The boiler controller gets the command to turn on the boiler when action C_Any_CallforHeat fires. The action fires when the condition C_Any_CallforHeat becomes true. The condition C_Any_CallforHeat becomes true when the expression C_MS_AutoCHControl AND C_MS_CallforHeat AND (M_HomeMode OR M_NightMode) returns a value of TRUE. This means each one of the terms in that expression returns a value of TRUE. Let’s break this one down:
C_MS_AutoCHControl: Becomes TRUE when our heating system ‘master switch’ (one of the switches of the multiswitch plugin).
M_HomeMode OR M_NightMode: I want the heating system to work only if the VERA house mode is one of these, meaning somebody is at home.
C_MS_CallforHeat: Becomes TRUE when P_MS_CallforHeat == 1. P_MS_CallforHeat is another one of our multiswitch switches. So when does P_MS_CallforHeat become TRUE? When another condition sets it to TRUE. Looking at the actions list, we can see that P_MS_CallforHeat is set to TRUE when either C_Zone1_CallforHeat or C_Zone2_CallforHeat are TRUE. So if there is a call for heat from either Zone1 or Zone2, P_MS_CallforHeat is set to TRUE, C_MS_CallforHeat then becomes TRUE, and if the master switch is on and somebody is at home, the boiler will turn on!
Action C_Zone1_CallforHeat fires when condition C_Zone1_CallforHeat becomes TRUE. Condition C_Zone1_CallforHeat becomes TRUE when (P_ZONE1_Temp < P_CH_SetPoint) i.e. when the ambient in Zone 1 (P_ZONE1_Temp) is less than the boiler controller set point P_CH_SetPoint.
Action C_Zone2_CallforHeat fires when condition C_Zone2_CallforHeat becomes TRUE. Condition C_Zone2_CallforHeat becomes TRUE when (P_ZONE2_Temp < P_CH_SetPoint) i.e. when the ambient in Zone 2 (P_ZONE2_Temp) is less than the boiler controller set point P_CH_SetPoint.
After some time you are feeling all warm and toasty and you hear your Imperihome tablet announcing that its too warm and the boiler turns off by itself. How did that happen? The boiler controller gets the command to turn off the boiler when action C_Boiler_CH_Off fires. Action C_Boiler_CH_Off fires when condition C_Boiler_CH_Off becomes TRUE. Condition C_Boiler_CH_Off becomes TRUE when P_MS_CallforHeat == 0 i.e. property P_MS_CallforHeat is FALSE. P_MS_CallforHeat as we saw above is a switch that is flipped on if there is a call for heat from any zone. Conversely there is an action C_All_StopCallsforHeat which sets P_MS_CallforHeat to FALSE. Action C_All_StopCallsforHeat fires when condition C_All_StopCallsforHeat becomes TRUE. Condition C_All_StopCallsforHeat becomes TRUE when the expression C_Zone2_StopCallingForHeat AND C_Zone1_StopCallingForHeat returns TRUE, i.e. when both zones stop calling for heat.
C_Zone1_StopCallingForHeat: This condition becomes TRUE when (P_ZONE1_Temp > P_CH_SetPoint), i.e. the ambient temperature in Zone1 is above the boiler controller set point.
C_Zone2_StopCallingForHeat: This condition becomes TRUE when (P_ZONE2_Temp > P_CH_SetPoint), i.e. the ambient temperature in Zone2 is above the boiler controller set point.
Final Steps
Once you have loaded in all the settings I have listed above in the PLEG Editor, go to Editor Option > Reload LUA. Then you can close the editor. Wait a few minutes for the Vera to reload the LUA engine and your new automated heating system is now up and running.
What next? Monitor your system to ensure its working as expected, its easy to make mistakes in programming PLEG so don’t be surprised if everything doesn’t go as planned the first time round.
I hope this guide helps you in setting up your own fully automated Z-Wave heating system using Vera and PLEG. Please leave a comment or feedback below!
I believe a DIY home security camera system is not complete unless it has indoor cameras. Outdoor cameras are great for securing your home’s perimeter and alerting you to an intrusion, but what if the intruder has already entered your home?
That’s why you need smartly placed indoor IP cameras to hopefully capture identifying features of the intruder so that law enforcement can take them down!
Product prices and availability are accurate as of the date/time indicated and are subject to change. Any price and availability information displayed on https://www.amazon.com/ at the time of purchase will apply to the purchase of this product.
Product prices and availability are accurate as of the date/time indicated and are subject to change. Any price and availability information displayed on https://www.amazon.com/ at the time of purchase will apply to the purchase of this product.
Product prices and availability are accurate as of the date/time indicated and are subject to change. Any price and availability information displayed on https://www.amazon.com/ at the time of purchase will apply to the purchase of this product.
At the end of this article, you will also find my thoughts on some other popular IP cameras and why they didn’t make the cut.
A quick note: As an Amazon Associate I earn from qualifying purchases. This post contains affiliate link(s). An affiliate link means I may earn advertising or referral fees if you make a purchase through my link, at no extra cost to you.
The cameras I have selected fall into two categories:
Pan-Tilt (PT)
Pan-Tilt-Zoom (PTZ)
Every IP camera I recommend below meets the must-have feature of fully local operation that is essential for a self-hosted smart home. This means these cameras are not cloud-reliant, not Internet-reliant and have zero monthly fees or subscription plans for basic things such as recording and viewing footage.
Using a NAS NVR, CCTV software like Blue Iris or just Home Assistant integrations (like I do), you can use these cameras to intelligently detect motion and take action automatically.
Product prices and availability are accurate as of the date/time indicated and are subject to change. Any price and availability information displayed on https://www.amazon.com/ at the time of purchase will apply to the purchase of this product.
(* = affiliate link / image source: Amazon Associates Program)
Amcrest was one of the earliest brands I featured on my roundups. While Foscam made some very popular cameras, they had several shortcomings and I was never really satisfied with their cameras. Then Amcrest spun off from Foscam and totally disrupted the market with their reasonably priced and well-made cameras such as this Amcrest ProHD 1080p Pan-Tilt WiFi Camera. Amcrest has this unique blend of high-quality hardware, reliable software, and great after-sales support that makes it easy to recommend any of their products.
This extremely affordable camera has an Ethernet port, 2.4 GHz WiFi, built-in InfraRed LEDs for very good night vision, clear 2-way audio with mic and speaker, built-in SD card local storage, and on top of all this, AI person detection and even a dedicated baby monitor mode.
Amcrest has smartphone apps for both iOS and Android. The camera does not need an Internet connection to be set up or for functioning normally. So it can work in a fully standalone manner. But in case you need it, a cloud subscription plan for 1 year is included with the camera.
Even though there is an Ethernet port, this Wi-Fi model doesn’t support Power-over-Ethernet (PoE). There is no PoE model available, but you can use a PoE injector to carry both power and data over a single Ethernet cable. The downside is that you will have to split them again at the other end before plugging in the camera.
Product prices and availability are accurate as of the date/time indicated and are subject to change. Any price and availability information displayed on https://www.amazon.com/ at the time of purchase will apply to the purchase of this product.
(* = affiliate link / image source: Amazon Associates Program)
The Amcrest IP4M-1041W is a stylish 4MP indoor IP camera that works with Amazon Alexa also. It can pan and tilt, but not zoom. The fixed lens has a decent wide angle of 90°. Wi-Fi can be tricky in the furthest corners of your home, so this camera supports both 2.4 GHz and 5.0 GHz bands. For the bitrates that such cameras typically use, 2.4GHz is more than enough and gives you maximum range. But to make use of higher resolutions, the 5 GHz band is best.
Even though there is an Ethernet port, this camera doesn’t support Power-over-Ethernet (PoE). There is no PoE model available, but you can use a PoE injector to carry both power and data over a single Ethernet cable. The downside is that you will have to split them again at the other end before plugging in the camera.
This camera does not have person detection for smart notifications, but it can detect moving objects and has auto-tracking. This is a great feature which allows for motion detection recording that will keep the camera trained on the moving object at all times.
Product prices and availability are accurate as of the date/time indicated and are subject to change. Any price and availability information displayed on https://www.amazon.com/ at the time of purchase will apply to the purchase of this product.
(* = affiliate link / image source: Amazon Associates Program)
Reolink is a very DIY-friendly security camera company. In fact they are my favourite for affordable no-nonsense well-built cameras that respect our privacy.
All non-battery powered Reolink cameras support the ONVIF standard. This lets you use them with any 3rd party NVR, NAS NVR or software such as Blueiris which supports the ONVIF standard. The RTSP video streaming protocol is also supported, so I have integrated the camera with my DIY home automation system built around Home Assistant.
The Reolink E1 series of indoor IP cameras are noticeably smaller than previous models and come only in white colour. So it blends into the background much better and can easily go unnoticed on a bookshelf. The tennis-ball shaped body fully encases the eye-ball style lens. The E1 Zoom has pan-tilt as well as optical zooming capability.
With the 5 Megapixel resolution, you get great video quality and sharp detail. You can use motion detection to record clips to the microSD card, send push or email notifications and even trigger an audible siren to scare off intruders. Of course you can also immediately push the 2-way talk button in the app to talk to whoever is in front of the camera.
You can configure the camera through the Reolink mobile app, or more fully through the Web User Interface (UI). The Reolink Client desktop PC app is also available if you prefer to manage multiple Reolink cameras in one interface. What’s more, ONVIF and RTSP support make it a breeze to add this camera to smart home software such as Home Assistant or Blue Iris.
Smart motion detection methods such as person/animal or advanced method such as line-crossing/intrusion detection are missing. This also means that auto-tracking is not available.
If you don’t need the optical zoom, the E1 Pro is identical to the E1 Zoom but without the optical zoom feature and the Web UI. Check out my full review below: [wpsm_top postid=8537]
The ones that didn’t make the cut
A couple of years ago, most camera manufacturers figured out that a better way of making money is to sell you cameras that are crippled and become expensive paperweights unless you hook them up to the Internet and (in most cases) pay a hefty monthly subscription – all for the luxury of using your security camera that you already paid for. I am an engineer and one thing that I learnt pretty early on is that you always have to look at the Total Cost of Ownership (TCO) when comparing any two products. You would be just wasting your money if you bought an ultra cheap product which then needs a monthly investment to keep working for the rest of its life.
The same TCO concept applies when you buy a camera. The TCO of cloud cameras which requires a monthly subscription is very high compared to a self-sufficient camera which has a one-time cost.
Nest Cam: It was and probably still is the most over-rated security camera ever. Even with the new IQ model, this is a very poor security camera. First off, it cannot work without an Internet connection, it has no local storage so it can only record to the Google cloud, and what’s worse it stores only 3 hours of footage unless you pay up for the Nest Aware cloud subscription ($10/mo per camera at the moment, discount available for additional cameras).
Instead of pushing out gimmicks such as person detection and face identification, they should make the camera 100% reliable by giving it at least a local backup storage location like the Netgear Arlo Q does, making it less Internet-reliant.
Logitech Circle and Circle 2: Last year, Logitech launched the Circle which was an overpriced attempt at competing with the Netgear Arlo and Nest Cam. Now they have launched the Logitech Circle 2 which is an outdoor camera in both wired and wire-free flavours. Regardless of whether its the original Circle or the new Circle 2, both lack a local storage option and are reliant on an Internet connection to the Logitech cloud servers. If you don’t pay for the monthly subscription, you have access to the last 24 hours recorded footage but no motion zones and advanced alerts.
Canary All-in-One Home Security: I am not a big fan of all in one security devices, mainly because they are full of compromises made to still keep the device within a reasonable price point. The Canary is one of many such I-can-do-it-all devices in the market today. Not only does it do home security, it does home health as well with sensors to monitor air quality. Now if I could do something useful with this sort of information locally such as turn on my dehumidifier or air filter, I would have been mildly interested. It may be possible through IFTTT but again this is Internet-reliant. Sadly, this device is also 100% cloud-reliant. I do not want to be locked into any single manufacturer’s eco-system and then end up paying a cloud subscription fee, but that’s the case with Canary! So in short, the Canary is crippled if the cloud servers decide to take a hike – not great when it comes to protecting your family.
Piper NV All-in-One Home Security: Piper burst onto the all in one security device market with a bold promise – no monthly fees. Yet it is 100% reliant on the cloud because it has no local storage options. There is no SD card or USB drive option available with the Piper NV. But it strangely has some elements of a DIY home automation system, it’s a ZWave hub as well. So its less locked-in and proprietary than others of its ilk. But don’t be deceived, this device is designed to be reliant on the Piper cloud servers: it still can do only 100 recorded clips of up to 35 seconds each before you are asked to start paying a monthly subscription fee.
That’s not a whole lot especially if for some reason you get a lot of false alerts. Its very interesting that while the Piper NV has battery backup in case of power loss, it has absolutely nothing to protect it from an Internet outage or if their cloud servers go down. What would happen in such a situation? A burglar breaks in, the Piper motion detection is activated, but your Internet connection is disabled or the cloud servers are unavailable and the Piper cant record its video clips! Great for the burglar, not so great for you. Bummer.
Granted, companies like Piper are bringing innovation to the home security market, but if they expect us to trust them 100% for our home security, the products need to be as close to 100% reliable as possible. This blog is hosted on a VPS that has a Service Level Agreement that promise a 99.9% up-time for example. My point is no cloud server has a 100% up-time, so what happens when the inevitable service disruption happens? Well folks, don’t rely on anybody’s cloud. Build your own local DIY home security system like I have!
Zmodo Sight: Last year I commended the Zmodo Pivot for having local storage in the form of 16GB onboard memory and not being cloud-reliant. While this is still the case, Zmodo is going the way of all the other cloud-reliant camera makers and appears to not let you view continuous video recordings or alert clips more than 12 hours old, unless you pay the monthly cloud subscription fee. No thanks.
Yi Cam: The Yi camera is possibly the cheapest IP camera you can get these days. Being nearly half the price of the cheapest mainstream brands sets off alarm bells for me right away. Yes being a Chinese brand, designed and owned by a Chinese company (Xiaoyi) does help keep costs down but surely there must be some trade-offs?
Yep, there’s no such thing as a free lunch. The Yi family of cameras work only with their smartphone apps and are 100% reliant on the cloud servers, these cameras don’t even have a web interface for you to use locally! Moreover, the company has been severely criticized by its users for its draconian terms and conditions of use. My recommendation – steer well clear of this and other unheard of Chinese brands.
Amazon Cloudcam: Amazon’s effort to integrate even more into your life (not just shopping), the Cloudcam naturally requires an internet connection and a connection to the Amazon cloud to function. Not fit for home security then.
What to look for in an indoor IP camera
The most important must-have features to look for in an indoor security camera are:
Video Resolution – In 2022, 720p cameras are just not acceptable. They simply don’t have the resolution to meet the very high threshold that the police and courts require to achieve a conviction. Unless the intruder’s face is right up against the camera, 720p is just not going to capture enough detail to identify a person, especially in the dark. So, my minimum recommendation remains 1080p Full HD (or 2 Megapixels).
Field of view or horizontal viewing angle – This depends on the focal length of the camera lens. The wider the horizontal viewing angle, the more flexible the camera is going to be for placement in a tricky place such as a wide living room. Some manufacturers quote the diagonal angle which can be misleading as its always going to be higher than the horizontal one – like how TV screens are marketed! All viewing angles in this article are horizontal values.
Night vision – InfraRed night vision is crucial for getting good quality night shots. A true IR cut filter helps to produce true colour images during the day and high quality images at night. EXIR LEDs are brighter and have longer lifespans than the typical IR LEDs used in cheaper cameras.
Audio – Most indoor cameras have a built-in microphone, this is great for recording incriminating evidence. It should also have a built-in speaker.
Should not be Cloud-reliant – I feel very strongly about privacy and being in control of my data. The trend in recent years has been to create ‘cloud’ cameras that are reliant on the manufacturer’s cloud servers to do even basic things such as motion detection and event recording. Why? Because the cloud subscriptions that you are then forced to pay generates a steady stream of income for the manufacturer for years to come.The worst of the lot are camera that are absolutely crippled and cannot operate without an internet connection – these are the most dangerous because the whole point in having a security camera is that its going to be watching your home 24/7. Since many manufacturers still don’t have reliable cloud servers and an intruder can easily disable your internet connection, how can you be assured that your camera will notify you in time if a break-in is in progress? What you want is a camera that does not need any outside help to do its job – all it should need is electricity. I use a CyberPower UPS to provide backup power in case the burglars cut the power.
RTSP stream capable so that you can access the video stream from a 3rd part app such as tinyCam Monitor Pro or IP Cam Viewer. ONVIF support is ideal so that you can connect the camera to an NVR like Amcrest NVRs which can support any ONVIF compatible camera.
The nice-to-have features to consider are:
Wireless – While an Ethernet cable connection is more stable and hence more reliable, support for WiFi and/or Bluetooth is great if you have to install the camera in a spot you can’t run a data cable to. Please do not install only wireless cameras – make sure you have wired cameras also in case your wireless cameras fail for whatever reason.
Continuous Video Recording – Most indoor camera will have automatic event triggered recording, but not all support continuous video recording. Typically a Network Video Recorder (NVR) or NAS is needed for this function because recording 24/7 to as SD card will damage it easily. You can specify how many days worth of storage you want to keep, and the older videos will be automatically overwritten.
Audio – Most cameras that have a mic and speaker built-in are not full-duplex – they are half-duplex meaning you cannot carry on a conversation in a natural way, you will have to adopt a walkie-talkie style of talking over the camera. So look for full-duplex capability.
Software features – Email alerts on motion detection, audio detection, echo cancellation and push notifications to smartphone apps.
Local storage – I love using local storage such as an SD card as a secondary location for motion triggered clips. 100% cloud-reliant cameras will not have any local storage, but some cloud cameras like the Arlo Q Plus now feature local storage in case the Internet connection is unavailable. In my opinion, the best cameras are the ones whose cloud features are strictly optional and let you access their video stream using 3rd party apps like tinyCam Monitor Pro.
Motion detection method – While software based image change detection is the most common motion detection method, a PIR motion sensor is preferable to cut down on false alerts
Power source – A wired Ethernet port is preferable over wireless connections for the best reliability. PoE (Power over Ethernet) support is ideal since then you don’t need two cables to each camera. An internal battery for power backup purposes is great if a burglar cuts the power supply to disable your home defences.
Advanced features – Preferably a full API should be available for interfacing with home automation controllers such as the Vera Plus. IFTTT is not enough because it relies on an Internet connection and so is not a local solution.
Picking the right IP camera for your DIY Smart Home is tough, I know. Your time is valuable, and what you need is solid, well-researched, actionable advice that you can use right now.
Since 2015, VueVille has built up a reputation for providing exactly that sort of buying advice. And I don’t take that responsibility lightly.
So I have created this brand new up-to-date list of the best outdoor IP cameras for 2024 and here are my top picks:
I separated indoor IP cameras into its own guide. At the end of this article, you will find our recommendations for specific purposes like battery powered cameras.
A quick note: As an Amazon Associate I earn from qualifying purchases. This post contains affiliate link(s). An affiliate link means I may earn advertising or referral fees if you make a purchase through my link, at no extra cost to you.
Best Outdoor IP Camera – 2024 Recommendations Summary
Here’s a handy summary of all our outdoor IP camera recommendations for 2024, split by use case:
[table id=70 responsive=scroll /]
Recommendation Methodology
IP cameras come in all shapes and sizes. There are a few ways we can categorize them:
By location – outdoor or indoor.
By form-factor: Turret (aka eye-ball) cameras are my favourite type and are highly flexible in how you can point the lens, even after installation. Bullet style cameras are most visible and are great if you prioritize deterrence, whereas dome style cameras are excellent for vandal resistance.
So I will split this Best IP Camera round-up into two posts: outdoor/indoor camera. In each post, I will also cover the best cameras of each form factor.
[easyazon_link identifier=”B08135WDZW” locale=”US” tag=”vueville.com-eaz-boipc18-20″]Check Price on Amazon[/easyazon_link]
I started reviewing Reolink products in 2017 and have been impressed with the consistently high quality yet affordable products they have put out. Reolink continues to be our favourite for budget-friendly outdoor IP cameras in 2024.
Last year, the RLC-520A was replaced by the RLC-820A and it continues to be a great choice. Smart motion detection of people and vehicles is becoming more common across Reolink’s model range. I would place these person and vehicle detection features between basic and advanced motion detection of the old classics, Hikvision and Dahua. Yes other brands such as Nest and Arlo also have smart detection but those require rely on the cloud for this to work – no Internet connection means no smart motion detection.
Reolink not only does the smart motion detection locally but importantly does this without asking you to pay a monthly subscription fee. That’s huge and kudos to Reolink for bucking the trend here.
The RLC-820A is a turret style camera. There is a true IR cut removable filter (ICR) to ensure excellent night time videos and faithful colour reproduction during the day. Noise reduction and backlight compensation are also available.
One of the features I look for and often fail to find in budget cameras is our beloved built-in NVR feature. All Reolink standalone IP cameras including the RLC-820A have this feature. It’s great if you are just starting out and have a single camera or do not have a dedicated NVR. So you can set up the camera to do basic or smart motion detection, record to NVR/FTP or the onboard SD card, and it will overwrite older videos automatically.
The camera doesn’t support continuous recording to the on-board SD card, which is fine because its not something I recommend anyway. You will just end up wearing out the SD card sooner. SD cards are best suited to intermittent motion detection clips being written, rather than continuous data recording. The cameras can instead record to a Reolink NVR or any 3rd party NVR or software that supports the ONVIF standard and RTSP protocol.
Best Value 4K Turret Camera: Amcrest IP8M-T2669EW-AI
[easyazon_link identifier=”B08CWGJY37″ locale=”US” tag=”vueville.com-eaz-boipc18-20″]Check Price on Amazon[/easyazon_link]
Amcrest cameras are actually rebranded Dahua cameras. While Dahua doesn’t really support retail customers, Amcrest is purely targeted at retail customers like you and me. And the cost is about the same. So why not go for something that you can buy with 100% peace of mind with a full warranty and the ability to return to Amazon if you don’t like it.
While Amcrest cannot match the price points that Reolink hits, they differentiate their products by adding a few premium features without a huge price tag. Features like true 120dB Wide Dynamic Range (WDR) and advanced motion detection methods like tripwire (line crossing) and intrusion detection.
The Amcrest IP8M-T2669EW-AI is an extremely feature-loaded 4K IP camera. It has several highlights such as wide-angle lens, 120dB true Wide Dynamic Range for better shadow detail, extremely bright EXIR IR LEDs, and perhaps most importantly every type of motion detection you cant think of – simple zone-based method, advanced methods such as tripwire (line-crossing) and intrusion, and smart person/vehicle detection. Combining these methods means that you can virtually eliminate false alerts.
The AI in the model name refers to the smart motion detection that is performed locally and does not need an Internet or cloud connection to work. Nor do you need any sort of paid subscription. This is similar to Reolink’s strategy and great for local-only smart home enthusiasts like us.
Unfortunately the IP8M-T2669EW-AI does not have audio or alarm in/out connections. But that’s the only thing that is missing in an otherwise excellent package.
Best Budget 4K Dome Camera: Amcrest IP8M-2493EW-V2
[easyazon_link identifier=”B077Y52782″ locale=”US” tag=”vueville.com-eaz-boipc18-20″]Check Price on Amazon[/easyazon_link]
In past years, Dahua featured prominently in this guide. But once again you won’t find any Dahuas here in 2024. The reason is that Amcrest cameras are just rebranded Dahua cameras. While Dahua doesn’t really support retail customers, Amcrest is purely targeted at retail customers like you and me. And the cost is about the same. So why not go for something that you can buy with 100% peace of mind with a full warranty and the ability to return to Amazon if you don’t like it.
The Amcrest IP8M-2493EW-V2 is a great camera for the DIY enthusiast. You get a brilliant 4K camera with the latest Ambarella S3L33M chipset and true 120dB WDR capability, a wide-angle lens and on-board SD card storage.
Sadly the recent industry trend of removing audio and alarm connections continues with this camera, so check out the Vivotek models at the end of this article if that’s what you need. But on the flipside, advanced motion detection such as trip wire and intrusion detection have been added. But smart detection (people/vehicle) is missing. The camera supports the latest H.265 and H.265+ encoding standards with a very high 10Mbps bitrate.
[easyazon_link identifier=”B09DPSB9BL” locale=”US” tag=”vueville.com-eaz-boipc18-20″]Check Price on Amazon[/easyazon_link]
If you need the ability to zoom in/out remotely, you need an IP camera with a motorized optical zoom. The Reolink RLC-842A offers 5x optical zoom in the traditional dome-style shape that also offers IK10 vandal resistance.
So this IP camera is a great choice for exposed installation locations where vandals are expected. The camera does not suffer from IR glare or reflections, so you get that awesome 4K resolution and clarity without any compromise.
The RLC-842A also supports smart motion detection, it can distinguish between persons and vehicles and send push notifications or email alerts.
[easyazon_link identifier=”B07K74GWX5″ locale=”US” tag=”vueville.com-eaz-boipc18-20″]Check Price on Amazon[/easyazon_link]
This is the most recognizable type of security camera – the classic bullet shape. This also makes it a natural choice for a home CCTV system as a very visible deterrent. If a burglar sees one of these, he knows its not worth risking jail time to break into your house. But do make sure that you have got multiple cameras covering your entry/exit points and that your bullet cameras are high up and out of reach of vandals, because a well-aimed missile can potentially knock it off target.
The 8mp RLC-810A is the upgraded version of last year’s 5MP RLC-510A. Just like the other Reolink cameras in this article, you get a high-quality camera with smart person and vehicle detection. But unlike the turret cameras, you don’t get EXIR LEDs for night vision, just the standard ring-style IR LEDs. Still, these are plenty fine for most users.
Best Value 4K Bullet Camera: Amcrest IP8M-2696EW-AI
[easyazon_link identifier=”B0837485XG” locale=”US” tag=”vueville.com-eaz-boipc18-20″]Check Price on Amazon[/easyazon_link]
The Amcrest IP8M-2696EW-AI is powered by a Sony Starvis image sensor and Ambarella S3LM chipset that can put out UltraHD 4K video at 15 fps. At the same time, true 120dB WDR helps to avoid washed-out scenes in bright daylight. Bumping the resolution down to 3MP will result in a max frame-rate of 30 fps. Personally, I am happy with 15 fps as it reduces the disk space required and so extends the hours of video recorded.
Just like every other camera in this article, this Amcrest also sports onboard storage. So pop in an SD card (up to 128GB) and the camera can work in a fully standalone manner. It can record motion detection triggered clips and snapshots straight to the SD card without requiring a PC, NVR or anything. This built-in NVR of the Amcrest can be accessed through a web browser or the Amcrest mobile app. The same app also delivers push notifications to your smartphone.
Uniquely this camera also has audio or alarm connections, that help you to extend the capabilities of this camera. If you dabble with Home Assistant and ESPHome, you can set up some nifty automations using these inputs.
[easyazon_link identifier=”B08QV8T3D9″ locale=”US” tag=”vueville.com-eaz-boipc18-20″]Check Price on Amazon[/easyazon_link]
Now I have to say this upfront: the only time I recommend Wi-Fi cameras is when you cannot conveniently wire the camera up at your installation location & you have another wired camera covering the same viewing area. Why because Wi-Fi cameras are simply never going to be as reliable as a wired camera. That said, they do have their place.
For a Wi-Fi camera, you are constrained by available bandwidth. So the maximum 5MP resolution is plenty fine and in fact I would suggest a lower resolution to avoid dropped frames if you are placing the camera well away from the nearest Wi-Fi access point.
A major highlight is the motorized optical zoom that you can control from the excellent Reolink mobile app. I also like that even though the camera is wireless, it has an Ethernet port that allows it to be used as a wired camera as well! That’s a great touch, even though its not PoE capable.
2.8-13.5mm motorized varifocal lens, with pan-tilt
27°-96° Viewing Angle
60m/200ft EXIR LED Range
Spotlight for colour night vision
Built-in siren
Power over Ethernet (PoE 802.3at)
IP66 weatherproof
Smart (Person/Vehicle) with Auto-tracking
Built-in mic and speaker
[easyazon_link identifier=”B095H2BBWZ” locale=”US” tag=”vueville.com-eaz-boipc18-20″]Check Price on Amazon[/easyazon_link]
I first reviewed the 4MP version of the Reolink RLC-423 in 2017 and were very impressed with the quality and features that Reolink managed to cram into this PTZ at a very affordable price. In 2020 Reolink launched the 5MP version of the same camera and last year Reolink upgraded it to the 4K 8MP RLC-823A.
The most important upgrades are smart person detection with auto-tracking, on-board SD card storage, spotlight LEDs for colour night vision and a siren. With these features, the RLC-823A becomes the best value PTZ on the market.
Reolink Argus 3 Pro: Wire-free or battery operated Wi-Fi cameras became mainstream a couple of years ago and I started reviewing them on VueVille. I wouldn’t recommend using only battery powered cameras in your DIY security camera system because they are not a 100% reliable. Batteries will run out, or fail at the most inopportune moment. But as a secondary camera covering areas already covered by mains powered or PoE cameras, wire-free cameras are an excellent choice.
The Argus 3 Pro has a 4MP sensor and coupled with with PIR motion sensing and SD card storage, its a perfect DIY IP camera. Being battery powered, you can’t really expect it to support RTSP or ONVIF. But it does have colour night vision, 2-way audio, pre-motion recording, person/vehicle detection, large built=in battery, solar panel support, IP65 weather-proofing and Google Assistant support.
The other new models include the Argus Lumus and the Argus Eco which is the only bullet-style battery powered camera I have seen.
Check out our detailed review of the Argus below:
[wpsm_top postid=4415]
[easyazon_link identifier=”B08S7Q3BSH” locale=”US” tag=”vueville.com-eaz-boipc18-20″]Check Price on Amazon[/easyazon_link]
Best Outdoor Spotlight Camera with Colour night vision
Reolink RLC-824A: If you are looking for a spotlight camera with excellent colour night vision, check out our hands-on review of the RLC-824A.
[wpsm_top postid=11942]
[easyazon_link identifier=”B099ZPF3B2″ locale=”US” tag=”vueville.com-eaz-boipc18-20″]Check Price on Amazon[/easyazon_link]
What to look for in an outdoor security camera
Every year IP camera technology advances and you get more features for your money. But what exactly should you be looking for? The most important must-have features to look for in an outdoor security camera are:
Video Resolution – at least 4MP resolution. This is to ensure an increased chance of positive identification of faces, especially at night. 4MP is recommended as it costs no more than 3MP models these days and you can also fall back on the 2MP(1080p) or 3MP setting if you want to reduce bandwidth usage and disk space usage.
Field of view – at least 80 degrees horizontally. This depends on the focal length of the camera lens. The shorter the focal length, the wider the field of view. Ignore diagonal measurements, what matters is horizontal field of view.
Night vision – Should at least have InfraRed LEDs for night vision with an auto IR cut filter to avoid false colour in the daytime. Every camera I recommend in this article has an auto IR cut filter.
Weather proofing – Expressed in IP ratings, the first digit is the solid ingress rating and the second digit is the water ingress rating (higher is better always). An X instead of a number indicates a product is unrated for that component. An IP weather-proof rating is preferable, IP66 is the standard for good security cameras. Vandal resistance is expressed in the IKXX rating and is good to have in high traffic areas.
Should not be Internet or Cloud reliant – Can the security camera function without an internet connection? Do you have to pay a monthly subscription for core features such as recording video clips, storing them, accessing them later on, for motion detection? I only recommend cameras that do not need an Internet connection to function, are not cloud reliant and have the ability to write video clips and images to a local device such as an NVR, a NAS, or SD card. This is because for something as critical as home security, your camera should be able to record and store clips without requiring anything more than just a power source. Get a UPS and you can keep your cameras running even if an intruder cuts your home’s power supply.
RTSP stream capable so that third party apps such as camera viewers and Home Automation controllers can access the camera video stream.
ONVIF compatibility so that you can connect it to an NVR like the Amcrest which can support any ONVIF compatible camera.
Software features – Motion detection, Email alerts on motion detection
The nice-to-have features to consider are:
Wireless – Support for WiFi and/or Bluetooth if you have to install the camera in a spot you can’t run an ethernet cable to. But really I do not recommend going with only wireless cameras for your whole network – Wi-Fi is not that reliable.
Continuous Video Recording instead of just automatic event triggered or manual recording. Requires a storage medium though, like an NVR which adds to the cost.
Software features – Built-in NVR feature, advanced motion detection methods to reduce false alerts, push notifications to smartphone apps
Local storage – in the form of a microSD card slot, or internal flash storage. A built-in NVR function is a plus.
Motion detection method – PIR motion sensor is preferable to cut down on false alerts
Power source – Ethernet port preferable with PoE (Power over Ethernet) support, internal battery good for power backup purposes
Audio – Microphone built-in would be a nice to have, full-duplex capability is superb but very rare
Advanced features:
API available for interfacing with home automation controllers such as the Vera Plus or Fibaro Home Centre
Full duplex 2-way audio support, built-in mic or audio and alarm connections
PIR sensor to reduce false alerts
How to use this IP camera buying guide
Choosing your own DIY IP cameras can be overwhelming. So if you are brand new to this, it’s a good idea to first read up on IP camera basics. It contains all the frequently asked questions about IP cameras.
All the cameras I recommend in this article are DIY cameras that are not cloud-reliant or even Internet-reliant. None of them are crippled by their manufacturers to make you pay a monthly fee.
While I do recommend sticking to one single brand for convenience and maximum compatibility, thanks to the ONVIF and RTSP standards you can mix and match as I have done with our DIY home security camera setup.
Also if you want to just start with any one of these cameras, you can always continue using them in your future setup that also supports open industry standards such as ONVIF and RTSP.
Want to start with a single IP camera that can do everything, and maybe expand later with an NVR or NAS NVR? Awesome, that’s how I started! Pick a camera with on-board storage (SD card slot) from the recommendations below.
Want to start with a NAS as an NVR, with the freedom to add IP cameras later? Awesome, any camera recommended below will work for you! Skip down to the recommendations below.
How to choose an IP camera for an existing NVR
If your existing NVR doesn’t support ONVIF, choose the same brand IP Camera as your NVR.
If your existing NVR supports ONVIF, any camera recommended below will work for you.
Conclusion
The wide range of outdoor IP cameras above should give you a good overview of the freedom and flexibility going Pro-DIY brings you. Have I missed a camera that really ought to be on this list? Please leave a comment below – I love hearing from you!
We have teamed up with Reolink to giveaway a Reolink Argus this November! Enter our sweepstakes below to win the new Reolink Argus wire-free security camera. One winner will be selected at random at the end of the sweepstakes.
You must be a USA or UK resident who is 18 or older.
Complete at least one of the given tasks.
You can use your email or login with your Facebook/Twitter/Youtube accounts.
Refer friends to get extra entries.
Come back daily and claim the daily bonus entry until the giveaway ends on 30 November 2017.
The more entries you have, the more chances you can gain to win. All the best!
Full Terms and conditions
GIVEAWAY (“GIVEAWAY”) SPONSORED BY VueVille.com and Reolink (“SPONSORS”) AND ADMINISTERED BY Gleam.io. (“ADMINISTRATOR”). GIVEAWAY BEGINS ON 2017-11-05 AT 00:00:00 hours AND ENDS ON 2017-11-30 AT 23:59:59 hours. (“GIVEAWAY PERIOD”). NO PURCHASE NECESSARY TO ENTER OR WIN.
Only the actions specified in the giveaway as entry methods are required. By participating, entrants agree to be bound by these Official Rules and the decisions of the Sponsor and Administrator. Void where prohibited by law. Giveaway is open to legal residents of the United States and the United Kingdom who have reached the age of majority in their respective province or territory of residence at the time of entry. Employees or contractors of the Sponsor(s) and immediate family members of, and any persons domiciled with any such employees or contractors, are not eligible to enter.
1 winner will be chosen at random using the Gleam widget. The odds of winning will depend on the number of entries received. The winner will be sent an email and will have forty-eight hours to respond with information proving their eligibility to participate in this giveaway. If no response is received within forty-eight hours, another winner will be chosen. Administrators are not responsible for prize fulfillment nor for any technical failures. Winning entry will be verified. A list of winners will be displayed on the giveaway widget on the original giveaway post. Prizes will be dispatched by Reolink direct to the address provided by the winner.
Facebook, Instagram, Pinterest, Twitter and/or Google+ are in no way associated with this giveaway. If applicable, social media posts (such as but not limited to tweets and Instagram posts) must be PUBLIC to be eligible. If you sign up for newsletters as entries, you must confirm your subscription for those entries to count.
Administrators and sponsors reserve the right to publish winner’s first name and last initial. Contact information for sponsor(s), if applicable, can be found in the giveaway website links. Retail value of prizes is listed in the giveaway text. Images included in the giveaway post may not depict the exact prize, and are for illustrative purposes only. We reserve the right to change the prize and/or replace it with a cash prize if we are unable to procure the advertised prize. Please contact the Sponsor for any questions using the contact page at VueVille.com
I have been running my DIY home security camera system with a slew of Hikvison cameras such as the DS-2CD2042WD-I for a couple of years now. The biggest challenge I faced when I set up my system was the incessant false alerts shot off by the cameras whenever leaves moved because of the wind or the sun played hide and seek with the clouds throwing shadows here and there.
But I soon discovered a few tricks to stop almost all false alerts using Hikvision’s built-in smart events. In this tutorial, I will show you how to set them up properly.
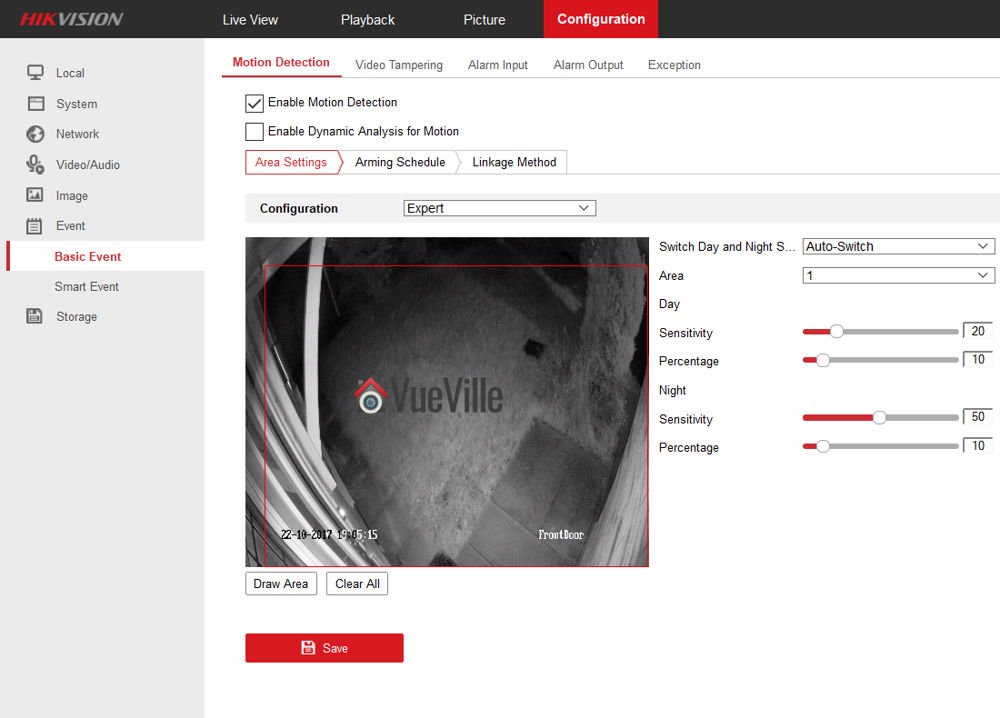
When you are just starting out the ‘basic event’ feature provided by Hikvision may seem to be sufficient. After all it lets you set the sensitivity level right? And on ‘expert mode’ you can set different settings for day time and night time and even the size of the object to be detected right?
I tried the Expert mode of the ‘Basic Event’ motion detection – still got tons of false alerts
Well the basic motion detection event is just that, basic. You can draw an area to monitor and set the sensitivity, and even set different sensitivities for day or night, but you got to remember that all the camera does is use a software algorithm to compare every frame to the previous one and see what has changed. The same settings that worked during the day won’t work and if you explored the ‘expert mode’ of the ‘basic event’, you may have figured out that you could reduce the sensitivity just during the night. But you know what? Even this degree of control and crafty zone drawing skills aren’t going to help in reality. You are still going to get tons of false alerts whenever a fly or insect wanders into the path of your camera’s onboard IR lamps.
So what’s the solution?
Let me show you how I have virtually eliminated false alerts from my Hikvision cameras while not missing a single important motion event that I need to be alerted to: Use Advanced Motion Detection events (Hikvision calls this Smart Events) such as Intrusion Detection and Line Crossing Detection.
Before we proceed, since most modern browsers such as Chrome, Firefox and Microsoft Edge stopped supporting the NPAPI plugin that Hikvision relies on, I recommend the Pale Moon browser which will let you access your Hikvision settings page.
Most Hikvision NVRs support these smart events, so you could use the techniques I describe below to achieve the same amazing results.
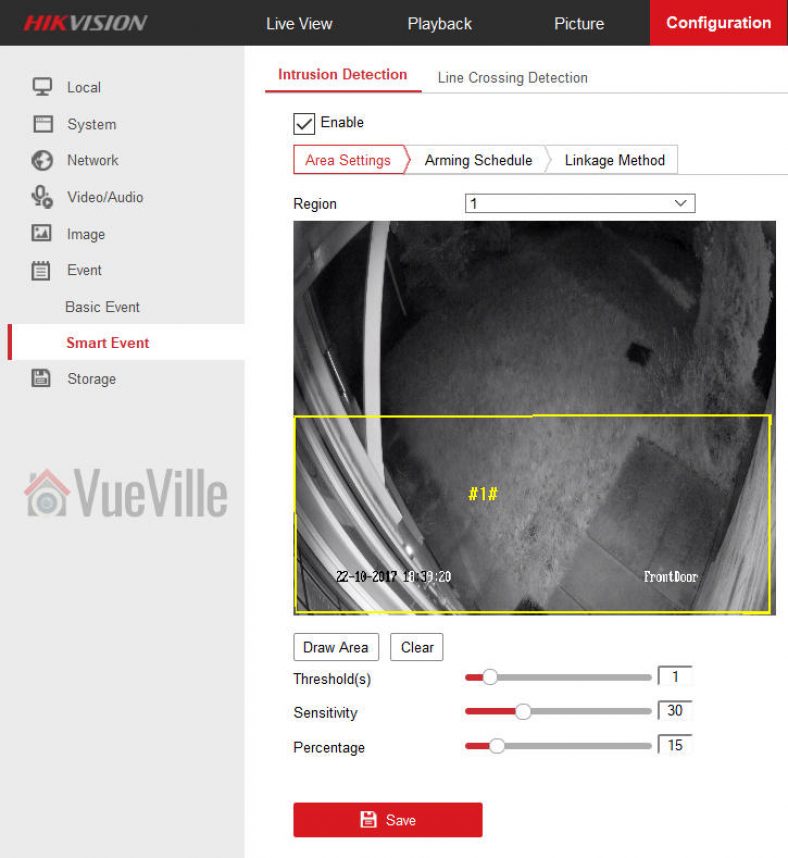
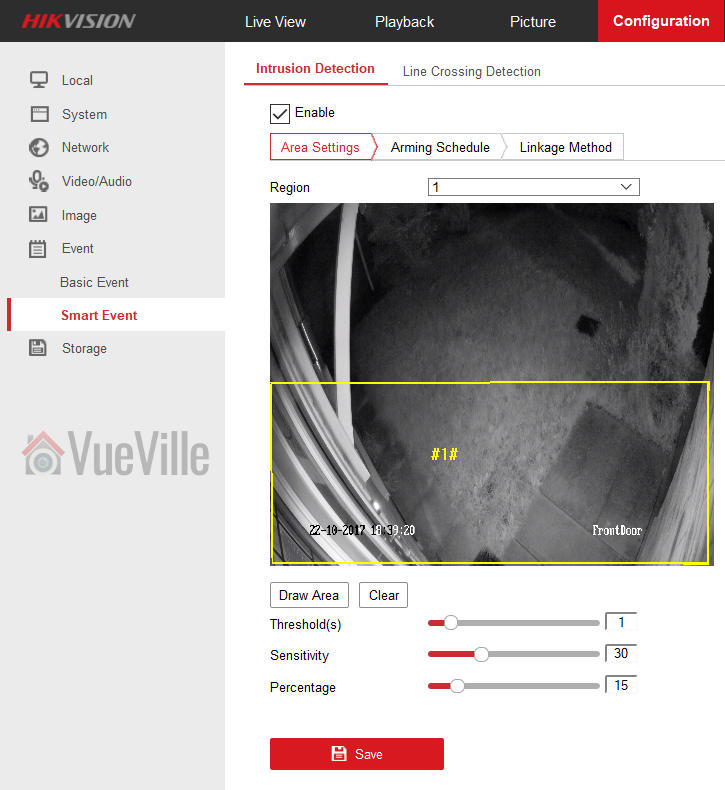
Intrusion Detection
The idea behind intrusion detection is that a real intruder would move towards and enter specific areas in your scene. Let’s look at an example below from my front door camera, a DS-2CD2542FWD-IWS.
I only need an email notification from the camera when a person is at the door. When I tried using the basic motion detection event, shadows of clouds passing by would keep triggering the event and send me false positives.
So what did I do? I needed to define 4 different parameters: the detection area itself, the dwell time in seconds (threshold), sensitivity, and the size of the object defined as a percentage of the total detection area. Whew, that sounds complicated right? How are you supposed to figure out all these things? Chill, I found an easy way of doing this.
I had the basic event defined for a few days and this gave me a large collection of motion triggered recordings from this camera. I separated these into two categories – the ones with people in them and the ones that were false positives.
I first looked at the genuine alerts, the ones that were triggered by people, to see what they did and where they stood in the scene. Watching closely where they stood and how they approached the door helped me define the smallest area I needed to draw. This is in the yellow box marked as area 1 (#1#) in the screenshot above. Visually judging how large the area occupied by the person in the scene compared to the yellow boxed area gave me a rough percentage value to use. If you set the percentage too low, you are going to get alerts of animals like cats too. Unless you want to see which of your neighbours’ pet cats is leaving a gift package at your door, don’t set this too low!
Then I looked at the motion triggered clips that did not have people in them told me that most of the false alerts were triggered by insects and headlights that crossed the scene very quickly (less than 1 sec). So that gave me the threshold.
That leaves one more setting to define – sensitivity. This is probably the toughest one as its not something you can calculate – you just got to use good ol’ trial and error here. 30 is what I recommend as a starting point.
Line Crossing Detection
Okay so if intrusion detection is so great, why do we need another smart event type? Well there may occur situations where a person (read perpetrator) darts into your camera’s scene, does the deed and runs away quicker in less than your dwell period or ‘threshold’ setting. Like when a kid decides to ring your bell and run away. Intrusion detection is going to fail here. That’s where line crossing detection comes in.
Not only can you define the direction in which the object (perp) needs to enter your scene to trigger the alert, but you can also specify the sensitivity. When you get really specific with your motion detection types, what happens is that you are defining a narrow set of conditions that need to be satisfied to trigger an alert. That’s why the line crossing alert works so well.
Conclusion
Using a combination of advanced motion detection events such as intrusion detection and line crossing detection is very powerful and will drastically cut down, if not eliminate the plague of false alerts from your Hikvision cameras or NVR.
Reolink recently launched their latest indoor pan-tilt wireless camera, the 4 Megapixel [easyazon_link identifier=”B01LS71HNM” locale=”US” tag=”vueville.com-eaz-20″]Reolink C1 Pro[/easyazon_link]. I got the chance to do a thorough hands-on review and I found it to be a great multi-purpose DIY security camera. With its easy setup, built-in NVR features, full duplex 2-way audio, and dual-band WiFi, its a solid choice for your DIY home security system, especially if you don’t want to be reliant on any cloud service.
I currently use the Amcrest ProHD 1080p as my son’s baby monitor. Since the Reolink C1 Pro is likely to be pitched as an upgrade to a ‘mere’ 2MP camera and I have been using the Amcrest for over a year, I will be drawing comparisons between these two throughout this review.
A quick note: As an Amazon Associate I earn from qualifying purchases. This post contains affiliate link(s). An affiliate link means I may earn advertising or referral fees if you make a purchase through my link, at no extra cost to you.
Specifications
[table id=39 responsive=scroll /]
Unboxing
The Reolink C1 Pro comes in a nicely packed box with a sufficient level of padding inside to protect the camera. The model name of the camera, and its main specs are clearly listed on a sticker on the outside of the box along with the default login details.
What’s in the box
Reolink C1 Pro Mini PT Camera
DC 5V wall adaptor
Mini USB cable
Ethernet cable (1 metre long)
Wall mounting bracket
Quick Start guide
What’s next booklet
Drilling templates
CD-ROM with software and manuals
Reolink surveillance notification sticker
Screws and rawl plugs
Design & Features
The C1 Pro is available in only one colour – black. The camera can be divided into three parts – the base, the body and the lens mounting which contains the lens itself. A chrome trim runs around the base, lending it a high-end look and feel.
The base has the indicator LEDs on the front (see above) and the connectivity ports on the back. You will find the 10/100 Mbps ethernet port, a microSD card slot and a micro-USB port which serves as the power input. Yes the camera runs on 5V DC which means that you can easily plug it into a USB port to power it. How much amperage would you need? Power = Voltage x Current. Since the camera is rated for a maximum of 6W power usage and runs at 5V, the current requirement is 1.2A. If your USB port is rated for charging devices, its 1.5A rating is more than sufficient to power the camera.
The dual Wi-Fi antennae are also fixed to the back of the base. Now this is a great feature to have as most of the C1 Pro’s competitors are still sporting just 2.4 GHz Wi-Fi. The antennae are adjustable and so you can orient it to get the strongest Wi-Fi signal.
You will also find a handy reset pin hole on the side of the base.
The body is the part that rotates around the vertical axis, and has a 355 degree freedom of motion. The body also contains the dual speakers, one on each side as you can see below. The built-in microphone can be found on the front of the body just under the lens mount.
The lens mounting piece is free to rotate about the horizontal plane with 42 degrees of movement. The daylight sensor is integrated into the Ring-type Infrared LEDs concealed smartly around the lens. If you look carefully you can see the red tinge of the Infrared LEDs under the darkened glass surrounding the lens.
All in all, the camera feels solid in construction and the matte finish of the dark plastic makes it look more expensive than it really is.
Installation & Setup
The Reolink C1 Pro comes with a very good quick start guide which is a double-sided glossy booklet, just like the Reolink Argus I reviewed recently. The general introduction section illustrates and labels the different parts of the camera such as the daylight sensor, the built-in mic, the speaker, the indicator LEDs and the various connections.
There is also a helpful camera connection guide for those who are new to security cameras. Initial setup needs the C1 Pro to be connected to your router via an ethernet cable unlike the Argus which had a niftier setup method. Nope, there’s no voice guiding you through the setup process like the Argus either.
Since the C1 Pro doesn’t support PoE, you have to use the included power adaptor. The camera uses a standard USB power plug so you may be able to power it using alternative power sources too. The blue power LED will lit up when I turned on the power. There was no ‘startup dance’ or calibration as my Amcrest ProHD 1080p PT does when I power it up, although after the initial setup I noticed it does this whenever I power it on.
So you have two options for setting up the camera:
Setup using a phone or tablet – the smart device method as Reolink calls it, or
Setup using a laptop
I suspect most people would opt for the smart device setup, so that’s what I did.
Install the Reolink mobile app. I had it already installed since I use the Reolink Argus.
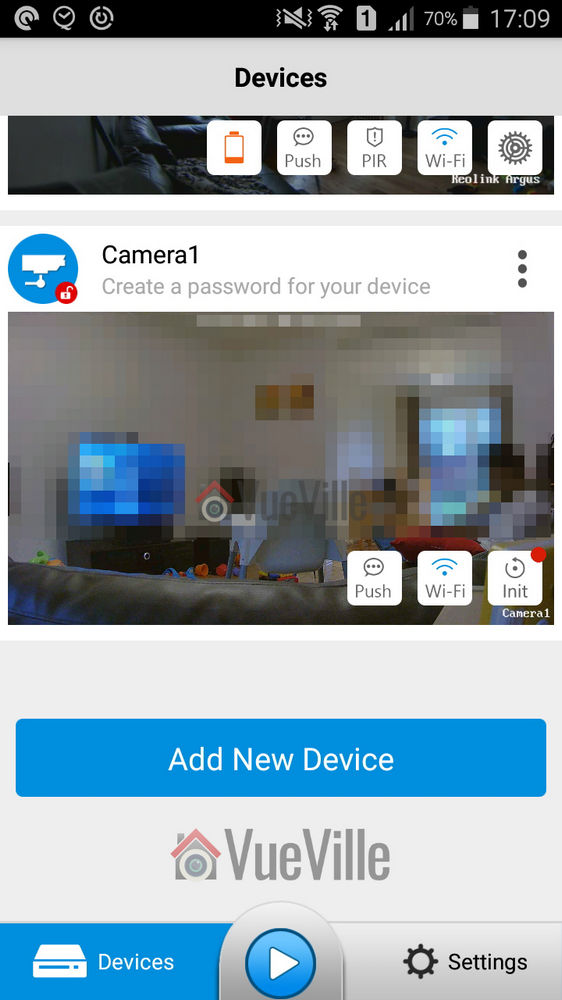
To my surprise, when I opened the app I found that it detected and added the Reolink C1 Pro automatically! There was a red indicator next to the ‘Init’ button for the C1 Pro. So I turned to the quick start booklet and sure enough it said the camera would be automatically detected.
Now its time to set up the Wi-Fi. I touched the Wi-Fi symbol for the C1, entered my Wi-Fi network details and then proceeded to perform the Wi-Fi test. The test was successful, so I backed out to the main devices page.
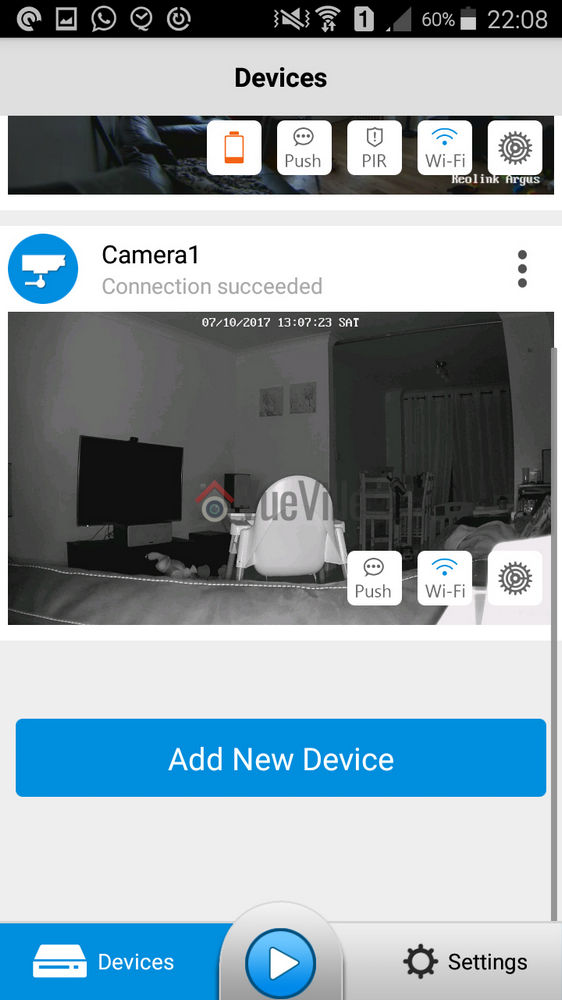
Next I clicked on the warning message saying ‘Create a password for your device’, and saved a password. The app then opened the camera’s dedicated page with all the control options including the PTZ button and Live View. Backing out to the main devices page showed that the warning message now changed to ‘Connection succeeded’.
Interestingly the quick start guide didn’t say anything about the Init button which still had a red indicator next to it (as you can see above). So I touched it and completed the initial setup. I touched ‘Synchronize phone time’ and then hit Next to complete the setup. Good, now the setup was really complete and the Init button changed into a settings gear button.
Configuring the C1 Pro
As we saw earlier, the easiest way of setting up the camera is using the app. This is in part because you don’t need to know the camera’s IP address to access it, the app does that part for you. But don’t forget this is not a dumbed down security camera. It has its own web admin page where you can access the advanced settings. But to do this you need to know the IP address of the camera. Since the initial setup requires the camera to be connected physically to your router via the Ethernet cable and DHCP is enabled by default to help newbies, the camera is accessible via that interface’s IP address. You can scan the network using any number of apps to find out the ethernet interface’s IP address.
If you have set up the Wi-Fi as well, that interface will have a separate IP address. Just like the Amcrest ProHD IP camera, both interfaces are live at the same time and you can choose to access the camera through either one. This is a very nice feature.
The Web Admin page
When you first log in to the web admin page, it takes you straight to the Live View page, which Reolink calls the ‘Preview’ tab. Here you can control the PTZ function of the camera, switch between different resolution (clear/fluent/balanced), and access some of the OSD settings. You can also mute the camera audio if required. The web admin page uses Adobe Flash though, I would have preferred an HTML5 interface.
The playback tab is for accessing the built-in NVR feature of the C1 Pro. What is the built-in NVR feature? Basically, pop in a microSD card and the camera can record continuous or motion detection triggered video clips or snapshots to the SD card. You can login any time from anywhere to review the footage through a timeline view. This means that if you need only a single camera or two in your home , you don’t need to buy a separate NVR just to record video footage. The camera can also push notifications to the Reolink app on your mobile phone, send email alerts with attached snapshots or video clips and even upload them to an FTP server.
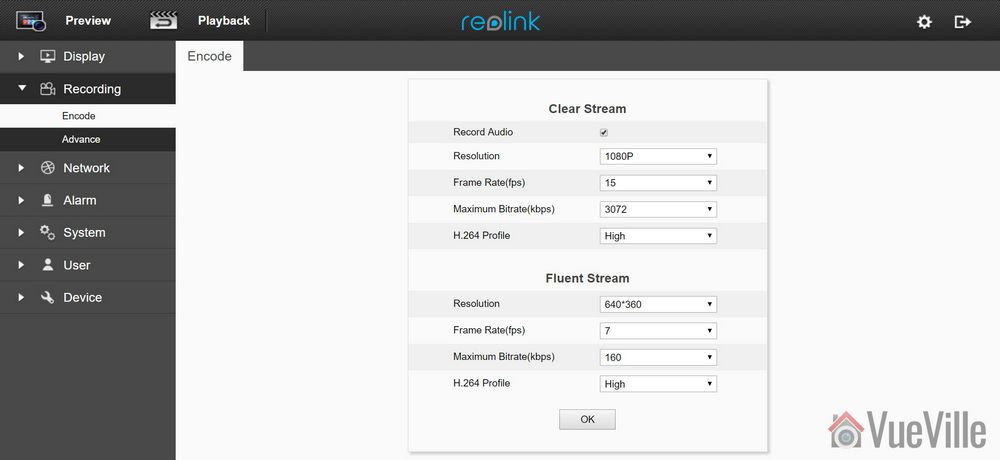
Moving on to the settings page, the various configuration options are neatly laid out in logical sections. You can set the video resolution and frame rates separately for the main stream (called clear stream) or the secondary stream (called the fluent stream). The secondary stream is used for the mobile app live view feature.
The network section lets you switch between static and dynamic IP allocation (DHCP), and also adjust many other settings such as the various ports used, set up a dynamic DNS ping, email notification setup, FTP settings, and push notifications. I was happy to see that uPNP is disabled by default – this is a great security feature. When ONVIF is available you really do not need uPNP.
Okay but how does the Reolink app manage to access the C1 Pro and receive push notifications even when you are outside your local network? Well its got to be that favourite protocol of every security camera manufacturer, P2P! Except, Reolink doesn’t call it that – you are looking for the UID setting. It is on by default which is fine for making the camera super easy to set up but for power users like me, I don’t need the C1 Pro to poke a hole through my network and connect to Reolink’s P2P servers. I have my super secure way of accessing my local network remotely through OpenVPN, so I immediately turned off the UID P2P feature.
Adding a microSD card for motion detection recording
I inserted a microSD card into the SD card slot. I had to push the card all the way into the slot before it click-locked. I then formatted the card through the web admin page. The camera then automatically rebooted and the microSD card was ready for use.
A word of warning here, by default the camera automatically will then start recording 24/7 to the SD card. I would have been happier to see the default set at ‘None’ or ‘Motion’ instead of ‘Normal’.
Mobile Push Notifications
Push notifications can be set up based on the time of the day. Remember that push notifications will not work outside your local network if you switch off P2P though.
Adding the Reolink to QNAP Surveillance Station
The C1 Pro supports ONVIF, so I was easily able to add it to my QNAP TS-253A’s Surveillance Station app. I first created an additional user for the NAS using the web admin page of the C1 Pro.
Performance
Okay so the C1 Pro is a 4 Megapixel camera that can do 30 frames per second, so its no surprise I found things ticking along nicely throughout the review with no slowdowns, frame stutters or any performance issue really.
Let’s look at the default settings the Reolink C1 Pro comes with from the factory:
Main stream: 4MP @ 15fps and 3Mbps
Now I think the default bitrate of 3Mbps is too low but since these are the defaults, I ran my day and night tests at these settings.
In the System>Performance section of the web admin page, I could see that while idling the processor usage ranged between 10% and 15%. When motion was detected this went up to around 40%, so there was always sufficient headroom for the camera’s processor.
Video quality
Video captured was crisp and clear both during the day time and in total darkness, in line with my expectations for a 4 Megapixel IP camera.
Here are the motion detection triggered videos recorded at the default 4Megapixel resolution, at 30 fps and 3 Mbps bitrate:
There was no blurring of the video and there were no dropped frames.
Motion detection
The C1 Pro is able to both pre-record and post-record. This means the camera is able to record not just what happens after motion was triggered but a few seconds before the trigger as well. This is a great feature and something that I always look for in a security camera. The post-record feature lets you decide how many seconds the camera should record after the last motion trigger. The default is 15 seconds.
Night vision
The Infrared LEDs are reasonably powerful and can light up a decent sized room. There are no settings to control the brightness of the LEDs and there are no advanced features to dynamically control the infrared light output.
Audio quality
Just like most indoor security camera, the C1 Pro supports 2-way audio. Usually the implementation in most manufacturers’ native apps mutes the audio when you activate the microphone. In other words they have half-duplex audio, not full-duplex. Ideally to use the camera as an intercom, you need 2-way full duplex audio.
Interestingly Reolink has not claimed full duplex audio, however the Reolink app doesn’t mute the incoming audio when you press the microphone button. You can continue to hear what the person at the other end is saying when you are speaking. So the C1 Pro actually supports full duplex audio.
So how well does it work in practice? The audio quality is great and the dual speakers do a great job in reproducing audio. But there is a noticeable lag, however slight, in audio playback and this makes the full duplex capability less useful. We found ourselves using the Reolink C1 Pro more like a walkie-talkie just like the Amcrest ProHD.
PTZ performance
If you are planning to use the C1 Pro as a baby monitor with 2-way audio, you are going to love how quiet it is. One complaint I do have with the Amcrest ProHD camera is how noisy the PT motion is, truly its loud enough to wake up my baby if he is sleeping lightly.
The C1 Pro hardly makes a sound and so is better suited as a baby monitor. There are no speed control settings though whereas the Amcrest ProHD does. One other drawback I found is that the motion detection stays active even when you use the Pan-Tilt controls which means the camera records a motion detection clip each time you use the PTZ controls.
Wireless performance
So I tested the camera over both Ethernet and Wi-Fi. But you know Ethernet is easy for any camera in 2017. What really matters is how good the Wi-Fi connection and performance is. The C1 Pro boasts of 2T2R MIMO antennae for improved wireless performance. So I moved the camera to the farthest point in my house to see how the Wi-Fi did. Over both 2.4GHz and 5 GHz, the C1 Pro was stable and performed just as if it was connected over Ethernet.
Mobile app live view
I first installed the Reolink Android app on my phone when I reviewed the RLC-423 PTZ. I then added the Reolink Argus and now the Reolink C1 Pro. I have been quite impressed with the fluid intelligent design of the mobile app, its definitely something that Hikvision for example can learn from. Where the iVMS app is clunky and often doesn’t work, the Reolink app simply delivers.
Live view on the app can be by camera or you can simultaneously view multiple Reolink cameras. There is a handy PTZ joystick button and the camera is quite responsive when you move the joystick around. Over a remote connection, there was a 0.5 second delay between moving the PTZ controls and the video changing.
Mobile app push notifications
So what should you be looking for when it comes to push notifications? The speed and reliability of the push notifications reaching you. You want the camera to send you push notifications immediately after it detects motion. Especially if you have configured email alerts, SD card recording at 4 Megapixel recording and push notifications, inferior cameras may struggle but not the C1 Pro.
Inside my local network I got push notifications on my phone instantaneously and on remote networks there was a delay of just 1 second which is very impressive. The success rate of receiving the push notifications over multiple motion triggers was a solid 100%.
Reviewing recorded footage
So this is how you access the built-in NVR feature of the C1 Pro. Clips recorded on the microSD card can be accessed either via the web admin interface or the Reolink mobile app.
Using the web browser interface
You can choose a date to review and if motion triggered recording is enabled, all these clips will be shown on the timeline. You can roll the mouse wheel to zoom in and out of the timeline to select specific clips. Click anywhere on the timeline and it will jump to the next recorded clip and then keep playing one clip after the other sequentially.
There is a handy download button which lets you download multiple clips to your computer. Overall great implementation and a very useful feature.
Using the mobile app
The Android mobile app also can access the built-in NVR feature of the C1 Pro. It works just like the web interface – you can choose the date to review and either let it play one motion triggered clip after the other or pick a specific point on the timeline.
Verdict
There are lots of indoor security cameras available these days – hundreds and hundreds of obscure brands that all promise to meet your indoor security needs. But there are a few brands that stand out – Reolink & Amcrest.
The super quiet Pan-Tilt motion of the camera calls for special mention, its ideal for discreet use cases or where you don’t want to wake up a baby in light sleep!
The Amcrest ProHD is available with PoE whereas the Reolink doesn’t have PoE. It would be nice to have the option of choosing between PoE and Wi-Fi.
[review]
Where to buy
[easyazon_link identifier=”B07CPNNT56″ locale=”US” tag=”vueville.com-eaz-20″]Check Price on your local Amazon site[/easyazon_link]
(* = affiliate link / image source: Amazon Associates Program)