Win a Samsung Gear VR and Wireless Controller kit with VueVille this June!
We are launching our second giveaway this year which runs through the whole month of June and we want you to take part! Enter our sweepstakes below to win a amazing new Samsung Gear VR kit with the wireless controller. One winner will be selected at random at the end of the sweepstakes.
You must be a USA or UK resident who is 18 or older.
Complete at least one of the given tasks.
You can use your email or login with your Facebook/Twitter/Youtube accounts.
Refer friends to get extra entries.
Come back daily and claim the daily bonus entry until the giveaway ends on 30 June 2018.
The more entries you have, the more chances you can gain to win. All the best!
Full Terms and conditions
GIVEAWAY (“GIVEAWAY”) SPONSORED BY VueVille.com (“SPONSOR”) AND ADMINISTERED BY Gleam.io. (“ADMINISTRATOR”). GIVEAWAY BEGINS ON 2018-06-01 AT 00:00:00 hours AND ENDS ON 2018-06-30 AT 23:59:59 hours Pacific Time. (“GIVEAWAY PERIOD”). NO PURCHASE NECESSARY TO ENTER OR WIN.
Only the actions specified in the giveaway as entry methods are required. By participating, entrants agree to be bound by these Official Rules and the decisions of the Sponsor and Administrator. Void where prohibited by law. Giveaway is open to legal residents of the United States and the United Kingdom who have reached the age of majority in their respective province or territory of residence at the time of entry. Employees or contractors of the Sponsor(s) and immediate family members of, and any persons domiciled with any such employees or contractors, are not eligible to enter.
1 winner will be chosen at random using the Gleam widget. The odds of winning will depend on the number of entries received. The winner will be sent an email and will have forty-eight hours to respond. If no response is received within forty-eight hours, another winner will be chosen. Administrators are not responsible for prize fulfillment nor for any technical failures. Winning entry will be verified. A list of winners will be displayed on the giveaway widget on the original giveaway post. Prizes will be dispatched within 30 days of the giveaway ending.
Facebook, Instagram, Pinterest, Twitter and/or Google+ are in no way associated with this giveaway. If applicable, social media posts (such as but not limited to tweets and Instagram posts) must be PUBLIC to be eligible. If you sign up for newsletters as entries, you must confirm your subscription for those entries to count.
Administrators and sponsors reserve the right to publish winner’s first name and last initial. Contact information for sponsor(s), if applicable, can be found in the giveaway website links. Retail value of prizes is listed in the giveaway text. Images included in the giveaway post may not depict the exact prize, and are for illustrative purposes only. We reserve the right to change the prize and/or replace it with a cash prize if we are unable to procure the advertised prize. Please contact the Sponsor for any questions using the contact page at VueVille.com
Smart home heating is all the rage these days. The Nest Smart thermostat kicked it all off in 2011 when it became the first smart heating device to go mainstream and capture the public’s smart home imagination. Now 7 years on, Nest is still around but its far from the only option for us smart home enthusiasts who want automated boiler control and separate independent heating zones.
Video Review
This is my first attempt at a proper video review, let me know your feedback! https://youtu.be/G_mIe0XKTVc
A quick note: As an Amazon Associate I earn from qualifying purchases. This post contains affiliate link(s). An affiliate link means I may earn advertising or referral fees if you make a purchase through my link, at no extra cost to you.
Why would you use a smart radiator thermostat?
The Nest Thermostat is a viable multi-zone option if your home has independent heating circuits. But what if your home has no true zones, has just a single thermostat for the whole house and you still want to set up multiple zones in your home? This is where smart radiator thermostats come in.
How does a smart radiator thermostat work?
An electronic radiator thermostat is designed to replace your existing manual radiator thermostat which sits atop your radiator valve. Then the electronic radiator thermostat can directly control the valve by opening or closing it. The flow of hot water from your boiler circuit into the radiator is thus controlled.
Eurotronic Spirit Smart Radiator Thermostat
Unboxing
[wpsm_quick_slider ids=”5828,5829,5830,5831″]
The Spirit comes in a compact box with attractive packaging. Opening up the box yields the following:
Thermostat
Adaptors and screws
Exchangeable top panel
Quickstart guide
Installation & operation guide
2x AA Batteries
Quality control confirmation note
Design and Hardware Features
I am a huge fan of the Z-Wave platform and always try to buy only Z-Wave enabled devices to maximise compatibility and avoid headaches. So when I decided that I want to go from my Vera Plus controlled single zone heating system to the new HomeSeer controlled multi-zone setup, I started looking for Z-Wave smart radiator thermostats. My research identified the following options:
Danfoss LC-13 Living Connect,
Fibaro Smart Thermostat,
Popp Heating Thermostat,
Eurotronic StellaZ,
Eurotronic Comet, and
Eurotronic Spirit
Of the above, only the Eurotronic Spirit has two features that I was looking for: a built-in temperature sensor and FLIRS (Frequently Listening Receiver Slave) which makes battery powered Z-Wave devices very responsive.
Eurotronic calls the Spirit an ‘intelligent energy-saving controller for Z-Wave with exchangeable design panels’ and can save up to 30% of heating costs. Using its built-in temperature sensor and its proprietary radiator valve control algorithm, the Spirit automatically decides how much to open the TRV.
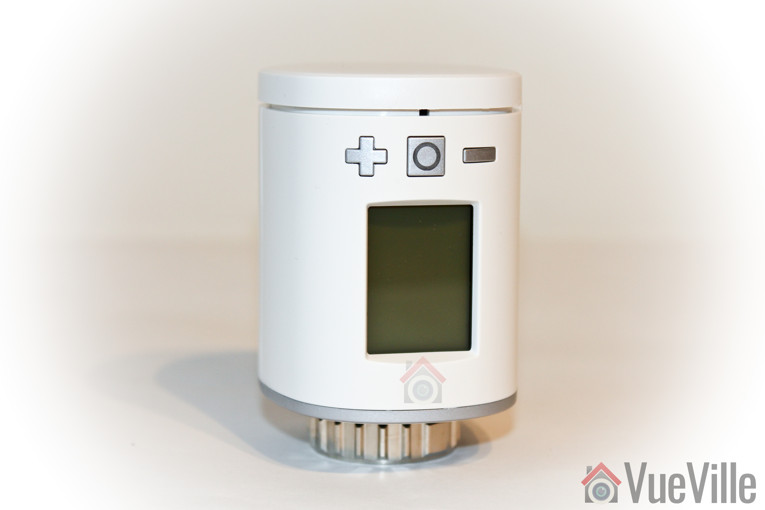
The thermostat itself is composed of three parts: the top panel that serves as the battery cover, the body itself which houses the LCD screen, the physical control buttons, and the bottom part with a M30 x 1.5mm thread which screws onto the radiator valve.
The top panel is the part that Eurotronic calls the exchangeable design panel. The default fitted panel is white, but there’s an additional grey panel in the box. You can also buy panels in other colours.
I really liked the large LCD that is also back-lit. Depending on the mode the thermostat is in (more on that later), the LCD shows you the temperature set-point or the valve opening percentage. There are also indicators for Z-Wave connectivity, child lock status, and low battery.
The physical set-point plus and minus buttons are not back-lit but have a nice solid action when pressed. The central button is called the Boost button as this is its main purpose in everyday operation. But it also serves a variety of purposes depending on the status of the device and it has a mutli-colour LED ring around it that can flash green or red to inform you of what’s going on.
The Spirit has a feature that I think all thermostats should have: an on-board temperature sensor that can report unsolicited temperature measurements back to your Z-Wave hub. Your first thought may be that these measurements are useless because of the proximity of the sensor to the radiator. You are right but an additional temperature measurement closer to the floor can be quite useful. It is also an easy way to confirm that your radiator is indeed heating when it should.
Software Features
One common issue that you will find on home automation forums is the poor responsiveness of most battery powered Z-Wave thermostats. Intermittently they do not respond to Z-Wave commands which is not what you want for your heating system.
The Eurotronic Spirit rectifies this by using a technology called FLIRS (Frequently LIstening Receiver Slave). Instead of waking up periodically to check with the Z-Wave hub what the set-point is, the thermostat continuously listens for incoming commands.
Another interesting feature is the open window detection which will turn off the thermostat for 15 minutes if it thinks a window has been opened. This can be cancelled by a button press and the sensitivity of the detection algorithm can be adjusted through parameter 7.
The thermostat can operate in 2 main states: default and manufacturer specific mode. Confusingly, Eurotronic clubs the latter together withe the operation modes of the thermostat. To clarify, you can set the following modes of the thermostat that Z-Wave controllers will discover and let you control: Off, Heat, Energy Heat, and Boost or Full Power. All of these modes are automatic in that they use the proprietary Eurotronic algorithm to decide how much to open the radiator valve. You cannot control the valve opening % yourself in these modes. This is possible only in the ‘manufacturer-specific’ state which Eurotronic calls a mode but is not a mode in the Z-Wave sense as it is not something you can control directly or through setting parameters. This is the only disadvantage that I found with the Eurotronic Spirit thermostat.
That said, you can configure quite a few parameters of the Spirit:
Invert the LCD display
Adjust the LCD timeout
LCD backlight
Battery report method and frequency
Measured temperature report
Valve opening percentage report
Window open detection
Measured temperature offset
Installation
The quick start guide has both German and English sections. The instruction are written in an easy to understand manner and contained illustrations exactly wherever I expected them.
These are the steps I followed to set up the Spirit and include it in my HomeSeer Z-Wave network:
I inserted the provided batteries and replace the battery cover. This brought the Spirit to life, its Boost button started blinking green and the LCD displayed “Inc” indicating that it is ready to be included into a Z-Wave network. This also meant that it is not currently paired.
I put HomeSeer into the “Add a node” mode and pressed the boost button. A countdown started from 120 seconds and after 5 seconds, the Spirit had successfully completed inclusion and displayed its node number. On 4 of the 5 Spirit thermostats I installed in my house, only 1 had issues pairing. From trial and error I discovered that doing a factory reset (insert batteries while holding down the + and – buttons) and holding the thermostat within inches of the Z-Wave hub during inclusion resolved the pairing issues.
It was then ready to be installed on the radiator valve, and the LCD display read “Ins” with a mechanical spanner icon.
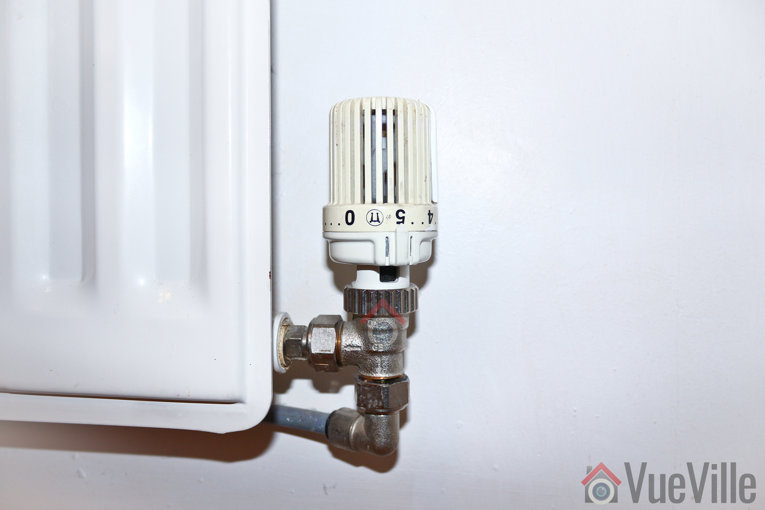
I set the old manual Honeywell thermostat on the radiator to the full open position, and unscrewed it.
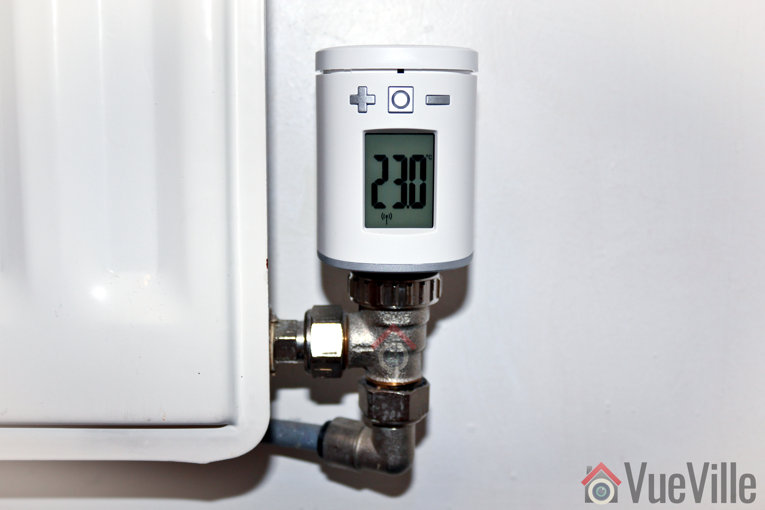
I then installed the Spirit onto the radiator valve and pressed the boost button which was blinking green. I didn’t need to use the provided adaptors because the Honeywell had a M30 x 1.5mm thread just like the Spirit. Adaptors are not needed for Heimeier, Junkers Landy + Gyr, MNG, Honeywell, and Braukmann valves. Anything else and you probably need the adaptors.
The thermostat completed the mechanical installation automatically and showed the default heating set-point of 22 degrees C. I increased the set point to 23 degrees C from the Homeseer control panel and the thermostat responded immediately.
Performance
The installation process
I should really split this into two sections as I had very different experiences with the Vera Plus and Homeseer HS3 using an Everspring SA-413 USB Z-Wave stick. As I was still in the process of migrating from the Vera Plus to HS3, I first tried adding them to the Vera Plus and of the 5, only 1 managed to pair properly. The others either didn’t pair at all, or paired but wouldn’t respond reliably to heating set-point changes. After many hours of factory resets and unpairing and pairing I got all of them to work properly with the Vera Plus.
I then unpaired the thermostats from the Vera Plus, shut down the Vera Plus, reset all of the thermostats and added them to my Homeseer HS3 Z-Wave network. With the Homeseer, I could see that the thermostats paired successfully as long as they were within a few inches of the Z-Wave USB stick. If it was more than a feet away, it would still pair but in non-secure mode. So the secure mode negotiation was the critical bit. At least with the HS3 I could see the pairing status messages and see what was going on, with the Vera I was just left guessing.
On the topic of security, the Spirit supports the latest Z-Wave S2 security standard. Any new device released after April 2, 2017 must support S2 security. However the HS3 Z-Wave plugin with S2 support is still in beta so I haven’t installed it yet.
Wireless range
My HS3 laptop and Z-Wave USB stick are at one end of the house, but even the furthest Spirit thermostat has no issues communicating with HS3. A have a generous amount of mains powered Z-Wave smart plugs, so my Z-Wave network is quite strong anyway since they all act as signal repeaters.
Responsiveness and reliability
I have been using the 5 thermostats in my home for 3 months now and once I moved them over to Homeseer, they have not skipped a beat. They now form the core of my advanced automatic multi-zone heating system running on HomeSeer HS3. I am glad I moved to Homeseer because as capable as PLEG was on the Vera, creating advanced scenes and events on the HS3 was much easier and quicker. No scripting required either!
How quiet is it?
The Spirit is not super-quiet when the motor is in operation opening or closing the valve. Nor is it loud. I’d say it is noticeable up to a few feet away from the radiator.
The thermostats are super-responsive and I have had no issues with reliability at all.
Configuring parameters
My radiators are a bit old so have the valves at the bottom and this meant that the Spirit thermostats had to be positioned upside down (according to the manual, this is not uncommon in British homes). So I set parameter 1 to value 1 and the display inverted itself as expected. To conserve battery life, I also reduced the LCD timeout to 5 seconds (the lowest).
I was disappointed that direct valve control is not possible unless a command in the basic command class (0xFE) is sent to the thermostat. Neither the Vera Plus nor Homeseer HS3 can do this, so I had to implement a workaround to get the valves to open 100% or close 100% on demand.
Battery life
In the 3 months I have had the thermostats, these are the battery stats: the lowest battery level is 80% and the highest is 100%. I am not sure how accurate these self-reported battery lebels are, so we will just have to wait and see.
Alternatives
Danfoss LC-13 Living Connect,
Fibaro Smart Thermostat,
Popp Heating Thermostat,
Eurotronic StellaZ,
Eurotronic Comet
Verdict
[review]
Where to buy
[easyazon_link identifier=”B075X257NC” locale=”UK” tag=”vueville.com-eaz-21″]Check Price on your local Amazon site[/easyazon_link]
(* = affiliate link / image source: Amazon Associates Program)
If you are looking into getting an IP camera system for your home or office, you must have come across the term PoE. What does PoE mean? Is it worth paying for? What are the alternatives? Can you use PoE for your existing IP cameras? These are some of the questions I often get from our readers, so I thought I would write a post dedicated to all things PoE. [wpsm_toplist] [wpsm_stickypanel][contents h2][/wpsm_stickypanel]
What is Power over Ethernet (PoE)?
Power over Ethernet or PoE for short, is a technology that lets you transmit power and data over a single Ethernet cable, without any negative effect on data speeds.
What is the difference between Active and Passive PoE?
Active PoE is where both the PoE power source and the PoE powered device are standards-compliant and talk to each other to negotiate the exact amount of power needed. If a device claims that it is PoE standards compliant to, say IEEE 802.3af, it is claiming that it is an active PoE device.
In contrast, you can piggy-back power over an Ethernet cable using a PoE injector and this is called passive PoE. The injector simply takes the power you provide and transmits it to the other end of the Ethernet cable in a dumb or passive fashion.
How does Power over Ethernet work?
A typical Ethernet cable consists of 4 twisted pairs of 8 copper cables. Depending on the speed of data transmission (10/100 Mbps or Gigabit Ethernet), some or all of these pairs are used for sending and receiving data. These same copper pairs can also be used to send electricity. Which pairs exactly are used for sending power depends on the type of PoE (Active or Passive) and the specific PoE standard used.
PoE is not a one-way technology, it uses signalling between the PoE power source and the PoE powered device to:
Detect devices that need power
Determines the correct amount of power to be delivered to each device
When to start sending power
Detect device disconnections
When to stop sending power
When a PoE camera is connected to a PoE power source, the PoE power source will go through a multi-step process to discover and negotiate the required power level of a PoE powered device. Using a method called signature detection and classification, the PoE power source will start off with a low voltage and will raise the voltage until it meets the requirements of the powered device. It will then continue to monitor the power consumption of the device and accommodate any fluctuations.
The IEEE 802.3af standard is the most common type of PoE you will find. This standard provides for up to 15.4W of DC power per PoE port, that is a minimum of 44 V DC and 350 mA current on each port (Power = Voltage x Current). Due to voltage losses however only 12.95W is assured per port. Most PoE switches output up to 48V.
Most fixed lens cameras use around 7 W power only, so 802.3af compliance is plenty. However for motorised cameras the power requirements can easily go into the 20 W range, for example the Reolink RLC-423 PTZ requires 22 W power. This is why the 802.3at standard called PoE+ (or PoE Plus) was created which provides up to 25.5 W of power per port.
There are two newer standards that aim to increase the power available per PoE port, 802.3bt Type 3 (max. 51 W) and 802.3bt Type 4 (max. 71 W). I haven’t seen devices that support these standards yet.
What voltage is Power over Ethernet?
Typically the voltage used by PoE is 48 V. Copper wires are not just electricity conductors but have electrical resistance as well. This resistance causes some of the energy it conducts to be lost as heat and causes voltage drops. So the voltage at the PoE power source is higher (in the 44-57 V range) than the voltage at the powered device (37-57 V, depending on the PoE standard used).
A lower voltage device like a camera that needs only 12 V will then step down this voltage internally before it is used by the camera. The reason for the higher transmission voltage is that voltage losses are lower at higher voltages, which is also the reason that power companies transmit electricity across large distances at very high voltages of up to 765 kV even though domestic power supply may be only 110/230/440 V.
What are the advantages of using Power over Ethernet (PoE)?
The main advantage of PoE is that you don’t need to run separate power and data cables. But there are also several other reasons to use PoE:
Flexibility and lower installation costs – PoE removes the need of having an electrical power outlet at the camera installation location. Also you don’t need to run separate power cables to each camera installation location.
A standards-compliant PoE switch can discover and auto-negotiate power requirements for each device that is connected to it. This means you do not have to figure out how much voltage or power to provide to your devices, as long as the power requirements are lower than the rate output of each PoE port on the switch you are fine.
Voltage losses over long Ethernet runs are automatically adjusted for by the PoE auto-power negotiation process.
PoE provides overload protection as it constantly monitors the power requirement of a device and can adjust it as required.
Centralised power management and troubleshooting becomes possible because you can monitor the power usage of each device through a smart PoE network switch.
Centralised power backup – My PoE switch is hooked up to a UPS and that’s it, all my PoE cameras now have instant power backup!
Simpler, neater and faster installation possible, especially if you are thinking of running Ethernet through your attic or basement.
How to connect an IP camera using PoE?
There are a few different ways you can achieve this:
Use a PoE NVR and Ethernet cable: If you are following the EasyDIY approach of just getting an all-inlclusice packaged security camera kit, your cameras will plug straight into the included NVR using the included Ethernet cables. It’s that simple. Read more about these all-in-one packages here.
Using a PoE switch: Ethernet switches with Power over Ethernet support are the easiest way to power a PoE camera. I use a TP-LINK TL-SG1008P gigabit switch with 4 PoE ports to connect my PoE IP cameras. Installation is simple and straight forward – connect the camera to a PoE port on the network switch using a Cat 5/5e/6 Ethernet cable. If you are connecting outdoor cameras, use an outdoor and burial rated Ethernet cable. This should last longer and be resistant to critters that like to gnaw away at your cables.[easyazon_image align=”center” height=”177″ identifier=”B00M1C03U2″ locale=”US” src=”https://images-na.ssl-images-amazon.com/images/I/417nhw5tq4L.jpg” width=”500″ localize=”n”]
Using a PoE injector: These devices are great if you want to use PoE for just one camera and don’t want to buy a PoE network switch OR if you want to use PoE for a non-PoE IP camera. Yes you read that right! You can use PoE even for an older camera that doesn’t support PoE. You have two further options here: a smart PoE injector or a dumb/passive PoE injector/splitter combo.
A smart PoE injector includes its own power source and will function just like a PoE switch. It will take your Ethernet cable that carries only data into its input port, and you connect its output port straight to your IP camera. When the camera is powered on, the PoE injector will discover and auto-negotiate the required voltage and power levels for your camera. Smart, isn’t it? [easyazon_image align=”center” height=”500″ identifier=”B001PS9E5I” locale=”US” src=”https://images-na.ssl-images-amazon.com/images/I/41E4a%2B2wjeL.jpg” width=”500″ localize=”n”]
A passive PoE injector/splitter combo (or dumb as I call it) can be used for adding PoE capability to a non-PoE camera where you already have a power source. [easyazon_image align=”center” height=”398″ identifier=”B004UBUB7C” locale=”US” src=”https://images-na.ssl-images-amazon.com/images/I/31ajAs0Y-dL.jpg” width=”500″ localize=”n”] Another use case is where you have a PoE camera but don’t have a PoE network switch and want to keep costs low. Just use something like this: [easyazon_image align=”center” height=”500″ identifier=”B00NRHNPUA” locale=”US” src=”https://images-na.ssl-images-amazon.com/images/I/41BwdyA6PML.jpg” width=”500″ localize=”n”]
How far can you run a PoE camera?
Usually Ethernet cable runs of more than 100 metres or 328 feet are not recommended when you are using it for just data. I recommend the same for PoE Ethernet cable runs because any more than this and you are going to have significant voltage drops which can affect the reliability of your IP cameras.
Can I use PoE for my existing IP cameras?
Yes! Just use a passive PoE injector and splitter combo, this way you can use your existing camera power adapter to keep costs down.
Which camera manufacturers support PoE?
All major camera manufacturers including Hikvision, Dahua, Axis, Bosch, Vivotek, Sony, Amcrest and Reolink have models that support PoE. Moreover their PoE cameras are always standards-compliant. Ubiquiti is one notable exception – along with stadards-compliant PoE they also have a proprietary passive PoE injection solution that uses a lower voltage of 24V. Be aware of which PoE is supported by a Ubiquiti device before you buy!
If you would like to learn more about how I use PoE in my home security camera system, I have written a full guide to my DIY setup. Let me know what you think!
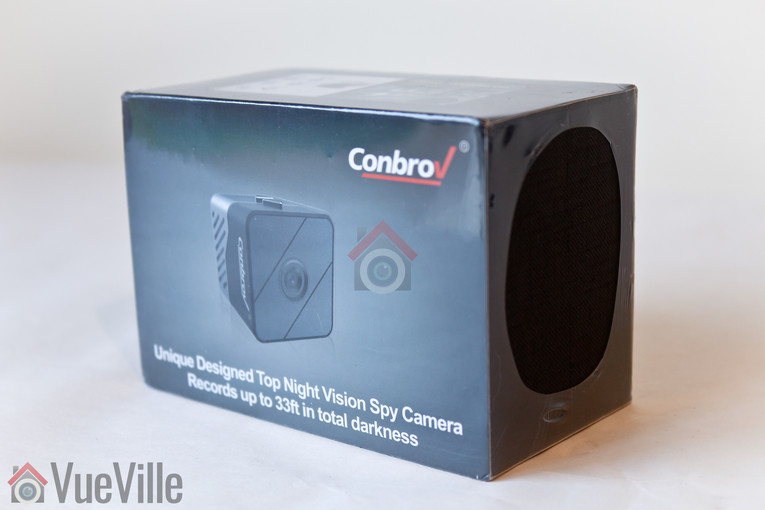
Conbrov is one of the more prolific hidden camera manufacturers out there. I reviewed the DV9 book camera last year and that was a very well designed camera that could be hidden in plain sight. The latest model that Conbrov has kindly provided for us to review is the minuscule [easyazon_link identifier=”B076V2KKGV” locale=”US” tag=”vueville.com-eaz-20″]T33[/easyazon_link] 1080p HD portable video recorder, which on the contrary is definitely meant to be hidden but is portable thanks to its built-in battery.
You could use the T33 in a variety of ways: a portable video recorder, webcam, or a mini home security camera. Since it can be powered by AC power or the built-in battery, you have a lot of flexibility in where and how you can use it.
Please note that we do not endorse any illegal use of the equipment we write about. All testing carried out using this camera features the authors of this blog only. Make sure you follow all local and national laws in your jurisdiction while operating this camera.
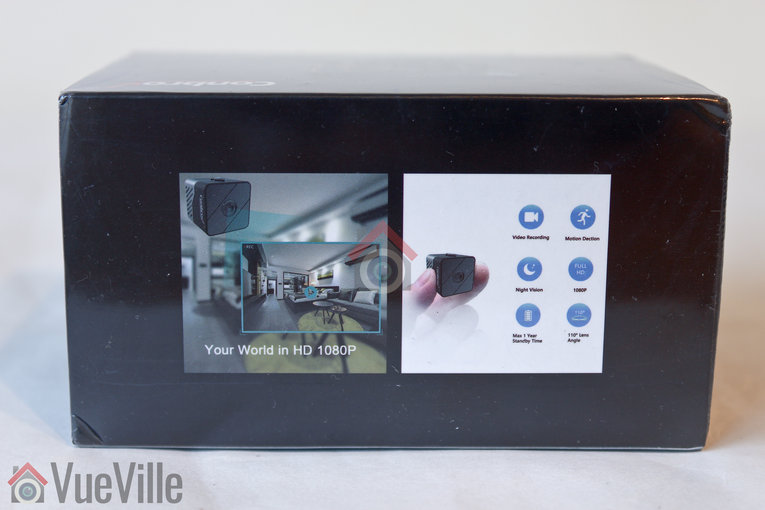
The Conbrov T33 comes in a smartly branded box that lists its main features on the back.
What’s in the box
T33 Hidden Spy Camera
User manual
Pin for resetting the camera
Magnetic bracket
1 x USB cable
1 x USB Card reader
VIP membership card
Warranty card
UNICEF donation card
Main Specifications
[table id=45 responsive=scroll /]
Design and Features
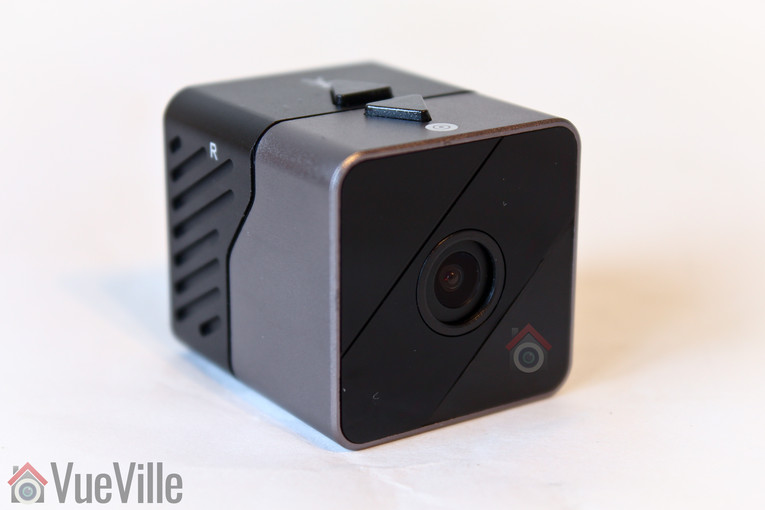
The Conbrov T33 is impressively small for the crazy amount of features it packs, measuring just 1.18 inches on each side. The two-tone cubic shell has a polished bronze front half and a plastic black half.
Hardware Features
The front of the camera houses the lens, the PIR sensor and the Infrared LED. But only the lens is visible making the camera very discreet.
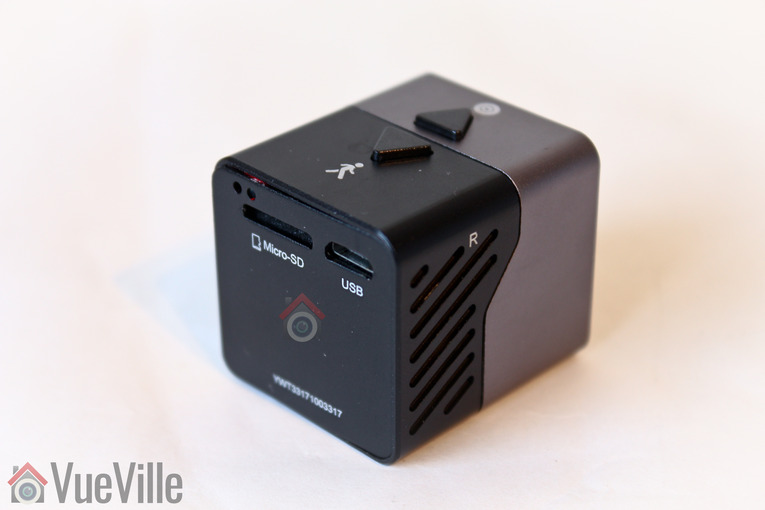
The rear of the camera has the micro SD card slot, the USB port and the activity LED lights. The top of the camera has two buttons – one for starting and stopping motion recording and another button for starting and stopping manual recording. There is also a reset button on the side of the camera. The camera has audio recording but it was not evident where the microphone is located.
Software Features
The camera can operate in two modes – manual recording that you start and stop or motion detection recording triggered by the on-board PIR motion sensor. Clips can be recorded at 1080p, 720p or VGA resolution. It can also add a date and time watermark to recorded clips. The camera can record while being powered over the USB port – this is a great feature and makes it possible to leave the camera in position for long periods of time without worrying about the battery dying.
PIR-based motion detection is more reliable than software-based detection and so top marks to Conbrov here. However I was disappointed to find that there is no pre-record feature, even on AC power. This is the feature whereby the camera records the few seconds before the actual event takes place. Its possible only if the camera is continuously recording to its video buffer, and I can understand this is too energy intensive when in battery mode, but could have been a great feature when the camera is powered over USB.
Loop recording or automatic overwriting is available when the SD card gets full, see the storage capacity section below to get an idea of how long a 32GB card would last. 32GB is the largest SD card capacity the camera supports.
Even though this camera can work off AC power, it doesn’t support the RTSP protocol or the ONVIF standard. So integrating this into an existing CCTV system is not an option. Which is a shame because a tiny camera like this can be very discreet indeed!
Audio is also recorded on the video clips – you can disable this feature in the camera settings screen – see below.
Camera Setup
The manual is written in good English and is very detailed. There are clear illustrations showing the different parts of the T33 camera and a helpful summary of the setup instructions. Then there are further sections that describe the setup process in detail.
A very helpful table of various LED indicator statuses is also provided at the end of the user manual.
So as per the instructions in the T33 user manual, I followed the steps below to set up the spy camera:
I used the provided USB cable to plug the camera into my laptop USB port and charge the battery. Charging took a few hours and the yellow LED stays lit during this process. When the yellow LED goes off, it means the battery is fully charged.
When the camera was fully charged and the yellow LED went off, I inserted a [easyazon_link identifier=”B007JTKLEK” locale=”US” tag=”vueville.com-eaz-20″]32GB Sandisk Class 10 microSD[/easyazon_link] card. When I first tried to insert the SD card the right way up as shown on the back of the camera, it didn’t go in. I had to insert it upside down – contacts side up. However the user manual correctly shows which way you need to insert the SD card in. Push it in all the way until you hear a click. On my review unit, the SD slot didn’t line up perfectly with the outside casing and so I had to angle the SD card a bit to get it in properly.
The third step is to set the camera parameters or in other words adjust the settings. Connect the camera to your computer using the USB cable. Press and hold the manual recording button for 2 seconds to turn on the camera and put it into USB disk mode. A blue LED at the back of the T33 will flash continuously and the microSD card will then show up as a removable disk on your computer.
Open the SD card and you will see a file called SetCamera.exe, open this file. Make the desired changes, click Save and then Exit. You will now see a new file created called CONFIG.INI which stores your settings.
That’s it – there are really no other software settings you can control. On the camera itself, the only thing you can do is choose the recording mode – manual or motion detection.
The next challenge is positioning the camera. As with most spy cameras, there is no Wi-Fi or live stream feature. So you can’t know whether you are getting everything you want in your scene until you record and then play back the video. But that’s just a one-time exercise.
Performance
You can power the camera either using a DC 5V power source and a USB cable, or by using the built-in 1000mAh battery. Its interesting that Conbrov doesn’t shout about two of the best features of this camera – that it can be powered externally and so you don’t need to worry about running out of juice. What’s the other one? The PIR sensor that it uses instead of the more commons software based motion detection method. The PIR range is easily 5 metres or 16 feet and the Infrared LED is also very powerful. It does have a flashlight effect though.
Video clips are recorded in 1 minute intervals, so stitching together longer recordings could become a bit of a chore.
Daytime video quality
Daytime video was of decent quality at the default 1080p resolution. Motion was smooth and did not have any artifacts, if anything it was slightly grainy. There seems to be a true IR-cut filter, so colour during the day time was accurate unlike the DV9 model we tested previously.
As there is no pre-record feature and motion detection is PIR-based, the camera starts recording only 1-2 seconds after I opened the door and entered the room.
Night-time video was soft and quite grainy. There is an ambient light sensor, so the Infrared LED switches on automatically in low light conditions. Again the first 1-2 seconds of the event are not available.
Audio quality was acceptable and I found the microphone of the T33 to be quite sensitive.
Battery life
The battery takes 3-4 hours to recharge fully and the yellow charging indicator LED will go off when its done. The charging speed depends on how much amperage your charging source puts out. I used my Samsung mobile phone charger which is rated at 1.5 Amps. Conbrov says the 1,000 mAh battery should provide a standby time of up to 12 months in motion detection mode, but of course we couldn’t test that.
There is no battery meter so if you are relying on the battery, be aware that it is rated for 6 hours of daytime usage and 3 hours of night time usage.
Storage capacity
The high bitrate of the recorded clips limits the number of hours the camera can record. I found that it needs approximately 2.15 Megabytes per second of video and audio in night mode and around 2.4 Megabytes per second for daytime clips. So a microSD card with the maximum supported size of 32 GB can store up to 4.1 hours of night-time video or 3.7 hours of day-time video before the loop recording feature kicks in and starts over-writing older clips.
Where can I buy one?
[easyazon_link identifier=”B076V2KKGV” locale=”US” tag=”vueville.com-eaz-20″]Check Price on your local Amazon Site[/easyazon_link]
(* = affiliate link / image source: Amazon Associates Program)
Verdict
The Conbrov T33 is a very compact camera that combines great features and practicality to make it one of the best hidden mini spy cameras available right now.
It feels like it was just a few months ago that I reviewed my first 4MP camera, a Hikvision mini-dome.
Today I am going to take a closer look at the 5 Megapixel Reolink RLC-422 dome camera with 4x optical zoom, kindly provided by Reolink for this review.
A quick note: As an Amazon Associate I earn from qualifying purchases. This post contains affiliate link(s). An affiliate link means I may earn advertising or referral fees if you make a purchase through my link, at no extra cost to you.
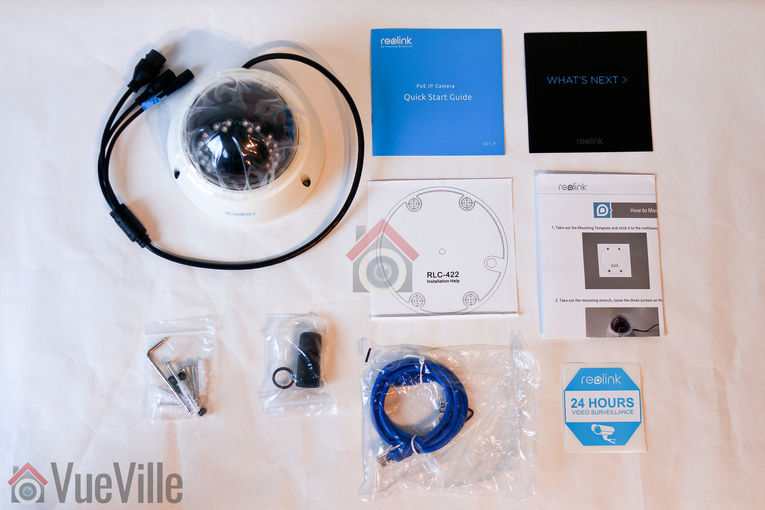
What’s in the box
The RLC-422 comes in an attractive package that showcases the Reolink mobile app on one side, and lists the camera features on another side.
On opening the box I found the RLC-422 camera to be well-protected with foam padding along with some accessories. Not surprising as every Reolink camera I have unbowed has been well packed.
Box contents:
RLC-422 Zoom IP camera
Waterproof sleeve for Ethernet cable
1 metre blue network cable
Screws, rawl plugs and an Allen key
Software CD
Quick start guide
What’s next guide
Installation guide with photos
Surveillance sign
Mounting hole template
Specifications
[table id=44 responsive=”scroll” /]
Design
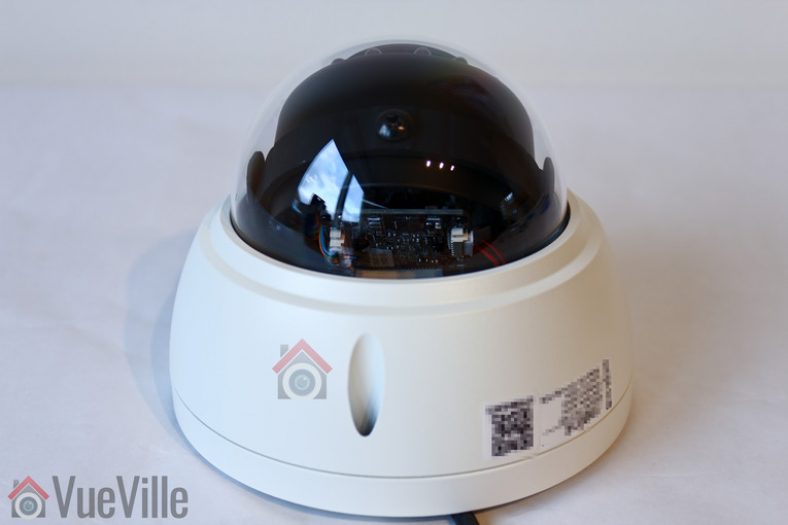
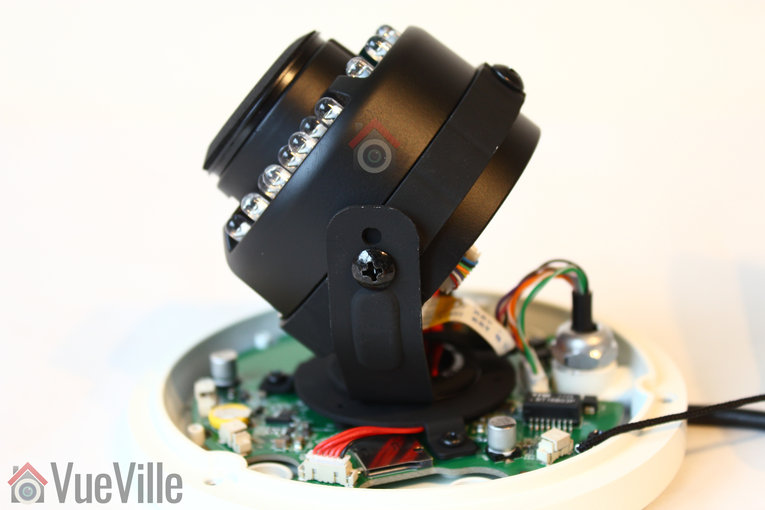
The RLC-422 has a traditional dome type design. This is a camera with a motorized lens though, so it is slightly larger than a fixed lens dome camera.
The base of the camera is made of steel and is painted white. The quality of the finish is very good and it feels like a camera that is far more expensive that it really is. The dome is made of clear plastic – I prefer it to be darkened because then its more difficult to figure out where exactly the lens is pointed.
On one side there is a sticker with the QR code for the mobile app setup and login details. I recommend removing this sticker before installing the camera outdoors.
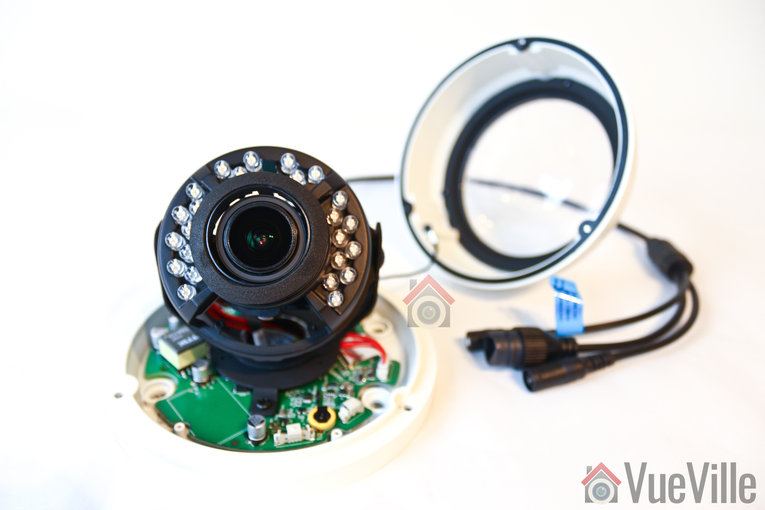
Unscrew three screws to open the camera and separate the dome from the base. The screws hold themselves in position in their holes when loose, and this is exactly what you want when you are trying to install the camera overhead. No screws falling out when you least want it.
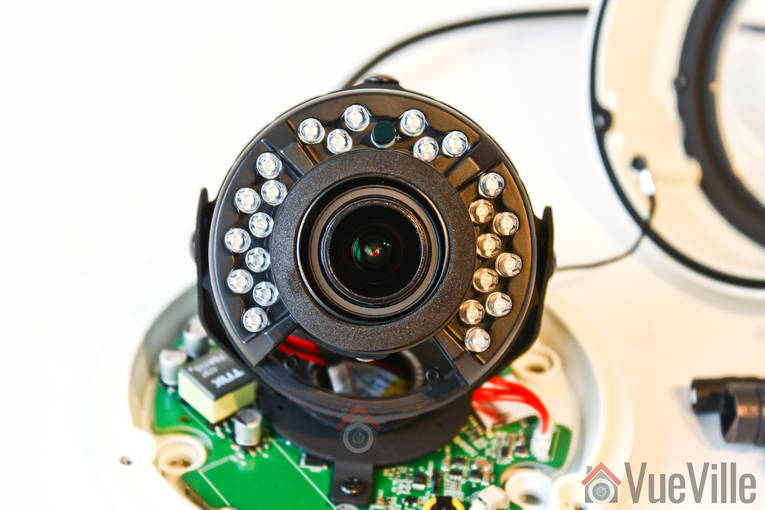
The lens assembly can be adjusted in two axes – the base of the lens rotates and the lens itself pivots around the arms. There are two screws that you need to loosen to allow this motion. One thing I always like to check is whether any of the 24 IR LEDs are blocked. As you can see in the photo below, we have no such issue with the RLC-422. You can also see the cord that connects the dome cover to the camera base, again terribly useful when you are trying to install the base to a ceiling.
The rear of the lens assembly can be seen below.
All the cabling comes out of the holder arm and can conveniently go into a junction box or down the wall through a cut-away provided for this purpose. The cabling consists of a pigtail with the following connectors:
12V power input jack
RJ-45 ethernet port
A reset push button
Just like the Reolink RLC-423 PTZ I reviewed, the reset button of the RLC-422 is not on the main body of the camera. Apart from eliminating an ingress point, it means nobody can reset the camera unless they get to the hidden reset button which is probably inside the wall or the soffit! This is much better than many other cameras such as Hikvision’s which have the reset button externally on the camera body itself.
Installation
I am not a huge fan of installing dome cameras, because they are generally a lot more work to install than a bullet camera. But as we saw earlier, Reolink has made it as painless as they can with the self-holding screws and the dome being linked to the camera base.
Hardware setup
The RLC-422 supports Power over Ethernet (PoE) which is my recommended way of powering IP cameras – using just a single Ethernet cable, you can send both data and power to the camera using either a PoE switch or a PoE injector.
You can adjust the lens around the perpendicular axis of the camera and you can rotate the lens around its own perpendicular axis by loosening the screws.
A typical fixed lens camera needs around 7W power, but the motorised lens of the RLC-422 means that it needs a little more power, a maximum of 10W to be exact. This is still within the 802.3af spec, so my TP-Link PoE switch had no trouble powering up the camera over PoE.
I added a Sandisk 64GB SD card so that I can record motion detection clips on-board the camera itself.
If you want to use the included waterproofing connector, you will have to remove the RJ-45 plug on the Ethernet cable and re-crimp it once it has been passed through the waterproofing connector.
Software setup
Most manufacturers ship their cameras with static IPs by default – for example Hikvision and Dahua. In most cases the camera will not have the same network settings (like sub-domain) as your network. This means that you cannot access the camera unless you change the camera network settings to that of your network. You are expected to do this using the manufacturer’s camera finder tool. While this static IP method has security benefits, most home users would find it much easier if the camera manufacturer used DHCP as default. Then the camera would automatically be configured to use your network settings and be ready to use.
As with all the Reolink cameras I have tested, this is exactly the case with the RLC-422: DHCP is enabled by default. When you are setting up the RLC-422 using DHCP, you won’t know what its IP address is and so will have no way of directly accessing the camera. If you have IP reservation set up on your router, yes then you may know. But let’s assume you don’t know the IP address. You just need to find the IP address of the camera and there are quite a few ways you can do this:
Use the Reolink mobile app
Use the Reolink desktop client software
Use any camera monitoring software such as BlueIris
Use a mobile security camera app such as tinyCam Monitor Pro
Scan your network using a network scanner app
The helpful setup guide suggests the first two methods – Access the camera by smartphone and access the camera by computer.
I have tried option 1 with another Reolink before so I went with option 2 this time – setup through a computer. These are the steps I followed:
Step 2: Installed Reolink Desktop Client v7.2.2.12 updated Oct 8, 2017, and ran it. Windows Defender identified it as a new app and asked me if I want to allow it Internet and LAN access. I allowed it to proceed.
Step 3: The app automatically identified the camera and logged in successfully, and presented me with the Live View screen.
Step 4: As I mentioned earlier, the camera has DHCP enabled by default but I like to assign my cameras static IP addresses. The main reason is that its easier to set up and access the camera form other devices wihtout having to check each time what the IP address is. Clicking on the setup gear icon and clicking through to Netowrk>General allowed me to change it. This caused the Reolik app to add another camera to the list, with my new static ip address. It also then started complaining that it could not find the original camera with DHCP IP address. This was a bit tiresome so I disabled the ‘Add Camera Automatically’ option under app settings. No reboot was needed which is great.
Step 5: I then tried to access the camera from the new static IP address through Chrome. I logged in with the default login details. However since the camera admin site uses Flash and Chrome disables it by default, I just had to click on the “Get Adobe Flash player” button in the live view section and enable it in Chrome.
Step 6: I then changed the password for the admin account. I also created a new user and tried to delete the admin account for safety but like most IP cameras, the RLC-422 doesn’t support this feature.
Once you have the IP address, you can simply pop that into Chrome or Firefox to directly access the camera settings. You could also use the desktop client app to change camera settings if you don’t want to use the web-based admin panel.
You should change the password of the camera as soon as you can, especially worth noting as the camera doesn’t require you to nor remind you to do it.
Software features
I have a number of ways of accessing my camera live feeds – typically I use the tinyCam Monitor Pro app on my Android phones, sometimes I flick my TV over to the QNAP Surveillance station channel (thanks to the TS-253A’s HDMI output). But when I want to tweak camera settings, I prefer using the web admin page – I can watch the live view stream, adjust the zoom and change camera settings.
So entering the camera’s IP address into any browser that supports the Adobe Flash player will let you login to the camera. As I always say, an HTML5 interface would have been better for wider device compatibility but its far better than the NPAPI plugin that Hikvision still insists on using. You can choose the stream you want to see at the login screen, Channel 1 is called Clear and is the 5 Megapixel stream (unless you have changed the camera settings). The other options are Balanced and Fluent. These can also be selected once you are logged in.
Reolink calls the landing page the Preview page, but I like to call it the Live View page, which is more logical. On the left hand side you have the live view stream, and at the bottom clicking the play button lets you select between the video quality by switching between the Clear, Balanced and Fluent streams.
On the right hand side, an accordion type content holder has three sections – Optical Zoom, Basic settings and Advanced settings. The basic and advanced settings sections are like a quick access area that duplicates the settings on the actual configuration page – accessed by clicking on the gear button at the top right.
The Optical Zoom section adjusts to the abilities of the camera. In the RLC-423 it let you zoom, and adjust the focus manually. With the RLC-422, you have only the zoom function. You can also adjust the focus manually, but since it has auto-focus I recommend not changing it.
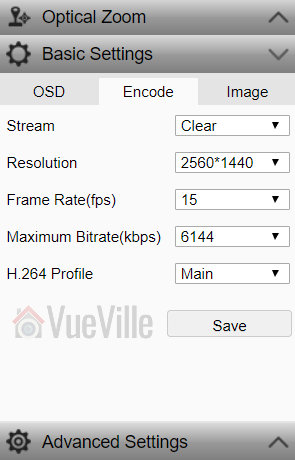
The Basic Settings section includes OSD settings, video stream encoding and image settings. The OSD page is pretty standard and lets you choose whether and where to show the OSD information such as day, date and time.
The Basic Settings is where you can set the video resolution, bitrate and frames per second of each of the Primary “Clear” stream (5MP default) and the Fluent stream (640×360 default). Interestingly, the ‘Balanced’ stream is missing in the stream selection dropdown.
The Image section lets you adjust the usual image settings such as brightness, contrast, saturation, sharpness and also mirroring and image rotation.
The advanced settings tab is where you will find the rest of the video settings and the ones I was most interested in – exposure, backlight and noise reduction. Setting the Exposure to ‘Low Noise’ lets you control just the range of gain, ‘Anti-smearing’ lets you control only the range of shutter speeds and manual lets you select both the gain and shutter speed ranges. The range selection method is novel – it means the camera will automatically choose the optimum settings from the range you specify. I didn’t see an option to change the i-frame interval. This is a bit strange as it is a setting that I would have expected to find. Why is it important? The i-frame setting specifies how often the entire frame is captured and not just what has changed from the previous i-frame. So being able to control it is important for getting the right balance between network bandwidth utilisation and a high quality non-blurry video.
Now the full camera settings configuration page is accessed by clicking the gear icon at the top right of the Live View page. This lets you access video resolution, network, motion detection, email and push notifications, user control, and system maintenance settings.
Click to enlarge
While the camera support motion detection alerts, these are of the basic variety. There is no advanced motion detection such as line crossing, or intrusion detection on offer here. One of the best ways to reduce false alerts is by using these advanced motion detection methods, so bear this in mind if you are planning to use this camera not for 24/7 recording but motion triggered recording. I would use it only for 24/7 recording or to capture images and videos based on commands from my DIY home automation system.
Click to enlarge
Click to enlarge
There is a built-in NVR feature, so the camera can record motion detection clips to the on-board SD card, and even 24/7 a network/NAS drive. The timeline feature is very handy and works well.
Click to enlarge
Performance
I tested the camera at its default settings of 5MP resolution and 20fps. Here are the properties of the video files it created:
[wpsm_codebox style=”1″]Daytime Video: MPEG4 Video (H264) 3072×1728 20fps 6253kbps [V: English [eng] (h264 high L5.1, yuv420p, 3072×1728, 6253 kb/s)][/wpsm_codebox]
[wpsm_codebox style=”1″]Night-time Video: MPEG4 Video (H264) 3072×1728 23.75fps 6105kbps [V: English [eng] (h264 high L5.1, yuv420p, 3072×1728, 6105 kb/s)][/wpsm_codebox]
I also added the RLC-422 to my favourite mobile CCTV app, tinyCAM monitor Pro and confirmed that I can view the camera streams there also.
However to optimise recording storage, I suggest recording at 4MP resolution and to lower the frame rate to 10fps:
The optical zoom function is the headline feature of the RLC-422. I found the zoom speed to be on par with that of the Reolink RLC-423 PTZ. The autofocus is a bit sluggish just like the RLC-423 but at such an affordable price, I shouldn’t complain.
Daytime video quality
The RLC-422 is a 5 megapixel with a 1/3″ sensor. In the daytime video is crisp and appeared to be sharper than my 4 Megapixel Hikvision DS-2CD2542FWS-IWS as well as the 4 Megapixel Reolink RLC-423 PTZ.
If the camera has one weakness, its the speed of the autofocus. While the accuracy of the autofocus is pretty good, it does take a few seconds to autofocus after zooming in or out.
Here’s a sample video of a recording during the daytime:
The real test of an IP camera is when the sun’s gone down and the lights are off. The RLC-422 uses 24 conventional IR LEDs arranged in a ring around the lens. I did not see any evidence of internal reflections or ghosting, common issues with lesser dome cameras.
Note that the RLC-422 doesn’t have true WDR, it employes digital WDR.
So how did it perform? The video quality is great with just a hint of noise. Check out the sample video below shot at default image settings (backlight off and 3D Noise Redcution on):
The Reolink mobile app is one of the best original manufacturer apps I have seen. Hands down beats Hikvision’s rather poor efforts and runs circles around other brands’ apps. I was able to quickly add the RLC-422 to the Reolink app on my phone, adjust the zoom level, and access the recorded clips stored on the on-board SD card.
Verdict
The RLC-422 is a very affordable 5MP dome camera capable of stand-alone operation due to the built-in NVR feature. However this is limited by the lack of advanced motion detection features. While the 5MP resolution is class-leading for affordable budget IP cameras, it is designed to a price – the lack of advanced motion detection methods, a microphone, audio and alarm connections and the slow auto-focus give away its budget nature. But for those who need a 24/7 recording dome camera with optical zoom, the ONVIF and RTSP support makes the camera very easy to integrate with an existing home CCTV or security system.
[review]
Where to buy
[easyazon_link identifier=”B01B4BKJHW” locale=”US” tag=”vueville.com-eaz-20″]Check Price on your local Amazon site[/easyazon_link]
(* = affiliate link / image source: Amazon Associates Program)
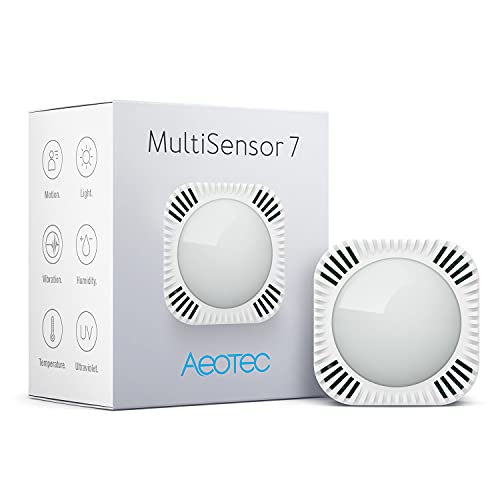
For example, light up the corridor in the hall when motion is detected but only if its dark. With conventional Z-Wave sensors, you need a separate light sensor and motion sensor to achieve this. But a single multi sensor like the Aeotec Multisensor 7 that has both light and motion sensors can do this and so much more, at a fraction of the cost.
Product prices and availability are accurate as of the date/time indicated and are subject to change. Any price and availability information displayed on https://www.amazon.com/ at the time of purchase will apply to the purchase of this product.
Product prices and availability are accurate as of the date/time indicated and are subject to change. Any price and availability information displayed on https://www.amazon.com/ at the time of purchase will apply to the purchase of this product.
Product prices and availability are accurate as of the date/time indicated and are subject to change. Any price and availability information displayed on https://www.amazon.com/ at the time of purchase will apply to the purchase of this product.
(* = affiliate link / image source: Amazon Associates Program)
A quick note: As an Amazon Associate I earn from qualifying purchases. This post contains affiliate link(s). An affiliate link means I may earn advertising or referral fees if you make a purchase through my link, at no extra cost to you.
Best Z-Wave Sensor in 2024 – Recommendation Summary & Comparison
Click each sensor to scroll to read more about it. You can check the latest Amazon price by clicking on the check price buttons.
[table id=74 responsive=scroll /]
(* = affiliate link / image source: Amazon Associates Program)
Product prices and availability are accurate as of the date/time indicated and are subject to change. Any price and availability information displayed on https://www.amazon.com/ at the time of purchase will apply to the purchase of this product.
Aeotec is the brand name of Aeon Labs, a company founded in 2006 and headquartered in California. They have offices in London and Hong Kong also, plus manufacturing facilities in China. Aeotec makes every Z-Wave device you can think of – power plugs, strips, multi-sensors, flood sensors, water main valve controllers, dimmers, relays, garage door controllers, sirens, touch panels, remotes, doorbells, energy meters, and on and on. Another brand you may come across is Oomi which are white-labelled Aeotec products.
The Multisensor 7 is the only 6-in-1 multi-sensor in the market and represents great value for money with the motion, temperature, light, humidity, UV and vibration sensors all packed into a tiny cube. All these features haven’t compromised battery life though – Aeotec suggests a 3 year battery life. Indeed, I have been using the previous model (the Aeotec Multisensor 6) for over 5 years now and only had to change the batteries once!
Of course you can always run it on AC power using the included USB cable – you just need to provide a power adaptor. In AC power mode, the MultiSensor 7 will send measurements to the Z-Wave controller in real-time in addition to working as a Z-Wave network extender/repeater.
Please refer to my in-depth hands-on review to learn more about this excellent Z-Wave sensor:
Product prices and availability are accurate as of the date/time indicated and are subject to change. Any price and availability information displayed on https://www.amazon.com/ at the time of purchase will apply to the purchase of this product.
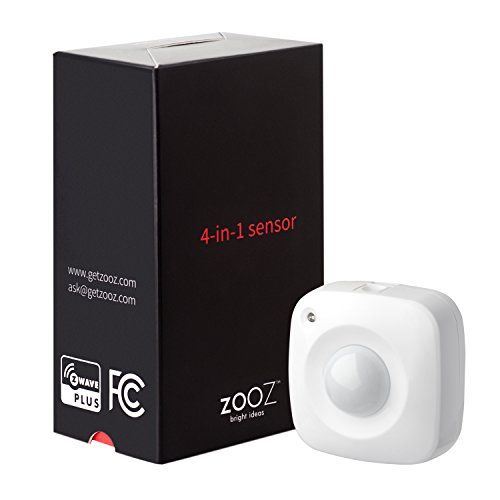
The Zooz Motion sensor has been around for a long time and the latest version is something that definitely is worth consideration. It has all the common sensors you’ll need – motion, illumination level, temperature and humidity.
There are 7 levels of motion detection sensitivity. There’s also a multi-colour LED that is very customisable – there are 4 modes you can put it in:
Mode 1 = LED indicator is fully turned off (no visual notifications).
Mode 2 = temperature is indicated by the LED pulsing and motion indicated by the LED flashing.
Mode 3 = temperature and motion indicated by flashing the LED. Flashes every 3 minutes for temperature.
Mode 4 = no indication for temperature, motion indicated by flashing the LED.
Moreover, the LED notification for temperature can be colour-coded based on the detected temperature.
Product prices and availability are accurate as of the date/time indicated and are subject to change. Any price and availability information displayed on https://www.amazon.com/ at the time of purchase will apply to the purchase of this product.
If you do not need the Aeotec Multisensor 7 but still prefer the Aeotec brand, here’s another option. This new multi-sensor has can be installed in 4 different ways: in the corner, on a shelf, beam or in the Aeotec Recessor for flush false ceiling installation.
Apart from looking very stylish, the motion sensor has a very good range of up to 7.5 metres. The light sensor has a range of 0-30000 Lux and can be used to automatically turn on/dim/off lights in your home. So a popular use case is to ramp up lamps as daylight breaks, and dim them as evening sets in.
The TriSensor multisensor comes pre-installed with a CR123A battery that is rated for 3 years of standard use. As per usual Aeotec standards, the included user guide is detailed, accurate and written in clear English. To add the TriSensor to your Z-Wave, just pull the mylar off the included battery and press the action button to put it in inclusion mode. The device also supports the exclusion, reset and association modes as expected. There are no tamper-proof switches, but the sensor does support Z-Wave S2 security which even the Multisensor 6 doesn’t. Some other interesting features are the OTA (Over The Air) firmware upgrade and the ability to change the action LED’s colour.
Refer to my in-depth hands-on review to learn more:
Product prices and availability are accurate as of the date/time indicated and are subject to change. Any price and availability information displayed on https://www.amazon.com/ at the time of purchase will apply to the purchase of this product.
The Fibaro Motion sensor is more than what its name suggests. Its actually a multi-sensor that can measure temperature, light intensity, and vibrations in addition to motion. The design element was given strong consideration by Fibaro and can be seen in the unique cat-eye style LED and the round shape of the sensor. The round shape and the brilliant cradle design let you point the sensor precisely and avoid blind spots in the motion detection zone.
The first Z-Wave sensor I bought was in fact this very Fibaro multi-sensor. I have been using it for more than 2 years and have been impressed with its performance and battery life. I especially like the multi-colour LED that flashes when motion is detected. The colour of the LED depends on the temperature in the room. Too cold and it shines blue, green if its just right and orange if its too warm. So whenever you enter the room, you can immediately see what the temperature is like by observing the colour of the flashing LED.
Refer to my in-depth hands-on review to learn more:
Product prices and availability are accurate as of the date/time indicated and are subject to change. Any price and availability information displayed on https://www.amazon.com/ at the time of purchase will apply to the purchase of this product.
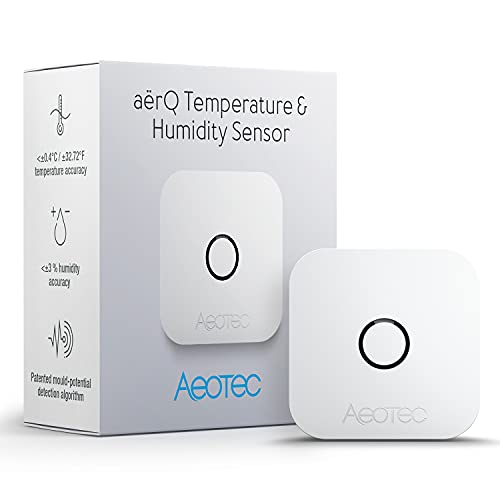
Sometimes you need a sensor that is very discreet and doesn’t call attention to itself. At just 1.4″, the Aeotec aerQ is the smallest Z-Wave sensor you can find that supports temperature and humidity measurement. It also can measure the dew point which is very useful for climate automations such as underfloor cooling/heating. This is because if you cool an underfloor system below the dew point, condensation may occur which is a safety hazard.
A long life battery with up to 2 years life makes it a very capable little multi-sensor.
Product prices and availability are accurate as of the date/time indicated and are subject to change. Any price and availability information displayed on https://www.amazon.com/ at the time of purchase will apply to the purchase of this product.
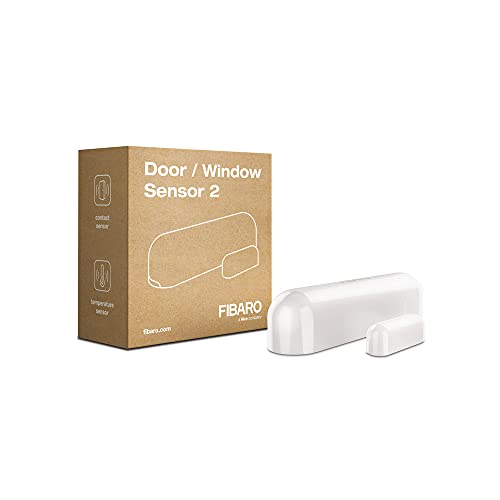
The Fibaro Door/Window Sensor 2 is a wireless, battery powered contact sensor that uses the Hall effect. You may have heard of the common reed switch sensor employed by door and window sensors, but what is a Hall effect sensor? The reed switch is an electrical switch that mechanically closes when a magnetic field is brought near it. A Hall effect sensor is a solid-state transducer that varies its output voltage according to the strength of a magnetic field, meaning it has no moving parts. This means that it is not susceptible to vibration or shock, unlike a reed type sensor.
The sensor is based on the Z-Wave Plus standard and also supports protected mode with AES-128 encryption. It has tamper detection and an LED indicator with 7 different colours. The temperature measuring range is 0-60°C (32-140°F) with an accuracy of 0.5 deg C. The battery used is a single ER14250 ½ AA battery that should be good for 2 years.
Why Z-Wave?
If you want the long answer, check out my Home Automation Guide. If you would like the short answer, Z-Wave is the industry standard for reliable, non-cloud reliant, self sufficient, low-power home automation. I have been using Z-Wave devices from different manufacturers and everything has always just worked. All my sensors are battery powered, and those batteries last a year at least. My home automation controller is the Vera Plus – no ugly cloud subscription or cloud-reliance here, an Internet connection is strictly optional.
What is a Z-Wave multisensor?
A Z-Wave multisensor is a small wireless device that typically runs on battery power and can sense motion using a PIR sensor and measure multiple environmental factors such as temperature, humidity, or light levels.
Which to choose – Single sensor or Multisensor?
I prefer multisensors because this approach let you place just one device per room and still get all the important readings. It doesn’t hurt that they are great value for money too!
What to look for in a multisensor?
The important things to look for are:
Types of sensors: More the merrier! You can choose from Motion, Temperature, Light levels, Humidity, UV intensity and Vibrations.
Sensitivity: Make sure the sensor covers the range of motion detection (distance and angle) or temperatures you want to monitor.
Z-Wave Technology: Look for the latest Z-Wave Plus 500 series enabled devices.
Power supply: Most multi-sensors are battery only but they last 1-2 years. To maximise battery life, sensors will usually send an update to the hub or controller only when readings change by a noticeable enough percentage (say 10%). But when powered by mains power (AC), these sensors can not only provide real-time readings but also act as repeaters or extenders. This is great because your Z-Wave network becomes that much stronger and wider.
Operating range: Most sensors can easily cover a 30 metre range, the mains powered models can go even higher.
Tamper-proof: Some sensors have a tamper switch on the back which can send an alert to the hub or controller if someone tampers with them. This is important if you are using the sensor outdoors under a porch or another area where it can be accessed.
Conclusion
I have enjoyed my Z-Wave multi-sensors and the immense array of possibilities they have opened up in monitoring my home and setting up advanced scenes. What have you achieved with your sensors? Let me know in the comments below!
When was the last time you backed up your data? 66% of us do it just once a year or less! If you are part of this group, this means all your precious data is stored in just one place on this planet. Hard drives are known to fail after all, and flash drives get misplaced, so you are taking a huge risk if you are not regularly backing up your hard drives (read weekly).
Now most people, including me, are quite lazy in our downtime and can’t be bothered to do something so dull as taking backups. This is where a Network Attached Storage (NAS) device comes into the picture – thanks to its redundant storage technology, all your data can be automatically backed up onto a second drive and even uploaded to a cloud storage provider if you so desire. Monthly backups become a breeze, as you just need to plug in an external USB (like my [easyazon_link identifier=”B00F0JXE04″ locale=”US” tag=”vueville.com-eaz-20″]WD Studio[/easyazon_link]) and hit the one-touch USB backup button. A few hours later, you have an offline backup of all your data too! Simply brilliant!
NAS servers have other advantages too. They can fulfil 24/7 file and media server duties reliably without driving up your electricity bills. In fact these little display-less (or headless in computer speak) computers can do a whole lot more, such as: be a CCTV Surveillance NVR, VPN client/servers, DLNA servers, FTP servers, web or mail servers, run virtual machines, take automatic mobile phone and laptop backups, even act as home automation controllers, the possibilities are endless.
So let’s take a detailed look at the 4GB RAM version of the 2-bay QNAP TS-253A NAS that I purchased recently. QNAP calls it a QTS-Linux Combo NAS that can help you create a private cloud. I will also compare it to my previous NAS, the QNAP TS-231+ it replaced.
A quick note: As an Amazon Associate I earn from qualifying purchases. This post contains affiliate link(s). An affiliate link means I may earn advertising or referral fees if you make a purchase through my link, at no extra cost to you.
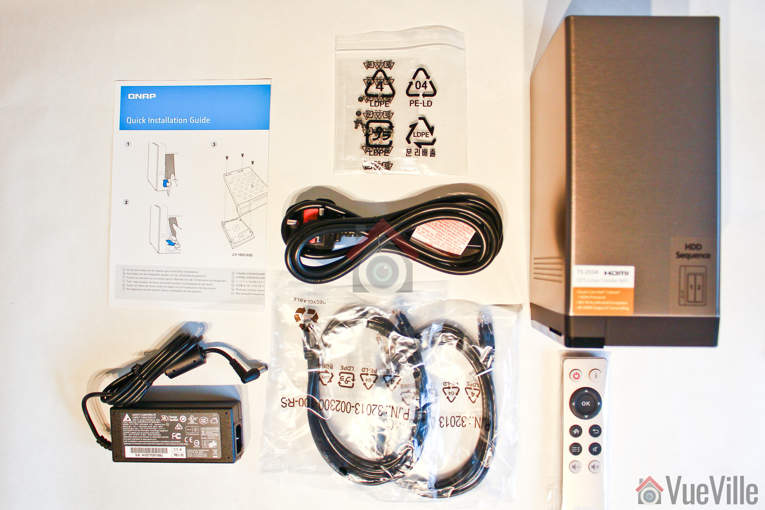
What’s in the box
The TS-253A comes in a fairly unassuming brown retail box with a sticker detailing its features and tech specs.
Opening up the box reveals the following kit:
TS-253A NAS
2x Ethernet Cable
65W AC Adapter (Model SP-2BAY-ADAPTOR)
Power cord
8x Flat head screw (for 3.5″ HDD)
6x Flat head screw (for 2.5″ HDD)
Quick Installation Guide (QIG)
Infrared (IR) Remote Control (Model RM-IR002)
Of course we shouldn’t forget one other thing that QNAP has generously provided with this NAS: 4 IP camera licences whereas the standard at this price point is just 2 if you look at the competition. For those of use looking to use the NAS as an NVR also, this coupled with the 2x HDMI ports is a great addition and increases the value of this NAS.
TS-253A Specifications
The most obvious feature is that the TS-253A is a 2-bay NAS. But it can also work with just 1 hard drive. My previous NAS was powered by a dual-core ARM processor, and so was a bit limited in the range of applications it could run. For example it did not have the power to run virtual machines. Nor did it have an HDMI output. But it did have very low power consumption due to the super-efficient ARM chip. So I decided I wanted an x86 based NAS that had more processing power but was still reasonable when it came to energy needs.
The TS-253A hits the sweet spot with its 14 nm lithography based Intel Celeron N3150 processor. This quad-core chip normally runs at 1.6GHz, but has a burst speed of 2.08 GHz, but needs only a cool 6W of power at 100% load! Just the type of chip you need for a NAS that runs 24/7. The N3150 chip is a 64-bit processor and supports Secure Boot, HD Audio & Intel Virtualization technology. The N3150 chip also supports Intel AES-NI hardware-accelerated encryption which prevents transfer speeds slowing down when dealing with AES 256-bit drive encryption. QNAP claims that the NAS can transfer data at up to 224 MB/s on a drive encrypted in this manner.
Lower spec NAS can perform only offline transcoding but the on-board graphics of the N3150 processor supports real-time 4K (H.264) and 1080p video transcoding. This allows the NAS to store 4K video content that it can convert on-demand in real-time to universal formats for playback on PCs, mobile devices and Smart TVs. The TS-253A comes in two flavours of DDR3L-1600 RAM: 4GB or 8GB. The RAM is user-upgradeable, so you can start with 4GB like I did and expand to 8GB later on.
Here are the full specs of the TS-253A:
[table id=42 responsive=scroll /]
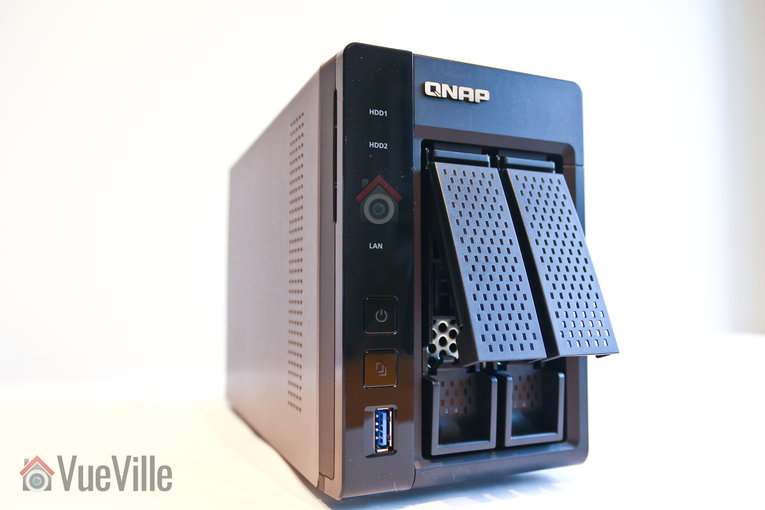
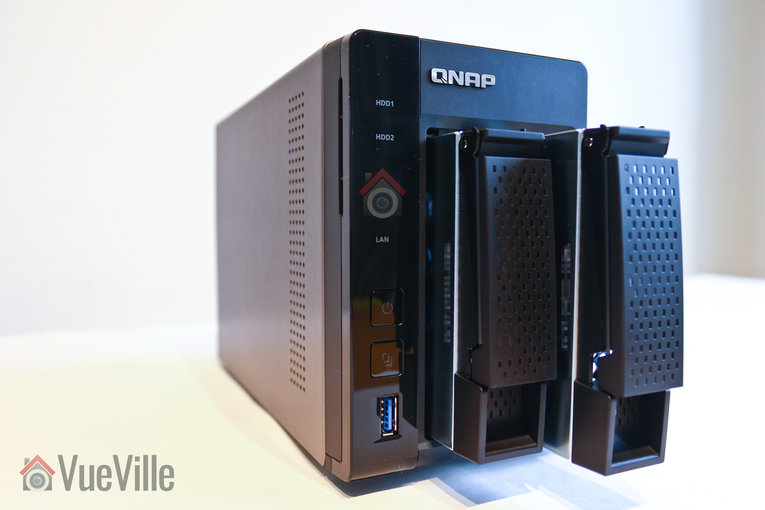
Design
While the lower models in the QNAP portfolio come in an unattractive white, the TS-253A is dressed in a striking glossy and matte black combo. The case is mostly metallic except for the plastic front face that surrounds the drive bays.
The front of the unit houses the two disk bays, LED indicators for each HDD that blink on activity, a LAN activity LED, a power button, the USB one-touch copy button and a front USB 3.0 port. The USB port can be configured to automatically start a copy action to the NAS or a backup from the NAS to an external USB drive such as a WD Studio drive.
With the hard disk caddies out, you can see the innards of the NAS. The electronics are housed on one side and at the back.
There is a sizable heatsink on the Intel N3150 processor and a 7 inch fan pushing hot air out the back.
The rear of the NAS has the reset button, two HDMI ports, 4 USB 3.0 ports, two Gigabit LAN ports, the power socket, two microphone inputs for the karaoke feature, an audio out, and a Kensington security lock.
The NAS feels well-made and looks to be built to last. The 2-year warranty is also something I appreciate, considering that this is a device that’s going to be running 24/7.
Installation and Setup
The included Quick Installation Guide splits the setup process into two – hardware setup and software setup. Nice and logical, so let’s stick to that structure.
Hardware setup
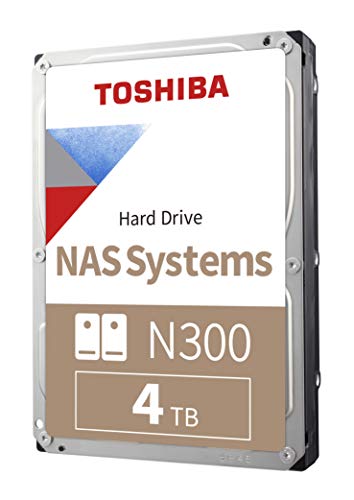
Installing the hard drives is the first step. Now you don’t have to use 2 drives, you can start with one hard drive and then later on add another hard drive to set up a mirrored RAID system (RAID 1). But I strongly recommend adding another drive at the same time to benefit from redundant storage. Check out my top recommended NAS hard drives here.
The Quick Installation Guide has nice visuals walking you through installing each drive:
Open the drive bay
Pull it out
Place the hard drive in the caddy and use the provided 4 screws (for 3.5″ drives) or 3 screws (for 2.5″ drives) to scure the hard drive
Insert the drive caddy back into the bay
Plug in the power cord and hook up the NAS to your router through one of the LAN ports, and hit the power button.
Software setup
Once the NAS powers on, visit start.qnap.com to continue the setup process and install the latest firmware. This is the best method for beginners but if you are a more advanced user, you can also use the Qfinder app which lets you setup the NAS without an Internet connection.
My previous NAS, the QNAP TS-231+ had a hardware issue and was refunded by QNAP under the standard 2-year warranty as I mentioned in my quick review of the TS-253A. This left me with two 3TB WD RED hard drives that I wanted to use with my new TS-253A. I didn’t think it would be as simple as popping my existing drives into the new NAS and it would all work – I was right. I installed the two drives and turned on the NAS but sadly the QTS operating system did not recognise my hard drives as drives with data on them. So I proceeded with the setup process as if they were brand new empty drives. I chose RAID 1 as my drive volume type – so disk 1 is mirrored on to disk 2 in realtime. If one of the drives should fail, the other one would still have a copy of my data.
There are two steps you should do that the setup process doesn’t tell you to:
Create ‘shares’ or folders on your NAS drive: Have a real deep think about how you want to structure your data. Don’t just start creating hundreds of folders and files in the root folder. I always create a few shares: Documents, Photos, Videos, Backup and CCTV. You can choose to share these ‘shares’ with each user on your network, they just need to map each share to a drive letter on their computers and you have easily accessible network storage that simply works.
Create one user per family member on your NAS, and use the same login details as they do on their computers. This lets their computers seamlessly login to the NAS and reconnect the mapped network drives automatically whenever they turn on their computers. Practically this means the network folders behave like local folders on their computers, and not like a remote folder they have to log into each time they want to access it. This little trick revolutionised my family’s experience of network storage.
Now I said the TS-253A didn’t recognise my hard drives as used drives. So it couldn’t access the data that was already on it. This is where my weekly backups of the NAS to an external USB drive ([easyazon_link identifier=”B00F0JXE04″ locale=”US” tag=”vueville.com-eaz-20″]WD Studio 4TB drive[/easyazon_link]) paid off. Once the setup process was completed, I manually re-created the shares I had on my old NAS and copied over the data one by one into each share. A bit time consuming but my weekly backup schedule was a true life-saver.
QTS Software
Linux is a far superior operating system to Windows. That’s why the majority of web servers (like the one that powers this website) run on Linux. What about supercomputers? Shockingly, the top 500 supercomputers in the world all run on Linux. Yep, every single one of them. Linux is just a beautiful efficient operating system that can scale from a humble Raspeberry Pi to supercomputers. No wonder then, that most NAS manufacturers build their OS on Linux.
QNAP’s customisation of Linux is called QTS and the latest version 4.2.2 is now available for all their current models. QNAP has been continuously improving the QTS OS and it come across as a polished unified interface that effectively hides the tons of features it packs. Let’s look at the main features:
Storage Management and Data Protection
File Station
Local Snapshot and Snapshot Replica
Backup from PC, MAC, mobile to NAS
Backup from NAS to cloud
Storage Manager (SSD/HDD tiered storage)
Network and Virtual Switch – Bridge Ethernet ports or dedicate ports to specific applications for network trunking
User accounts and access limits
Data Security
Connection blacklist/whitelist
Account security and push notifications
VPN server and client
Proxy server
Anti-virus
Data Encryption
Hard drive-level or folder level
App Center – Houses all the apps available for QTS
Virtualization Station – Install any OS in a VM with dedicated CPU cores, RAM, disk storage, dedicated Ethernet port, HDMI output etc.
Container Station – A one-click-install turnkey Linux VM with dedicated CPU cores, RAM, disk storage, dedicated Ethernet port, HDMI output etc.
QIoT Container – helps developers build an IoT environment, integrate sensors, and make use of development kits (Raspberry Pi, etc.) with the NAS’s Ponte (data receiver), Node-RED (data analysis), MongoDB (data storage), Freeboard (data presentation) to construct a comprehensive IoT architecture.
QNAP QvPC – Use your NAS like a PC
Surveillance Station 5.1
QUSBCam2
Multimedia Center
Video Station 2.5
Music Station 4.8
HD Station 3.1
OceanKTV Karaoke
Download Station 4.2
Plex Media Server
Kodi Media Player
Productivity Tools such as NAS management, myQNAPcloud and Notes Station
Signage Station
Okay so which of the above features of QTS do I actually use?
File Station – This is akin to Windows Explorer but a much more powerful way to browse your NAS drive contents and connected hard drives
Anti-virus to keep my NAS and network safe
Surveillance Station 5.1 – One of the main reasons I got the NAS was for the surveillance feature and the 4 included IP camera licences
Container Station – I used this feature to easily set up an Ubuntu virtual machine that I use to primarily test Linux apps
DDNS update – This feature periodically updates my DDNS service with my home network’s IP address
DLNA server (Twonky) – Lets me stream all my media across the home network
USB One-touch backup – I take a weekly backup of my NAS to the WD Studio 4TB
Surveillance Station
Since this is a blog about home security, I think we should take a closer look at Surveillance Station which is one of the apps included with the QTS OS. Here are the features of Surveillance Station:
Live View
Live view of up to 64 channels on a single screen
Monitor on TV via HDMI port
Instant playback feature which rewinds the last few seconds
Supports PTZ cameras
Supports camera audio
Preset positions and auto-cruising
E-map feature which lets you visually show cameras on a layout overlay
Push, E-mail, and SMS notifications
Recording
H.264, MPEG-4, M-JPEG, and MxPEG formats
24/7 recording mode
Event-based recording: 5 types of events (motion detection, alarm input, connection failure, recording failure and user-defined events) that can initiate 7 types of event actions (recording, PTZ Control, alarm output, email notification, SMS notification, buzzer notification, and user-defined actions).
Manual recording
Smart recording which records at a higher bitrate only when the camera alarm is triggered
Playback
Timeline view, synchronised playback of all cameras
Preview recordings by thumbnail
Playback speed control
Digital zoom
Intelligent Video Analytics (IVA) which can scan footage for missing objects
Real-time watermarking
Web-based user interface
QVR Client desktop app
Vmobile – iOS and Android app
3000 IP camera models supported
Up to 32 user accounts
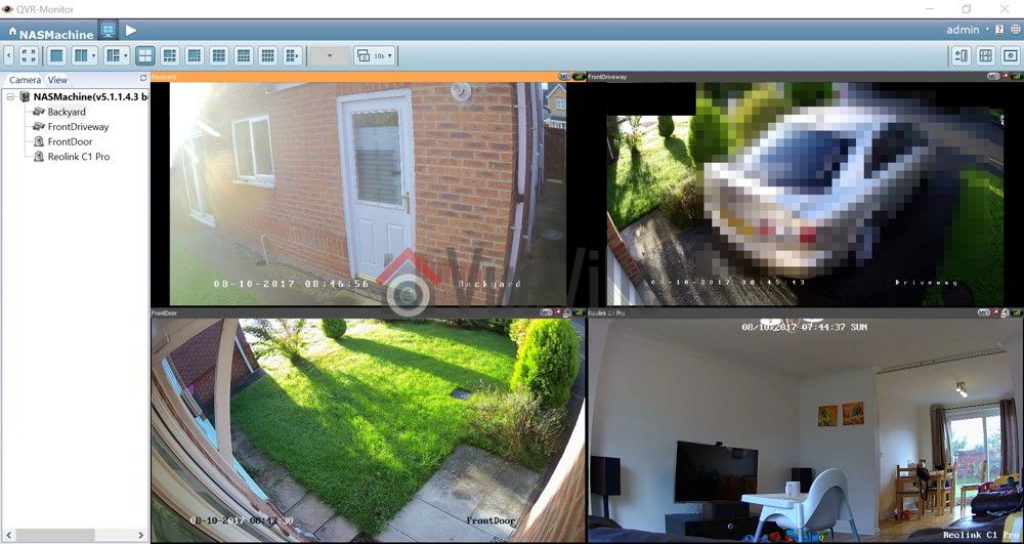
There are two ways you can access the web UI of Surveillance Station – log into the NAS admin and click on the Surveillance Station app or just go directly to the Surveillance Station app URL. In either case, what I dislike is having to log into the app even if I have logged into the NAS admin page. Why don’t I have Single Sign-On in 2018 QNAP?
The QNAP TS-253A is one of the rare 2-bay models on the market that come with 4 IP camera licences. To test the software, I added the following cameras at these resolutions:
Hikvivison DS-2CD2132F-IWS Dome camera
1920×1080 at 15fps, PoE
Hikvision DS-2CD2532FWD-IWS Mini-dome camera
1920×1080 at 15fps, PoE
Reolink RLC 422 Dome camera with motorised zoom
2560×1440 at 15fps, PoE
Reolink C1 Pro
2560×1440 at fps, WiFi
Surveillance Station auto-detected all the cameras either fully along with model number or as ONVIF models in the case of the newer Reolink C1 Pro. Even though the RLC-422 was a 5MP camera, Surveillance Station wouldn’t record higher than 4MP. Check out my detailed how-to article on setting up the QNAP surveillance station app with your cameras.
The app’s web-UI is not the new modern HTML5 style but relies on a plugin that has to be installed. For this reason, I prefer to use the far better QVR Client desktop app to monitor live-view and playback recorded video. Here’s a screenshot of the QVR client in action:
Our DIY Home Security System – QNAP QVR Client for Surveillance Station
Performance
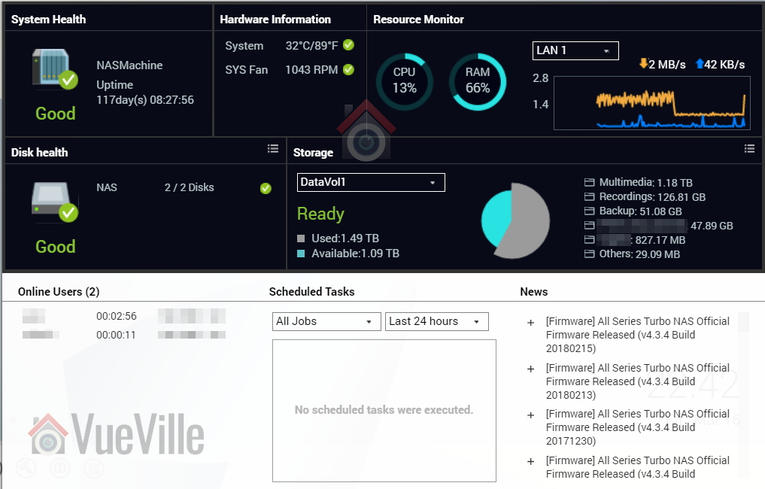
Okay so how does the NAS deal with recording 4 cameras at these high resolutions along with all the other things I ask of the NAS such as running a full Ubuntu VM? Without breaking a sweat, I am happy to report. CPU load hovered at around 13% and RAM usage was a steady 66%.
Verdict
NAS servers these days are versatile gadgets that can protect not just your data but also your home through its NAS NVR and VPN server features. I am amazed at the incredible level of functionality these devices pack for so little money.
The TS-253A is one of the best value NAS servers you can pick up right now that has an Intel processor, oodles of RAM, can run virtual machines and has 4 IP camera licences. If you have been dithering on getting a NAS for whatever reason, this is one NAS that is worth checking out.
[review]
Where to buy
[easyazon_link identifier=”B017YB4Y1S” locale=”US” tag=”vueville.com-eaz-20″]Check Price on your local Amazon site[/easyazon_link]
(* = affiliate link / image source: Amazon Associates Program)
Hard drives are not really the first thing that comes to our minds when we are thinking about our CCTV setup. That honour goes to the camera right? Whether you plan to record just motion detection clips or 24/7 round the clock, the safety of your recordings comes down to one thing: the hard drives you choose for your NVR (Network Video Recorder) or DIY NAS NVR (Network Attached Storage NVR).
In fact, I would say that the hard drive is the weakest link in your CCTV setup. Why? Because it is the only mechanical device in the whole system. Since hard drives do not last forever and will fail at some point, it is very important to choose the best hard drive for your NVR or NAS.
Product prices and availability are accurate as of the date/time indicated and are subject to change. Any price and availability information displayed on https://www.amazon.com/ at the time of purchase will apply to the purchase of this product.
Product prices and availability are accurate as of the date/time indicated and are subject to change. Any price and availability information displayed on https://www.amazon.com/ at the time of purchase will apply to the purchase of this product.
Product prices and availability are accurate as of the date/time indicated and are subject to change. Any price and availability information displayed on https://www.amazon.com/ at the time of purchase will apply to the purchase of this product.
A quick note: As an Amazon Associate I earn from qualifying purchases. This post contains affiliate link(s). An affiliate link means I may earn advertising or referral fees if you make a purchase through my link, at no extra cost to you.
(* = affiliate link / image source: Amazon Associates Program)
Best Hard Drives for Surveillance NVR – 2024 Recommendations: Summary
[table id=72 responsive=scroll /]
(* = affiliate link / image source: Amazon Associates Program)
I use my QNAP TS-253A NAS as my NVR, you can see my full setup here. The TS-253A is a few years old now, so do look at my latest NAS choices.
If you already have a NAS and don’t need more than a couple of IP cameras, you may not even need a dedicated NVR. Your NAS can probably do double duty as your NVR. There are several benefits in doing this, namely that you automatically get the benefits of a redundant backup thanks to the RAID-1 option.
RAID-1 means that as the NAS records the IP camera stream, it automatically copies it to the second hard drive in the NAS. This setup of hard drives is called RAID (Redundant Array of Independent Disks) and is also the key reason I recommend using a NAS as your NVR, with frequent (weekly for me) USB backups to an external drive. Some NVRs can do RAID but they tend to be a lot more expensive, but for a NAS this is its main feature – redundant storage.
I will be considering only the traditional mechanical spinning drives because large capacity SSDs are still too expensive for home users and are less durable. I have split this round-up into two main sections: hard drives for NAS NVR usage and for dedicated surveillance systems.
Players in the HDD market
Western Digital, Seagate and Toshiba are the market leaders. It’s worth noting that Western Digital now owns HGST (Hitachi). Also interesting is the fact that WD and Toshiba are partners.
CMR vs. SMR controversy
As drive capacities increased, disk manufacturers have found creative ways to cram more data into the same physical platters. Traditionally hard drives used a technology called Conventional Magnetic Recording (CMR) for arranging data tracks in the disk platter. One of these newer technologies is called Shingled Magnetic Recording (SMR).
SMR drives are cheaper to manufacture but are slower to write to and read from. So these drives use free space in the drive as a cache and may even have additional cache memory to offset the slower performance. However, with heavy read/write operations the cache will fill up and the read/write speed drops a lot.
This may be fine for a backup drive, but not for NAS environments where raid rebuilding will result in unacceptable delays.
Traditionally, all NAS drives from WD used CMR disks. But controversy erupted when WD was recently caught shipping NAS drives that use SMR, without disclosing it.
See this test that shows a CMR based NAS rebuild (resilver) takes 17 hours but the same drive based on SMR takes 9 days!
Since SMR drives are clearly inferior for NAS environments, the least that WD could do was disclose this change and mention it in their datasheets. But they didn’t which for me is a huge error in judgment from WD’s side.
Thankfully all the WD drives I recommended in my post were the older CMR based drives with model numbers ending in ‘EFRX’. For example: WD40EFRX. So if you purchased the ones that were listed here, you are fine.
In the end, they fessed up but clearly I have lost trust in them and have taken this into account in my recommendations by making Seagate my first choice for smaller drives and WD only for larger drives >8TB where only CMR is used.
Seagate maintains that they have never used and currently do not use SMR in their IronWolf and IronWolf Pro NAS drives.
Toshiba has admitted they use SMR in their drives, and have also not been disclosing this.
Hitachi has also been found to be using SMR in their drives.
Best Hard Drives for NAS NVR – My 2024 Recommendations
Let’s take a detailed look at the various NAS hard drives available. For the sake of comparison, I will assume you are looking at a 4TB hard drive. This is the most common HDD size sold so should be a good fit for most people. So all the specs mentioned in the features box is for a 4TB model from the product family being discussed.
Best Overall NAS NVR Drive: Seagate IronWolf & IronWolf Pro
Product prices and availability are accurate as of the date/time indicated and are subject to change. Any price and availability information displayed on https://www.amazon.com/ at the time of purchase will apply to the purchase of this product.
(* = affiliate link / image source: Amazon Associates Program)
I remember my first computer hard drive – a 1GB Seagate ATA drive. It was a pretty nippy drive too! Seagate is also the one big hard drive brand that does not belong to or has not partnered with Western Digital, in fact it is WD’s only real competitor. Another popular brand from yesteryear is Matrox, which Seagate acquired in 2006. Seagate’s Barracuda drives are one of the most popular hard drives over the last decade.
A casual perusal of Seagate’s product lineup with its bold and colourful marketing reveals the Guardian series of hard drives. This is where Seagate’s NAS offering lives. It comes in two flavours like Western Digital’s, the Ironwolf to be used in NAS enclosures up to 8 bays, and the Ironwolf Pro for up to 16 bays.
The Ironwolf drive runs at a constant 5900 rpm. But interestingly the 6TB and higher models rotate at 7200 rpm (faster then WD Red) and have 256MB cache (matched by the WD Red only at 10TB). All other specs are similar such as the MTBF, workload and load-unload cycle ratings.
The great thing about Ironwolf and Ironwolf drives are that they all use the superior CMR recording technology , unlike WD that uses both CMR and SMR across its NAS range.
Compared to the Ironwolf, the Ironwolf Pro models add even more cache memory, have RV sensors across the board, have a higher 300 TB/year workload, up the warranty to 5 years and offer their 2-year ‘Rescue’ data recovery service as standard.
Seagate NAS firmware optimisations called AgileArray work together with Rotational Vibration (RV) sensors (4TB drives and above), something that WD drives curiously don’t have. The firmware performs error recovery control as expected in a NAS drive. IronWolf Health Management is available on compatible NAS systems such as Synology and Asustor to provide better drive health data.
A few years ago, Seagate faced some criticism over the reliability of its drives from hard drive statistics data released by Backblaze, a cloud storage provider. But as the recent numbers show, Seagate has taken this feedback seriously and seem to have over-engineered the Ironwolf range to improve its public perception.
Runner-up NAS NVR Drive: WD Red Plus & Red Pro NAS Hard Drive
Product prices and availability are accurate as of the date/time indicated and are subject to change. Any price and availability information displayed on https://www.amazon.com/ at the time of purchase will apply to the purchase of this product.
(* = affiliate link / image source: Amazon Associates Program)
Western Digital is the most recognisable name in the hard rive market and has been in the storage industry since the 1980s. But did you know that they acquired HGST (Hitachi’s storage division) in 2011 and Sandisk in 2016? These acquisitions have made WD top dog in the HDD market. Also interesting is the fact that WD and Toshiba are partners. Yet WD, HGST and Toshiba have stated that they all compete with each other.
The current product line is simple and easy to understand – named after various colours:
Blue for standard desktop & laptop drives
Black for high performance desktop & laptop drives
Red, Red Plus and Red Pro for NAS drives
Purple for surveillance drives
Gold for enterprise drives
The original WD Red drives have been the most popular NAS drives in the market. But then the SMR controversy hit when WD quietly changed some Red drive models to SMR recording technology from the superior CMR tech. To address the criticism of the poor transparency of its marketing material, WD has now changed the WS red lineup totally.
Inexplicably WD still sells the SMR drives but only under the WD Red moniker. The CMR drives from the old Red line have been moved to the newly created WD Red Plus line. While Red Pro remains unchanged and continues to have only CMR models in it.
So to summarize:
WD Red: SMR
WD Red Plus: CMR
WD Pro: CMR
So avoid the WD Red line and only consider Red Plus and Red Pro lines. I don’t understand why WD still pushes the inferior SMR drives as NAS drives, when they are clearly not good enough due to the atrocious NAS re-build (re-silvering) times and widely reported RAID errors.
The Red and Red Plus drives are aimed at NAS enclosures of up to 8 bays, and the Red Pro for more than 10-16 bays.
I have been using WD Red drives in my QNAP NAS for the past 5 years and have been very happy with the performance, reliability and quietness of these drives. Of course back then they were selling only CMR models. Personally I have found the WD RED drives to be extremely quiet in operation, which is an important feature as the NAS sits in once corner of my living room.
The NAS optimisations on the software front are packaged into the special firmware WD calls NASware 3.0.
An interesting feature that’s unique to WD is the Intellipower system which optimises the rotational speed, transfer speed and cache usage to optimise performance and power consumption. In practice, this means the rpm ranges between 5400 and 7200 rpm and results in a best-in-class power consumption of just 4.5W in operation (for the 4TB drive). In most cases, the performance of the Intellipower drive should be comparable to that of a conventional 7200rpm drive such as the Hitachi HGST Deskstar.
The Red Plus & Red Pro drives also boast a high load/unload cycle rating of 600,000 similar to the Seagate Ironwolf & Ironwolf Pro. However the smaller WD Red Plus drives have only 128 MB cache whereas the Ironwolf has 256 MB for the same sizes. Other ratings are inline with the industry at 1 million hours MTBF, 180 TB/year workload rating, and 3 years limited warranty.
The Red Pro drives are a step above with higher internal transfer rates, 512MB cache, 300 TB/year workload and 5 years warranty. This is broadly similar to Seagate’s Ironwolf strategy. I don’t see the need for home NAS NVRs to get the WD Red Pro drives unless you need the higher workload capacity.
How about some practical numbers from my own NAS? I have been running my 2-bay QNAP NAS 24/7 with 3TB drives in RAID-1 for 5 years now. The original pair of drives I bought are both dead now – the first drive after 1.5 years of service and the second after nearly 5 years of 24/7 service.
Alternative NAS NVR Drive: Toshiba N300 & N300 Pro
Product prices and availability are accurate as of the date/time indicated and are subject to change. Any price and availability information displayed on https://www.amazon.com/ at the time of purchase will apply to the purchase of this product.
(* = affiliate link / image source: Amazon Associates Program)
Toshiba NAS drives are not hugely popular but are a good budget option. The N300 is the NAS oriented model and has a very good 7200 rpm rotational speed. Power consumption figures are on the higher side as a result. The 128 GB cache memory is the same as the WD Red Plus but lags behind the 256 MB of the Seagate Ironwolf.
The N300 is suitable for 1-8 bay NAS enclosures and have integrated RV sensors to protect itself from vibration. This drive also has a few other tricks to increase reliability – it automatically adjusts the seek speed to reduce heat output during intensive operations.
Recently they also launched the N300 Pro, taking a leaf out of WD’s and Seagate’s approach. The Pro adds rotational vibration sensors, 256/512MB cache, a higher workload of 300 TB/year, the best MTBF I have seen of 1.2 million hours and 5 years warranty.
Best Hard Drives for Dedicated NVR – My 2024 Recommendations
What if you have a dedicated NVR, and not a NAS? You may be thinking the best option is to get a NAS-rated drive, but actually you could get a purpose-made surveillance drive. These drives are optimised for recording multiple video streams from CCTV cameras and have special optimisations to avoid errors & maintain integrity of the recordings.
Best Overall Dedicated NVR Drive: WD Purple & Purple Pro Surveillance Drive
Product prices and availability are accurate as of the date/time indicated and are subject to change. Any price and availability information displayed on https://www.amazon.com/ at the time of purchase will apply to the purchase of this product.
(* = affiliate link / image source: Amazon Associates Program)
The WD Purple drives is now in its 5th generation and has over 15 million drives shipped so far. These drives are optimised for recording multiple IP camera streams 24/7 under harsh conditions without consuming a lot of power. The features that let it do this are the AllFrame 4K technology and Intelliseek. Allframe 4K is WD’s implementation of ATA streaming. When used in systems that support the ATA command set, the Purple drive can skip error correction if it encounters a write error. Why is this important? In a NAS the drive’s priority is to ensure file integrity, and so it will try to correct the error slowing down write operations. In a surveillance system, if the drive slows down writing for the sake of error correction, the write buffer will quickly fill up with new video frames leading to dropped frames. So the surveillance drive prioritises writing as many frames as possible to the disk instead of getting every last bit correct.
If your NVR supports RAID, you can use up to 16 WD Purple drives in your NVR but note that these drives do not have any vibration protection unlike the Seagate Skyhawk drive below. The larger drives use the Helioseal technology to boost hard drive densities.
Just as with the Red range, WD now launched a Purple Pro line. These have a much higher workload rating of 550 TB/year, 7200 rpm speeds, 600,000 load/unload cycles and a 5 year warranty. No sign of rotational vibration sensors though!
For home NVRs I think the WD Purple is more than enough, the Purple Pro is probably overkill.
Product prices and availability are accurate as of the date/time indicated and are subject to change. Any price and availability information displayed on https://www.amazon.com/ at the time of purchase will apply to the purchase of this product.
(* = affiliate link / image source: Amazon Associates Program)
The Skyhawk and Skyhawk AI Surveillance drives are Seagate’s answer to the popular WD Purple and Purple Pro drives. The Skyhawk is designed for multi-bay NVRs with a workload of up to 180 TB/year, and sport RV sensors for vibration protection whereas the Skyhawk AI versions can do up to 550 TB/year. Both drive models use Seagate’s ImagePerfect technology which is similar to WD’s AllFrame 4K for improved video stream writing capabilities.
While the Skyhawk line has both CMR and SMR drives, the Skyhawk AI uses only CMR recording technology. For this reason, the Skyhawk is not our first choice of dedicated surveillance drives.
Discontinued Drives
NAS NVR Drive: Hitachi HGST Deskstar
7200 rpm
600,000 load/unload cycles
1 million hours MTBF
3 years limited warranty
HGST is a highly respected brand that is often overlooked by most home users. Over the years they have quietly gone about building incredibly reliable hard drives and were recently acquired by Western Digital. Their NAS line is named Deskstar NAS and feature 7200 rpm drives and at least 128MB cache across the whole disk size range of 4TB-10TB. HGST is also the only manufacturer to claim a sub-12ms seek time.
Like the Seagate Ironwolf drives, the Deskstar NAS drives also feature rotational vibration sensors to improve reliability.
What to look for in a hard drive
Hard drives are measured on a range of performance and reliability factors that can help narrow in on the right hard drive for you.
RPM: The speed at which the disks spin – ranges from the slower 5400 rpm to the fastest 7200 rpm. Enterprise drives may go up to 10,000 rpm. Faster RPM = lower seek times and higher data transfer rates.
Mean Time Between Failures (MTBF): A standard measure of reliability for any device, higher numbers are better. But do not put much faith in the 1 million hours MTBF often quoted by hard drive companies – you won’t use your hard drive for 114 years. The load/unload (LUL) cycles, workload (TB/year) and power-on hours ratings are far more useful numbers.
Load/unload cycles: This is the number of times the drive can spin up its discs in preparation for a read/write activity by the heads, and then spin down. If the drive is recording footage 24/7 this figure becomes less important.
Data write/read capacity – measured in TB/year rating
Power-on hours – how many hours the drive is designed to remain powered on
Vibration tolerance: The more bays you have in your NAS, the higher the vibration is going to be. Hard drives hate vibration and NAS hard drives are designed to counter the vibrations induced by multiple spinning discs. Some brands such as Seagate’s Ironwolf even have sensors to detect and precisely adjust for these vibrations.
Power-efficiency: Most NAS and dedicated NVRs are designed to be economical devices as they run 24/7. The power usage of a ahrd drive might seem trivial at face value, but consider that my TS-253A NAS with no drives consumes just 14.4W in operation. So two WD Red drives at 4.5W each in operation will consume 9W which is 62.5% of the NAS’ power consumption. Over a year, 24/7 operation can run up significant energy costs if the drives are not efficient. Also consider that generally more energy consumed = more heat output.
Transfer speed: Most hard drives in this roundup approach the typical maximum of 1Gbps transfer speed a home network can handle. (1 Gbps or 1000 Megabits per second = 125 Megabytes per second). If you are accessing your NAS primarily over Wi-Fi, you are never going to max out the hard drive’s transfer rate.
Advanced Format (AF): In order to increase hard disk densities ever higher, the AF technology has been developed by the leading hard drive manufacturers. This is a whole new way of organising data on the drive, but is backwards compatible with older hardware and software. If you are buying a larger hard drive (>6 TB), make sure it supports AF for future-proofing.
What’s the difference between Desktop/NAS/Surveillance hard drives?
So you have three options in total: a standard desktop hard drive, a NAS optimised hard drive or a Surveillance-grade hard drive.
A standard computer hard drive is designed to be used a few hours every day over a number of years. This is perfect if you are using it in a laptop or desktop PC that spends more time switched off than on. But in a NAS or NVR that is running 24/7, your hard drive is constantly working with no rest apart from the odd reboot or firmware upgrade and throwing out heat. A standard hard drive is not going to last long in that kind of environment, its simply not designed for it.
There are other important differences too – NAS hard drives have error recovery control built into the disk controller, they have firmware optimisations that fine-tune the disk for typical NAS operations, and last but not least they have vibration tolerance which is critical in multi-disk NAS enclosures. Another often overlooked benefit is that NAS drives are tested by hard drive manufacturers for compatibility with different RAID configurations and NAS enclosures.
If you are using your NAS as the NVR
NAS hard drives are designed for 24/7 frequent random reads and writes from multiple users or sources. From a surveillance point of view, this is ideal for recording either motion detection clips. Surveillance-grade hard drives on the other hand are optimised for sequential read and write operations, or in other words 24/7 continuous recording of IP camera footage. Note that these drives are less concerned about write errors because a write error in a surveillance drive will only result in a few dropped frames which is not a big deal.
Here’s a comparison of various types of HDDs using WD as the example: [table id=73 responsive-scroll /]
So if you are looking at using your NAS as an NVR in addition to the usual home server functionality, I would still go for the NAS hard drives like the WD Red. This is because NAS drives are great multi-functional drives and are good enough for 24/7 recording of footage.
Even if you are going to use a NAS exclusively as your NVR, I still think the NAS hard drives are a better choice because the surveillance drives are not suited to NAS enclosures because a) they have weak or no vibration tolerance, and b) they are not designed for RAID arrays.
If you are using a dedicated NVR
If you are looking for a hard drive for your dedicated NVR such as a Hikvision, Dahua, Amcrest or Reolink NVR, definitely go with the surveillance drives which will excel because they are going to do nothing but record multiple IP camera streams 24/7.
Conclusion
I hope this post gives you an overview of the various options available for your NAS NVRs and dedicated NVRs. Remember try to go for a RAID setup in any case, and take frequent backups to an external drive such as the WD My Book.