
It feels like it was just a few months ago that I reviewed my first 4MP camera, a Hikvision mini-dome.
Today I am going to take a closer look at the 5 Megapixel Reolink RLC-422 dome camera with 4x optical zoom, kindly provided by Reolink for this review.
A quick note: As an Amazon Associate I earn from qualifying purchases. This post contains affiliate link(s). An affiliate link means I may earn advertising or referral fees if you make a purchase through my link, at no extra cost to you.
What’s in the box

The RLC-422 comes in an attractive package that showcases the Reolink mobile app on one side, and lists the camera features on another side.

On opening the box I found the RLC-422 camera to be well-protected with foam padding along with some accessories. Not surprising as every Reolink camera I have unbowed has been well packed.
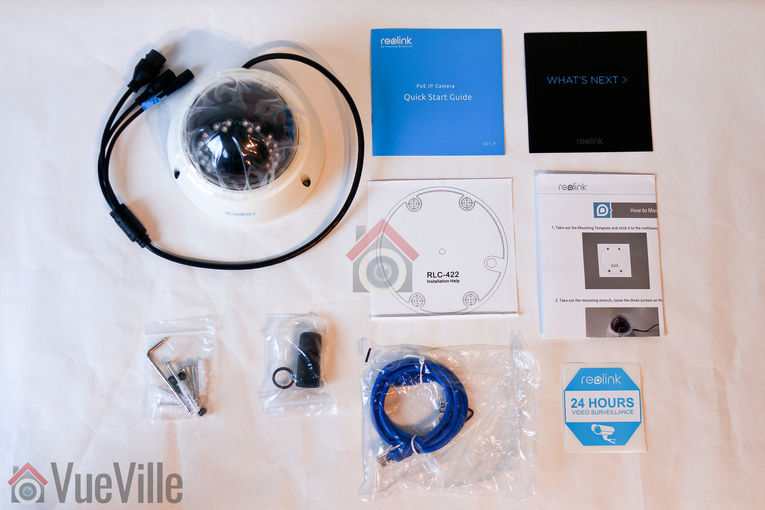
Box contents:
- RLC-422 Zoom IP camera
- Waterproof sleeve for Ethernet cable
- 1 metre blue network cable
- Screws, rawl plugs and an Allen key
- Software CD
- Quick start guide
- What’s next guide
- Installation guide with photos
- Surveillance sign
- Mounting hole template
Specifications
Design
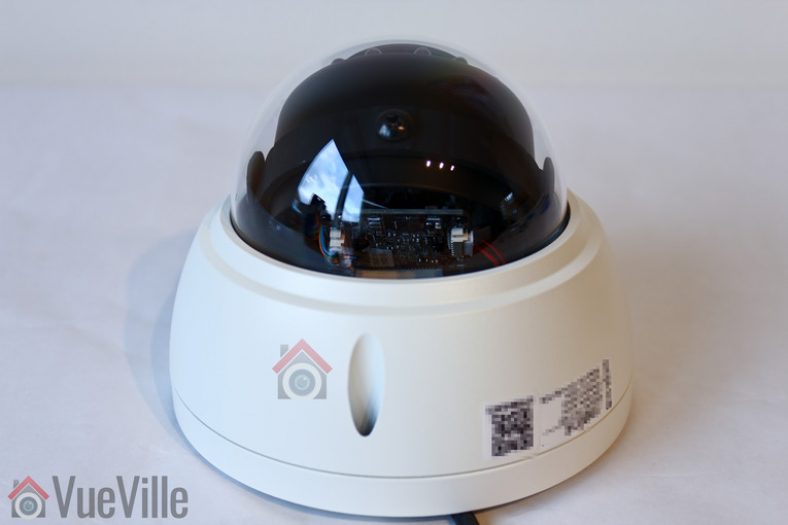
The RLC-422 has a traditional dome type design. This is a camera with a motorized lens though, so it is slightly larger than a fixed lens dome camera.
The base of the camera is made of steel and is painted white. The quality of the finish is very good and it feels like a camera that is far more expensive that it really is. The dome is made of clear plastic – I prefer it to be darkened because then its more difficult to figure out where exactly the lens is pointed.

On one side there is a sticker with the QR code for the mobile app setup and login details. I recommend removing this sticker before installing the camera outdoors.
Unscrew three screws to open the camera and separate the dome from the base. The screws hold themselves in position in their holes when loose, and this is exactly what you want when you are trying to install the camera overhead. No screws falling out when you least want it.
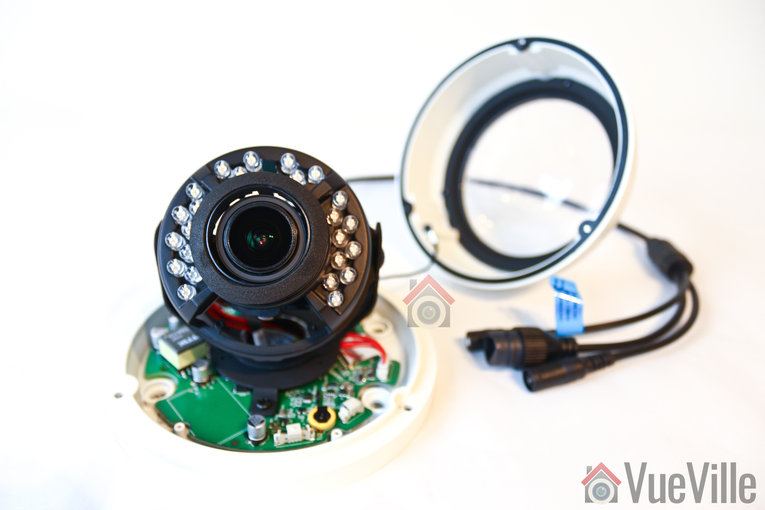
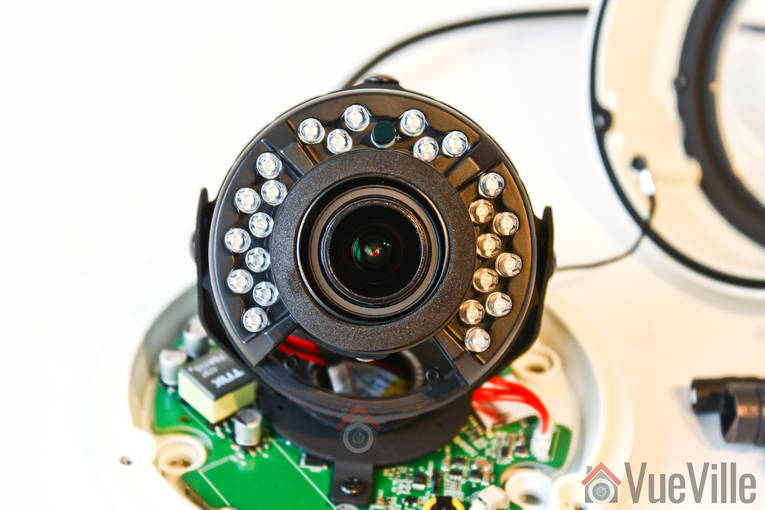
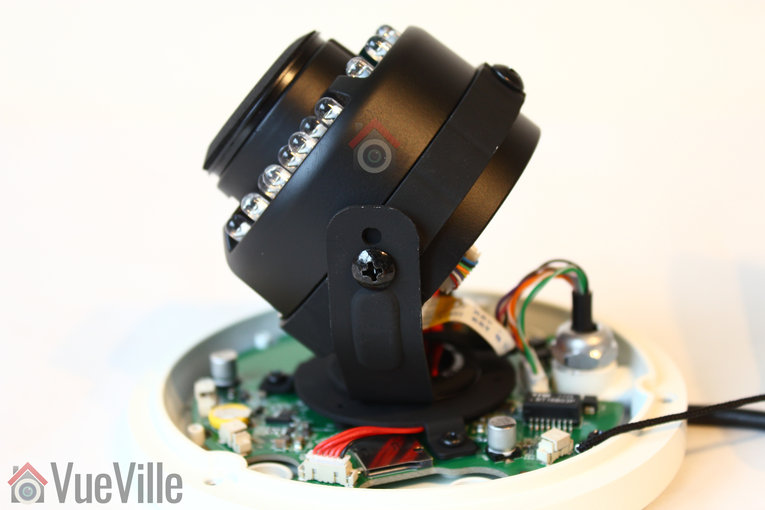
The lens assembly can be adjusted in two axes – the base of the lens rotates and the lens itself pivots around the arms. There are two screws that you need to loosen to allow this motion. One thing I always like to check is whether any of the 24 IR LEDs are blocked. As you can see in the photo below, we have no such issue with the RLC-422. You can also see the cord that connects the dome cover to the camera base, again terribly useful when you are trying to install the base to a ceiling.
The rear of the lens assembly can be seen below.

All the cabling comes out of the holder arm and can conveniently go into a junction box or down the wall through a cut-away provided for this purpose. The cabling consists of a pigtail with the following connectors:
- 12V power input jack
- RJ-45 ethernet port
- A reset push button

Just like the Reolink RLC-423 PTZ I reviewed, the reset button of the RLC-422 is not on the main body of the camera. Apart from eliminating an ingress point, it means nobody can reset the camera unless they get to the hidden reset button which is probably inside the wall or the soffit! This is much better than many other cameras such as Hikvision’s which have the reset button externally on the camera body itself.
Installation
I am not a huge fan of installing dome cameras, because they are generally a lot more work to install than a bullet camera. But as we saw earlier, Reolink has made it as painless as they can with the self-holding screws and the dome being linked to the camera base.
Hardware setup
The RLC-422 supports Power over Ethernet (PoE) which is my recommended way of powering IP cameras – using just a single Ethernet cable, you can send both data and power to the camera using either a PoE switch or a PoE injector.
You can adjust the lens around the perpendicular axis of the camera and you can rotate the lens around its own perpendicular axis by loosening the screws.
A typical fixed lens camera needs around 7W power, but the motorised lens of the RLC-422 means that it needs a little more power, a maximum of 10W to be exact. This is still within the 802.3af spec, so my TP-Link PoE switch had no trouble powering up the camera over PoE.
I added a Sandisk 64GB SD card so that I can record motion detection clips on-board the camera itself.

If you want to use the included waterproofing connector, you will have to remove the RJ-45 plug on the Ethernet cable and re-crimp it once it has been passed through the waterproofing connector.
Software setup
Most manufacturers ship their cameras with static IPs by default – for example Hikvision and Dahua. In most cases the camera will not have the same network settings (like sub-domain) as your network. This means that you cannot access the camera unless you change the camera network settings to that of your network. You are expected to do this using the manufacturer’s camera finder tool. While this static IP method has security benefits, most home users would find it much easier if the camera manufacturer used DHCP as default. Then the camera would automatically be configured to use your network settings and be ready to use.
As with all the Reolink cameras I have tested, this is exactly the case with the RLC-422: DHCP is enabled by default. When you are setting up the RLC-422 using DHCP, you won’t know what its IP address is and so will have no way of directly accessing the camera. If you have IP reservation set up on your router, yes then you may know. But let’s assume you don’t know the IP address. You just need to find the IP address of the camera and there are quite a few ways you can do this:
- Use the Reolink mobile app
- Use the Reolink desktop client software
- Use any camera monitoring software such as BlueIris
- Use a mobile security camera app such as tinyCam Monitor Pro
- Scan your network using a network scanner app
The helpful setup guide suggests the first two methods – Access the camera by smartphone and access the camera by computer.
I have tried option 1 with another Reolink before so I went with option 2 this time – setup through a computer. These are the steps I followed:
Step 1: I downloaded the Reolink Desktop Client app from the URL as the manual suggested: https://reolink.com/software-and-manual/
Step 2: Installed Reolink Desktop Client v7.2.2.12 updated Oct 8, 2017, and ran it. Windows Defender identified it as a new app and asked me if I want to allow it Internet and LAN access. I allowed it to proceed.
Step 3: The app automatically identified the camera and logged in successfully, and presented me with the Live View screen.
Step 4: As I mentioned earlier, the camera has DHCP enabled by default but I like to assign my cameras static IP addresses. The main reason is that its easier to set up and access the camera form other devices wihtout having to check each time what the IP address is. Clicking on the setup gear icon and clicking through to Netowrk>General allowed me to change it. This caused the Reolik app to add another camera to the list, with my new static ip address. It also then started complaining that it could not find the original camera with DHCP IP address. This was a bit tiresome so I disabled the ‘Add Camera Automatically’ option under app settings. No reboot was needed which is great.
Step 5: I then tried to access the camera from the new static IP address through Chrome. I logged in with the default login details. However since the camera admin site uses Flash and Chrome disables it by default, I just had to click on the “Get Adobe Flash player” button in the live view section and enable it in Chrome.
Step 6: I then changed the password for the admin account. I also created a new user and tried to delete the admin account for safety but like most IP cameras, the RLC-422 doesn’t support this feature.
Once you have the IP address, you can simply pop that into Chrome or Firefox to directly access the camera settings. You could also use the desktop client app to change camera settings if you don’t want to use the web-based admin panel.
You should change the password of the camera as soon as you can, especially worth noting as the camera doesn’t require you to nor remind you to do it.
Software features
I have a number of ways of accessing my camera live feeds – typically I use the tinyCam Monitor Pro app on my Android phones, sometimes I flick my TV over to the QNAP Surveillance station channel (thanks to the TS-253A’s HDMI output). But when I want to tweak camera settings, I prefer using the web admin page – I can watch the live view stream, adjust the zoom and change camera settings.
So entering the camera’s IP address into any browser that supports the Adobe Flash player will let you login to the camera. As I always say, an HTML5 interface would have been better for wider device compatibility but its far better than the NPAPI plugin that Hikvision still insists on using. You can choose the stream you want to see at the login screen, Channel 1 is called Clear and is the 5 Megapixel stream (unless you have changed the camera settings). The other options are Balanced and Fluent. These can also be selected once you are logged in.

Reolink calls the landing page the Preview page, but I like to call it the Live View page, which is more logical. On the left hand side you have the live view stream, and at the bottom clicking the play button lets you select between the video quality by switching between the Clear, Balanced and Fluent streams.
On the right hand side, an accordion type content holder has three sections – Optical Zoom, Basic settings and Advanced settings. The basic and advanced settings sections are like a quick access area that duplicates the settings on the actual configuration page – accessed by clicking on the gear button at the top right.
The Optical Zoom section adjusts to the abilities of the camera. In the RLC-423 it let you zoom, and adjust the focus manually. With the RLC-422, you have only the zoom function. You can also adjust the focus manually, but since it has auto-focus I recommend not changing it.
The Basic Settings section includes OSD settings, video stream encoding and image settings. The OSD page is pretty standard and lets you choose whether and where to show the OSD information such as day, date and time.
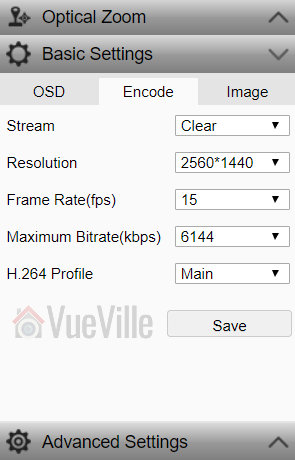
The Basic Settings is where you can set the video resolution, bitrate and frames per second of each of the Primary “Clear” stream (5MP default) and the Fluent stream (640×360 default). Interestingly, the ‘Balanced’ stream is missing in the stream selection dropdown.
The Image section lets you adjust the usual image settings such as brightness, contrast, saturation, sharpness and also mirroring and image rotation.

The advanced settings tab is where you will find the rest of the video settings and the ones I was most interested in – exposure, backlight and noise reduction. Setting the Exposure to ‘Low Noise’ lets you control just the range of gain, ‘Anti-smearing’ lets you control only the range of shutter speeds and manual lets you select both the gain and shutter speed ranges. The range selection method is novel – it means the camera will automatically choose the optimum settings from the range you specify. I didn’t see an option to change the i-frame interval. This is a bit strange as it is a setting that I would have expected to find. Why is it important? The i-frame setting specifies how often the entire frame is captured and not just what has changed from the previous i-frame. So being able to control it is important for getting the right balance between network bandwidth utilisation and a high quality non-blurry video.
Now the full camera settings configuration page is accessed by clicking the gear icon at the top right of the Live View page. This lets you access video resolution, network, motion detection, email and push notifications, user control, and system maintenance settings.

Click to enlarge
While the camera support motion detection alerts, these are of the basic variety. There is no advanced motion detection such as line crossing, or intrusion detection on offer here. One of the best ways to reduce false alerts is by using these advanced motion detection methods, so bear this in mind if you are planning to use this camera not for 24/7 recording but motion triggered recording. I would use it only for 24/7 recording or to capture images and videos based on commands from my DIY home automation system.

Click to enlarge

Click to enlarge
There is a built-in NVR feature, so the camera can record motion detection clips to the on-board SD card, and even 24/7 a network/NAS drive. The timeline feature is very handy and works well.

Click to enlarge
Performance
I tested the camera at its default settings of 5MP resolution and 20fps. Here are the properties of the video files it created:
[wpsm_codebox style=”1″]Daytime Video: MPEG4 Video (H264) 3072×1728 20fps 6253kbps [V: English [eng] (h264 high L5.1, yuv420p, 3072×1728, 6253 kb/s)][/wpsm_codebox]
[wpsm_codebox style=”1″]Night-time Video: MPEG4 Video (H264) 3072×1728 23.75fps 6105kbps [V: English [eng] (h264 high L5.1, yuv420p, 3072×1728, 6105 kb/s)][/wpsm_codebox]
I also added the RLC-422 to my favourite mobile CCTV app, tinyCAM monitor Pro and confirmed that I can view the camera streams there also.
However to optimise recording storage, I suggest recording at 4MP resolution and to lower the frame rate to 10fps:
[wpsm_titlebox title=”Recommended Video Stream Settings” style=”3″]
Primary Stream: 4MP (2560×1440), constant 6144 Kbps @ 10 fps.
Secondary stream: 640×360, 512 Kbps @ 6 fps.
[/wpsm_titlebox]
Optical Zoom Function
The optical zoom function is the headline feature of the RLC-422. I found the zoom speed to be on par with that of the Reolink RLC-423 PTZ. The autofocus is a bit sluggish just like the RLC-423 but at such an affordable price, I shouldn’t complain.
Daytime video quality
The RLC-422 is a 5 megapixel with a 1/3″ sensor. In the daytime video is crisp and appeared to be sharper than my 4 Megapixel Hikvision DS-2CD2542FWS-IWS as well as the 4 Megapixel Reolink RLC-423 PTZ.
If the camera has one weakness, its the speed of the autofocus. While the accuracy of the autofocus is pretty good, it does take a few seconds to autofocus after zooming in or out.
Here’s a sample video of a recording during the daytime:
[wpsm_video]https://www.youtube.com/embed/KplV0thvNqs[/wpsm_video]
Night-time video quality
The real test of an IP camera is when the sun’s gone down and the lights are off. The RLC-422 uses 24 conventional IR LEDs arranged in a ring around the lens. I did not see any evidence of internal reflections or ghosting, common issues with lesser dome cameras.
Note that the RLC-422 doesn’t have true WDR, it employes digital WDR.
So how did it perform? The video quality is great with just a hint of noise. Check out the sample video below shot at default image settings (backlight off and 3D Noise Redcution on):
[wpsm_video]https://www.youtube.com/embed/pfG8Vrfwr8M[/wpsm_video]
Mobile app
The Reolink mobile app is one of the best original manufacturer apps I have seen. Hands down beats Hikvision’s rather poor efforts and runs circles around other brands’ apps. I was able to quickly add the RLC-422 to the Reolink app on my phone, adjust the zoom level, and access the recorded clips stored on the on-board SD card.
Verdict
The RLC-422 is a very affordable 5MP dome camera capable of stand-alone operation due to the built-in NVR feature. However this is limited by the lack of advanced motion detection features. While the 5MP resolution is class-leading for affordable budget IP cameras, it is designed to a price – the lack of advanced motion detection methods, a microphone, audio and alarm connections and the slow auto-focus give away its budget nature. But for those who need a 24/7 recording dome camera with optical zoom, the ONVIF and RTSP support makes the camera very easy to integrate with an existing home CCTV or security system.
[review]
Where to buy
[easyazon_link identifier=”B01B4BKJHW” locale=”US” tag=”vueville.com-eaz-20″]Check Price on your local Amazon site[/easyazon_link]
(* = affiliate link / image source: Amazon Associates Program)
Leave a Reply