I cut the cord over a year ago, so I don’t watch much of ‘linear’ TV. But back when I used to, there was a British Gas ad that was always on. It had a catchy jingle and went something like “with Hive you can control your heating from your phone”. The product being advertised by British Gas was the Hive automated heating system, and the message was what if you could adjust your thermostat when you are not at home? Of course the cost had to be an expensive monthly subscription on top of the very expensive hardware you had to buy from British Gas.
One of my core principles that I have tried to imbibe in this blog is that I do not like to pay monthly subscription fees. There’s simply no need! So I set out to build my own home automation system which could do not just home heating but a whole lot more! So today let’s see how I automated the heating part of my system.

[wpsm_stickypanel][contents h2][/wpsm_stickypanel]
[wpsm_toplist]
Zone-based heating methods
The main selling point of plug-n-play heating systems like Hive is that you can create zones in your home and selectively control the temperature in each zone. So I set out to replicate this. There are two ways you can do this:
- Z-Wave Temperature Sensor method – Z-Wave sensors are used to create zones. While this method is cheaper and easier to implement, the downside is that you cannot control individual radiators. When one zone of your home needs heat, all the zones will get heated (regardless of their actual call for heat status). This is how it works: you set the desired temperature ‘set point’ on your Z-Wave boiler controller. Then the Vera Plus will turn the boiler on if the temperature reported by any one of your Z-Wave sensors is less than the set point. When all the Z-Wave sensors report a temperature higher than the set point, the Vera Plus switches off your boiler. So each room with a Z-Wave sensor in effect becomes a zone.
- Z-Wave TRV method – Z-Wave thermostatic radiator valve (TRV) on each radiator are used to create zones. The advantage here is that you can set different set point temperatures for different zones. This is how it works: each radiator equipped with a TRV take the place of the sensor above. So each room controlled by a TRV in effect can be made a zone. You could also group TRVs together to create a zone if you have a large room with multiple radiators. So you set the desired temperature set point for each zone, on the Vera Plus. Let’s consider one of the multiple zones that will exist, and lets assume this zone has only one radiator with a TRV. If the TRV reports a temperature lesser than the set point for that zone, the TRV will send a call for heat to the Vera Plus and open the radiator valve in expectation of hot water from the boiler. The Vera Plus will then turn on your boiler. Assuming all the other TRVs are not sending a call for heat and remain closed, only the zone that needs heating is heated.
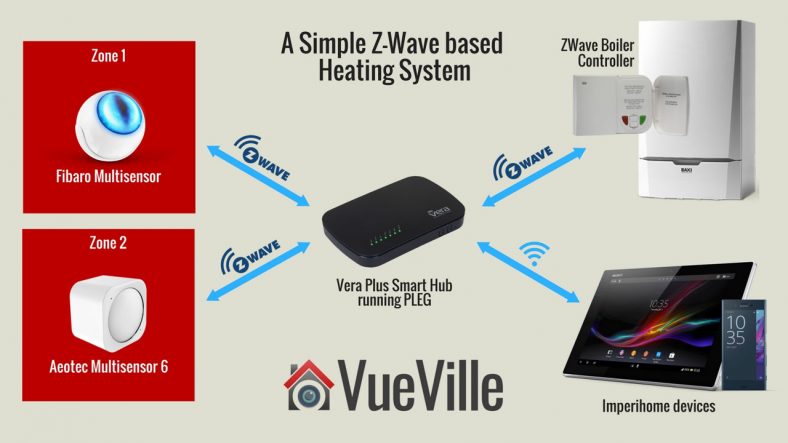
I went with the sensor-based method because its more wallet-friendly and easier to set up for beginners. You can always add TRVs later on to upgrade to the second method. I divided my home into two zones – the ground floor and the first floor. Since the ground floor is pretty much open plan, a single Z-Wave temperature sensor worked well enough as the goal was to heat the whole ground floor up to a particular temperature.
On the first floor, I use a single temperature sensor placed in the master bedroom. This means the actual temperature of the other two rooms on the first floor are irrelevant to my heating system. One of them is my office which is usually a bit warmer, so I turned the manual radiator valve down a bit. The guest bedroom is rarely used so I just left the radiator valve in that room at a minimum so as not to waste any heat.
Equipment needed
- Vera Plus or Vera Edge or Vera Secure running the UI7 OS – read my Vera Plus review here.
- A temperature sensor per zone you want to create, e.g. Fibaro or Aeotec Multisensors.
- In the steps below, the Fibaro Multisensor is used in Zone1 and Aeotec Multisensor 6 is used in Zone2.
- Optional: A smart phone or tablet to control your heating system and make voice announcements using Imperihome.
Software needed
The default Vera software is good for simple scenes but for something more complex such as an automated heating system, you need a plugin called Program Logic Event Generator or PLEG for short. There is a 30 day free trial but its easily the best plugin I have seen for the Vera, so I strongly recommend paying the very fair one-off license fee of $5.50 + tax.
You will also need the excellent free Multiswitch plugin to create virtual switches that can be used by you and PLEG.
If you want to control your Vera from a smartphone or a tablet, get the Imperihome Pro app (paid app).
Setting up the MultiSwitch plugin
Install the Multiswitch app from the Vera dashboard by going to Apps > Install Apps and search for Multiswitch. Once you install the app and enable it, you can rename the switches you need.

Don’t worry the name you use doesn’t matter as we will be referring to each individual switch using its technical name (Status1, Status 2 etc.).
Setting up Imperihome Pro
Imperihome Pro is great for powering a home automation tablet and for voice announcements for your heating system. For example when the house gets too cold and the boiler is turned on automatically, I have added an action to make my tablet announce that the boiler is being turned on.
Simply follow the steps outlined using the guide here to:
- Install Imperihome Pro on your tablet or smartphone and activate the API http server.
- Install the Imperihome plugin on your Vera.
You can then include these devices in your PLEG actions and switch to different pages and use Text To Speech (TTS) to make voice announcements.
Setting up PLEG
PLEG requires the Program Logic Core app to work, so install that first under Apps>Install Apps. Then search for and install PLEG the same way. Once the PLEG device has been added to your dashboard, open it and click Edit. This will open the PLEG interface. Under Editor, click Register and click on the Registration portal link to purchase a licence. Pop your licence into the PLEG registration screen and activate your copy of PLEG. Restart your VERA before you proceed.
PLEG uses logic inputs, conditions and actions to work:
- Logic Inputs which can be evaluated:
- House mode: These can reflect Vera’s default house modes (Home, Away, Night or Vacation Mode) or you can create others.
- Device property: This is a measurement or state of a device, say the ambient temperature reported by a Fibaro Sensor in a zone.
- Device trigger: This could be something like humidity hits 70% or motion is detected.
- Schedules & timers: This lets you perform actions at specified intervals or times.
- Counters: This lets you keep track of events that are repetitive in nature.
- Conditions need to become true for an action to fire.
- Actions fire when specified condition(s) become true.
For our simple heating system, we will make use of device properties, conditions and actions.
House Modes
I do not want my automated heating system to function when I am away or on vacation, so I have to make PLEG aware of the current Vera house mode. This can be achieved by creating PLEG house modes to reflect the current Vera mode.
Create the following modes:
- M_HomeMode
- M_AwayMode
- M_NightMode
- M_VacationMode
Now your House modes screen should look like this (click to enlarge):

Device Properties
Create the following properties:
- P_MS_AutoCHControl: This is one of the multiswitches and acts like a master switch that lets us turn our entire PLEG heating system on or off easily.
- P_BOILER_CH_MODE: This property reflects the current mode of the Central Heating zone of the boiler controller (not to be confused with the physical zones for our heating system). It will be ‘Off’ if the boiler controller is off and ‘HEAT’ if the boiler controller is on.
- P_CH_SetPoint: This property will reflect the set point of the Central Heating zone of the boiler controller (not to be confused with the physical zones for our heating system).
- P_MS_CallforHeat: This is one of the multiswitches and will show the current overall call for heat status (this switch also drives the animated flame icon in Imperihome)
- P_ZONE1_Temp: This property reflects the current temperature reported by the sensor in Zone 1
- P_ZONE2_Temp: This property reflects the current temperature reported by the sensor in Zone 2
Now your screen should look like similar to this – click to enlarge (ignore the properties not listed above – they are for my automatic climate control system):

Device Schedules
My Secure 2-channel Boiler Controller has an irritating ‘safety feature’ of shutting down the boiler if it doesn’t hear from the Vera roughly every 20 minutes. So I created a schedule that repeats the current boiler operation instruction every 15 minutes. You may not need this schedule and it is not required for the rest of the logic to work if you have a different boiler controller.

Your screen should look like similar to this – click to enlarge:
Conditions
Create the following conditions:
[table id=40 responsive=scroll /]

Now your screen should look like similar to this – click to enlarge (ignore the conditions not listed above – they are for my automatic climate control system):
Actions
PLEG actions don’t have their own names but take the name of the condition that triggers them. Create the following actions, in the following order (they will execute in the order they are created):
[table id=41 responsive=scroll /]

Now your screen should look like similar to this – click to enlarge (ignore the actions not listed above – they are for my automatic climate control system):
Here’s an example of how to set up one of the actions above:

So how does it actually work?
So how do all these properties, conditions and actions work together? If you want to keep it simple and are not too bothered about the details, just check out the flowchart I made below – click to enlarge:

Intrigued? Want to know how it actually works? Okay let’s do this. Let’s start from the end action and work backwards.
You see the boiler turns on by itself. How did that happen? The boiler controller gets the command to turn on the boiler when action C_Any_CallforHeat fires. The action fires when the condition C_Any_CallforHeat becomes true. The condition C_Any_CallforHeat becomes true when the expression C_MS_AutoCHControl AND C_MS_CallforHeat AND (M_HomeMode OR M_NightMode) returns a value of TRUE. This means each one of the terms in that expression returns a value of TRUE. Let’s break this one down:
- C_MS_AutoCHControl: Becomes TRUE when our heating system ‘master switch’ (one of the switches of the multiswitch plugin).
- M_HomeMode OR M_NightMode: I want the heating system to work only if the VERA house mode is one of these, meaning somebody is at home.
- C_MS_CallforHeat: Becomes TRUE when P_MS_CallforHeat == 1. P_MS_CallforHeat is another one of our multiswitch switches. So when does P_MS_CallforHeat become TRUE? When another condition sets it to TRUE. Looking at the actions list, we can see that P_MS_CallforHeat is set to TRUE when either C_Zone1_CallforHeat or C_Zone2_CallforHeat are TRUE. So if there is a call for heat from either Zone1 or Zone2, P_MS_CallforHeat is set to TRUE, C_MS_CallforHeat then becomes TRUE, and if the master switch is on and somebody is at home, the boiler will turn on!
- Action C_Zone1_CallforHeat fires when condition C_Zone1_CallforHeat becomes TRUE. Condition C_Zone1_CallforHeat becomes TRUE when (P_ZONE1_Temp < P_CH_SetPoint) i.e. when the ambient in Zone 1 (P_ZONE1_Temp) is less than the boiler controller set point P_CH_SetPoint.
- Action C_Zone2_CallforHeat fires when condition C_Zone2_CallforHeat becomes TRUE. Condition C_Zone2_CallforHeat becomes TRUE when (P_ZONE2_Temp < P_CH_SetPoint) i.e. when the ambient in Zone 2 (P_ZONE2_Temp) is less than the boiler controller set point P_CH_SetPoint.
After some time you are feeling all warm and toasty and you hear your Imperihome tablet announcing that its too warm and the boiler turns off by itself. How did that happen? The boiler controller gets the command to turn off the boiler when action C_Boiler_CH_Off fires. Action C_Boiler_CH_Off fires when condition C_Boiler_CH_Off becomes TRUE. Condition C_Boiler_CH_Off becomes TRUE when P_MS_CallforHeat == 0 i.e. property P_MS_CallforHeat is FALSE. P_MS_CallforHeat as we saw above is a switch that is flipped on if there is a call for heat from any zone. Conversely there is an action C_All_StopCallsforHeat which sets P_MS_CallforHeat to FALSE. Action C_All_StopCallsforHeat fires when condition C_All_StopCallsforHeat becomes TRUE. Condition C_All_StopCallsforHeat becomes TRUE when the expression C_Zone2_StopCallingForHeat AND C_Zone1_StopCallingForHeat returns TRUE, i.e. when both zones stop calling for heat.
- C_Zone1_StopCallingForHeat: This condition becomes TRUE when (P_ZONE1_Temp > P_CH_SetPoint), i.e. the ambient temperature in Zone1 is above the boiler controller set point.
- C_Zone2_StopCallingForHeat: This condition becomes TRUE when (P_ZONE2_Temp > P_CH_SetPoint), i.e. the ambient temperature in Zone2 is above the boiler controller set point.
Final Steps
Once you have loaded in all the settings I have listed above in the PLEG Editor, go to Editor Option > Reload LUA. Then you can close the editor. Wait a few minutes for the Vera to reload the LUA engine and your new automated heating system is now up and running.
What next? Monitor your system to ensure its working as expected, its easy to make mistakes in programming PLEG so don’t be surprised if everything doesn’t go as planned the first time round.
I hope this guide helps you in setting up your own fully automated Z-Wave heating system using Vera and PLEG. Please leave a comment or feedback below!
Leave a Reply