If you have read my DIY home security camera system story, you know that I have gone the FullDIY route and created a DIY NAS NVR system. So I have a single box, the QNAP TS-253A running my entire home security system with redundant RAID storage, an OpenVPN server for secure access from outside the home, email notifications, push notifications, and USB backups. And oh, it also serves as my home file server, DLNA server and mobile device backup destination. Did I say I get all of this in one box that costs less than $500? I love my NAS!
So you have bought your QNAP NAS and now would like to setup the NAS as an NVR. Here’s a step-by-step guide showing you how.
Click the Install button and when it is installed, click the open button
Login with your admin account
The next step is to choose a recording folder. I chose to create a new shared folder called ‘Recordings’. Click Apply.
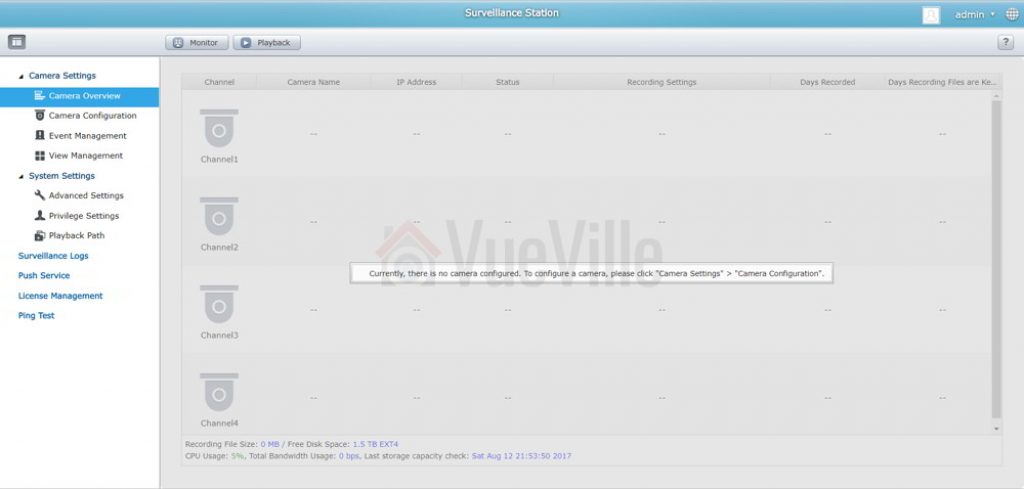
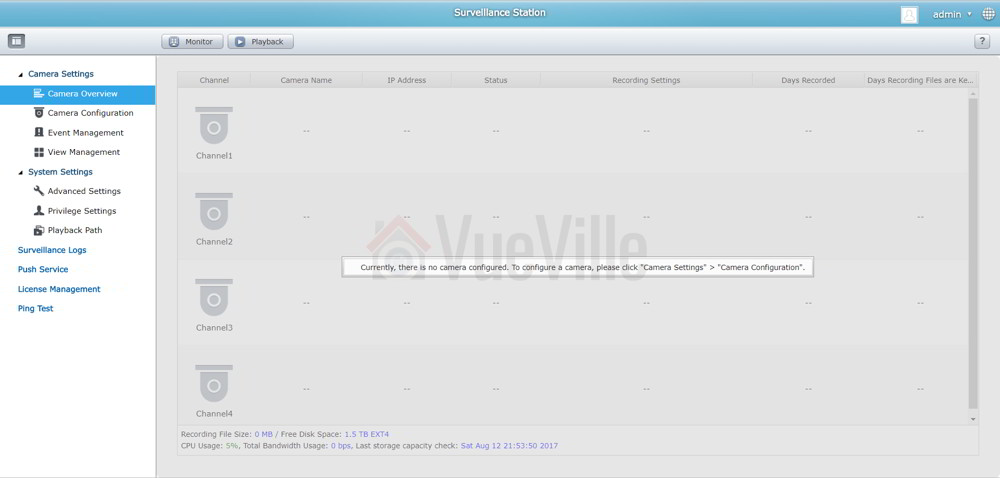
After a minute, you should reach the Surveillance Station home page
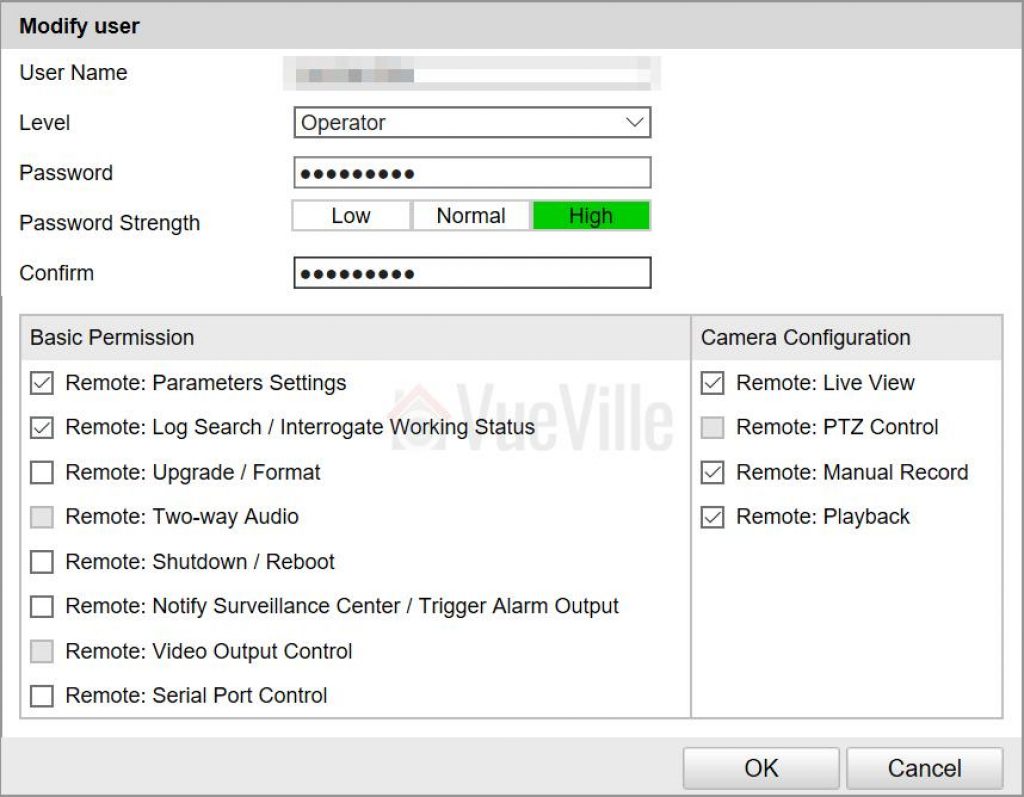
Create a new account with full access in each of your cameras. We will give these login details to Surveillance Station in the next step. Make sure the accounts are of type Operator and not User if you are using Hikvision cameras. Here’s what this looks like in my Hikvision IP camera:Note: If you have trouble getting QNAP Surveillance Station to recognise your cameras, just use the admin account of your camera.
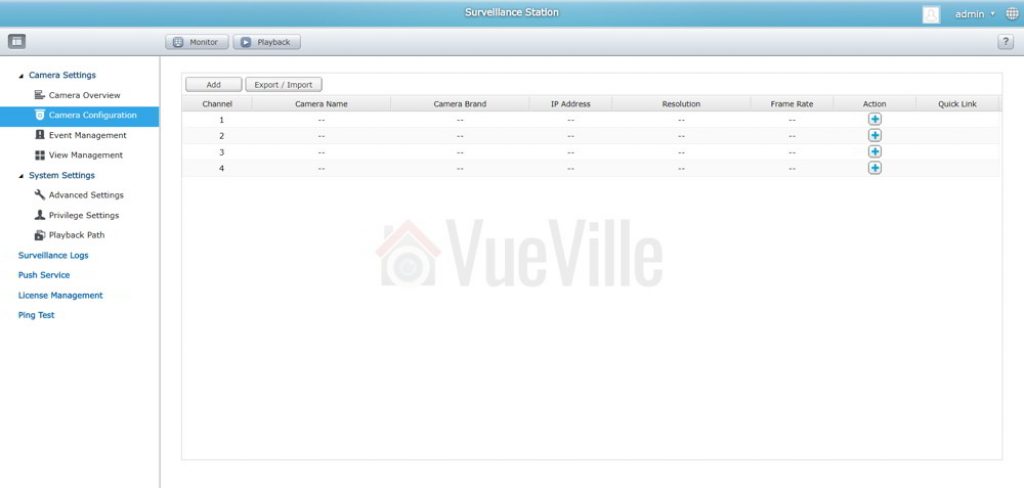
Adding a camera
Go to Camera Settings and click Camera Configuration
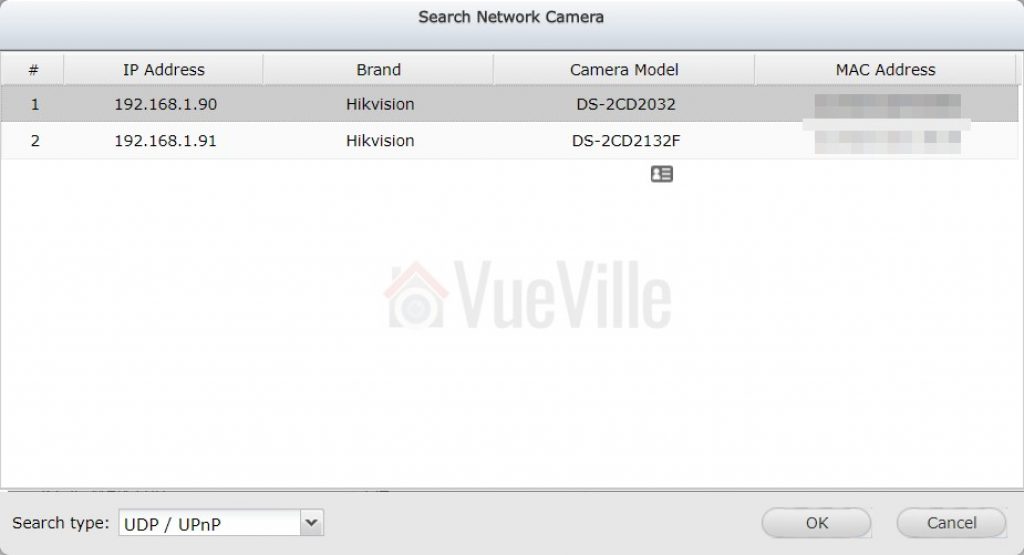
Now click on the Add button. I like to manually configure my cameras, but you can also have the NAS search for them automatically using uPNP or ONVIF. If you have disabled uPNP on your cameras, you will be able to use only the ONVIF or manual setup method.
Select the camera you want to add, enter the camera details and then click TEST. Make sure you use an account with admin privileges, otherwise you will get a question mark instead of the preview image. Click Next.
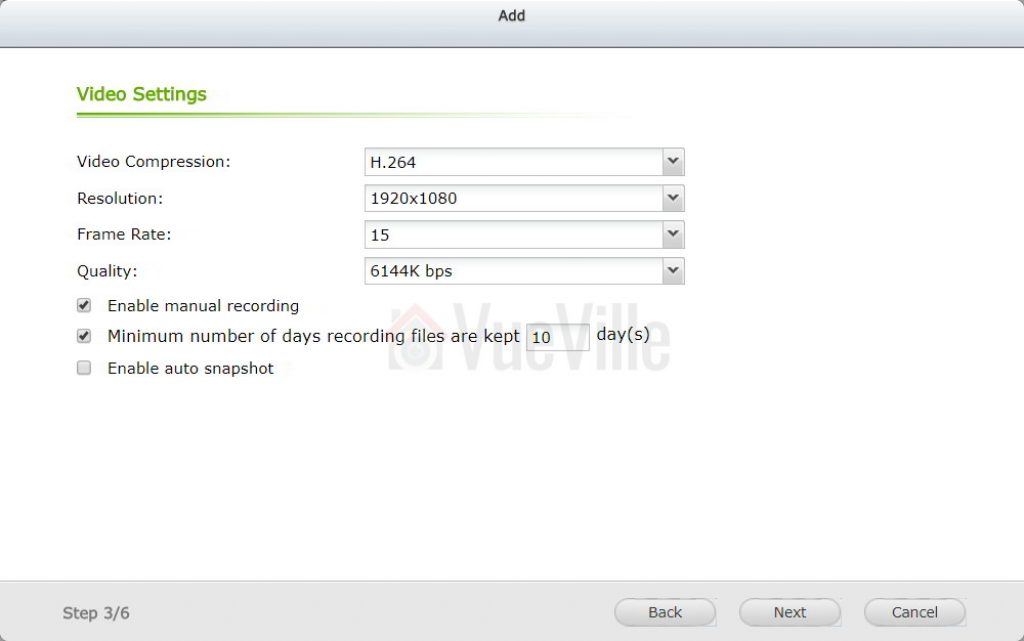
Enter the quality settings as desired. Click Next.
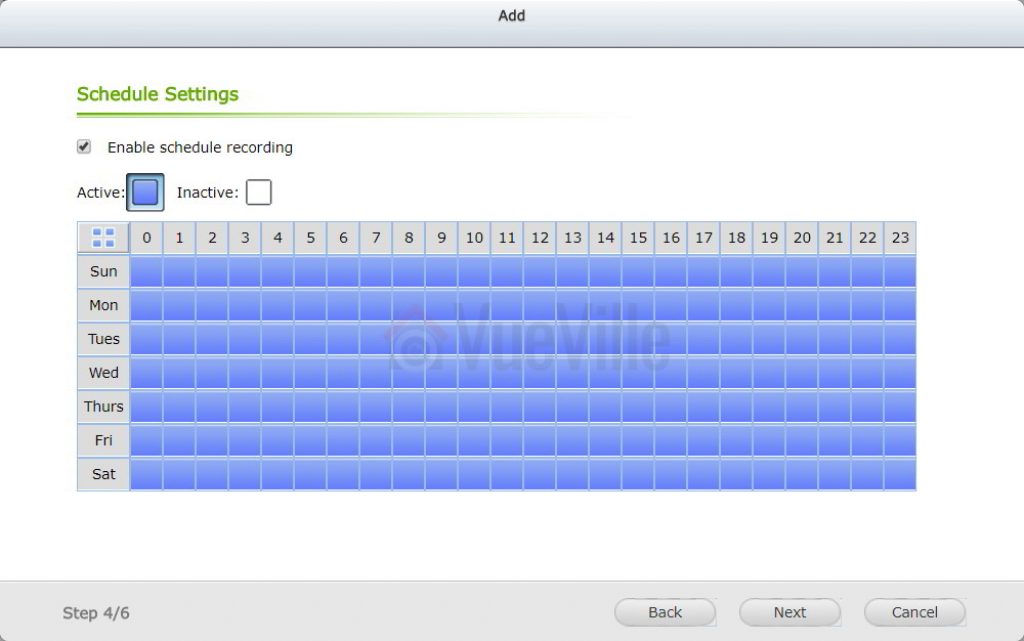
Enable Schedule recording if you wish to record 24/7. Click Next.
Review the settings you have chosen and click Next.
You should now see the success message.
Once you have added all your cameras, the camera configuration page will look like this:
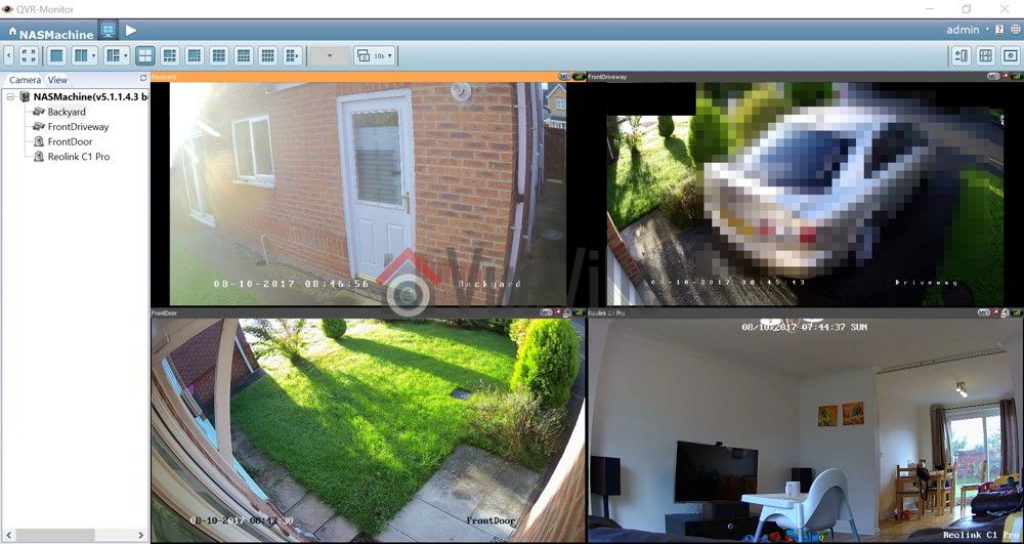
Viewing your cameras
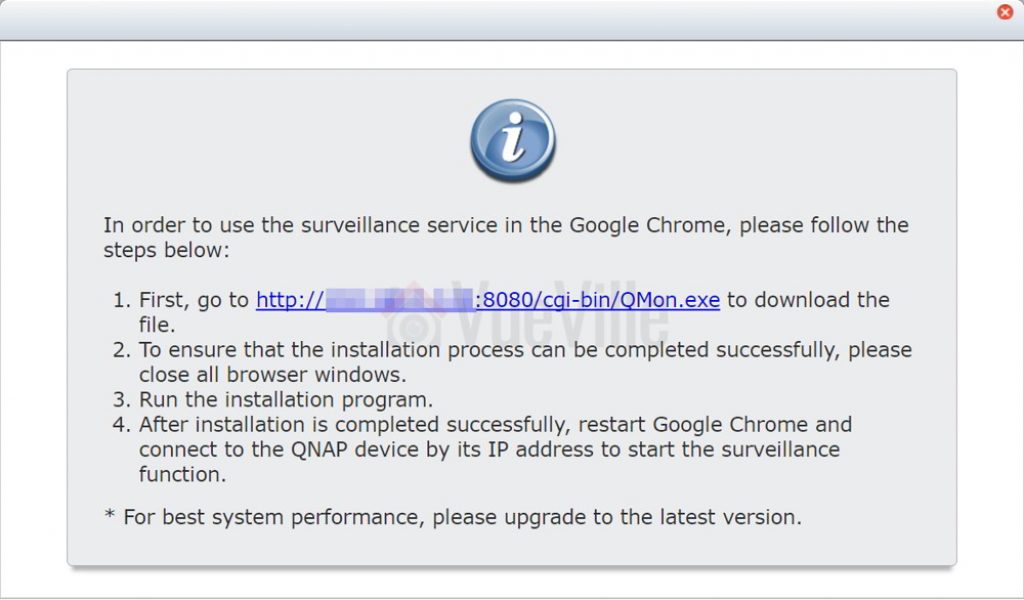
The first time you click on the Monitor button, you will get the following message:
Once you install the QMon plugin, you should be able to view all your cameras simultaneously
That’s it, now you have set up QNAP Surveillance Station to receive video streams from your IP cameras.
Win 2 Samsung Gear VR and Wireless Controller kits with VueVille this September!
After the stupendous success of our July Amazon Echo giveaway, we are now launching our second giveaway which runs through the whole month of September and we want you to take part! Enter our sweepstakes below to win TWO amazing new Samsung Gear VR kits with the wireless controller. Two winners will be selected at random at the end of the sweepstakes.
You must be a USA or UK resident who is 18 or older.
Complete at least one of the given tasks.
You can use your email or login with your Facebook/Twitter/Youtube accounts.
Refer friends to get extra entries.
Come back daily and claim the daily bonus entry until the giveaway ends on 30 September 2017.
The more entries you have, the more chances you can gain to win. All the best!
Full Terms and conditions
GIVEAWAY (“GIVEAWAY”) SPONSORED BY VueVille.com (“SPONSOR”) AND ADMINISTERED BY Gleam.io. (“ADMINISTRATOR”). GIVEAWAY BEGINS ON 2017-09-01 AT 00:00:00 hours AND ENDS ON 2017-09-30 AT 23:59:59 hours. (“GIVEAWAY PERIOD”). NO PURCHASE NECESSARY TO ENTER OR WIN.
Only the actions specified in the giveaway as entry methods are required. By participating, entrants agree to be bound by these Official Rules and the decisions of the Sponsor and Administrator. Void where prohibited by law. Giveaway is open to legal residents of the United States and the United Kingdom who have reached the age of majority in their respective province or territory of residence at the time of entry. Employees or contractors of the Sponsor(s) and immediate family members of, and any persons domiciled with any such employees or contractors, are not eligible to enter.
2 winners will be chosen at random using the Gleam widget. The odds of winning will depend on the number of entries received. The winner will be sent an email and will have forty-eight hours to respond. If no response is received within forty-eight hours, another winner will be chosen. Administrators are not responsible for prize fulfillment nor for any technical failures. Winning entry will be verified. A list of winners will be displayed on the giveaway widget on the original giveaway post. Prizes will be dispatched within 30 days of the giveaway ending.
Facebook, Instagram, Pinterest, Twitter and/or Google+ are in no way associated with this giveaway. If applicable, social media posts (such as but not limited to tweets and Instagram posts) must be PUBLIC to be eligible. If you sign up for newsletters as entries, you must confirm your subscription for those entries to count.
Administrators and sponsors reserve the right to publish winner’s first name and last initial. Contact information for sponsor(s), if applicable, can be found in the giveaway website links. Retail value of prizes is listed in the giveaway text. Images included in the giveaway post may not depict the exact prize, and are for illustrative purposes only. We reserve the right to change the prize and/or replace it with a cash prize if we are unable to procure the advertised prize. Please contact the Sponsor for any questions using the contact page at VueVille.com
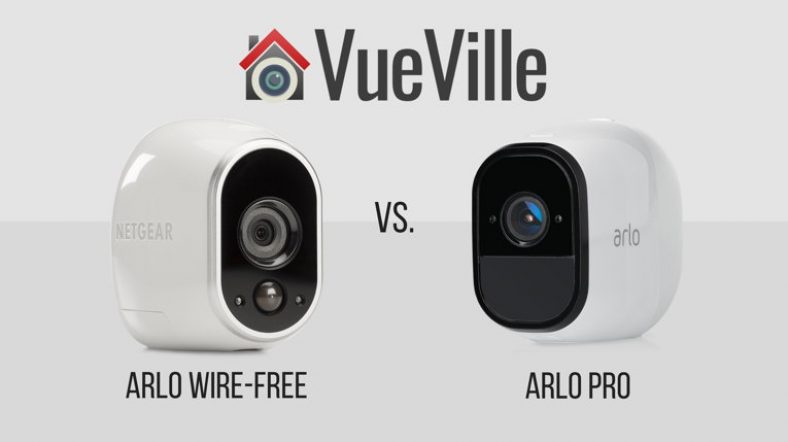
The Netgear Arlo is that once in a century product, that totally revolutionizes the industry by making taking something niche into the mainstream. As I noted in my recent Reolink Argus wire-free camera review, I was initially against battery-powered cameras. But my experience with the Argus blew me away. It forced me to take a fresh look at how a good wire-free camera can help fill out and complete a good DIY security camera system.
So in the spirit of discovery, I am looking at the Arlo family today. Starting with the [easyazon_link identifier=”B00QH0Q8J4″ locale=”US” tag=”vueville.com-eaz-20″]Arlo[/easyazon_link] and the [easyazon_link identifier=”B075P84FH9″ locale=”US” tag=”vueville.com-eaz-20″]Arlo Pro[/easyazon_link], I will take you through the different features, and talk about which camera is best for which situations.
The basic idea of the Arlo is this: small 100% wire-free battery-powered cameras that connect to a hub. The hub is then connected to your Wi-Fi network. The Netgear Arlo is lovingly called the Arlo HD by customers, even though Netgear prefers just Arlo. The Arlo Pro is a beefed up version of the Arlo HD and is sort of the big brother of the Arlo HD. Calling the Arlo, the lowest member of the Arlo family ‘HD’ makes sense because it has 720p resolution which is popularly known as HD resolution.
A quick note: As an Amazon Associate I earn from qualifying purchases. This post contains affiliate link(s). An affiliate link means I may earn advertising or referral fees if you make a purchase through my link, at no extra cost to you.
Arlo HD vs. Arlo Pro – Comparison Table
Here’s a quick comparison table between the Arlo Pro and the Arlo HD: [wpsm_comparison_table id=”14″ class=”hover-col1 “]
Now let’s look at the main features of these battery-powered cameras head-to-head.
Video Quality
Both the Arlo HD and the Arlo Pro have the same 720p sensor and therefore have similar image quality. 720p is on the lower side and if you need 1080p, you need to go up to the Arlo Q or the Arlo Q Plus which also sports Power over Ethernet.
Both cameras also feature auto-adaptive white/black balance and exposure adjustment.
Audio Quality
Well the Arlo HD doesn’t have a microphone, and so cannot compete with the Arlo Pro which does have one. Having a microphone is a major advantage because it lets you listen in on the camera from your mobile phone, and also can record incriminating conversations if needed!
The Arlo Pro is capable of 2-way audio because it has both a speaker and a microphone built-in. It can also send you audio alerts so it can alert you to unwanted visitors who may manage to avoid the camera but still get caught on audio.
Motion Detection
The Arlo, Arlo Pro and Arlo Go all have a real PIR sensor which is far better than software-based motion detection that most cameras use. This is because a PIR sensor detects motion using Infrared rays which reduces the number of false alerts that you will invariably get with non-PIR cameras. There is a weakness though, PIR sensors are weak at detecting motion that’s perpendicular to it, side-to-side motion is where it excels.
The image above illustrates this problem very well. The solution is to have more than one camera covering the same scene.
Weatherproofing
The Arlo and Arlo Pro now both have a very good IP65 rating and so should be absolutely fine braving the elements. This is a recent development though, as only the Pro had IP65 rating when I checked last year.
Battery-life
This is where the cameras start drifting apart. The Arlo HD uses four off-the-shelf CR123A batteries. This means the camera operation time depends on the mAh rating of the batteries you choose. You could use rechargeable batteries also, the batteries recommended by Netgear are the Tenergy rechargeable batteries.
The Arlo Pro makes use of a built-in rechargeable battery that you cannot replace yourself. It has a capacity of 2440 mAh and it needs this extra juice for the extra features such as the built-in speaker and microphone.
Which Arlo is better for the outdoors?
Since both the Arlo Pro and the Arlo are now rated IP65 for water and dust resistance, you can put either one outdoors. Although as always its preferable to put them under the eaves or in a sheltered area to minimise the risk of damage.
Senior citizens are some of the most vulnerable people in today’s modern society. It is devastating when I see reports of their abuse in the news and on social media. However, it is even more unbearable and disturbing when it happens to a loved one who might be forced into a situation where they are neglected and mistreated by a staff with no conscience.
It seems to happen all too frequently that these workers are hired without going through the proper screening process that would keep them from interacting with our family and friends. However, there is technology available to help get the evidence needed to catch and put a stop to this type of abuse. This is why I am writing this article about the best spy camera for nursing home centers.
With the proper video evidence, the nursing home and company can be sued since they are legally responsible for the patient who is under their care. So, while one can never truly nullify the effects of mental and physical trauma, there can be some types of reimbursement available through the filing of a personal injury or medical malpractice lawsuit.
Best Hidden Cameras for Nursing Homes
These are my top picks for hidden spy cameras that can help you in a nursing home setting. Also see the full article below for many more alternatives.
A quick note: As an Amazon Associate I earn from qualifying purchases. This post contains affiliate link(s). An affiliate link means I may earn advertising or referral fees if you make a purchase through my link, at no extra cost to you.
Choosing the right Hidden camera for Nursing Homes
Knowing how to prove abuse is essential, and so let us take a look at the best spy cameras which can help to covertly get that nursing home abuse caught on camera. I have included a mini-review of each of these as they are each a best hidden camera for care home evidence gathering.
It is estimated that 1 in 6 of the elderly population have experienced some type of abuse with the percent of what is actually reported to authorities being around a mere 7% of the actual occurrences. Protect your loved one by choosing a quality product with long battery life and audio capabilities.
Here are my picks for the best on the market right now.
[easyazon_link identifier=”B0B678PFZ6″ locale=”US” tag=”vueville.com-eaz-spynurshom-20″]Check Price on Amazon[/easyazon_link]
This is a photo frame hidden spy camera which has a camera lens that is so covertly placed that it may never be found even if you are looking for it and know that it is there. It has a myriad of features to cover every nursing home need to help catch abuse. The resolution of the camera is 1920*1080P (Full HD) at 30fps.
The SD card is not included with the spy frame, but it needs one which is a class 10 micro SD card up to 128 GB capacity for recording all of that video footage. The built-in battery has a super capacity which is good for 4 hours usage.
The downsides are that this camera’s video cannot be viewed in real time on a mobile app. Also this camera does not record audio in compliance with federal law.
[easyazon_link identifier=”B07GLTW936″ locale=”US” tag=”vueville.com-eaz-spynurshom-20″]Check Price on Amazon[/easyazon_link]
This is a great spy camera which doubles as an alarm clock so that it is not recognizable as anything other than an appliance to tell the time. It has a host of great features such as motion detection, a remote control, and others listed below. Unusually it has a PIR motion sensor that is more reliable for motion triggered recording. Unfortunately it doesn’t have a microphone, but this is required for compliance with federal law.
[easyazon_link identifier=”B0B9G2FTX1″ locale=”US” tag=”vueville.com-eaz-spynurshom-20″]Check Price on Amazon[/easyazon_link]
This is a spy pen with a hidden camera that makes for a perfect portable device that you can use to capture abuse and neglect of your loved ones wherever they are. It is very affordable and a solid investment towards ending mistreatment. Its not a Wi-Fi camera and so you don’t need a Wi-Fi connection to use it.
Not being tethered to a power point has a huge advantage – the user can dynamically position it to capture the best angle or view of an abusive situation without giving away the presence of the spy camera. It can also be clipped into a front pocket or lapel to record situations away from the user’s room.
Wi-Fi enables live-stream to mobile anywhere in the world
5-port USB Hub that can actually charge phones
No microphone
[easyazon_link identifier=”B06XGWYXZQ” locale=”US” tag=”vueville.com-eaz-spynurshom-20″]Check Price on Amazon[/easyazon_link]
This is a great USB charger hub which holds the perfect hidden functionality that you need in order to gather evidence of nursing home abuse. You will be able to catch abuse on camera with motion detection and auto-loop recording to keep the latest and most relevant footage on hand.
Since it has Wi-Fi, you can use the mobile app to drop in virtually any time to check on your loved ones. Audio recording is not possible in compliance with federal law. There are no Infrared LEDs for night vision and there is no battery backup in case of mains power failure.
[easyazon_link identifier=”B09KYJDNG7″ locale=”US” tag=”vueville.com-eaz-spynurshom-20″]Check Price on Amazon[/easyazon_link]
This camera uses a novel packaging method to disguise it as a power adapter. Since it can draw power form the AC socket, you are no longer constrained by battery life. On the flipside, you cannot always control the location of the camera due to it being dependent on a power socket!
So if you don’t need Wi-Fi, this is a good choice. As this camera is mains powered, you can view a live-stream on your mobile phone at any time without worrying about its battery running out. But on the other hand this means the camera won’t work if there is a mains power failure. Note that there is no audio recording in line with federal law.
[easyazon_link identifier=”B09XFB7MCY” locale=”US” tag=”vueville.com-eaz-spynurshom-20″]Check Price on Amazon[/easyazon_link]
This is an excellent looking watch that you would probably wear even if it did not come with the discreet spy camera functionality. It is in a league of its own as one of the best discreet hidden camera for nursing home abuse prevention – especially when there are no ideal power points to plug in a powered spy camera.
This hidden camera is unique in that it looks just like a normal smart watch but holds the spy camera functionality necessary to monitor nursing home and care facility areas. This is a great entry-level hidden camera that can record up to 3 hours continuously.
1.5 hours of recording time when using battery, unlimited when charging/plugged into outlet
400 mAh battery capacity
[easyazon_link identifier=”B093C1Y1SC” locale=”US” tag=”vueville.com-eaz-spynurshom-20″]Check Price on Amazon[/easyazon_link]
Sometimes you need something that not just works well as a spy camera but also needs to match the person wearing it. For an older person in a nursing home, this spy camera classic watch is a natural fit and will not arouse any suspicion at all.
3-5 hours of recording time when using battery, unlimited when charging/plugged into outlet
5000 mAh battery capacity
[easyazon_link identifier=”B07H23TVY7″ locale=”US” tag=”vueville.com-eaz-spynurshom-20″]Check Price on Amazon[/easyazon_link]
This is an excellent hidden camera in the form of a bog-standard wall clock which can be easily hung on the wall of a room or living area in order to capture everything that goes on in the room. You can charge the battery while using the camera. In fact it is recommended to connect the clock full-time to a USB power adaptor, and then rely on the built-in large capacity battery as a backup in case mains power fails.
Conclusion
So there you have it, these are my recommendations for the best hidden spy cameras for nursing homes and care homes in 2023. It is important that all instances of nursing home abuse be recorded and investigated in order to protect those who are the most vulnerable in our society. Any of the great spy cameras detailed on this list should be a perfect tool to help accomplish that goal. With one of these you will be able to have the peace of mind to know that all is alright with your loved one even when you are not available to be there for them. Leave your thoughts below!
I often get questions from friends, family and colleagues about our cloud-free DIY Smart Home and how they can also get something like it. I have already written a detailed technology guide to home automation but this blog post is about how I put my smart home together and how you can do the same without breaking the bank.
Home automation is so affordable and accessible these days. Gone are the days when you had to shell out thousands for your own smart home, and even then the end result was far from impressive! You can get fully wireless smart home lighting or security kits for $100-$200 today, instead of the thousands it used to cost! And you don’t need an army of technicians to install it either.
The focus of my blog is DIY smart home solutions, and you can get your smart home set up yourself for the most part – but you may need a certified electrician if you are not confident enough or your country’s codes require you to use one.
A quick note: As an Amazon Associate I earn from qualifying purchases. This post contains affiliate link(s). An affiliate link means I may earn advertising or referral fees if you make a purchase through my link, at no extra cost to you.
What does my Home Automation System do?
When I first started documenting my smart home adventures here on VueVille, we were in an early 2000s home centrally heated by a gas boiler and radiators. But this year we moved to a new sustainable home that is 100% self-sufficient for energy (using solar panels) and meets Passivhaus standards of air tightness! Gone is the gas boiler, and in comes a heat pump and air handling unit to retain all that precious heat (or cool air in summer)!
So this post will be a running commentary on my progress in making our new home a smart home.
Add sensors to each room in the house – WIP
Setup a Zigbee network for lights and sensors in addition to my Z-Wave network – WIP, see my review of the Sonoff ZBDongle-P
Install Shelly relays (Z-Wave and Wi-Fi) for making dumb switches and lights smart – WIP
Integrate solar inverter into Home Assistant – DONE
Ethernet cabling for outdoor security cameras – DONE
Integrate Samsung heat pump into Home Assistant, mainly for monitoring – Not started
Integrate SystemAir SAVE VSR-500 air handling unit to retain heat/cooling and maintain air quality – Not started
Eventually, these are the things I would like it to do:
Turn on/off lights around the house according to the time of the day and the weather OR on demand via smartphone or wall-mounted tablet (no mind-control yet!)
At night, turn the corridor lights on when motion is detected (someone going to the toilet). Switch it off a few minutes after motion is no longer detected.
Automatically turn on/off the humidifier in the baby’s nursery based on the measured humidity in the room.
Interface with the home alarm system so that I can arm it or disarm it from anywhere in the world.
Monitor all my security cameras.
If motion is detected when the alarm system is armed, turn on QNAP QVR Pro camera recording and turn on the nearest outside lights.
Take snaps/record camera security videos based on different triggers such as new post or a doorbell push.
Send me email alerts when anything unusual happens in the house or if the alarm system is triggered.
Of course there’s a lot more it can do. Even with my current setup, there are probably hundreds of different scenarios I could set up to make my life more comfortable and increase the security of my home – this is what gets me really excited about home automation!
What I wish I knew when I started on Home Automation
As discussed in detail in my home automation technology guide, think of different functions in your home as sub-systems. For example, lighting is a sub-system, so are heating, water management, and fire safety. Ultimately you need all your sub-systems to be aware of each other and interact well so that you can actually automate your home, not end up with an expensive collection of stuff that gives you headaches!
Choose your HA platforms carefully – I chose Home Assistant with Wi-Fi, Z-Wave & Zigbee
As I say again and again, you have to think long and hard about the basic technology platform that your home automation is built on. If you start buying stuff without considering how they will interact with each other, you will end up wasting your money on kit that works poorly as a whole. With home automation, the attitude has to be ‘set-and-forget’. Your time is precious and should be spent doing what you love with those you love, NOT troubleshooting your smart home all the time. Your smart home should always be working away in the background, doing what you have asked it to quietly and efficiently. It should make its presence felt only when needed.
What are your options? Even though modern wireless home automation is still in its infancy, there is a bewildering array of home automation platforms:
DIY platforms
Proprietary cloud-based platforms that allow unrelated smart devices to work together
Amazon’s Alexa-powered smart speakers
Apple Homekit
Google Home
IFTTT
Cloud-based platforms based on open standards such as Z-Wave and Zigbee
Eg. Samsung SmartThings
Pros: Cheap, but basic in capabilities
Cons: Won’t work without the cloud, not much control in your hands, your data is not yours really
Consumer level DIY platforms that are not reliant on the cloud/Internet<- I recommend these
Eg. Home Assistant, Hubitat, HomeSeer HS4
Pros: Affordable (even free like Home Assistant) and can be very powerful with optional plugins
Cons: Varying levels of complexity
Professional platforms such as Control4
Very costly, very advanced and will need professional installation & support.
Managed platforms such as Vivint and ADT
Installed and maintained by a 3rd party, costly.
So what did I go for? As shown in red above, Home Assistant which is a DIY open-source software that is not cloud-reliant, but at the same time is very powerful yet flexible.
For my sensors and smart home devices, I chose a mix of Wi-Fi, Z-Wave and Zigbee protocols as the foundation of my smart home
Z-Wave for critical gear such as in-wall relays controlling dumb switches and dumb lights.
Zigbee for smart bulbs, and battery powered sensors.
Wi-Fi for certain devices such as my ESPHome DIY sensors, Mi Humidifiers & in-wall relays like Shellys controlling smart lights and dumb switches in detached mode (also called smart bulb mode).
I mainly use 5GHz Wi-Fi for media, surfing etc. I keep the 2.4 GHz for some Wi-Fi smart stuff (like the Mi Humidifiers), and for Zigbee.
There are quite a few reasons for choosing Z-Wave and Zigbee wherever possible:
They are not one manufacturer’s proprietary standard – means I am not tied into one single company’s products or eco-system (no, I am not an Apple person). Wi-fi devices usually work only with the maker’s cloud apps (the notable exceptions are Shelly & Sonoff flashed with ESPHome).
Z-Wave is the industry leading standard with solid reliability and high performance, Zigbee excels at having the best prices.
I don’t think Z-Wave & Zigbee are going away anytime soon due to their sizeable ecosystems today.
My Home Assistant based Smart Home Layout
Our DIY Smart Home in 2025
Long-time readers may be aware that I started out around 8 years ago with the Vera Plus from Vera Controls as my smart home hub. However as the time available to work on my HA system has reduced (I am a father of 2 young kids) and my HA needs have grown, I outgrew the Vera Plus.
The stock Vera could handle basic to medium-level complexity scenes. So actions such as turning my hot water on according to a schedule was handled fine by the default Vera. But my fully automated central heating control was way too complex for the default Vera scene editor, so I used the PLEG plugin from the community instead. While I was able to create a single-zone automatic heating system using PLEG, the PLEG plugin was clunky and had a very workman-like archaic approach to workflow. This became impossible to deal with as my second child arrived – I simply did not have the luxury of time or the patience.
After much dithering about the higher cost of HomeSeer software and a laptop to run it vs. my Vera Plus, I finally decided to switch to the HomeSeer HS3 software a few years ago.
While HS3 was easy to set up and use and extremely reliable, it didn’t have integrations for some newer smart devices I bought such as the Mi Air Purifier and Mi Humidifier. So I moved to the versatile yet powerful Home Assistant software last year.
Home Assistant is an amazing piece of open source software – it works with nearly any protocol or standard you can think of: Wi-Fi, Z-Wave, Zigbee, Bluetooth, NFC tags, Ethernet devices, Homekit, voice assistants….. there’s an integration for nearly every smart platform you can think of. And what also captured my attention was the fact that I could build my own cheap ESP8266 based sensors such as air quality, temperature and humidity sensors (using ESPHome).
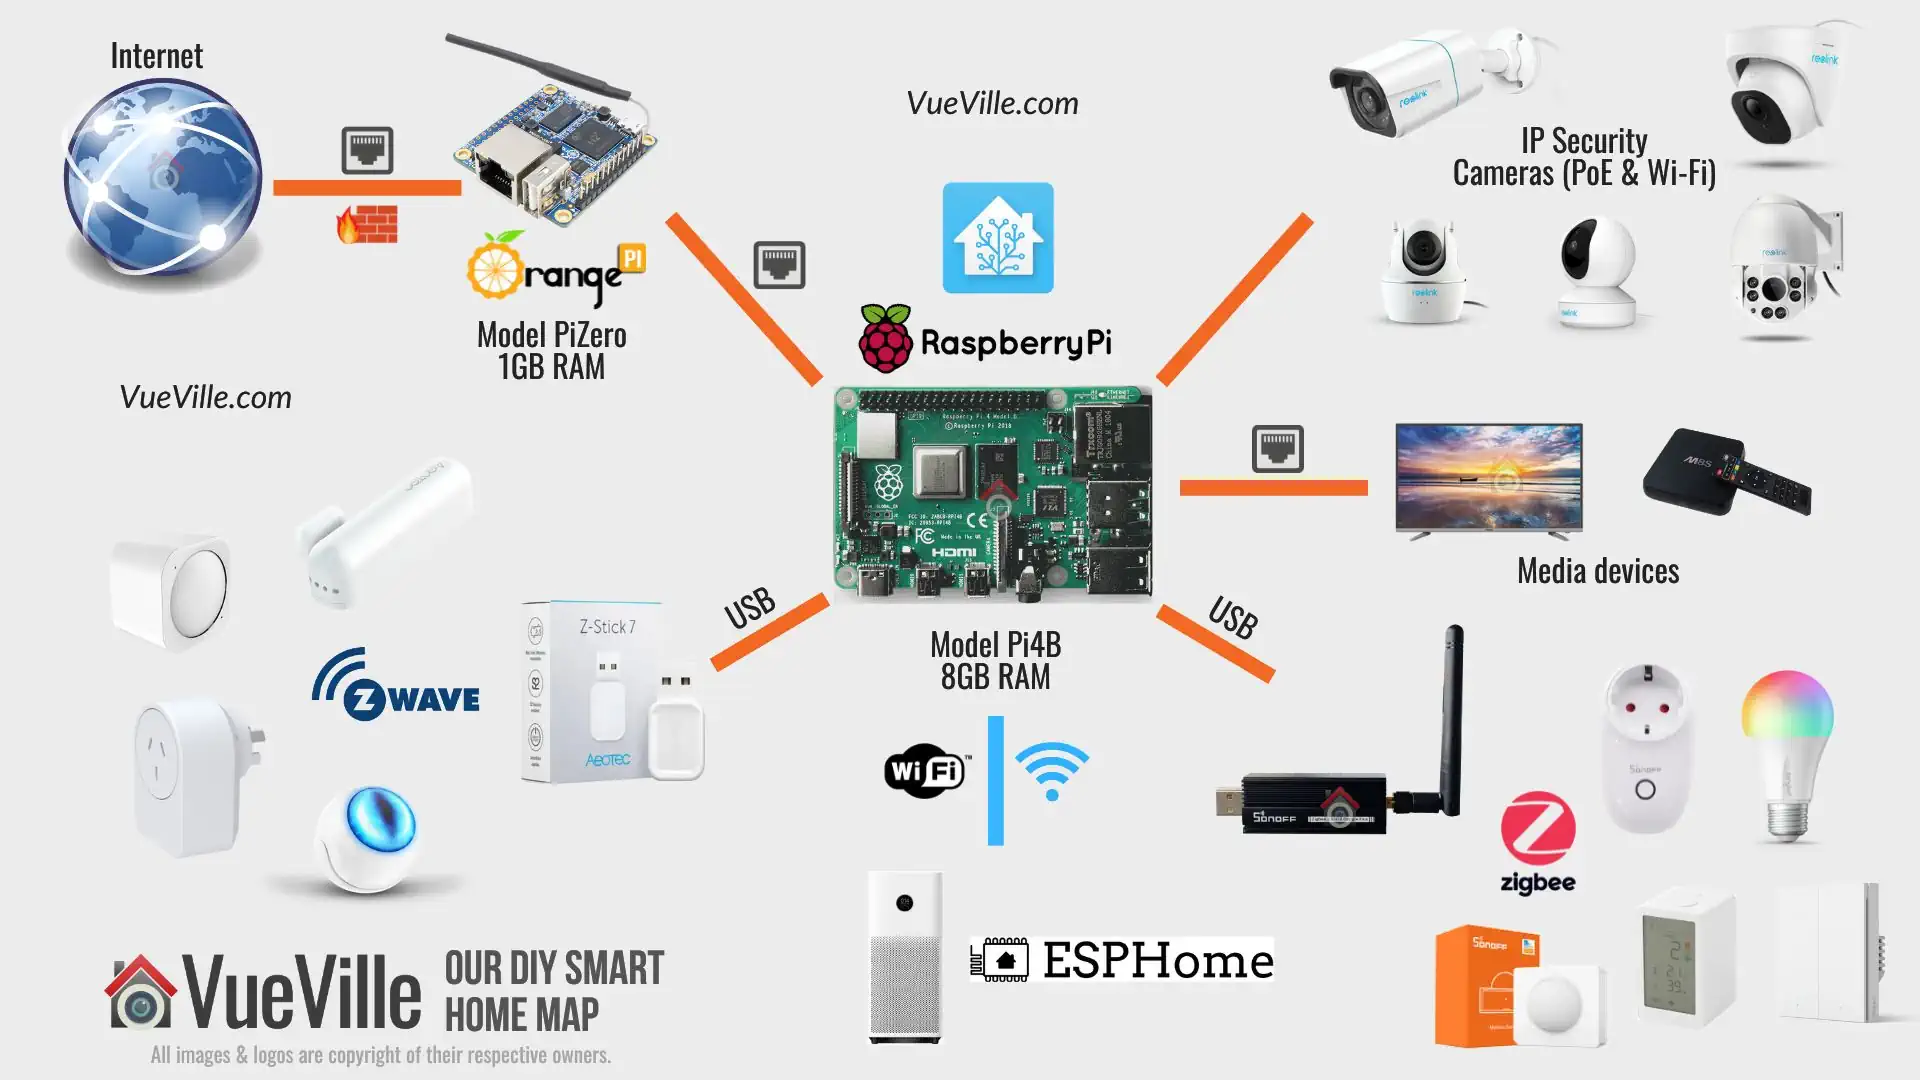
Home Assistant running on a Raspberry Pi 4 – My Smart Home Hub
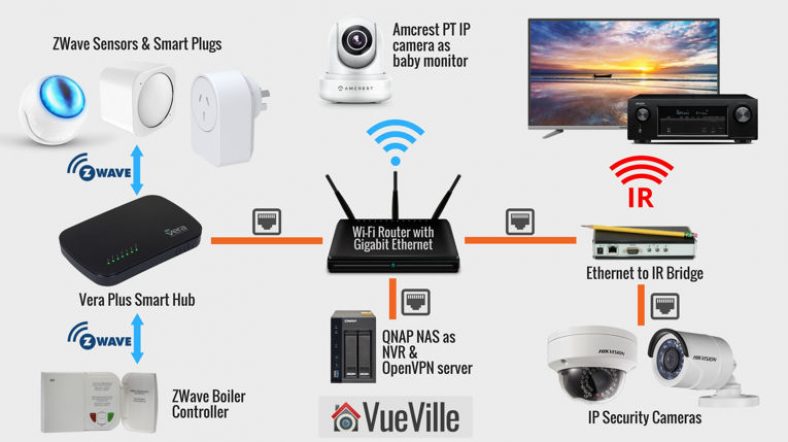
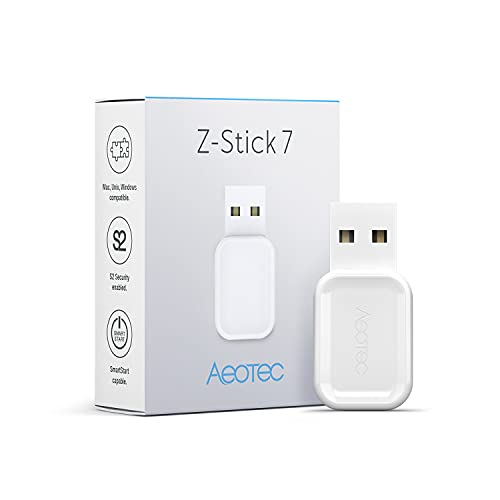
So the heart of my DIY home automation system today is the Home Assistant software running on a Raspberry Pi 4 using an Aeotec Z-Stick 7 Plus USB stick.
This is a very powerful Z-Wave based solution that connects to a wide variety of devices such as my:
Denon home theatre system through an Ethernet-to-IR bridge
Tablets and mobile phones which run the Home Assistant dashboard to control my smart home
Z-Wave Interface
I added a Z-Wave radio to the Pi4 with the Aeotec Z-Stick 7 Plus. This is one of the best Z-Wave USB adaptors I have used and I have had absolutely zero issues with it over the last 3 years. It is fully supported by Z-Wave JS integration in Home Assistant. Highly recommended.
Product prices and availability are accurate as of the date/time indicated and are subject to change. Any price and availability information displayed on https://www.amazon.com/ at the time of purchase will apply to the purchase of this product.
(* = affiliate link / image source: Amazon Associates Program)
Zigbee Interface
I use a SONOFF ZigBee 3.0 USB Dongle Plus (ZBDongle-P) as the coordinator of my Zigbee mesh network. I have written an extensive hands-on review of the adaptor including my experience of flashing the firmware to the latest version for improved mesh network quality.
Product prices and availability are accurate as of the date/time indicated and are subject to change. Any price and availability information displayed on https://www.amazon.com/ at the time of purchase will apply to the purchase of this product.
(* = affiliate link / image source: Amazon Associates Program)
An alternative is the new Aeotec Zi-Stick that I reviewed, this is ideal if you want to use the Home Assistant ZHA integration instead of Zigbee2MQTT.
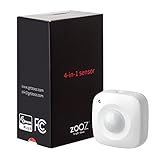
Z-Wave Sensors
I just love these amazing little devices that can sense everything you may want to monitor in your house. Temperature, humidity, light levels, motion detection, vibrations, UV rays – you name it, there’s a sensor for it.
Based on the readings of the sensor, you can make your Smart home hub heat up or cool down a particular room, switch on lights, open the blinds, send you a text alert, etc.
These sensors are battery powered so you can place them anywhere in your house. But hey won’t the batteries run out quickly? The beauty of Z-Wave technology is that it’s mesh-based and is ultra low-power, unlike Wi-Fi which requires much more power. So the batteries will last for at least a year.
Product prices and availability are accurate as of the date/time indicated and are subject to change. Any price and availability information displayed on https://www.amazon.com/ at the time of purchase will apply to the purchase of this product.
Product prices and availability are accurate as of the date/time indicated and are subject to change. Any price and availability information displayed on https://www.amazon.com/ at the time of purchase will apply to the purchase of this product.
Product prices and availability are accurate as of the date/time indicated and are subject to change. Any price and availability information displayed on https://www.amazon.com/ at the time of purchase will apply to the purchase of this product.
(* = affiliate link / image source: Amazon Associates Program)
Z-Wave Wi-Fi Relays
I have a variety of Shelly relays around the home, both Wi-fi such as the Shelly 1PM, Shelly 2.5 and the new Z-Wave based Shelly Qubino Wave 1PM that I reviewed recently.
Z-Wave & Zigbee Smart Plugs
Everyone’s heard about Belkin’s WeMo which popularised the idea of making dumb appliances smart by putting a smart plug between the wall and the appliance. Z-Wave smart plugs are similar, but they just work on the far more reliable Z-Wave & Zigbee mesh wireless technology instead of Wi-Fi like the WeMo.
I currently use the Aeotec Smart Switch 7 to automate my bedside lamps, floor-stander lamps, humidifiers and air purifiers.
Ethernet-to-IR bridge
There are a few ways you can control your home theatre devices – gold old infrared which is supported by any device, or sending http commands via a network connection. But I didn’t know that I could make my Smart Home Hub control an infrared emitter to mimic an IR remote control!
So my first attempt was the http API route. While my Denon AVR fully supported http API commands, my Panasonic Viera LCD TV had a limited http API command set. So this was a no go. Some quick research led me to a plugin for the HomeSeer HS4 that could control an InfraRed emitter from a company called Global Cache. I managed to score one of these Global Cache Ethernet to IR devices on eBay.
Product prices and availability are accurate as of the date/time indicated and are subject to change. Any price and availability information displayed on https://www.amazon.com/ at the time of purchase will apply to the purchase of this product.
(* = affiliate link / image source: Amazon Associates Program)
This is a brilliant device which plugs into a network switch using its ethernet port and will take properly formatted TCP/IP commands and convert it into InfraRed commands that it beams out of one of its three IR emitters.
They also have a WiFi-to-IR model but I haven’t tried it.
For these older devices that work very well with the HomeSeer HS4 software, it made sense to stick with the setup. So HS4 continues to run on an old laptop and is integrated with the Home Assistant system using a plug-in.
Stuff I don’t use since moving to my new self-sufficient sustainable home
This year we moved to a modern home built to passive home standards. We use only electricity – no gas or solid fuels are used! We are also fully self-sufficient thanks to the 12 kW solar panels on our roof. I am in the process of integrating these into my smart home and will update this post with more details soon!
Since we no longer use gas, there’s no need of a boiler controller. But in our previous home we had a gas-powered boiler which I had fully automated using the below product.
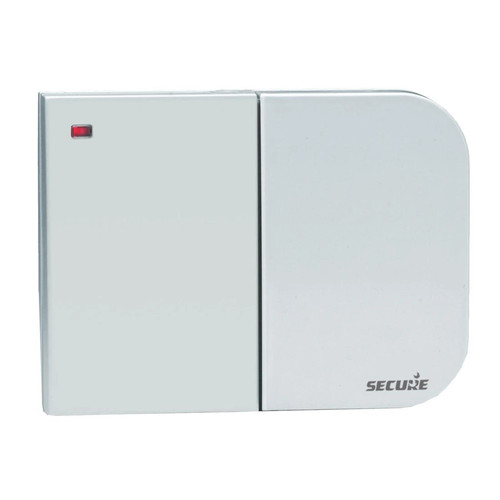
Z-Wave Boiler Controller
In a sense my home automation journey started with my boiler controller. When we moved into our new home, I quickly found that the existing boiler controller was outdated and didn’t even have a holiday mode! So instead of replacing it with a new ‘dumb’ controller, I got my first Z-Wave device, the Secure 2-channel boiler receiver.
In the UK you can get this receiver from Vesternet.
QNAP NAS as NVR
My first foray into the world of Network Attached Storage (NAS) was the QNAP TS-231+ many years ago, and was the inspiration behind starting my DIY home surveillance system. Later I upgraded to the much more powerful QNAP TS-253A NAS.
The TS-253A is my network storage, my NVR (using QVR Pro), and my media streaming server using DLNA. In the past I have used the NAS as my OpenVPN server, but due to security concerns I have moved to using an OrangePi running PiVPN as my VPN server. I use the excellent Wireguard protocol on PiVPN mainly because it has a much lower overhead compared to OpenVPN. This suits a low-power device like the OrangePi.
Product prices and availability are accurate as of the date/time indicated and are subject to change. Any price and availability information displayed on https://www.amazon.com/ at the time of purchase will apply to the purchase of this product.
Product prices and availability are accurate as of the date/time indicated and are subject to change. Any price and availability information displayed on https://www.amazon.com/ at the time of purchase will apply to the purchase of this product.
Product prices and availability are accurate as of the date/time indicated and are subject to change. Any price and availability information displayed on https://www.amazon.com/ at the time of purchase will apply to the purchase of this product.
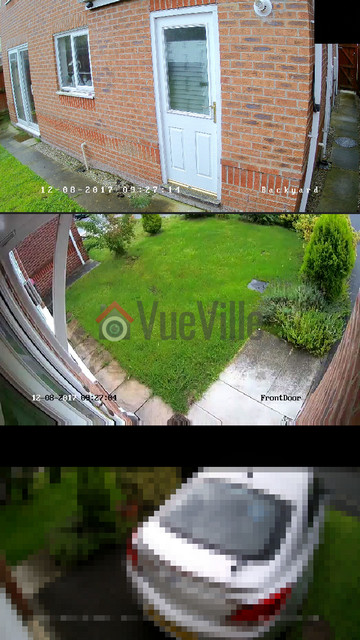
How do you access your security cameras remotely when you are away from home? In all likelihood, you are accessing each device using the manufacturer’s mobile app because they simply work without having to mess with port forwarding or VPNs. In other words you are relying on the manufacturer’s P2P servers, whether you realise it or not.
I think there are two main issues with this approach:
Inconvenience If you have a Hikvision camera, an Amcrest camera and a Reolink camera, you may be using the Hikvision iVMS app to access the Hikvision camera, the Amcrest app to access the Amcrest camera and finally the Reolink app to access the Reolink camera, one by one. Not the most convenient way to access all your cameras is it?
Security Although its straightforward and simple to use your camera manufacturer’s native app, you should understand what exactly is happening here. You are allowing the camera to make an outgoing connection from your network to the manufacturer’s servers. So essentially you are trusting the manufacturer’s security practices. If you are using their cloud service for data storage instead of using local storage, you are trusting your private data to a 3rd party.If you think this is without risks, just google the iCloud hack. If it can happen to Apple, it can happen to you.
So, what’s the alternative?
If you are a power user like me, why not do what I do and use a single app like tinyCAM Monitor Pro to view the live streams of all your cameras?
tinyCAM Monitor Pro
And why not access your DIY NAS NVR and review all your camera’s recorded clips in one place, with simultaneous synchronised playback?
QNAP NAS – QVRClient
And why not do all of this securely without relying on any 3rd party to protect your data?
As I alluded to earlier, there are 3 ways to access your home network remotely, but not all are secure:
the manufacturer’s own app which uses the manufacturer’s servers, uPnP and P2P protocols to reach your camera,
port forwarding each of your devices to your router,
set up a VPN server on your home network – I recommend this method!
The first and second methods are not secure as you are either relying on the security of your device manufacturers or opening up multiple ports on your network to the Internet (port forwarding). The recommended way of remotely accessing your home network and security cameras is by creating a VPN connection from your remote device straight to your home network.
If you are wondering how your VPN server can be reached from the Internet, you have been paying attention! You cannot eliminate port forwarding totally. Your VPN server needs to listen for incoming connections and so you have to port forward your VPN server’s port to the router. But this is far safer than port forwarding every single camera and exposing these devices which often have poor security to the dangerous digital expanse we call the Internet.
Unless you have a static IP for your home broadband, you also have to deal with the fact that your home IP address will change occasionally and so you may not be able to reach your VPN server when you need to! Fear not, there is a way around it – Dynamic DNS services.
Here’s a 4-step summary of how to set up the VPN method of remotely accessing your home network and your security cameras:
Set up a device in your home network to act as a VPN server, eg. WiFi router, NAS, a PC or a Raspberry Pi
Forward the OpenVPN port from your NAS to your broadband router
Set up the same VPN server or any other device in your home network to periodically report your home IP address to a Dynamic DNS service, so that you can always reach your VPN server using an address like yournetworkname.noip.com
Set up a VPN client on the device you will use to remotely access your home network, eg. your mobile phone, tablet or laptop
Now simply use the VPN client to connect to your VPN server and voila, you are in your home network, as if you never left home. You can then access your security camera or any device on your home network, without relying on third-party P2P services, without port forwarding each IP camera, without a static ip address, and with maximum security.
Let’s take these steps one by one and break them down. I will be using my QNAP TS-253A NAS for this how-to.
Some house-keeping
Make sure you disable all existing port forwarding rules and uPnP in your router settings. Then systematically disable P2P in each of your cameras (and NVR if you use one). This locks down the cameras and other devices so that they are isolated from the Internet and cannot ‘dial home’ without your knowledge.
If you still want to use the camera manufacturer’s app, you should not disable uPnP and P2P. But then don’t be surprised if your cameras and network get hacked!
Step 1 – Set up the QNAP NAS as a VPN server
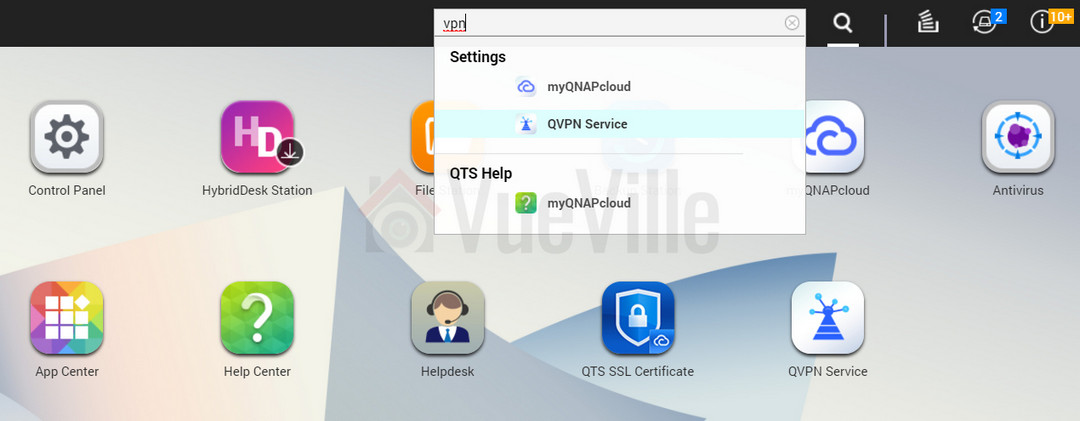
Login to your QNAP NAS using an admin account and search for vpn. Click on QVPN.
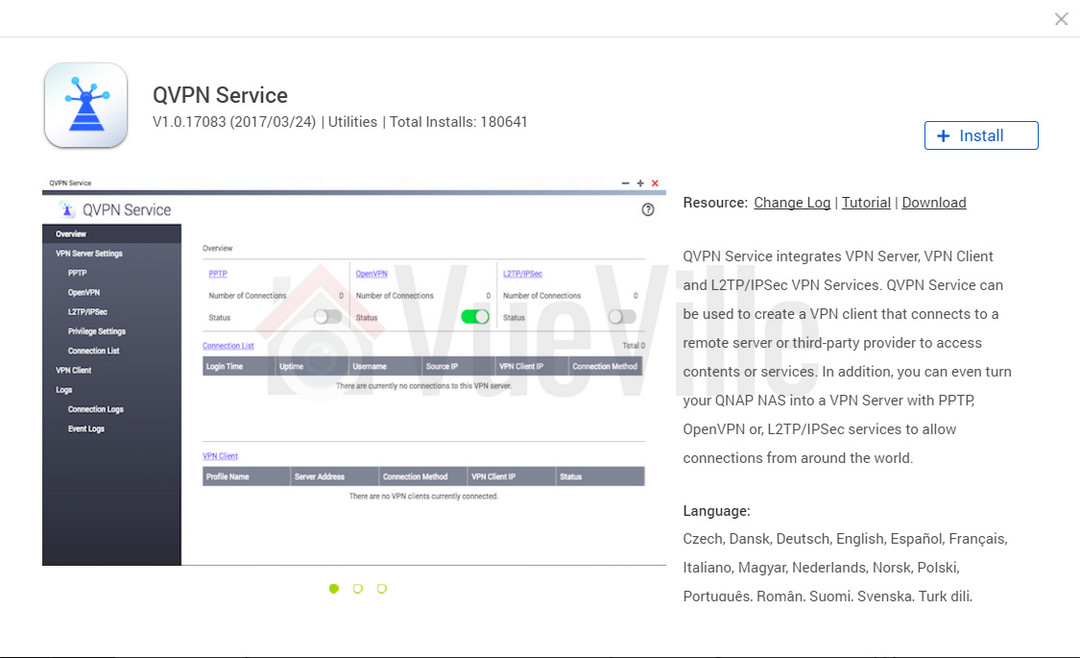
This will take you to the QVPN page in the QNAP App service. Click the Install button.
Now go to the desktop and you will find a new QVPN Service shortcut. Click on it.
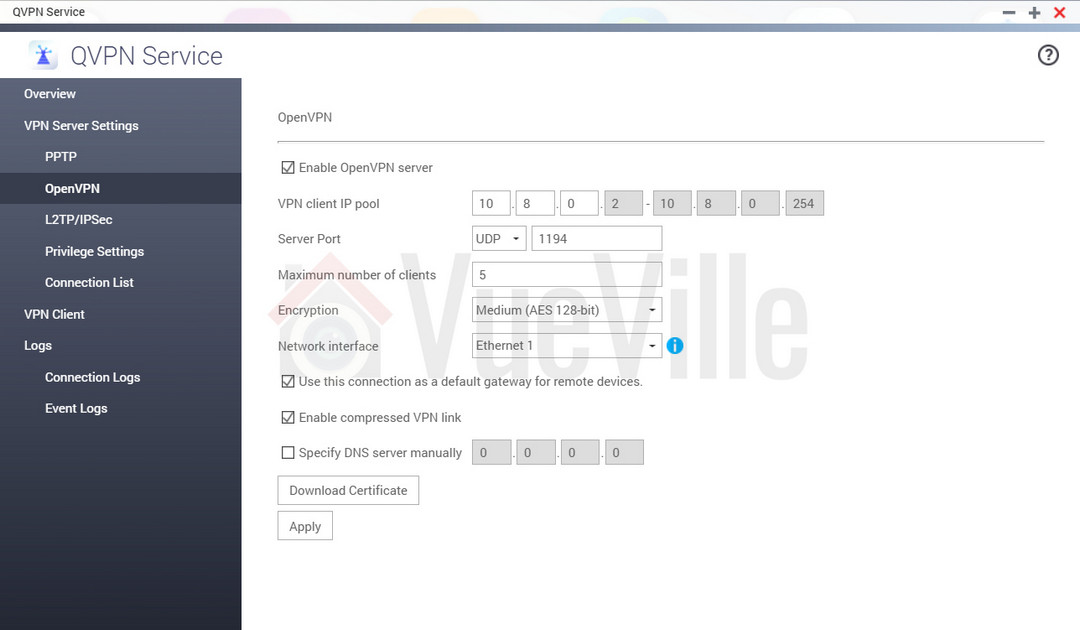
The QVPN app will open. You have three different VPN technologies to choose from at this point – PPTP, OpenVPN and L2TP/IPSec. Since PPTP and L2RP/IPSec are not the most secure protocols, turn on OpenVPN.
Choose OpenVPN from the menu on the left and tick the checkbox of the first three options as shown below. Click Apply.
Now click “Download Certificate” and save the resulting zip file to your hard drive.
Choose Privilege Settings from the menu on the left, and enable OpenVPN for the accounts you would like to use to login to your home network.
If you would like to have all VPN connections logged, turn this on in the Connection Logs section.
Step 2 – Port Forwarding from your NAS to your router
Follow your broadband router or gateway’s instructions to forward the 1194 UDP port from the NAS to an external port. 1194 is the default port used by OpenVPN.
If your router supports port forwarding with port translation, one tip I have is to choose an external port that is not 1194. This adds an extra layer of security from hackers who may be scanning for an open 1194 port on your network. So for example, I would map UDP port 1194 of my NAS to the router’s external port 35376, where 35376 is just a random port I chose.
So port 35376 on router -> port 1194 on NAS. The screenshot below shows how this port forwarding rule is set up in my ISP-provided broadband router.
Step 3 – Set up Dynamic DNS on your QNAP NAS
First sign up for a dynamic dns account at noip.com (or any service supported by QNAP), note that the free account forces you to verify your account every 30 days.
Login to your QNAP NAS using an admin account and navigate to Control Panel>Network & File Services>Network Access and click on the DDNS Service.
Enable the DDNS Service, and enter the noip username, password and host name you created at noip.com and click ‘Apply All’.
Step 4 – Set up the OpenVPN client on your device
Before you can set up the OpenVPN client on any device, you need to edit the client configuration file (openvpn.ovpn):
Unzip the certificate zip file you downloaded from your NAS earlier, you will now have 3 files ca.crt, openvpn.ovpn and readme.txt
Edit the openvpn.ovpn file and replace the IP address with the noip hostname you created in the steps above.
Save the file.
Android devices – Set up the OpenVPN for Android client
Transfer the three files, ca.crt, the edited openvpn.ovpn and readme.txt to your mobile device.
Install the OpenVPN for Android app from the Google Play Store.When you first open the app, it will look like this:
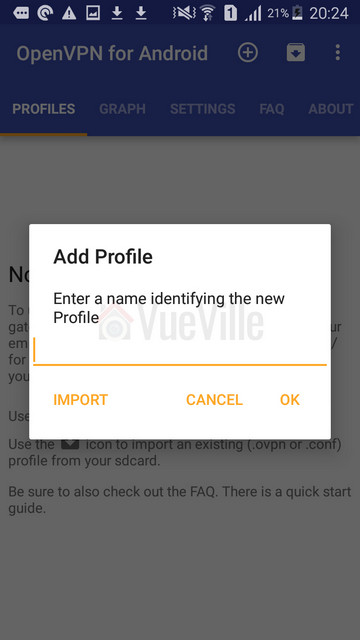
Tap the + symbol at the top right of the app which will give you the screen below.
At the ‘Add Profile’ screen, select Import.
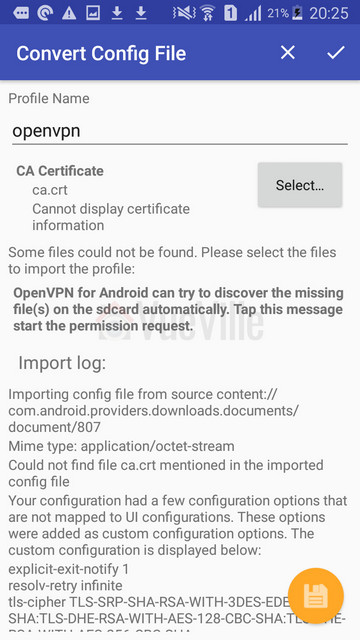
Now choose the openvpn.ovpn file you copied to your mobile device.
At the Convert Congif File screen, select the certificate file you downloaded.
Now select the tick mark at the top right.
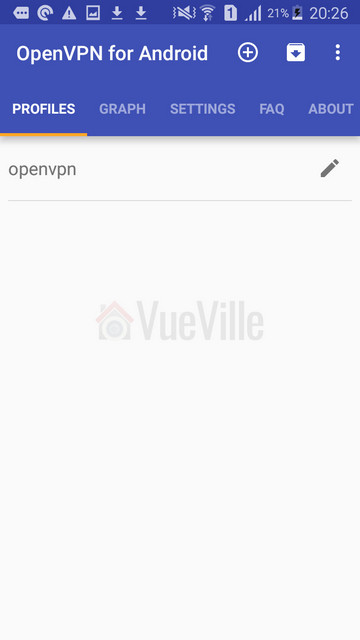
Now you will find a new profile called openvpn in the app Profiles tab, tap this.
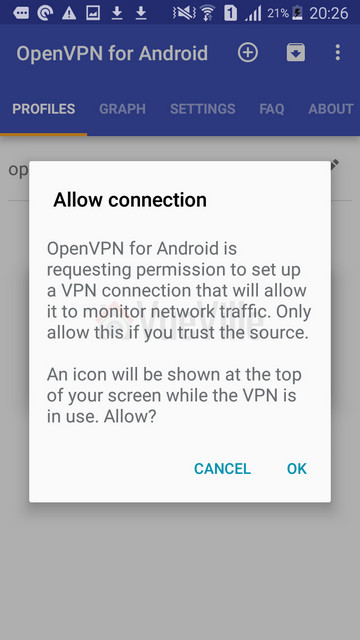
In the Allow Connection screen, click OK.
When it asks for the username and password, press Cancel.
Click on the edit icon of the openvpn profile.
Go to the Server List tab and change the Server Port to the port number you forwarded the UDP 1194 port to. If you followed my recommendation of using an external port such as 35376 which is different from 1194, use that. Back out to the main app screen.
Make sure you are on an external network such as 3G or 4G, and tap the openvpn profile to connect.
Enter the username and password of one of your QNAP NAS accounts which you allowed VPN access to the NAS. Click Ok.
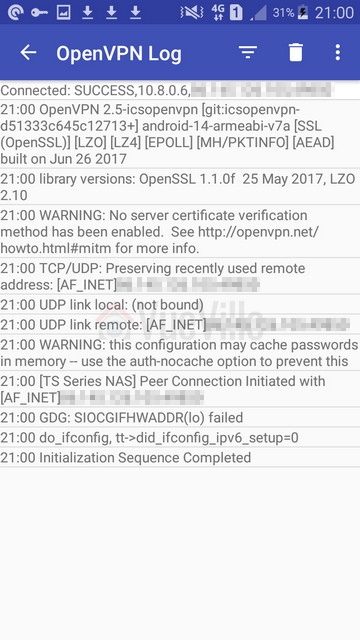
That’s it you are now connected to your QNAP VPN server!
Conclusion
I hope this how-to has helped you set up your own VPN server at home which lets you securely access your security cameras and the home network remotely.
Even if you are not ready to implement a full blown VPN server, it’s a great idea to disable uPnP on your router and to avoid port forwarding your devices to the Internet.
I’ll admit it – I have never been a fan of battery powered security cameras and have stayed away from them in the past. I am a set-it-and-forget-it type of person and that is probably why batteries have never appealed to me. Well all that changed when I started writing this Reolink Argus review.
To make things simple, lets talk about what wire-free cameras are not for:
they are not for 24/7 live-streaming or recording. Why? Because of batteries.
they are not for locations that are remote or cannot be accessed every 3 months or so. Why? Again because of batteries.
For any application that do not need the above, wire-free cameras can be considered.
For outdoor security cameras, generally power is not an issue because you can just run Ethernet cables anywhere and power up the cameras using Power-over-Ethernet (PoE). But where battery powered cameras come into their own are locations outside your home where you cant get cables to or for applications inside the home where there’s no power source nearby.
Lets take an example of a common application most people would consider the Argus for. When I heard of the Argus, the first thought that I had was ‘can it be a portable baby monitor’? You see, I have been using the Amcrest IP2M-841B as my baby monitor for over a year now. While its a great camera for this purpose, there is one little issue – when my baby moves around the house during the course of the day, I have to keep moving the baby monitor along with him. This is not great because I have to keep hopping the camera from one power socket to the next.
With a wire-free camera, I am no longer constrained by the location of power sockets! In fact this was the source of inspiration that led Reolink’s CEO Colin Liu to create this camera in the first place through their highly successful IndieGoGo campaign that raised over a million dollars. So is the Argus a good baby camera? Not a primary one as you will see soon, but good as a secondary one.
Wire-free cameras are also great for renters who are not allowed to make permanent changes to their properties. There are a few other possible applications too – ever wanted to put a camera inside your pets cage? Or inside the bird house at the bottom of the garden?
Well if only there was a wire-free weather resistant camera that could also solve the problem of false motion detection alerts – enter the Reolink Argus! Reolink have kindly provided a test unit and I put it through its paces.
What’s in the box
Reolink’s packaging is usually great and the Argus is no exception. The Argus box itself was encased in another shipping box providing an extra layer of safety.
The box has the main features of the camera printed on it.
So what’s inside the box?
Reolink Argus camera
4x CR123a batteries
Magnetic base
Magnetic base hole template
2x Pack of screws
Reset needle
Outdoor security mount
Outdoor security mount template
What’s next card
Quick start guide
Surveillance sticker
Everything that you need to get started with wire-free surveillance is included. 4 GP-branded CR123A batteries are included and this is a great choice. I personally use GP batteries in all my home automation sensors and so very pleased to see Reolink opted for the same brand.
Specification
[table id=38 responsive=scroll /]
Design & Hardware Features
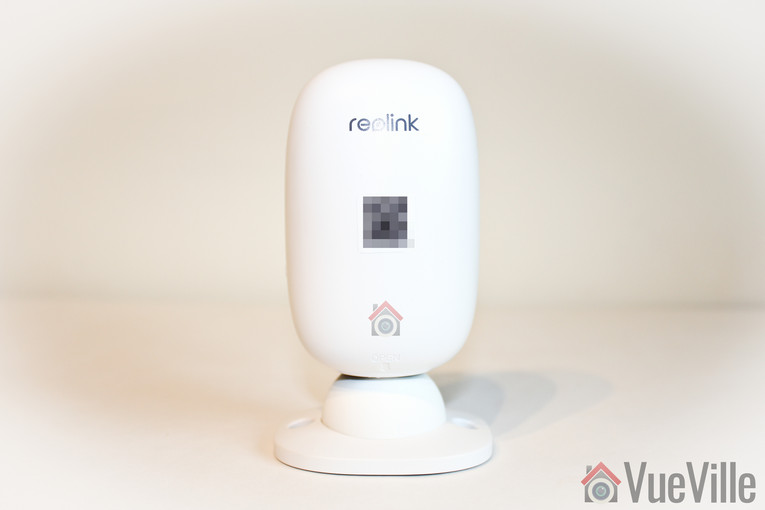
Right off the bat, let me say that the Argus looks and feels a lot more expensive than its price suggests. The glossy glass-like finish, the quality of the materials used and the general fit and finish are very Nest-like.
In the photo above, the camera is attached to the magnetic base and in the photo below, it is attached to the outside security mount.
Starting from the top, there is a daylight sensor which automatically turns on or off the Infrared LEDs. Next is the lens itself, surrounded by the Infrared LEDs. There is a status LED that shines bright blue below the lens. Below the status LED sits the built-in microphone.
You can’t miss one of the best features of the Argus, the built-in PIR motion sensor. This enables accurate motion detection instead of the more inaccurate software based motion detection.
The speaker is placed at the very bottom of the camera and is identifiable by the grill holes.
The rear of the camera sports just the Reolink logo and the quick setup QR code (more on that later).
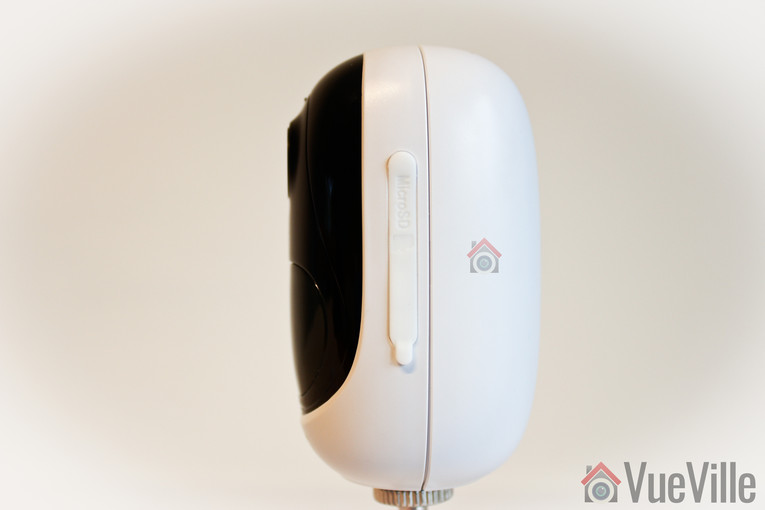
On the left of the camera, we find a removable soft rubber cover. Open it and the microSD card slot is revealed along with the reset button.
I should point out something here to save you potential frustration especially as the manual doesn’t mention it. Typically microSD slots have a spring loaded mechanism which clicks when you push the card in and locks it in place. But in the Argus, there is just a spring mechanism. Meaning the microSD card never stays locked inside the slot by itself. You have to push the card in and then replace the rubber cover. That’s it. It would have been helpful if Reolink just used the standard microSD card slot every other manufacturer uses.
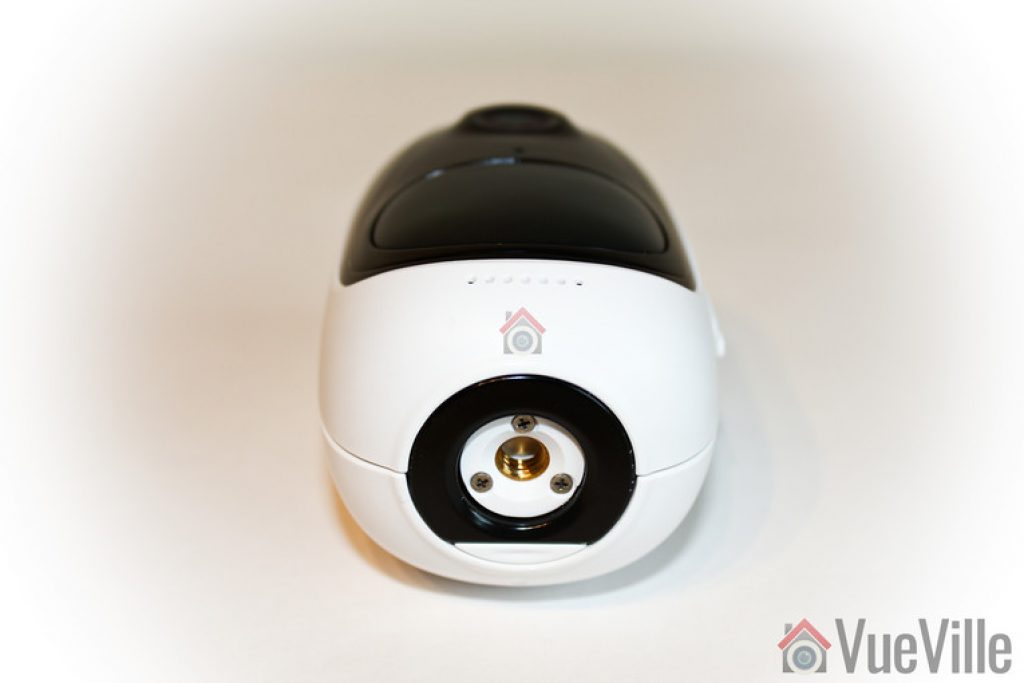
The bottom of the Argus contains a magnet for the magnetic base and a standard tripod mount. The magnet in the base of the camera attaches very strongly and securely to the magnetic base. Its a great idea and fits in nicely with the wire-free theme. It lets you quickly detach the Argus from the magnetic base and move it around the home.
The provided wedge is needed to open the Argus. The camera needs four CR123A batteries and these are included in the box.
Installation
The included quick start manual is if very high quality and illustrates the setup process well. The Reolink Argus is designed to be as easy to set up as possible and I have to say a 5 year old can set up this camera – its that simple.
How does the camera do this? By guiding you through the setup process using voice instructions. Yes the camera actually speaks to you. Very cool and it’s not just a gimmick, I found it held my hand right through the setup process.
These are the steps I followed from the user manual to set up the Argus:
Insert the batteries into the cameraAs soon as I added the batteries, a red light came on and the camera started talking with a female voice every 60 seconds: “Please run Reolink app. Click the ‘Add new device’ button and follow instructions to set up the camera.”
The next step is to install the Reolink app. Now there are 2 ways to proceed – go to the App Store (iOS) or the Android Play Store and install it yourself or scan the QR code in the manual.
Click the ‘Add new device’ button as prompted earlier by the camera
Scan the QR code on the cameraClick on the ‘Set up camera’ option when prompted by the Reolink app.
Now the camera will ask you whether you heard the voice prompt heard in step 1. So click the button named “I heard the voice prompt”.
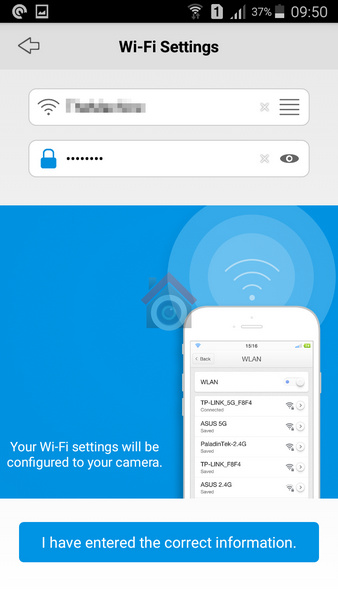
Next enter your WiFi network information and tap the “I have entered the correct information” button.
The next step is a novel one. You have to point the camera at your mobile screen where a QR code is displayed. Basically the app is telling the camera what the WiFi network login details are. If the camera reads the QR code successfully, you will hear the camera say “Scan succeeds. Camera is connecting to the router.” Now click the ‘I heard scan succeeds’ button’.
When the camera successfully connects to the your WiFi router, you should hear the camera say “WiFi connection succeeds (sic), welcome to Reolink!”. Go ahead and tap the ‘I heard WiFi connection succeeds’ button.
Now the camera is connected to your WiFi network and you can login for the first time
As soon as you login, the camera will prompt you to change the default password which is just a blank. This is a good security feature and I am happy to see the Argus has it.
Don’t forget to tap the ‘Init’ button on the live view page to set the camera’s time and Daylight Savings Time (DST) settings.
You don’t have to do any extra setup such as port forwarding for accessing the camera remotely. It utilises Reolink’s P2P servers to accomplish this automatically. If you are worried about security you can block the P2P service and do your own port forwarding, or better yet give the Argus local access only and just VPN into your home network.
Software features & Mobile app
The Reolink Argus is controlled exclusively by the Reolink mobile app. You cannot access the camera from any other source. That said, the app is quite good and lets you do everything that you could through a dedicated web interface.
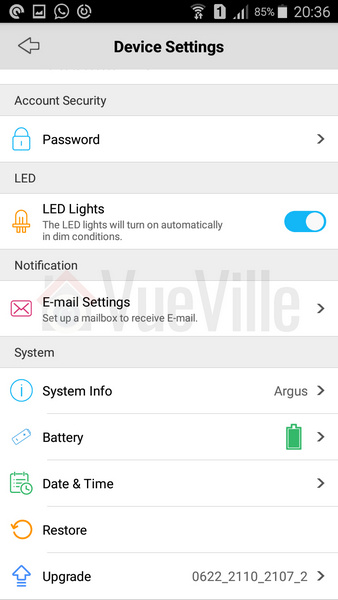
The app has two main sections – Devices and Settings. When you open the app, it takes you to the Devices screen by default. This is a list of all the devices and buttons that let you view each device’s battery status, turn on/off PIR and push notifications and access the full configuration page.
The Settings section is actually app-related settings such as a password, and enabling access over mobile data networks.
Device View
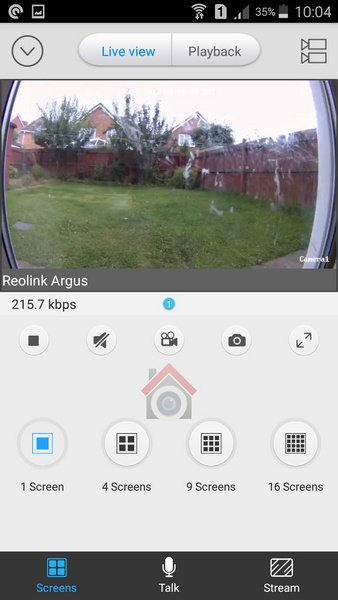
When you select a device, its own live view screen will open. Here you can turn on audio, record a video, or take a photo.
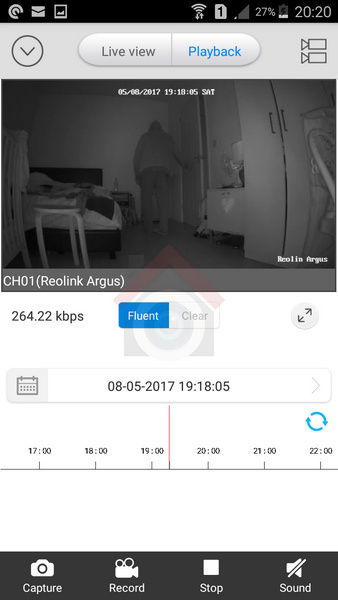
If you switch to the Playback tab, you can view both motion detection clips and video clips recorded through the app. These clips are stored on the microSD card.
You can select a specific date or select the marker on the timeline to choose a particular recording. At any point, you have the option of viewing more than one device by clicking on the multiple camera icon in the top right.
Device Setting page
Performance
The camera was able to maintain a steady WiFi signal from all corners of my home. It was able to keep serving a live video stream from some parts of my garden also.
Mobile App Live view
I tested the camera from inside my home network and remotely over 4G. My home broadband is 50 mbps up/10 mbps down and 4G network is around 15 mbps up/down. These are very high speeds and are ideal for bandwidth intensive applications such as video. You may not get the same results as I did if you are on slower networks.
On the whole, the Reolink Argus camera performed well considering the fact that it is a battery powered WiFi device. Even remotely, the app was zippy in logging into the camera and displaying the live stream.
Video
The FullHD 1080p video resolution is very good and provides the Argus with sharp and clear video, both during live streaming and in clips recorded to the microSD card. The IR LEDs are not the brightest you will find in a security camera but are adequate for the job.
In my humble opinion, what makes or breaks a security camera is its ability to capture motion triggered video clips. After all, lets not forget that the main purpose you are getting the Argus in the first place is to capture an intruder in action and get a clear shot that the police can use.
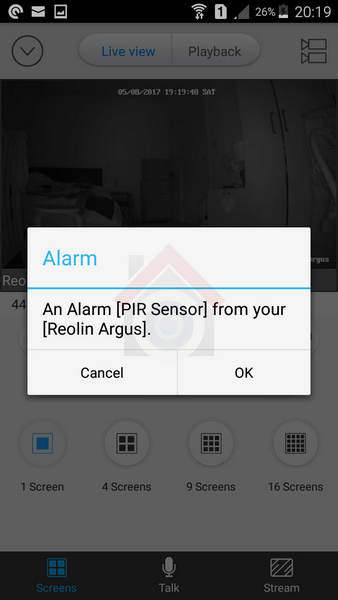
The PIR sensor gives the Argus an edge over cameras that rely on purely software based motion detection- you will get far fewer false alerts. You can also adjust the sensitivity of the PIR sensor to suit the installation location.
So how does it perform? In my many tests, it never once failed to trigger within the claimed detection area. I got immediate push notifications and email alerts on my mobile phone.
However there was one area of weakness which has more to do with the camera’s programming than the PIR sensor itself. The camera does not seem to have a pre-record feature and a very short recording duration for each motion detection event. These two are perhaps the most important software features a camera should have.
Watch the following videos to see what I mean:
Daytime Indoors video https://www.youtube.com/watch?v=RL3PDPDXLgE
Night-time Indoors video https://www.youtube.com/watch?v=FgcgfWhcvUo
Daytime Outdoor video https://www.youtube.com/watch?v=c6v-2YP5ydU
Night-time Outdoor video https://www.youtube.com/watch?v=mD5uee3fw4w
There is no pre-recording – the recording begins only around a second after the PIR sensor fires. So it missed me entering the room with my face exposed. With pre-recording, the camera would be recording the stream 24/7 automatically and so would be able to capture the few seconds before the PIR sensor fires.
Short recording duration – In the test videos below, I first trigger the PIR then walk towards the camera with my face exposed. But because the PIR cannot detect motion in a direction perpendicular to the sensor, it stops firing and recording stops soon after. If it had continued recording for 10 seconds, it would have caught my face. Of course I then reached the camera and the PIR sensor fires again as I move sideways.
I put the 2 points above to Reolink who informed me that there was no pre-record feature and that the recording duration was a fixed 6 seconds. While I can live without pre-recording on a battery powered camera, the fixed recording duration of 6 seconds is not great at all. Fortunately Reolink also added that the ability to adjust the recording duration will be added to the camera in future.
Audio
While most indoor security camera boast half-duplex 2-way audio, the Reolink actually has full-duplex 2-way audio. This means you can speak and hear at the same time as you would on a normal phone call, not take turns to speak like on a walkie-talkie.
Interestingly Reolink doesn’t claim to have full-duplex audio and maybe that’s because its not perfect yet. I found two slight issues. When I pressed the talk button when the audio from the camera was also on, it resulted in the volume of the camera audio stream reducing by quite a bit. This made it difficult to hear what was being said. Secondly, there was an occasional echo.
Advanced features
Being a consumer focused model, the camera doesn’t currently have Motion JPEG, RTSP or API support which would help it interface with your existing home automation or NVR. I asked Reolink whethere there were plans to add RTSP and they said its on the cards! With that I would be able to just ask my Vera Plus smart home hub to get an alert whenever the camera PIR senses motion and take a snapshot or record the RTSP stream. Now that would be cool!
Battery
Each of the 4 batteries provided by Reolink can hold 1500mAh. This means that with standard usage, the camera should last around 4-6 months. Over the week I intensively tested the camera, the battery level hardly fell. I would have liked for Reolink to provide a % level meter instead of the detailed statistics screen showing me how many minutes I have used the camera each day. There is a visual meter but it has no scale, so can be difficult to read accurately.
Reolink Argus vs. Netgear Arlo
The Netgear Arlo comes in different varieties starting with the Arlo Wirefree, the Arlo Pro and the Arlo Go. The Arlo model that is closest to the Argus is the Arlo Pro, and this is the choice you will most probably come up against.
Both the Argus and the Arlo Pro are wirefree thanks to their batteries. However the Arlo Pro has a proprietary rechargeable battery which can result in higher operation time depending on which batteries you use in the Argus.
When it comes to video, the Argus has a clear advantage due to its 1080p sensor. Things are more equal when it comes to audio with both cameras having full duplex 2-way audio with a built-in microphone and speaker.
Connectivity is an area where there are major differences between the Argus and the Arlo Pro. Both cameras use Wi-Fi for communication, but the Argus is a standalone camera. The Arlo Pro on the other hand needs its base.
Both cameras support motion alerts and are weatherproof with IP65 ratings.
Verdict
Overall, my experience with the Reolink was very positive and this is a camera with great potential. It’s very easy to set up with the voice guide, it has good video and audio quality, it has a PIR sensor for true motion detection, a stable app and last but not the least, the ability to work without the cloud thanks to its microSD local storage.
Some improvements are necessary to make this a killer camera though – the ability to adjust the motion detection recording duration, RTSP support and an API to access the camera from apps other than the official Reolink app. All of these are slated to be added in the future and I look forward to that.
[review]
Where to buy
[easyazon_link identifier=”B07GBRV8W5″ locale=”US” tag=”vueville.com-eaz-20″]Check your local Amazon site[/easyazon_link]