It’s all well and good being able to monitor motion and temperatures changes around your house, but your home truly becomes a smart home only when it can then respond to those changes. This can be done by controlling lights, home appliances and other security gadgets in your home.
After I got my Fibaro and Aeotec motion sensors up and running, I started researching how I could get my existing dumb appliances to work with my smart home network. Let’s take the example of a humidifier. My son occasionally suffers from dry skin, so its very important that I am able to maintain a good humidity level in his nursery. I already have a [easyazon_link identifier=”B01C5UCWH6″ locale=”US” tag=”vueville.com-eaz-20″]non-smart humidifier[/easyazon_link] which is an ultrasonic cool mist humidifier. My Aeotec Multisensor 6 tells me what the humidity is but since the humidifier is not a smart device, I then need to manually switch it on or off. This is not very convenient in the middle of the night – I like my beauty sleep!
The expensive way of automating the humidification is by getting an expensive smart humidifier like the [easyazon_link identifier=”B01K3KTR9Q” locale=”US” tag=”vueville.com-eaz-20″]Motorola Smart Nursery Humidifier[/easyazon_link]. But there’s an easier and far more cost-effective way of making your existing dumb appliances smart – by using smart power plugs like the Greenwave Powernode 1.
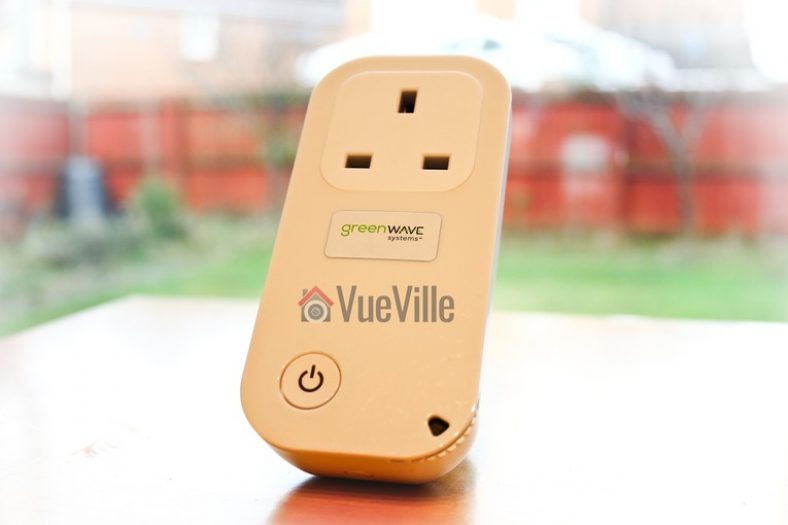
For my first smart plug, I chose the Greenwave Powernode 1 because it is a very reasonably priced Z-Wave wall plug that has power usage monitoring and yet has great reviews.
Greenwave Systems was formerly known as Greenwave Reality Pte Ltd, a company started in 2008 in Singapore. Greenwave Reality became Greenwave Systems in May 2014. The company caters to both the consumer market through its smart home devices and industry through its disruptive Greenwave360 and AXON solutions.
Greenwave Powernode Series
The Greenwave Powernode Family
The Greenwave Powernode series consists of everything you need to control electrical appliances and monitor their power usage. Their most popular products are the 1-port wall plug and the power strip.
Greenwave 1-port Powernode Specifications
[table id=35 /]
Design
The Greenwave 1-port PowerNode is a well-built device with a premium feel to it. The rounded contours and matte plastic exude high-quality which you wouldn’t expect for such an affordable smart plug.
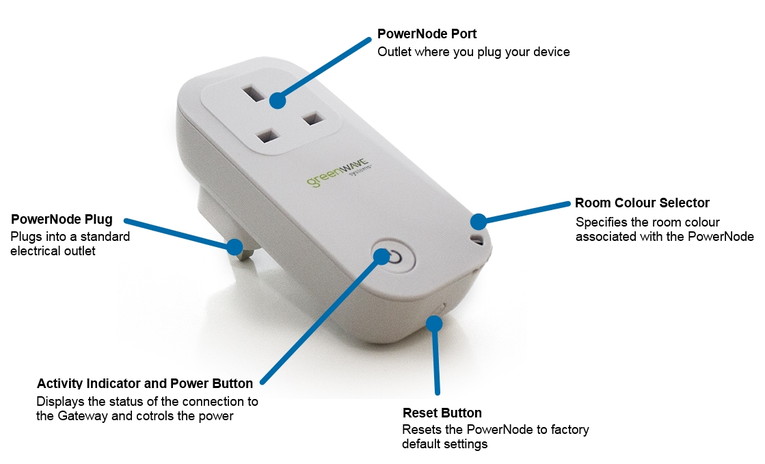
On the front, there is a manual over-ride switch which also doubles up as a slightly confusing indicator LED array. I say slightly confusing because, it is not a single LED but a ring of LEDs arranged in a circle around and behind the button. The LEDs are used in a dizzying number of patterns to convey different states and operation modes – keep the manual handy.
Features
Note that the reset button is also a SYNC button. Image courtesy – Vesternet
The PowerNode is a first generation Z-Wave device, which means it is not based on the latest 500 series chipset. However I don’t think it matters because for switching and power measurement purposes the increased bandwidth of Z-Wave 500 is not needed. I also found the range of the device very good, so don’t let the 1st gen nature of the device discourage you.
The PowerNode has both the basic relay function and a power usage monitoring feature. It supports a healthy switching capacity of 2,400W and up to 10A.
The other main feature if the smart plug is that it can monitor and report the power usage of plugged in devices. I tested it with an LED lamp, a humidifier, a traditional CFL lamp and every time it gave a reading that was in line with the device’s stated power consumption.
There is a room colour selection wheel at the bottom right, however this feature works only if you use Greenwave’s own Gateway controller. If this is the case, you can assign a colour using the wheel and it will reflect this assignment on the Gateway’s control panel. Frankly it sounds more like a gimmick than anything useful and anyway since I have a Vera Plus I can’t use this feature.
There is a Reset button on the bottom of the plug, but what the manual doesn’t state clearly is that it is primarily a Sync button. Even the physical symbol on the button is that of SYNC. So its just a multi-purpose button that does different things based on how many times you press it. You will need to know this, otherwise you will spend ages wondering where on earth the sync button is like I did. Greenwave, you need to really sort out your user manual!
Installation
I found installation mostly straight forward except for finding the sync button because the manual insists its a reset button.
The rather confusing user manual is written mainly with the assumption that you will be using the PowerNode with Greenwave’s own Gateway. But I suspect most people will want to use it with their own Z-Wave gateway, so here are the steps for adding it to your Z-Wave network (I used a Vera Plus, but the steps are the same):
Click on the Add Device button
Now you need to select the type of device – choose ‘Generic Z-Wave Device’
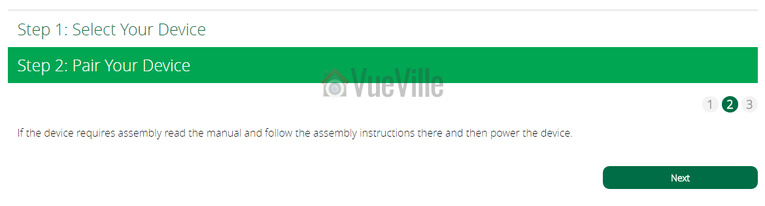
Then you will see this screen, simply click ‘Next’
Now plug the PowerNode into an electrical outlet that is close to your Z-Wave controller.
Locate the sync button on the PowerNode. It is a small round button on the side of the device, marked with the sync symbol.
Press and hold the sync button for one second until the PowerNode activity indicator begins to display a clockwise-rotating pattern, which shows that the PowerNode is attempting ‘inclusion’ into your Z-Wave network.
Now press Next on your Vera Plus wizardYou will then see the following screen as the Vera Plus starts looking for any new Z-Wave device in range:
After a few seconds, the rotating pattern on the PowerNode LED indicator should stop and all bars turn green for five seconds to indicate successful inclusion. The PowerNode is now part of your Z-Wave network. If the rotating pattern has stopped but the bars rapidly flash green for five seconds, then the PowerNode inclusion process has failed, and you must start over.
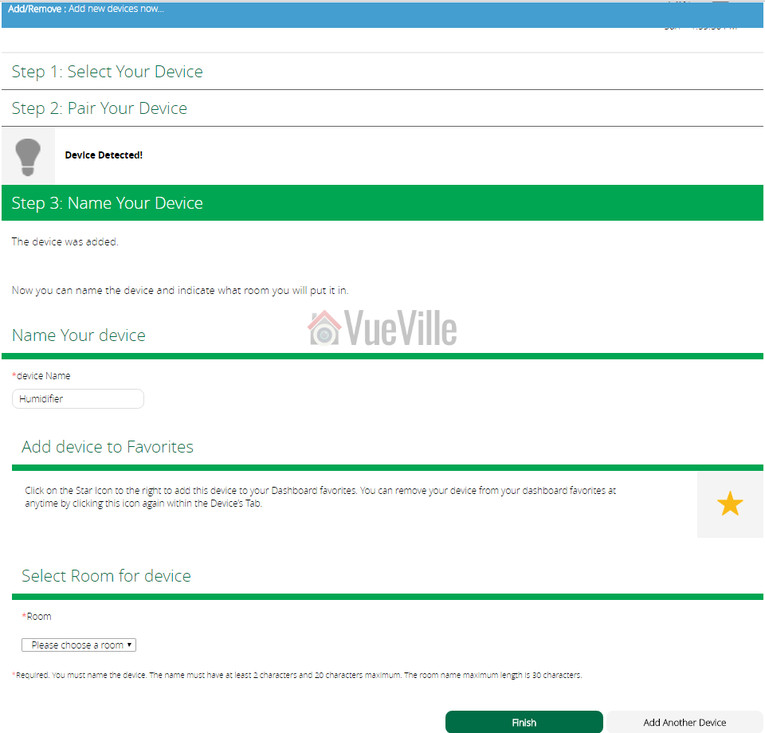
Give the device a name and click Finish.
You will then see a “Please Wait” message at the top.
When it disappears, your new device will show up in the device list.
Performance
So when it comes to using it daily, how did it fare? Very well – I have 5 of these smart plugs in service for the last 6 months and they have been simply excellent. It has turned on and off every time as commanded by the Vera Plus. No issues at all with wireless range and they function as signal repeaters, so are great for extending the reach of the network too.
Power usage monitoring works well and while I am not doing anything with the info presently, its nice to know I can keep an eye on the connected appliance’s power usage.
There is no noticeable delay between me turning on my living room lamp from Imperihome and the LED lamp actually turning on.
If there is one quibble I have, its the PowerNode being quite needy when it comes to receiving a pulse from the Vera Plus. If it does not hear from the Z-Wave controller every couple of minutes, it starts angrily flashing its very bright LEDs. Yes they are enough to make you lose your sleep. The culprit is the default poll time which you can increase to sort out the problem, or you can instruct your controller to send the PowerNode a pulse every minute and keep it happy.
Verdict
[review]
Comments
2 responses to “Review: Greenwave PowerNode 1-port Z-Wave Smart Plug with Power Monitoring”


Leave a Reply