
Are you wondering how to make your DIY home security camera system and your smart home hub talk to each other? Getting these two important parts of your smart home to communicate effectively is the secret to a truly smart home. So in this article, I am going to show you how I achieved this:
[text-blocks id=”earning-disclaimer”]
Hold on…why should they talk to each other?
I first started off building my DIY home security camera system. Later on I added a smart home hub to create my DIY home automation system. But there was a problem – the two systems didn’t talk to each other and were oblivious of what the other half was up to. Not a very smart home, then!
There are several things I can now do thanks to the left hand knowing what the right is up to:
- Surveillance Station -> HomeSeer HS3
- Whenever motion is detected, certain lights turn on at that camera location.
- Whenever motion is detected, tablet devices activate and switch to the camera view until the motion stops.
- Whenever motion is detected, my smart home hub sends me email snapshots of all the cameras (not just the one that detected motion).
- HomeSeer HS3 -> Surveillance Station
- Whenever motion is detected by external PIR sensors, my smart home hub can ask my NVR to start recording the camera in that area.
- When the doorbell is pushed, Surveillance Station will start recording the front door camera.
- When the Neo Coolcam Door/Window sensor attached to my mailbox detects new mail, Surveillance Station will start recording the front door camera.
- I can sync the cameras to my house mode. So I can arm the cameras at night or when I am away so that I get notifications only when I am not at home. Throw in geo-fencing and you have a super-smart autonomous CCTV system!
In this guide, I am going to focus on how to get Surveillance Station to talk to HS3. We will look at the reverse process in a later blog post.
What’s the basic principle?
My DIY home security camera system consits of Hikvision and Reolink cameras connected to a QNAP TS-253A NAS that acts as an NVR. This is possible due to the Surveillance Station app on the QNAP that includes 4 free IP camera license with no restrictions, or 8 camera licenses with 14 days recordings (QVR Pro).
My home automation system is controlled by HomeSeer HS3 software running on a fanless low-power Acer notebook. HS3 can accept messages (http requests or more accurately json packets) which can be used to control any and all aspects of HS3. HS3 can also send these http requests to any network device (I use this feature for my smart mailbox and smart front door motion detection).
Thankfully, QNAP Surveillance Pro is also able to send and receive http requests!
So whenever Surveillance Station detects motion, it can send an http request to HS3 and change the status of a timed on/off virtual device. The change in status of this virtual device can then be used to trigger HomeSeer events. I love virtual devices for this very reason, they are so versatile!
How does the QNAP Surveillance Station motion detection work?
When you add a camera and turn on motion detection alerts, the NAS will login to your cameras and attempt to set up motion detection rules in the camera software. Then when the camera sends an alert according to the rules defined by the NAS, Surveillance Station will receive them and then respond accordingly (trigger the cirtual device on HomeSeer3, start recording, put an event marker on the timeline, send email snapshot, send an SMS alert etc.).
So the key takeaway here is that the QNAP NAS actually doesn’t do any motion detection, it relies on the camera to do it. So you wont find any configuration options for those rules in your NAS – you will find it in your camera settings. This is a smart method because your camera will usually have more advanced motion detection methods such as line detection, intrusion detection, PIR motion sensors etc to which the NAS can theoretically respond. I say theoretically because there is a downside – the NAS’s ability to respond to those alerts depends on how well QNAP supports your specific camera make and model. For example with my Hikvision cameras, the NAS will not respond to any motion detection alert other than the basic motion detection one. So it ignores the line detection and intrusion detection alerts that I love because they cut down false alerts massively.
The up side is that the NAS NVR doesn’t have to analyse the video streams to perform motion detection, as the camera does this for the NAS. This also keeps power consumption and heat levels down.
Step-by-step process
Here;s a summary of the 3 step process for connecting QNAP Surveillance Station to the HomeSeer HS3:
- Set up HomeSeer3 virtual devices and events
- Set up QNAP Surveillance Station
- Adjust motion detection settings in your camera
STEP 1: Set up HomeSeer3 virtual devices and events
A virtual device is a device you create in HomeSeer3 instead of it being created by a physical Z-Wave device like a sensor. Virtual devices can have multiple states or multiple values set, so you could create an on/off toggle switch, a multi-state switch (like low/medium/high), a dimmer, or even a slider.
We will create one virtual device for each of your security cameras that you want to use as a motion detection trigger.
First, login to your HomeSeer3 web page and click the ‘Add Device’ button on the right (green plus button).

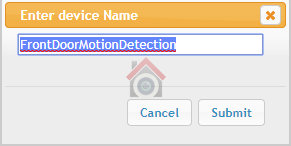
Then enter a device name. I have chosen ‘FrontDoorMotionDetection’ which will be switched to ON by my QNAP NAS whenever the front door camera detects motion.
In the Configuration tab, assign a floor and a room.
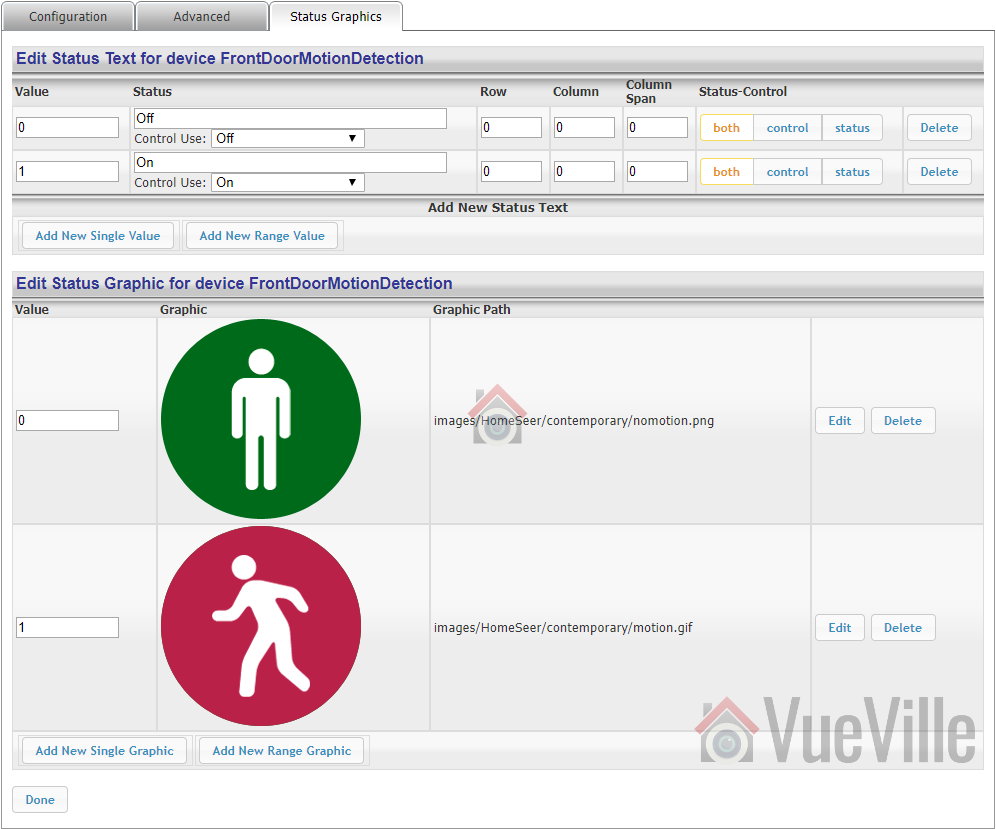
Click on the Status Graphics tab, and edit the Status Text and Status Graphics to match the screenshot below.
Click Done to complete setting up the virtual device. Repeat the process for each of your IP cameras.
Now in order to be of any use, the motion detection virtual switch should function like a toggle switch with a time delay. When it is triggered to the on position, it should return to the off position after say 1 minute. We can achieve this by creating an event to reset the virtual switch to off 1 minute after motion is detected:

STEP 2: Set up QNAP Surveillance Station
Assuming you have set up the Surveillance Station app on your QNAP NAS, you can move on to setting up the necessary actions in it.
Login to Surveillance Station.
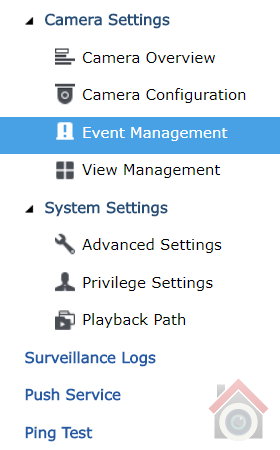
On the left-hand-side navigation menu, go to Camera Settings > Event Management.
The default mode for managing events is ‘Traditional Mode’. Switch to Advanced Mode. Advanced mode lets you create multiple actions whereas the ‘Traditional Mode’ lets you set up only a single action. You will want to create multiple events because whenever a camera detects motion, not only do you want to trigger the corresponding HS3 virtual device but presumably also start recording that camera.

Before you proceed, click Apply and then restart your NAS. I know it sounds weird but without doing this, the changes won’t stick. I don’t know what the QNAP developers were smoking when they thought this was a great workflow.
After restarting, Navigate back to Camera Settings > Event Management in Surveillance Station.
The action we want to set up is the one that triggers the FrontDoorMotionDetection HS3 virtual device we created earlier. Select the ‘Motion Detection’ menu item under your camera name. My front door camera is named ‘FrontDoor’ as can be seen in the screenshot below.

Now click the ‘Add’ button to add a new action. Under Action Type, change the default selection of ‘Recording’ to ‘User-defined Action’.

Edit the fields to the values below:
Action Name: You can call it whatever you want, I used ‘TriggerFrontDoorMDVS’, where MDVS is short for Motion Detection Virtual Switch.
IP Address: This is the IP Address of your HS3 device.
Port: The default is 80 and will work unless you have changed the HS3 web server port.
HTTP URL: This is the bit where the magic happens. For HS3, the format of the URL required to change the state of the virtual switch we created earlier is
[wpsm_codebox style=”2″]/JSON?request=controldevicebyvalue&ref=REFERENCE_ID&value=VALUE_TO_SET[/wpsm_codebox]
You can find the Reference ID of your virtual switch under the ‘Advanced’ tab of the device page in HS3.

My virtual device’s code is 236, so to change the state of the virtual switch to ON is “/JSON?request=controldevicebyvalue&ref=236&value=1” without the quotes.
User name: Type in blank
Password: Type in blank
This is what it looks like for my action:

Now click Apply and then the blue Apply button again at the bottom of the screen. When it has saved the action, exit Surveillance Station and restart your NAS.
You may also want to set up a recording action and a ‘send email snapshot notification’ action. You can see I have done this in the screenshot below. Remember: do not switch between Traditional and Advanced mode and if you do you have to click Apply and restart your NAS for the change to take effect.

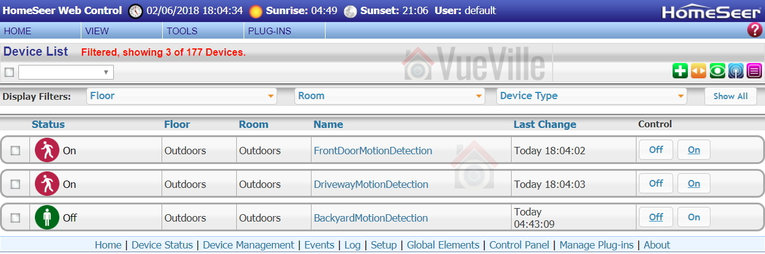
Now set off the motion detection of your camera and check the status of your virtual switch in HS3. If you have followed the steps above, you should see the virtual switch turning to the On position. Here’s what it looks like on my HS3 front-end:
STEP 3: Adjust motion detection settings in your camera
QNAP Surveillance Station can detect only the basic motion detection events of most IP cameras, including my Hikvision cameras. So its vital that you adjust the motion detection settings to reduce the number of false alerts you get. Trust me, you are going to get false alerts, its only a question of minimizing them.
Wrapping Up
That wasn’t too hard, was it? And just like that, HS3 can now monitor your camera’s software-based motion detection. Couple this with outdoor PIR sensors like the Everspring Outdoor PIR motion sensor and that’s the most reliable low-cost motion detection system you are going to get. In a future post, I will show how you can achieve the reverse: make QNAP Surveillance Station record whenever HomeSeer HS3 detects motion!
If this guide has helped you, please leave a comment below. I would love to know how are you using these sort of interfaces in your smart home.
Leave a Reply