
I recently installed Shelly smart relays in most of my light switches. So now I can control them from my phone through Home Assistant. But even better, I can now integrate my home lighting into my automations – such as linking lights in a room to occupancy.
But to detect motion, you need a motion sensor. That’s where this small but very capable multisensor from Aeotec comes in. It’s called the Aeotec MultiSensor 7 and many thanks to Aeotec for providing this retail sample for our comprehensive review. As always, all opinions are our own.
A quick note: As an Amazon Associate I earn from qualifying purchases. This post contains affiliate link(s). An affiliate link means I may earn advertising or referral fees if you make a purchase through my link, at no extra cost to you.
Video Review
If you prefer a video instead, here’s a comprehensive video version of this review:
What’s in the box


The MultiSensor 7 comes with a short user guide, a USB cable, wall mounting kit and two CR123A batteries. In short, everything that you need to get you up and going.
Specifications of the MultiSensor 7
[table id=88 responsive=scroll /]
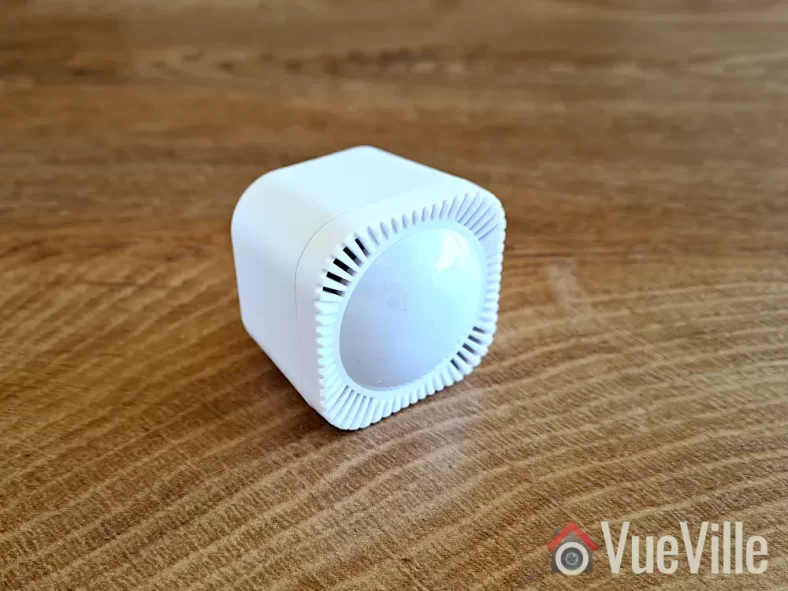
Design & Features – Taking a closer look
The MultiSensor 7 is a Z-Wave Series 700 device that supports the latest S2 security specification. It is the successor of the popular Z-Wave MultiSensor 6 that we reviewed a few years ago. That sensor was one of the very few that could act as a Z-Wave repeater when using USB power. I have one of those in a bedroom plugged into a USB charger for over 5 years now and it still works great.
In spite of the 7 in its name, the MultiSensor 7 has 6 sensors just like its predecessor: Motion, Tamper/Vibration, Temperature, Humidity, Light (Lux), & Ultraviolet Index. Where the MultiSensor 7 improves upon the 6 is in the 700 series Z-Wave support and better sensor sensitivity. For example the motion sensor now has a stated range of 10 metres (32 feet) vs. 5 metres (16 feet) earlier. The temperature and humidity measurement accuracy has also been improved.
Physically the MultiSensor 7 is similar to the 6. There is a bright multi-colour LED embedded on the front behind the translucent sensor cover. You can control the behaviour of the LED or switch it off entirely using the Z-Wave configuration page in Home Assitant (or using Z-Wave parameters in any other Z-Wave controller).


Popping the front cover off reveals the PCB with the motion sensor and other sensor instruments mounted on it.
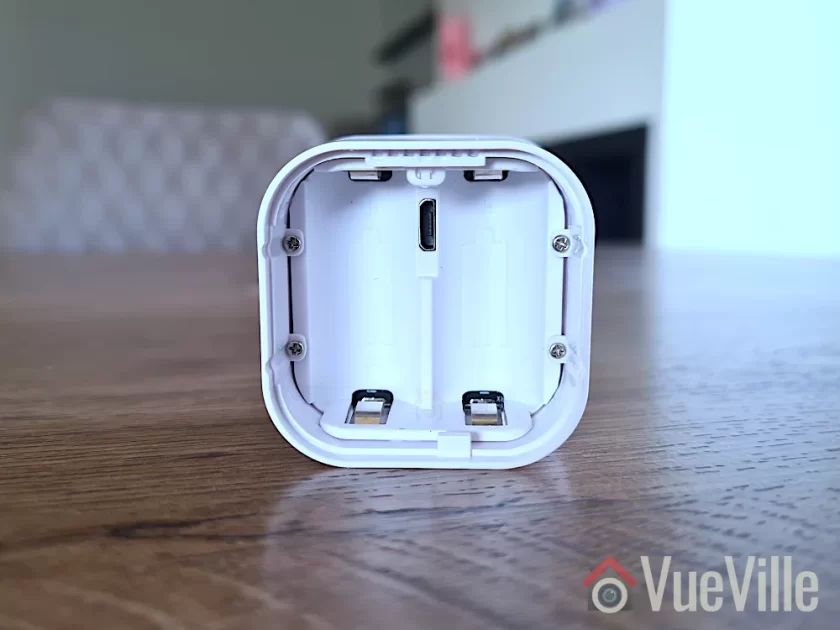
The back of the sensor is exact the same as the Aeotec TriSensor which we have also reviewed. Just like the TriSensor, the Z-Wave action button is accessible only from the inside now (the MutiSensor 6 allowed you to press it from outside).

Slide open the locking mechanism and you get access to the batteries, the USB power port, and the reset button above it. The sensor is powered by two CR123A batteries that should last for 3 years according to Aeotec.
The MultiSensor 7 has IP20 certification but as the 0 in the IP20 suggests, it is an indoor sensor and does not have any protection against liquids. The 2 in IP20 means that it has protection against solid objects down to 12 mm (keeps fingers out). I wouldn’t recommend using it outdoors unless you plan to put it in a covered porch where it will not get wet or splashed.
Adding the MultiSensor 7 to the Z-Wave network
Now let’s look at adding the MultiSensor 7 to a Z-Wave network. I recommend doing this in the same room as your final installation location, but before permanently mounting it in case you want to fine-tune its position later. Why? Because if you pair it near the controller but then move it to the other end of your house, your sensor may not be able to reach the controller any more and it won’t know about any neighbouring routing devices! So the advantage of pairing it in the final location instead, is that your sensor will find the best possible route to the Z-Wave controller through neighbouring routing devices & remember this ensuring reliable operation.
You now need to choose whether you will use the batteries or the USB power route. Most people will probably use the battery option, but I tested the sensor in both battery and USB power mode. If you do change your mind after pairing the sensor in a particular power mode and want to switch to the other power mode, you should factory reset and re-pair it with your Z-Wave controller.
Jump to the Z-Wave setup chapter in our video review or continue reading after the video below:
Let’s put the batteries in. When you first power up the sensor, the LED will fade in and out with a blue colour. But it’s easy to miss this while inserting the batteries! Because technically the sensor can work with just 1 battery, so the moment you insert the first battery, the LED will fade in and out with a blue colour. Insert the second battery as well.
Finally, it’s time to pair the sensor with your Z-Wave controller. I use the Z-Wave JS add-on running on Home Assistant with an Aeotec Z-Stick 7. Put your Z-Wave hub into inclusion mode – this is how I do it in Z-Wave JS. I recommend including it with no security (so you don’t need to enter the DSK pin). Tap the action button on the MultiSensor. Just a short tap. It will light up a solid yellow as it enters pairing mode. It will then flash white/green for 2 seconds to indicate successful inclusion. Like so. But if it fails, it will be white/red instead and you should reset the sensor to factory conditions before trying again.
Wall mounting the MultiSensor 7
You could use the included 3M double-sided sticky tape to mount the sensor, but I prefer the more permanent screw method. Make sure you follow the advice in the user manual regarding location, height and motion sensor detection range.

To get the best results, avoid pointing the sensor at windows and take the time to think through all the possible ways people may enter and leave your intended detection area. This is crucial when using the motion sensor for presence detection and occupancy.
I chose this particular location for the sensor because then it can monitor the widest possible area including the entry from the corridor and the kitchen. The sensor has a 120 degree field of view which helps a lot as well.
Using the MultiSensor 7 in Home Assistant
Even though Z-Wave JS said the sensor was paired and added successfully to the Z-Wave network, I couldn’t find any of the sensor entities under my entities list. No worries though, this happens sometimes when adding battery-powered sensors. I simply used the Re-interview node command with the reset security classes box ticked to force Z-Wave JS to identify the MultiSensor’s capabilities.
This worked and I could then view readings for all of the MultiSensor’s 6 sensors. All the configuration parameters also showed up. However, unlike the MultiSensor 6 there was no obvious vibration sensor entity. The vibration sensors are linked to the entities alarmLevel and alarmType which were disabled by default, so I had to enable in the Home Assistant entities list.

Its important to understand that the vibration sensor in this multi-sensor also serves the function of tamper detection. Unfortunately the sensor uses a notification event rather than a binary sensor for vibration detection. You can see this in the logbook section in the screenshot above, as well as in the Z-Wave JS debug log as seen below. There was no option to change the reporting type in the Z-Wave configuration parameters (some devices do allow you to do that, but this sensor doesn’t).

But we can work with that. First I created an input boolean helper to act as the vibration sensor:

Then I created the automation below to detect the Z-Wave CC notification event and then use that to toggle my helper on and after a minute off. This simulates a vibration sensor perfectly. You can adjust the duration to simulate a cool-down period.

Here’s the yaml code for the automation:
alias: Multisensor 7 Tamper Detection
description: ""
trigger:
  - platform: device
    device_id: ecd5fa9466eae0cb533076582c84b1ca
    domain: zwave_js
    type: event.notification.notification
    command_class: 113
    type.: "7"
    label: Home Security
    event: "9"
condition: []
action:
  - service: input_boolean.turn_on
    data: {}
    target:
      entity_id: input_boolean.multisensor_7_tamper_detection
  - delay:
      hours: 0
      minutes: 1
      seconds: 0
      milliseconds: 0
  - service: input_boolean.turn_off
    data: {}
    target:
      entity_id: input_boolean.multisensor_7_tamper_detection
mode: single
Performance testing
Test system: Raspberry Pi4 (8GB RAM) running DietPi and Home Assistant Supervised in a Docker container, Aeotec Z-stick Gen 7 USB dongle for Z-Wave, Z-Wave JS as controller software (HA add-on).
Battery-power mode
I was keen to put the claimed 10 metres (33 feet) range of the MultiSensor to the test. The longest room in my house is the living room and I was able to position the sensor such that its maximum possible detection distance to the corridor wall came to 10 metres. Perfect! So that’s where I did this test. To make it even more of a challenge the entry point would not be head-on but off to the side of the sensor. This is as close to real-life as a test can get!
And the results are impressive! I measured the distance between the sensor and the point at which it detected motion (green flash) at just under 10 metres which is also the claimed figure for the motion sensor. It takes around a seconf from the sensor detecting motion (green LED flash) to the Shelly 2.5 relay turning the lights on. So overall a very good result.

Moving to the temperature and humidity sensors, the readings are similar to those of the Mi Air purifier in the same room. Any discrepancy can be put down to them being at opposite ends of the room, and the 3 metres of height difference with the air purifier on the ground and the sensor being nearer to the ceiling.
While motion sensor reports are of course instantaneous, the default reporting interval for the other sensors is 240 seconds. You can reduce this to 60 seconds on battery power or down to 1 second on USB power.
You may be wondering about the wireless range of this sensor. Looking at the Z-Wave JS network map, I can see that the MultiSensor 7 found a route to the controller through the Aeotec Doorbell in the foyer around 10 metres and 2 concrete walls away. Makes sense and that’s what I would expect it to do. If you power it up over USB before pairing, the MultiSensor will be a routing device. If you have AC/USB power at your installation point, I’d recommend that.
I used the sensor for over a month and the battery remains at 100%. The previous MultiSensor 6 had excellent battery life with the batteries lasting well over 2 years and I expect this new model to be similar. But time will tell whether it will last the 3 years that Aeotec states on the engineering datasheet.
Compared to the MultiSensor 6, the MultiSensor 7 truly has twice the motion detection range (10 metres vs. 5 metres), improved wireless range and the option of S2 security should you need it.
USB Power Mode
I repeated the tests above with the MultiSensor 7 on USB power mode and the results were similar. If anything, the responsiveness of the sensor seemed to get even better with virtually zero lag or delay between motion detection and automations firing. Not that it was bad on battery-power, it went from <0.5 seconds to almost instantaneous. I also set the auto-report interval to 60 seconds for more periodic reporting from the various sensors, this is very useful for lux level based lighting automations.
MultiSensor 7 vs. MultiSensor 6
So to summarise, the major differences I came across with the 7 vs. 6 are:
- Z-Wave 700 support on the 7 vs. 500 on the 6
- S2 security (although I dont recommend using Z-Wave security for sensors, its more relevant for door locks)
- 10 metres motion detection range on the 7 vs. 5 metres on the 6
- Better temperature and humidity measurement accuracy on the 7
- Improved wireless range (although I couldn’t test that as I have a solid mesh with many Z-Wave router devices nearby)
The VueVille Verdict
So what’s great about the MultiSensor 7? You get 6 of the most useful sensors for just about any home automation scenario in one compact package. The most important sensors such as motion, temperature and humidity work very well. The motion sensor especially is very sensitive and can truly detect people at a distance of 10 metres, which is stunningly good. Temperature, humidity, light level, and UV reporting intervals can be changed from the default 240 seconds, and can go down to 60 seconds on battery power and 1 second on USB power. And it can act as a routing device on USB power. You get the USB cable and a wall mount, no need to buy that separately! So overall this MultiSensor is very good value if you need all these different sensors.
While I didn’t find any issues with this MultiSensor itself, the Z-Wave technology itself does seem to be going the way of Betamax with Zigbee being VHS in this analogy. Yes Z-Wave devices are more reliable and do not suffer from interference with Wi-Fi networks like Zigbee does. But the gap is closing – I have set up a very stable Zigbee network at home without much effort using the tried and tested Sonoff Zigbee Dongle (ZBDongle-P). The biggest reason for Zigbee devices popularity IMO is that they are much cheaper because of the less strict certification process for device manufacturers.
This also means there’s far more choice in the market for consumers with familiar names such as Ikea joining the action. I expect a Zigbee equivalent to the MultiSensor 7 to emerge in the near future.
But for now, the unique combination of 6 useful sensors and the USB power option make the Aeotec MultiSensor 7 a compelling choice.
So what do you think about the MultiSensor 7? Leave your comments or any questions you may have below!
Where to Buy
(* = affiliate link / image source: Amazon Associates Program)
Leave a Reply