Since I moved into our new home this year, I have been making upgrades to turn it into the ultimate smart home. At the top of my to-do list is smart lighting, because it easily has the single biggest impact on comfort and how we experience our home.
Soon after setting up my Z-Wave and Zigbee networks, I got to work on smart lighting. And that’s where the newly launched Shelly Qubino Wave 1PM comes in. You can use these to turn your dumb switches into smart switches! Yes, this in-wall Z-Wave relay requires a neutral wire at the installation location. A no-neutral version is not available at the moment. The relay also supports power measurement and energy monitoring which is a great feature.
Because I already have physical dumb switches and many light fixtures that I like and have invested in, I do not want to replace them with smart bulbs. Instead I bought a variety of Shelly in-wall relays to install around my home. This includes three Wave 1PM relays – one for my foyer lights, and one in each bathroom. The Wave 1PM is the one that has virtually no reviews on the Internet, so let’s dive right in to see how well it has been working in my smart home!
A quick note: As an Amazon Associate I earn from qualifying purchases. This post contains affiliate link(s). An affiliate link means I may earn advertising or referral fees if you make a purchase through my link, at no extra cost to you.
How to use this Smart Relay
If I were starting all over again, I may consider going with smart switches but I have already invested in dumb switches and dumb ceiling lights that I do not want to replace. So it makes sense for me to retrofit my existing dumb switches to make them smart.
Installing a smart relay behind an existing switch or power socket in the wall is a good choice for when you want to keep your existing physical switch or socket but want to remotely control or measure an electrical load (light/fan etc.) connected to that switch.
This way you can control the connected load through the physical switch as well as remotely through the smart relay using Home Assistant or any other Z-Wave compatible smart home platform.
Since the Shelly Qubino Wave 1PM works as a Z-Wave repeater, I will be using it to strategically extend the wireless range of my Z-Wave network as well. Only mains powered Z-Wave devices are capable of being repeaters, so an in-wall relay is a great fit for this purpose.
For areas already having a strong Z-Wave signal, I prefer to use the much cheaper Shelly Wi-fi relays.
As the PM in the name suggests, this relay also supports power measurement. This is possible because it is not a dry contact relay – the relay is connected inline through the electrical load, so it is able to measure power consumption also.
If you want a dry contact type to control a traditional garage door for instance, go for the Shelly Qubino Wave 1 which does not have energy monitoring.
There is also a dual relay version called the Shelly Qubino Wave 2PM, which would be the Z-Wave equivalent of the Shelly 2.5. However this is quite difficult to find in stock at the moment.
Now here’s what I am going to use this smart relay for: I am going to install it in the wall behind the foyer light switch, and use it in an automation together with a Sonoff Zigbee motion sensor. The idea is that Home Assistant will turn on the lights through the relay whenever motion is detected and after some time switch them off. Of course if anyone wants to turn on the lights physically, the existing physical switch will continue to function exactly as it always has. But I also then have the added bonus of Home Assistant being aware fo the status of the switch and turn off the relay if someone forgets to turn the lights off! I can also use it as part of my night mode routine to ensure all lights are off at bedtime. The possibilities are endless!
Who’s Qubino?
Shelly has been making Wi-fi relays exclusively and they are the go-to option for most people. But Z-Wave and Zigbee devices have been sorely lacking in their product range. Now if you have been into home automation for quite some time, the name Qubino may ring a bell.
Qubino is a popular name in Europe where they are well known for Z-Wave devices such as dimmers & smart meters for a long time. So it makes sense that Shelly recently acquired Qubino instead of creating their own Z-Wave devices from scratch. In fact if you look closely, there are a lot of similarities between the new Shelly Qubino Wave 1PM / 2PM devices and the / 2 Relay.
I have to admit I have never looked at these Qubino offerings because they were pretty expensive. However the Shelly Wave 1PM/2PM devices are selling at just half the price.
What’s in the box
The Shelly Wave 1PM comes in a compact box as Shellys usually do. The box cover mentions the Z-Wave frequency (868.4 MHz) and Z-Wave Plus certification on the front.
The rest of the box states the specifications such as the Z-Wave 800 series chip and the EU declaration of conformity.

Inside the box, we find the Z-Wave relay, the DSK pin, and a user manual with a wiring diagram.

Specifications of the Shelly Qubino Wave 1PM
| Model | Shelly Qubino Wave 1PM |
|---|---|
| Certifications | Z-Wave Plus with Smart Start |
| Radio protocol | Z-Wave 800 series |
| Radio Frequency | 868.42MHz (EU) |
| Security | S2 Security |
| Wireless range | Up to 40 m indoors (131 ft.) (depends on local condition) |
| Maximum radio frequency power transmitted in frequency band(s) | <25mW |
| ZWave Repeater | Yes |
| Power measurement (Watts) | Yes |
| Overheating protection | Yes |
| Overload protection | Yes |
| Neutral wire | Required |
| Power Supply | 110-240 V AC / 24–30 V DC |
| Power consumption | <0.3W |
| Max connected load | 3500 W (mentioned only in the user manual) |
| Max switching voltage AC | 240 V |
| Max switching current AC | 16 A |
| Max switching voltage DC | 30 V |
| Max switching current DC | 10 A |
| Screw terminals max. torque | 0.4 Nm / 3.5 lbin |
| Conductor cross section | 0.5 to 1.5 mm² / 20 to 16 AWG |
| Conductor stripped length | 5 to 6 mm / 0.20 to 0.24 in |
| Operating Temperature | -20°C to 40°C / -5°F to 105°F |
| Operating Humidity | 30% to 70% RH |
| Waterproofing | None |
| Material | Plastic |
| Weight | 27 g / 0.95 oz. |
| Dimensions | 37x42x16 mm / 1.46x1.65x0.63 in |
Design & Features – Taking a closer look
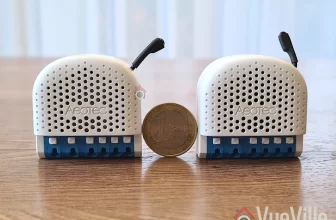
The Shelly Qubino Wave 1PM resembles previous Shelly relays and measures 37x42x16 mm (1.46×1.65×0.63 in). It should comfortably fit in most European standard wall boxes but do make sure before buying. I am disappointed that it is not as compact as the also new Shelly Plus 1PM Mini which is only 29x35x16mm / 1.11×1.35×0.63in.
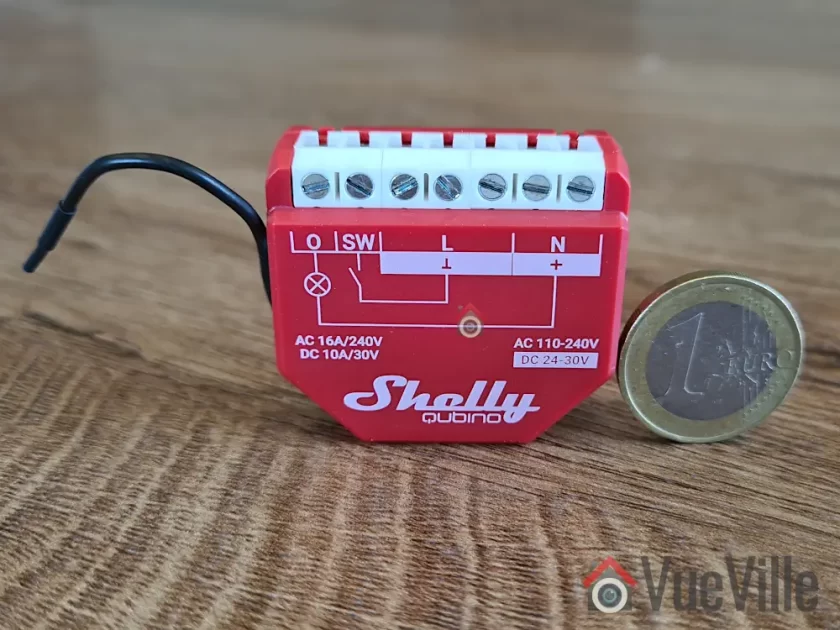
The front of the cover shows the internal wiring logic between the terminals. There are also 2 tiny LEDs on the front of the relay – a blue LED and a green LED. These will blink in different ‘modes’ or patterns to indicate the status of the relay during inclusion, exclusion and the factory reset process.
The rear of the relay contains the Z-Wave action button that Shelly calls the S button. We also find a cutout in the case that gives access to the circuit board if needed. Of course unique to this Shelly relay is the external Z-Wave antenna to maximise wireless range.

Overall the relay seems to be well-built and of good quality.
So what are the features of this relay? On the Z-Wave side, the Wave 1PM supports the latest Z-Wave Series 800 standard. It also supports SmartStart although I haven’t tried that myself. I find the standard inclusion process simple enough. At the moment, the Wave 1PM is available only in the 868.42MHz frequency that is allowed only in regions such as EU/UK/Singapore. The relay supports S2 security, but I personally don’t see the need to use security for devices such as light switches. I do recommend it for external door locks though!
The relay supports both AC and DC wiring applications though I suspect the overwhelming majority of users will be using it in domestic AC wiring. It can handle up to 16A of AC switching current which is very good. The user manual mentions a maximum connected load of 3500 W, although I would be wary of running any relay at close to its maximum rating. What is important though is that you have that extra headroom which is a good margin of safety if you are switching something like 10A through this relay.
The Wave 1PM offers 3 modes of operation – as a toggle switch that changes on toggle (default), toggle switch that follows the physical switch, or as a momentary switch (push-button).
What is missing here is the ‘detached mode’ that lets you unlink the connected physical switch from the relay and use the switch as a virtual switch in Home Assistant. This means you can use smart LED bulbs (such as Ikea Tradfri) and stop people from cutting power to the bulbs through the physical switch. What would you do with the physical switch then? Of course use it to control the smart bulbs!
Installation & Wiring
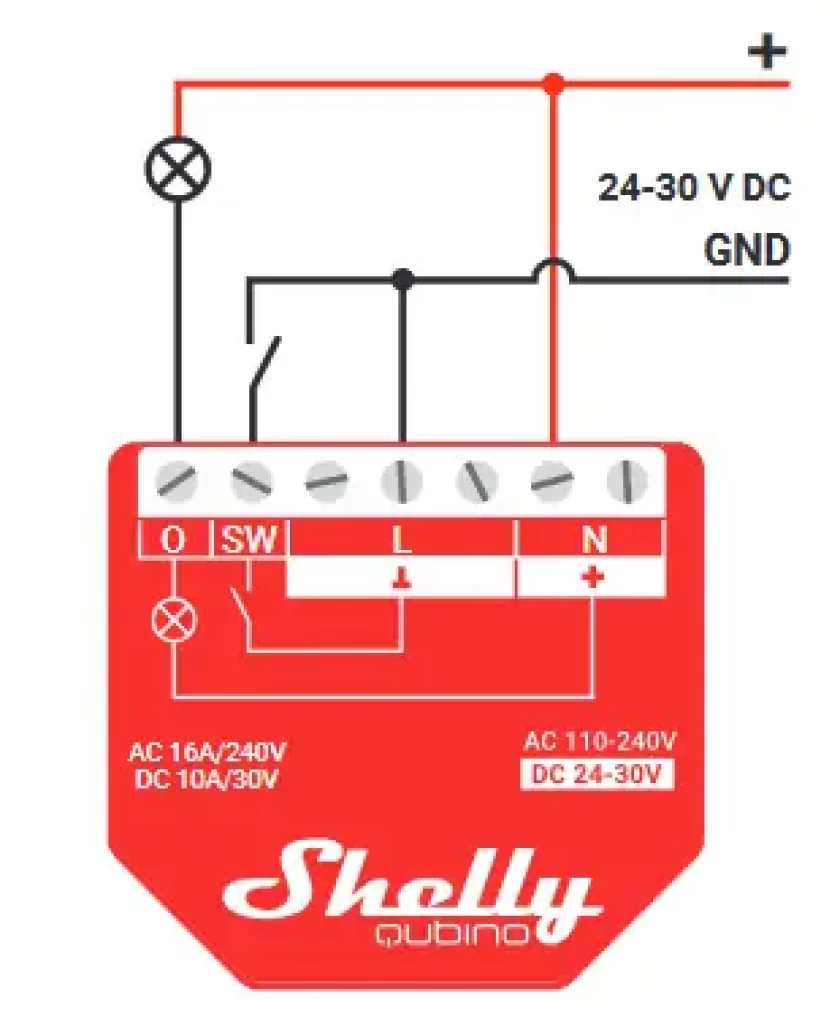
The Wave 1PM user manual is quite detailed and shows the wiring diagram for using the relay in a 1-way switch scenario. This matched my use case, so installation was straight forward.
The terminal block of the Wave 1PM contains extra terminals for live and neutral connections. That makes it much easier to fit the relay into tight spaces without having to add extra Wago connectors.

I recommend getting a professional to do the wiring if you are not confident or are not allowed to by local regulations. I engaged a certified electrician to install the relay, this is the photo I took during the wiring:

You can see how the existing physical switch is connected to the SW and Live terminals.
Adding the Wave 1PM to my Home Assistant Z-Wave network
The best time to add the relay to a Z-Wave network is after wiring and before you put the relay into the wall. This is because there is a very helpful LED indicator on the relay that shows whether the relay is in pairing mode or not.
There are 3 ways to put the relay into pairing / inclusion mode:
- Using the SmartStart feature
- Using the S-button (only possible before the relay is closed up behind the switch)
- Using the switch connected to the relay
I chose the S-button method because the electrician had not put the relay in and put the switch back yet.
As always, I recommend factory resetting the any Z-Wave device before including it in your Z-Wave network. In fact, this advice is given by most manufacturers as well (but not Shelly!)
So these are the steps I followed:
- Wire the smart relay as per the wiring diagram
- Make sure the blue LED is blinking in mode 1 (0.5 seconds ON, 2 seconds OFF)
- Enable add/pairing/inclusion mode on your gateway (Z-Wave JS in my case)
- Press and hold the S-button until the LED turns solid blue
- Quickly release and then press and hold for more than 2 seconds the S-button until it starts rapidly blinking in Mode 3 (0.1 seconds ON, 0.1 seconds OFF)
- Now the blue LED will be blinking a bit slower in mode 2 (0.5 seconds ON, 0.5 seconds OFF)
- Wait for a bit and when pairing is successful, the connected load (a light in my case) will blink twice (1 sec ON > 1 sec OFF > 1 sec ON > 1 sec OFF)
- The green LED will now blink in mode 1 (0.5 seconds ON, 2 seconds OFF)
Here’s the success message I received in Z-Wave JS:

I renamed the device from the Home Assistant devices page to ‘Foyer Lights’ because that’s what the relay controls.
Looking at the device page in Z-Wave JS, we can see the various sensors and controls exposed by the Wave 1PM:

The over-heat and over-current sensors were enabled by default but the Heat alarm sensor was disabled. So I went to the entities page in Home Assistant settings and enabled this.
These are the various configuration parameters available in Z-Wave JS for this device:

Performance
Now we get to the juicy part! So how does the Shelly Qubino Wave 1PM fare as a Z-Wave smart relay?
I like to look at the following areas when I judge a smart relay:
- Local operation,
- Responsiveness (both over the Z-Wave network and the physical switch),
- Reliability,
- Z-Wave range extension,
- Safety and
- Cost.
I use an RPi4 running ZwaveJS container with an Aeotec Z-Stick7 placed at the center of the house, and a NUC mini-pc in the garage running Home Assistant.
Local operation
The Shelly range of devices are well known for allowing fully local operation without any need for Internet access or cloud reliance. So that’s an easy one, full points here!
Responsiveness
So then let’s look at actually using the Wave 1PM. And right off the bat I ran into what is probably the biggest complaint I have about the Wave 1PM. There is a noticeable lag between the lights turning ON or OFF when the physical switch is used. Yes, the physical switch! I would put it at around 0.5 seconds. Not a deal-breaker, but disappointing. None of the other Shelly models I have around my home such as the Shelly 1PM or 2.5 have this lag.
Its almost as if the physical switch is in ‘detached mode’ (like the Wi-fi models can be put in) and there is some extra processing going on – but I have not set it up this way, in fact the Wave 1PM model doesn’t even support detached mode! That’s a downside by the way – you cannot wire up the switch, but detach the relay control from the physical switch via software and then use the physical switch as purely a virtual switch in Home Assistant.
All 3 relays I have of the same model exhibit the same behaviour. I even tried adding 1 relay in each Z_wave mode: no encryption, S0 encryption, and S2 encryption – nope it still lagged. I tried re-pairing, factory resetting, re-interviewing, everything. All the relays still lag when controlled by the physical switch.
Thankfully, there is virtually no lag when using Home Assistant to turn the relay ON or OFF. So my intended use case of motion detected foyer lights works well.
Reliability
How about reliability? I have been using the Wave 1PM in my foyer and 2 additional locations on a daily basis for over a month now. The relays have never gone offline, become unavailable, or failed to respond to commands from Home Assistant.
Wireless range is good, there are at least 2 solid concrete walls between my Aeotec Z-Stick 7 controller and the Shellys.
Power Measurement & Energy Monitoring
I was keen on using the power measurement feature and was satisfied with how it reports the power consumption as soon as the relay is turned on. There’s no delay at all unlike some smart power plugs I have used in the past.
The relay also supports energy monitoring, it creates a kWh sensor so that you can keep track of historical energy usage.
Repeater feature
Looking at my Z-Wave network map in Z-Wave JS, I could see that the various Wave 1PMs I installed were all connecting directly to the controller and exposed themselves as Z-Wave repeaters. So now I can add various battery powered Z-Wave devices in those areas without any range concerns.
Safety
The Wave 1PM meets all the safety requirements for such devices in the EU, however it is not UL certified for the USA.
Cost
When it comes to cost, the Wave 1PM costs twice as much as the regular Shelly 1PM in my EU country. Given that the regular Shelly 1PM has no lag in the lights turning on when using the physical switch, I would go for that model in the future.
The In-Wall Relay Competition
Some Z-Wave alternatives to the Shelly Qubino Wave 1PM are the Fibaro Z-Wave relay, the Aeotec Nano Switch relay, and of course the are still being sold, but all of these are more expensive than the Shelly.
Sonoff has Zigbee based relays that are cheaper than the Shelly Qubino Wave 1PM, so this may be an option if you are open to Zigbee. However I do have quality concerns when it comes to Sonoff devices that would go into my AC power wiring.
Aeotec has recently launched their Pico series of Zigbee relays that I have been trying out at home, this may be a great option when it comes to super-compact in-wall relays.
The VueVille Verdict
If you need a Z-Wave relay that can switch up to 16A, act as a router, has power measurement and don’t mind a 0.5 second delay when using the physical switch, the Shelly Qubino Wave 1PM is a good choice. The saving grace here is that there is no delay or lag when the relay is controlled over Z-Wave.
Where to Buy
Shelly Qubino Wave 1PM


(* = affiliate link / image source: Amazon Associates Program)