
As you pull into your drive after a long day at work, the porch lights turn on. You unlock the smart lock with a code and open the door. Immediately the lights turn on softly and your smart speaker starts playing your unwind playlist. Sounds good, right? This is what you can do with a modern smart home.
Notice that key point where you open the door and your home comes to life? That right there is possible thanks to door/window sensors. The Neo Coolcam Z-Wave Plus Door/Window wireless sensor is one such device. We have been extensively testing this Z-Wave sensor for the past 6 months in our smart home and our hands-on review will tell you whether its worth your money.

Of course you should not use these door/window sensors for the alarm system. That requires a dedicated alarm panel from the likes of DSC or GE for home security.
A quick note: As an Amazon Associate I earn from qualifying purchases. This post contains affiliate link(s). An affiliate link means I may earn advertising or referral fees if you make a purchase through my link, at no extra cost to you.
What else do you need to use this door sensor?
This is not a standalone device. It is intended to work as part of a Z-Wave based smart home.
So you need a Z-Wave controller such as a Vera Plus or HomeSeer HomeTroller Sel that acts as the smart hub to use this sensor. This is the right way of building a smart home that you can upgrade and enhance as you wish, instead of getting stuck with things that work only with the manufacturer’s other devices or an internet-reliant smart speaker like Alexa.
Unboxing
The Neo Coolcam Door/Window sensor comes in a smart package with a modern design. The Z-Wave Plus logo is prominently featured at the top left.

The back of the box lists the main specifications of the sensor.

Strangely enough, while the box claims the battery life is a highly improbable 2 years, the manual inside claims its only 1 year. Which is it Neo?
Also the standby current of 1uA listed in the manual is half that printed on the box. Doesn’t bother me too much though as long as it lasts at least a year.
Notably absent is tamper detection which would have been a great addition to make this sensor unbeatable when it comes to features.

Opening the box, we find the following:
- Door/window sensor main body with 1xCR2-3V battery pre-installed
- Magnetic counterpart of the sensor
- User manual
- Screws and rawl plugs
- 3M stickers
Neo Coolcam Door Sensor Manual
The included user manual is high-quality and unusually for Chinese products, has good quality English. Here’s a link in case you want to check it out before buying.
Specifications
[table id=46 responsive=scroll /]Design & Features
The Neo Coolcam Door/Window sensor is an all plastic affair and is made of two halves – the main body and the magnetic half. As you can see in our photos below, the sensor has a glossy plastic finish that looks quite good.
When the sensor is activated, a red LED will glow next to the Coolcam logo.

Here’s what the back of the main body looks like. The two holes are for screws to pass through in case you want to fix it permanently to a surface.

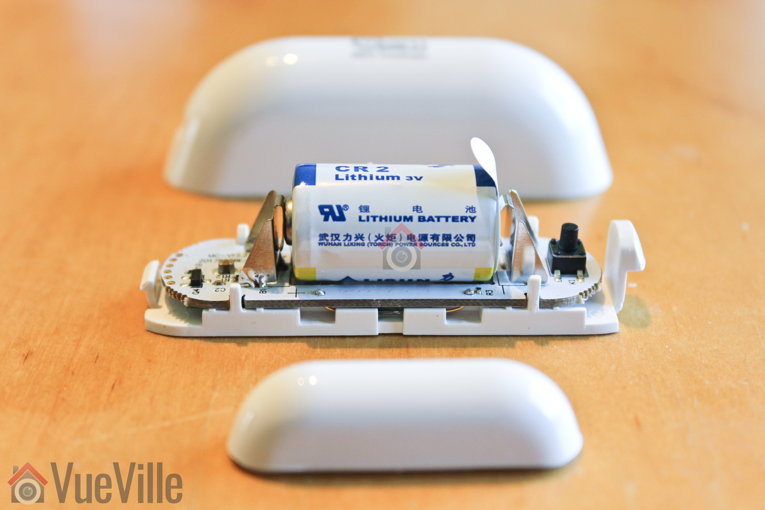
Depressing the tab at the bottom releases the back cover of the main body. You will need to apply a significant amount of pressure to pop it open. An unbranded CR2 battery is pre-installed in the sensor which is a nice touch.
The black ‘code’ button is also found here. This button has a few different functions: waking up the sensor so that you can configure it, putting the sensor in inclusion/exclusion mode and for restoring factory defaults.
Installation
I found the whole Z-Wave inclusion or pairing process easy and pretty straight-forward.
Its always best to perform a factory default on a new Z-Wave device before including it in your Z-Wave network. I have found that this one step usually solves any problem I am having with including a new Z-Wave device.
So these are the steps I took to set up the sensor:
- I removed the back cover of the sensor’s main body.
- I pulled the paper tab to turn on the device as the battery comes pre-installed.
- I put HomeSeer into inclusion mode.
- I pressed the code button on the Coolcam sensor thrice very quickly (it needs three presses within 1.5 seconds).
- The red LED flashed 5 times.
- After a few seconds, HomeSeer reported that the sensor had been successfully included and the child devices had been created.
This is what the HomeSeer interface looks like for the Neo Coolcam door window sensor. Note the main device and the 3 child devices:

The first device is the parent device and the one where you configure settings such as the parameters we discussed earlier. The second device is the battery status. The third device called “Access Control Notification” is the main device that I use for monitoring the sensor and has two states – Closed or Open.
You would think for a HomeSeer smart hub setup, the last device called “Sensor Binary Door_Window” is the main device to be used for scenes but I don’t think so. The reason is that this last device is a bit unreliable and sometimes ‘sticks’. But the “Access Control Notification” device is 100% reliable and so I use that in my smart mailbox events.
Configuration Parameters
There’s no need to change any Z-Wave parameters, but if you need to the following are configurable:
[table id=48 responsive=scroll /]Performance
There are 4 main criteria that define how good a wireless door/window sensor is:
- Response time
- Reliability
- Z-Wave wireless range
- Battery life
So I tested the Coolcam sensor extensively for over a month now and as the photo above shows, it is now doing permanent duty as my mailbox open/close sensor.
Response time: Excellent
How quickly does the sensor send the ‘open’ or ‘close’ status change to the smart hub? You do not want a delay at all. I was very pleased to see that the Coolcam sensor’s response was instantaneous with no discernible delay in my Z-Wave smart hub interface whenever the sensor changed states.
Reliability: Excellent
Does the sensor miss open or close actions, especially when they happen very quickly? In my weeks of testing, it never skipped a beat. Every open and close action was faithfully captured and transmitted to the Z-Wave smart hub. No actions were missed.
Z-Wave wireless range: Very good
Since Z-Wave is a mesh network technology, the strength of your Z-Wave network at the point of installation depends on proximity to the smart hub or a repeater device.
All AC powered Z-Wave devices act as repeaters and we have a generous number of Greenwave Powernodes scattered around the house.
So it was no surprise to see that the Coolcam sensor was working perfectly even at the farthest ends of our house.
Battery life: Excellent so far, testing underway
The Coolcam sensor reports it battery status and after a month of extensive use, the battery status is still at a 100%. This is not unusual as Z-Wave devices often report a battery life change only at defined thresholds of 5%.
Verdict
The Neo Coolcam Z-Wave Plus Door/Window sensor is a very reasonably priced sensor that delivers. We are impressed to see such good performance and reliability from a relatively unknown brand.
We are currently reviewing the rest of the Coolcam product range, so stay tuned for more hands-on reviews!
Leave a Reply