
A few years ago, my wife and I decided to get a CCTV security system. We didn’t know much about home security or security cameras at that point. But we wanted to be check in on our home while we were away.
If we were not DIY-crazy, we would have probably gone the Easy-DIY route and bought an all-in-one home security kit from Ring or Simplisafe.
But we felt deep unease about these brands storing our video footage on the cloud, especially indoor videos. Cloud-reliant security cameras were getting hacked left, right and center. Some companies even offered up video clips to cops without warrants! Moreover, many useful features of these cameras such as advanced motion detection were locked behind monthly paid subscription plans. Even basic things like being able to review recorded clips, which you would expect is a given.
So while the upfront costs looked low, ongoing costs would quickly balloon. This is the downside of the subscription-based model of business that most security camera companies are turning to these days. Don’t get me wrong, cloud backup is fine and serves as off-site backup. But having it shoved down our throats and having to pay for it is simply unacceptable.
But being the DIY and tech-crazy people we are, we decided to do it ourself – the ProDIY way, learning by doing, using excellent stand-alone IP cameras (like the Reolink E1 Pro), and high-quality yet affordable prosumer networking gear (like Ubiquiti’s Unifi range).
Today, we have a DIY CCTV home security camera system that we chose and set up ourselves based on months of research. It is ultra-reliable and has highly useful features such as interfacing fully with our Home Assistant-based home automation system, yet is very affordable.
We often get questions about our DIY CCTV setup, such as how we are able to view our home security cameras securely from anywhere in the world. So we thought we would share our journey with you, our readers.
We will list our complete security camera setup and how we are able to safely and securely connect to our home from just about anywhere. Also we will go into not just a list of the different devices that form the system, but also how they all come together to help us achieve our specific security goals.
A quick note: As an Amazon Associate I earn from qualifying purchases. This post contains affiliate link(s). An affiliate link means I may earn advertising or referral fees if you make a purchase through my link, at no extra cost to you.
Our DIY Home Security Camera System goals were:
- Be able to simultaneously view multiple cameras on a single screen. This could be from a tablet while indoors and from our mobile phones and laptops remotely.
- Be able to record motion-detection clips and have the option to at record at least 2 weeks worth of 24/7 video footage.
- Be able to inform my home automation system whenever motion was detected so that I could take action such as turning on lights
- Get motion detection alerts by email with snapshots within seconds of the intrusion.
- High enough resolution to get a clear picture at day or night.
- Our privacy is paramount. All camera footage needs to be stored locally. No cloud-reliant stuff for us! We do not want to port forward cameras leaving the entire network vulnerable to hackers and botnets.
- Push notifications – a nice to have if it doesn’t compromise network security.
- The system should be flexible enough to grow and change according to our evolving needs.
- All of this should not break the bank! No monthly fees, no ongoing cloud subscriptions.
The End Result:
Here is a screenshot of how we live-view our IP cameras from our laptops, tablets and on the TV:
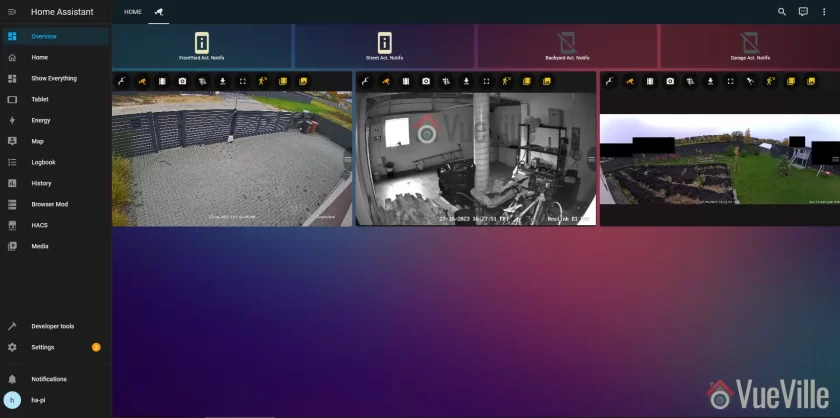
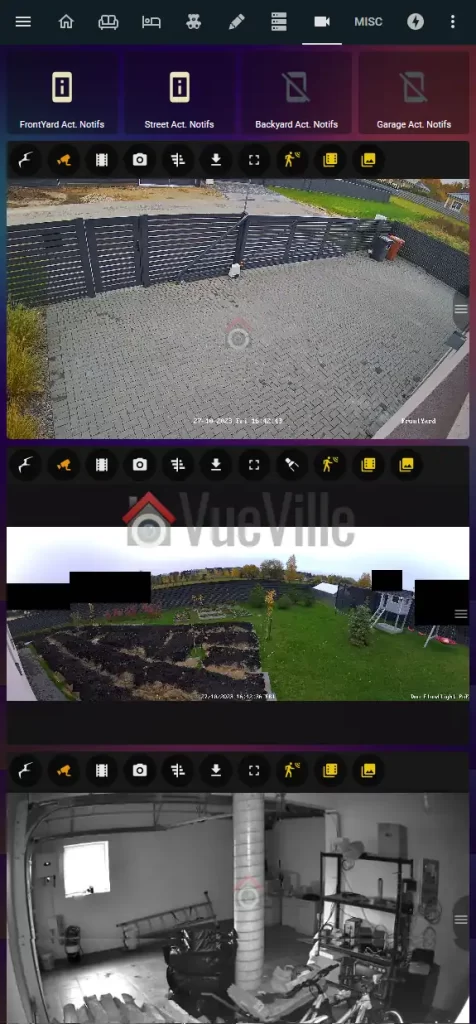
We can also access the cameras from our smartphones using the Home Assistant mobile app which loads the same dashboard, or the tinyCAM Monitor Pro app.
So how does it work? My primary NVR software is Frigate NVR running on an Intel NUC mini-PC. Frigate pulls the RTSP streams of all the IP cameras and performs AI motion detection on it.
Whenever it detects any of the configured objects of my choice (person/car/van/cat/dog), it informs our Home Assistant home automation system which can then send a push notification, turn on external lights through Shelly relays, turn on the Reolink Duo’s floodlights or siren alarm, send mobile notifications, pop up a video clip on a tablet, anything I can think of really.
In the past I used HomeSeer HS3 and so I connected QNAP’s now phased-out Surveillance Station directly to my Homeseer HS3 system. But I have since then switched entirely from Homeseer to Home Assistant.
Now let’s see what the security camera system part of our smart home network looks like (also see this separate blog post that details how we are building our DIY Smart Home Automation system)
Our DIY Home Security System Network Setup
A topology is a representation of how a system is connected together. Network topologies may be either physical or logical. A physical network topology shows the actual physical layout and the connections between different elements. A logical network topology shows how they are functionally linked to each other.
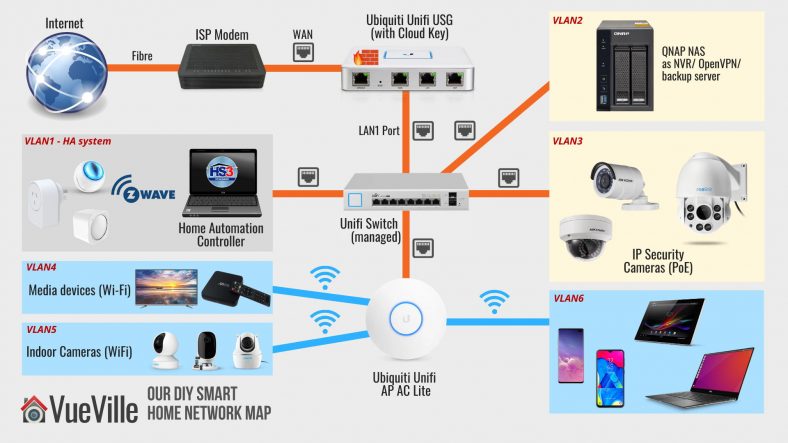
Here’s a physical map of our entire smart home network. For a reliable and scalable surveillance system, you got to have the right network set up to support it. So let’s begin there.
The first thing you will notice is that there are a lot of different network components, and that devices are nicely siloed off into neat compartments (LAN, VLAN2, VLAN3…etc.).
Most people just connect a Wi-Fi router to the ISP modem and call it a day. If you are just using a couple of wireless cameras, that will probably do.
But for our Pro-DIY system that is security and privacy-focused, we need to go further. We need to be able to defend our network from hackers and botnets. For this we need a strong and powerful hardware firewall.
We need to be able to isolate security cameras so that they cannot ‘dial home’ or leak data outside our network. Any device in our network we do not trust (like most Chinese security cameras) shouldn’t be able to access sensitive personal devices like laptops and mobile phones of its own volition. For this we need the ability to create Virtual LAN (VLAN) networks.
Every consumer Wi-Fi router has a built-in firewall that offers basic protection. But they are often not very customizable. For example, in most cases you can’t create your own firewall rules. And most of them cannot create VLANs. So after dabbling with overpriced ‘prosumer’ ASUS router for some time and failing to get what I need, I switched to enterprise standard networking gear. I went with Ubiquiti’s Unifi range.
We have a large home and getting reliable Wi-Fi throughout has been an issue. I had realized we needed multiple Wi-Fi access points. But the house is already wired for gigabit Ethernet. So this was another reason to skip the consumer-grade mesh networks and just go with a reliable established enterprise brand.
Also when your network gets large and you have multiple devices (router, switches, Access points), it becomes difficult and time-consuming to configure and manage multiple devices.
Here are the advantages of the Ubiquiti Unifi line of enterprise class networking gear:
- Enterprise-grade hardware with higher reliability
- Central management dashboard
- Seamless Wi-Fi mesh network with Ethernet back-haul
- Affordably priced
- Ability to create VLANs
The easiest way to understand Unifi’s product line is this: a typical Wi-Fi router like Asus or Netgear is an all-in-one device.
There’s a router, a firewall, and Wi-Fi access point all rolled into one device for convenience. However this means that your Wi-Fi coverage is limited to the area where the router resides. Also if you want advanced features such as VLANs, you are usually out of luck.
Also if one function (like the wireless radio) fails, the entire network fails and you have to junk the whole device. Not great for redundancy or your wallet. I speak from experience – over the years I have amassed a cupboard full of various consumer-level Wi-Fi routers with busted Wi-Fi that are otherwise perfectly fine.
Full equipment description
The Network Hardware
Starting from the top left of the network map, we have a symmetric 1 Gbps up/down fibre broadband connection. So the first device is the ISP fibre-optic modem which we cannot avoid. However, everything after that point is of our own choice and design.
After the ISP modem, comes the Unifi Security Gateway (or USG). This is our hardware firewall which serves as the DHCP router for the whole network and also manages all the VLANs. The USG has a Dual-Core 500 MHz processor with 512MB RAM. It can handle up to 1,000,000 packets per second. It can handle our 1 Gbps fibre broadband connection at full speed, but only without extra security features turned on like Deep Packet Inspection (DPI), Intrusion Detection System (IDS) or Intrusion Prevention System (IPS). If I turn these on, the throughput drops to a measly 85 Mbps. The USG is more than 5 years old now and as you can guess, obsolete. The WAN failover has been forever broken, and it has not received newer features like WIreguard VPN or WAN load balancing which the UDM now has.
That’s why I don’t recommend the Unifi USG any more (they are also getting increasingly difficult to buy!). Unifi has released something else that I recommend now – the UDM product range comprising of three models:
- Unifi Dream Machine (UDM)
- Unifi Dream Machine Pro (UDM-Pro)
- Unifi Dream Machine Special Edition (UDM-SE)
The UDM range combines the USG, a managed network switch and the Unifi OS network management software into a single device. The UDM is the baby of the trio and is a direct replacement of an existing Wi-Fi router because it also includes a Wi-Fi Access Point.
The UDM-Pro and SE models are more powerful, are rack-mountable and so may be a better fit if you plan to use a server rack or cabinet. But note these don’t have built-in Wi-Fi.
But hey what about the Unifi Dream Router (UDR)? I’d say give it a miss, because its a cut-down version of the UDM – less powerful CPU that makes it more like the USG than the UDM.


(* = affiliate link / image source: Amazon Associates Program)
The UDM SE/Pro can perform Intrusion Detection and Prevention at up to 3.5 Gbps line speed, which is far superior to that of the USG’s 85 Mbps or even the UDM’s 850 Mbps. But for most home users, the UDM will be enough.
One key difference between the UDM SE and UDM Pro models is that the SE has PoE support. This removes the need to get a separate PoE switch.
Read more here: Unifi UDM vs. UDM Pro and USM-SE vs. UDM-Pro.
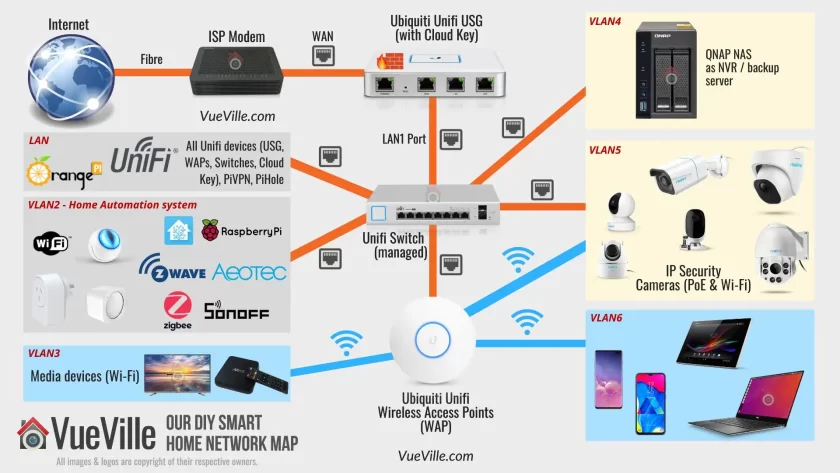
Back to the layout: The ISP modem plugs into the USG’s WAN1 port (WAN port in the UDM SE/Pro). The USG has only two physical LAN ports – LAN1 and LAN2 (the UDM SE/Pro have 8). Each port can be used to create a unique sub-net, but I use only the USG’s LAN1 port for my network – I will refer to this as LAN. The Unifi system uses a central management portal for all device configuration and logging. The UDM SE/Pro have this built-in, but the USG doesn’t. So you will have to run it off a computer but only when you need to configure devices.
So you can see why its better to go with the UDM SE. If you still want to use the USG (it is cheaper), you can get a [easyazon_link identifier=”B017T2QB22″ locale=”US” tag=”vueville.com-eaz-20″]Cloud Key[/easyazon_link], a small PoE device that hosts the controller software and logs network statistics locally 24/7. I don’t want a computer running all the time, but I like to log all the data I can. So I went for the Cloud Key.
As mentioned in our goals earlier, we didn’t want to forward ports from the cameras to the Internet. The alternative to forwarding ports from the camera to the router and exposing them to the Internet, is to create a VPN connection to your home network so that you can dial in securely. For this you need an Internet-facing device in your home network that can act as a VPN server.
The Unifi UDM Pro and SE support OpenVPN & Wireguard. So that’s the way forward.
But I am still stuck on the old USG which doesn’t support either of these protocols. QNAP has built into their NAS a VPN server app that supports all the major VPN protocols. In the beginning, I used our QNAP TS-253A NAS as the VPN server for the entire home network. But again I quickly learnt that exposing a NAS server to the Internet is risky.
So I have the excellent open-source free PiVPN running on an [easyazon_link identifier=”B0B973214J” locale=”US” tag=”vueville.com-eaz-20″]Orange Pi Zero[/easyazon_link] that also runs PiHole on my network. I chose the Wireguard protocol as it requires less resources than the OpenVPN protocol.
The Pi Zero’s Wireguard port is forwarded to the Unifi USG. No other ports are forwarded. The USG is configured with Dynamic DNS (DDNS) and so is always accessible from the internet using a friendly name, instead of the public dynamic IP address which ISPs change every so often. I use the excellent and free Afraid.org service.
We use the official Wireguard VPN client on our Android phones or laptops to connect to our home network, the Orange Pi Zero acting as the Wireguard server for the entire home network. This lets us access all our network resources as if we never left home, live-viewing and reviewing recorded footage is so easy.
Moving to the center of the network map, we reach the network switch.
If you just want to create VLANs for Wi-Fi devices you don’t need a managed Ethernet switch – the Unifi wireless access points (WAP) can do that. But to create Ethernet-based VLANs, you need a managed switch. The UDMs have a built-in managed switch but I needed to get a separate one.
I created separate VLANs for Home Automation gear (Raspberry Pi4 running Home Assistant), and IP cameras using the excellent Unifi firewall rules feature. See the links below to learn how to do this. Yes you can have both wired and wireless devices in the same VLAN!
Related: How to create a separate VLAN for wired Ethernet devices
Related: How to create a separate VLAN for Wi-Fi devices
Of course you can also follow the guides above to assign wired and wireless devices to the same VLAN as I have.
Note: If you get the Unifi USG or the UDM Pro, you will need a separate PoE switch. This is because the USG and UDM Pro don’t have PoE support.
With the UDM SE/Pro you get 8 managed ports, so one of them can be connected to a PoE switch. If you want to further managed each port of the PoE switch you will need to go for a managed option like the Unifi US-8-60W I got (image below). This is an 8-Port fully managed 802.3af PoE Gigabit switch. It has a fan-less design and thus is silent in operation.
The switching capacity is up to 8 Gbps total, and it can provide up to 15W output per PoE port. I use one of the PoE ports to power the Unifi Cloud Key.
If you do not mind all the ports of your PoE switch being unmanaged and ending up in a single VLAN, you just need an unmanaged PoE switch like the TP-Link SG1008 I have detailed below.
The Unifi Wi-Fi Access Points (WAP) are widely acclaimed for solid wireless performance. I use the Unifi 6 Lite and U6 Pro in my home. The U6 Lite is an 802.11ax AX1500 Dual-band WAP, it can do up to 300 Mbps in the 2.4GHz band and up to 1.2 Gbps in the 5GHz band simultaneously. The U6 Pro is an AX5400 WAP ups those figures to 573.5Mbps in the 2.4 GHz band and 4.8 Gbps in the 5GHz band.


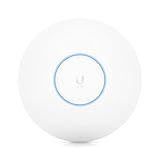

(* = affiliate link / image source: Amazon Associates Program)
You can power these WAPs via standard 802.3af PoE (the UDM-SE has 8 such ports) or Ubiuiti’s proprietary 24V PoE (if you are already invested in their older equipment).
I am able to create separate Wi-Fi VLANs for my personal devices (VLAN6), media devices (VLAN3) and also add the security cameras into the same VLAN as the wired cameras (VLAN5). This is possible because the Unifi WAPs support VLANs. I am very happy with these WAPs, my 200 sq. m home is fully covered with just 2 of these.
I no longer experience dropped frames on my Wi-Fi cameras and overall responsiveness while browsing on our WiFi6 devices (such as the Samsung Galaxy S20) has improved noticeably.
The DIY Security Camera System
Outdoor IP Cameras
We use mostly Reolink cameras and a few Hikvision cameras, all recording on motion detection to a Network Attached Storage (NAS) system from QNAP. They are connected to the TP-Link PoE switch which in turn is connected to the Unifi Managed Switch.
I created a VLAN (numbered as VLAN5) to group both wired and wireless cameras together. The Unifi WAPs and the Unifi managed switch work seamlessly to make this possible using the Unifi controller web interface. The Unifi USG firewall then allows me to then set up strict firewall rules on what these cameras can and cannot do in my network.
For example, the Hikvisions cannot phone home to their Chinese manufacturer, they cannot access the Internet, they cannot even initiate any connection outside of the VLAN they are in. They can only respond to ONVIF and RTSP connection requests (using port number access controls on the Unifi USG). That’s what an advanced enterprise-grade firewall like the Unifi USG can do.
Please note that Hikvision and Dahua along with their associated brands are now banned from the USA. Brands like Lorex which are white-labelled Dahuas are also banned. So I do not recommend buying these brands.
For a long time, I had only Hikivison outdoor cameras. But recently we added 2 more cameras:
- A Battery-powered camera – the Reolink TrackMix which is a 4MP PTZ camera powered by a solar panel
- A 180º panoramic dual-lens camera – the Reolink Duo Floodlight PoE
If you need just a standard IP camera (without floodlights), check out my current recommendations for the best outdoor IP cameras without a paid subscription or ongoing fees, here’s a preview of my top picks:
Indoor IP Cameras
We have quite a few indoor security cameras, the latest being the Reolink E1 Pro. This is a Wi-Fi camera that also has an Ethernet port, and we use it as our baby monitor camera.
Check out my current recommendations for the best indoor IP cameras without a paid subscription or ongoing fees, here’s a preview of my top picks:


Other Switches I use
If you get the UDM SE model, you need to consider the below section only if its onboard 8 managed PoE ports are not sufficient for your home.
With the UDM Pro or USG, like me, you will need a separate PoE switch like the Unifi US-8-60W I mentioned above or the ones below.
TP-Link 8-port Gigabit Unmanaged PoE switch

TP-Link TL-SG1008P – 8 Port Gigabit Unmanaged PoE Switch
(* = affiliate link / image source: Amazon Associates Program)
The TP-Link TL-SG1008P Gigabit PoE switch powers the PoE cameras, and is connected to the Unifi Managed Switch. Note that this is an unmanaged switch. Read our review of this capable little switch.
Netgear 8-port Gigabit Unmanaged Switch

NETGEAR GS308 – 8 Port Gigabit Unmanaged Switch
(* = affiliate link / image source: Amazon Associates Program)
You can never have enough Ethernet ports! The Netgear GS-308 8-port gigabit switch is an unmanaged switch. This means there are no settings to configure, it is truly plug and play. It has a sturdy metal chassis, auto-sensing 10/100/1000 Mbps port support and excellent real-world performance.
It also has LED activity, link speed and status LEDs per port. I have been using it for over 6 months now and it has been super reliable. Highly recommended plug and play switch for setting up your home surveillance network!
DIY Network Attached Storage (NAS) NVR
QNAP NAS TS-253A with 2x 8TB WD Red hard drives
Now let’s move on to the NVR where the camera footage is recorded. You could take one of 3 Pro-DIY routes for recording video streams from your cameras:
- use an IP camera and NVR kit
- use a NAS as the NVR.
- use a PC as your NVR using NVR software like BlueIris
The main reason we went for the NAS is because it allows us to integrate the security cameras with our Home Assistant-based home automation system without needing a powerful energy-guzzling computer to run BlueIris software 24/7.
Read: EasyDIY or ProDIY – The VueVille Smart Home DIY Framework
NAS devices today are much more than just network storage, they are more like mini-servers. Generally they run their own Linux-based operating system that is accessed through a web browser.
Common uses for a NAS are centralized network storage, as a backup target, as a VPN client/server, and as a DLNA server for streaming your media across the house to multiple devices.
Synology and QNAP make NAS models that have powerful software running on them which makes them more like computers than dumb hard drives. But since they use Linux and specialized software, they can do a lot of things far more efficiently. So we use the NAS as the NVR, a VPN server, backing up our laptops, phones, and as a DLNA server. All for a few watts of energy usage.
The QNAP TS-253A we chose is an affordable yet powerful NAS that is the hub of our surveillance system and an integral part of our home automation system.
We settled on the QNAP because it had more powerful hardware, more features such as HDMI out ports, and 2 extra camera licenses over the nearest comparable Synology model. Both Synology and QNAP are great brands though.
My TS-253A has been discontinued, so check out my latest recommendations for the best NAS models to use as NVRs:


(* = affiliate link / image source: Amazon Associates Program)
The QNAP NAS has a built-in NVR software called Surveillance Station. So the QNAP records full resolution video streams from my IP cameras to its internal hard drives. You could get a dedicated NVR but as I said, we had other uses for the NAS.
QNAP now also have an alternative free NAS NVR app called QNAP QVR Pro which grants you 8 IP camera channels regardless of how many channels your NAS originally came with. Here’s a rundown of QVR Pro and how it compares to QNAP’s standard Surveillance Station software. This is incredible value and I highly recommend trying it out.
Related: QNAP TS-253A Hands-on Review
Related: How to set up your own DIY NAS NVR using QNAP Surveillance Station
I have set up my NAS hard drives with RAID-1 drive mirroring. This gives me peace of mind in case a hard drive fails. If 1 of the hard drives fail, the system will carry on working as usual, and I just need to replace the failed drive with a new one. Zero interruptions because my NAS supports hot-swapping of disks.
For the hard drives, I currently use 8TB WD NAS drives (model [easyazon_link identifier=”B07D3MWMNZ” locale=”US” tag=”vueville.com-eaz-20″]WD80EFAX[/easyazon_link]). When I got my drives 2 years ago, life was simple, there were only two choices in the WD NAS range – WD Red and Red Pro. Both were CMR based drives so I went for the cheaper Red drives.
After the SMR-CMR scandal, WD made the Red line SMR-only, spun off the CMR Red drives into a new product line called Red Plus, and Red Pro remained a CMR-only line.
Strangely in doing this, WD renamed my 8TB drives from Red to Red Plus, but without changing the model number WD80EFAX. So the next time I replace my drives, I will be extra careful to buy CMR drives only.
So check out my recommended surveillance hard drives for both NAS NVRs and dedicated NVRs.
(* = affiliate link / image source: Amazon Associates Program)
Accessing the security camera system while at home
The QNAP NAS Surveillance Station can be accessed either via the web interface or the Windows QNAP QVR client software that you saw above in the screenshot.
The tinyCAM Monitor Pro app on our smartphones are all configured using the local IP address of the QNAP NAS and Hikvision cameras. At home, we just open the app and it simply works. No fuss. No hassles.
Accessing the security camera system from outside the home
Outside our home network, I simply need to connect to the VPN server (running on the the Orange Pi Zero as mentioned earlier), and all the apps and the QVR client on the laptop simply continue to work. This is the detailed process: So I use the Wireguard client on my laptop or phone to connect to the Wireguard server on the Pi Zero. Once connected, my PC is virtually part of our home network.
So none of our IP cameras are exposed to the Internet. The Pi Zero running Wireguard server is though, but this is a far better option because the Wireguard server is built for this purpose and has attack defeat measures such as IP exclusion, automatic IP bans based on rules etc. which the IP cameras simply don’t have.
Also the VPN server allows me to access the data on my QNAP NAS without hassle – my laptop or smartphone will think that they are in the local network. So all network drives automatically re-connect and the experience is seamless in terms of recently used files etc.
External IR Illuminators

Two basic IR illuminators for the backyard and 12V power adaptors that have lasted nearly a year now and are still going strong. These are of the 60 degree coverage variety, and you can also get wide-angle illuminators.
Ethernet Cables
For Ethernet cables that run outside the home, I recommend using cables that are designed specially for this purpose – outdoor heavy-duty burial-grade CAT-5e or CAT-6 Ethernet cables.
This will ensure that you do not face issues with the cables such as breakage, little animals chewing the cables etc. Ensure that the cables are 100% pure copper and not the cheaper and inferior Copper Clad Aluminium(CCA) variety.
UPS

A CyberPower BRICs BR650ELCD (Line-interactive UPS – 390W/650 VA) to protect and power the entire system (13% load for all the above kit + a couple of other devices). I got a cheap yet reliable UPS which is officially compatible with the QNAP NAS.
If the power fails or supply voltage is outside the tolerance, it informs the NAS which is programmed to shut down gracefully. I also have a schedule to turn it on automatically every morning, which ensures the NAS will turn itself on the next morning if the power fails and it shuts down.
I believe the UPS has paid for itself. On several occasions, the NAS has informed me that it had shut down as instructed by the UPS.
Miscellaneous

64GB SD cards for all the cameras. 128 GB SD cards should also work but some cameras are a bit picky about which 128GB cards they will accept.
Make sure you use at least a Class 10 speed card so that you don’t suffer from dropped frames in the recordings. I use the SD cards to record motion detection alert clips. This is then yet another location where the clips are backed up.
Software
The QNAP NAS comes with the free QVR Pro app. It supports all the features a good NVR has and it works very well.
We use tinyCam Monitor PRO app on Samsung Galaxy S9, Samsung Galaxy A5, Samsung Galaxy M10S and a Nexus 7 tablet. The tablet is our dedicated IP camera monitoring screen running the Imperihome Android app.
Storage capacity needed for QNAP Surveillance Station
Initially I recorded all my 3 external IP cameras 24/7 at 6Mbps bitrate and 10fps. This meant that the 1.5TB that I had set aside was good for 8-10 days of CCTV footage for all 3 cameras put together.
But I have since realized I don’t really need 24/7 recording and that replacing hard drives every year or so is no fun. Modern surveillance hard drives are rated for no more than 1 year of continuous operation. So now I just use alarm recording which places markers on the QVR Pro timeline so that I can jump directly to motion events.
The amount of storage you need depends on the quality and frame per second settings. After 3 years of experimenting with various quality settings, I have settled at 2Mbps and 6fps as we couldn’t see any improvement with higher settings.
I have also set the QVR Pro app on the QNAP to use only 1.5 TB (out of the 3TB available). So it automatically overwrites older recordings to maintain the 1.5TB quota. You can also specify number of days instead.
Conclusion
We hope this article gives you an insight into how you can set up your own DIY home security camera system. If you have any questions at all, please do not hesitate to get in touch through the comments field below.
Leave a Reply