The 3 Megapixel Hikvision DS-2CD2132F-IWS Network Security Camera under review today is a popular choice among our readers looking for a cheap yet reliable outdoor security camera. It is the dome equivalent of its widely acclaimed cousin, the Hikvision DS-2CD2032F-IW (Amazon link).
The key feature that makes this network camera a fully standalone solution is the built-in micro SD card slot supporting cards up to 128GB. As you will find from our exhaustive Hikvision Network Camera guide, this is represented by the additional ‘F’ in the model number. This local storage feature enables the camera to record motion detection clips or images without the need of any other device.
Hook up the camera via Power-over-Ethernet (PoE) or via the separate power and network cables, and it will do all of the following without the need of any other device:
- record 24/7 or motion detection clips and images to the SD card,
- send email alerts with attached snapshots,
- upload snapshots via FTP,
- automatically switch between day and night modes using the IR cut filter and built-in IR LEDs, and much more.
Optionally you can also connect the camera to a Network Video Recorder (NVR), a Network Attached Storage (NAS) device or directly to the cloud. But as with any IP camera, there are certain points you need to be aware of before purchasing this camera. Read on to learn what we found in our hands-on review.
[text-blocks id=”4426″ slug=”earnings-disclaimer-incl-hivision-dahua”]
What is the DS-2CD2132F-IWS suitable for?
The DS-2CD2132F-IWS is ideal for both indoor and outdoor surveillance applications. It is fully weatherproof and so should fare well in all weather conditions. It also acts as an effective deterrent due to vandal-proof design. It is also compact at Φ111 mm× 82mm (4.4” × 3.2”).
Main specifications
As always with Hikvision, there is a camera to suit every use case and every application. There are two variants of the same dome camera which you can view on Amazon: the DS-2CD2132F-IS model (without the WiFi function) and the DS-2CD2132F-IWS which adds Wi-Fi connectivity. In all other respects, these cameras are exactly the same.
We reviewed the non-WiFi DS-2CD2132F-IS model.
| Image Sensor | 1/3″ Progressive Scan CMOS |
| Minimum illumination | 0.07Lux @ (F1.2, AGC ON) ,0 Lux with IR, 0.19 Lux @ (F2.0, AGC ON) ,0 Lux with IR, 0 Lux with IR |
| IR LED Range | 10-30m |
| Focal length | 4mm @ F2.0 (2.8mm, 6mm also available) |
| Angle of view | 98.5°(2.8mm), 79°(4mm) , 49°(6mm) |
| Bit rate | H.264/M-JPEG, 32 Kbps – 12 Mbps |
| Ethernet | 10/100 RJ-45 |
| Wi-Fi | 802.11b: 11Mbps, 802.11g: 54Mbps, 802.11n: up to 150Mbps |
| Protocols | TCP/IP,ICMP,HTTP,HTTPS,FTP,DHCP,DNS,DDNS,RTP,RTSP,RTCP, PPPoE,NTP,UPnP,SMTP,SNMP,IGMP,802.1X,QoS,IPv6,Bonjour |
| Storage | Micro SD/SDHC/SDXC card slot, up to 128 GB |
| Other Connections | Audio I/O, 1 alarm I/O |
| Power consumption | <5W, Power over Ethernet available |
| Main stream Frame rate | 2048 × 1536 @ 20fps, 1080p/720p @ 30fps |
| Sub stream Frame Rate | VGA/QVGA @ 30fps |
| Audio support | N/A |
| Dimensions | Φ111 × 82 (4.4” × 3.2”) |
| Weight | 500g (1.1 lb) |
| Weather-proofing | IP66 |
Design
Its impossible to not compare the DS-2CD2132F-IWS to its very succesful predecessor, the DS-2CD2132F-I. Let’s take a look at them side-by-side and see what had changed:
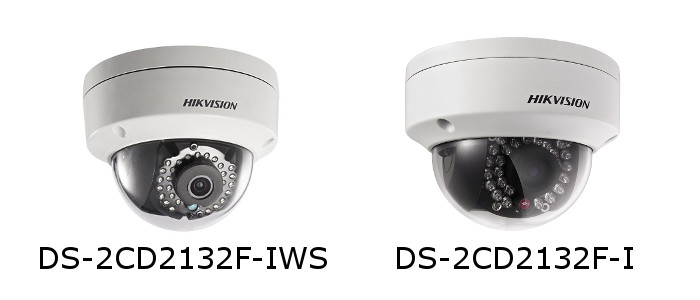
The older DS-2CD2132F-I (right) had an issue where some of the IR LEDs were obscured by the base of the camera. This has been rectified in the new DS-2CD2132F-IWS. The lens is also 3-axis vs. the older model’s 2-axis.
Camera Installation

Dome cameras are not as easy to install as bullets (unless you are using an installation bracket). This is because of the very nature of the camera and the way they are attached to the installation surface (eaves, walls). There are 4 steps for installing this camera:
- Unscrew the dome – there are three screws that secure the dome to the camera base. Hikvision has smartly used built-in screws that remain attached to the dome at all times – very convenient when you are trying to hold the camera to the installation surface and putting in the first screw!
- Connect the DS-2CD2132F-IWS to your network and hold it in the desired installation position. Check the live view to frame the image. This camera has a 3 axis design (pan/tilt/rotate) so getting the image framed just right is so easy. Also you can mount it on a slanted eave and still get a levelled image.
- Secure the camera to the installation surface using the provided rawl plugs and screws.
- Put the dome on and screw tight the 3 built-in screws. Again Hikvision has provided a ribbon band that connects the dome to the camera base to make installation easier.
I was able to easily install the camera myself – its a one-man job!
Camera Network Setup
Hikvision cameras come set up with a default IP of 192.0.0.64, which may not be the same as your network’s subnet. If so, you have to use the included Search Active Devices Protocol (SADP) tool to change the IP address and subnet of your camera. Why use the SADP tool? Because if the camera is on a subnet different from your network, it will not be accessible from your laptop or computer.

When you install and launch the SADP tool, it automatically searches for Hikvision cameras connected to your network. You can also click the Refresh button to search manually. When your camera appears on the list, select it and set a new password. Then change the IP address to one in your network’s subnet. We recommend not using DHCP, but rather use a fixed IP address. The default username is ‘admin’ and the password is 12345. This is not secure so you should choose a stronger password.
Once you have done the above, you no longer need the SADP tool to access the camera. You can enter the IP address of the camera in your browser to access the administration portal where you can access the live view and configuration pages.
The web administration portal is easy to use and very functional. However as with most current IP cameras, the interface uses an NPAPI plugin which does not work on the Chrome browser but this is not Hikvision’s fault. Google has stopped supporting this plugin in Chrome as part of its efforts to push developers away from this plugin. We expect Hikvision will soon redesign the web interface in HTML5 to overcome such browser limitations.
Camera Features
Hardware
The DS-2CD2132F-IWS has a 1/3″ progressive scan CMOS sensor with a resolution of 3 megapixels. This lets you record at up to 2048×1536 resolution (20 frames per seconds) or 1920×1080 (30 fps). The increased resolution is very useful for capturing extra detail, hey it may just be the difference between a just-too-blurry video and a crisp close-up that the cops can actually use!
You can order the camera with a choice of lens, from 2.8mm to 6mm. According to Hikvision, the angles of view will be around 98.5°(2.8mm), 79°(4mm) , and 49°(6mm). The camera’s pan (0-355°), rotation (0-355°), and tilt (0-75°) functions allow you to point the camera at the area or object of interest.
The on-board IR has a claimed range of 10-30 metres which is quite standard for this class of IP camera. These are not the EXIR LEDs found in the 2332-I turret model but are bright enough. A true IR-cut filter is present which will give true colour images during the daytime and true night vision images in the dark. This avoids problems such as false colour that cameras without a true IR-cut filter can suffer from.
The camera is capable of recording up to a bitrate of 12Mbps. Our general recommendation is a minimum of 4Mbps to ensure sharp and clear images and videos. Unusually, the DS-2CD2132F-IWS supports Wi-Fi upto 802.11n speeds of 150 Mbps.
Of course there is also the SD card slot, which is so useful for storing motion detection images or video clips. Even if you intned to use this camera with an NVR, the SD card storage is a sensible secondary storage option.
Web Administration Portal
When you go to the IP address you set using SADP for the camera, you are greeted by the login screen.

The default login details are: username = admin and password = 12345. But you should have changed it already using the SADP tool. If not, that’s the first thing to do after logging in.
You will be prompted to install the WebComponents plugin so that the camera video can be displayed. This will automatically be downloaded from Hikvision and installed.
Now you may get a warning in your browser about the plugin like this:

It is perfectly safe to allow the Web Components plugin.
The home screen has 4 main tabs – Live View, Playback, Log and Configuration.

You can control the volume if you have connected a microphone on the camera. You can also push the Mic button to send audio to an attached speaker. You can also take snapshots and videos from the Live View screen. We found the live view screen to be smooth, responsive and stable.
Recorded clips can be viewed by clicking on the Playback tab. You can either search for clips to view by using the calendar or by clicking and dragging the timeline slider. If you are using only event based recording (such as motion detection), the player will automatically advance to the next clip and keep playing till all the clips have been played.
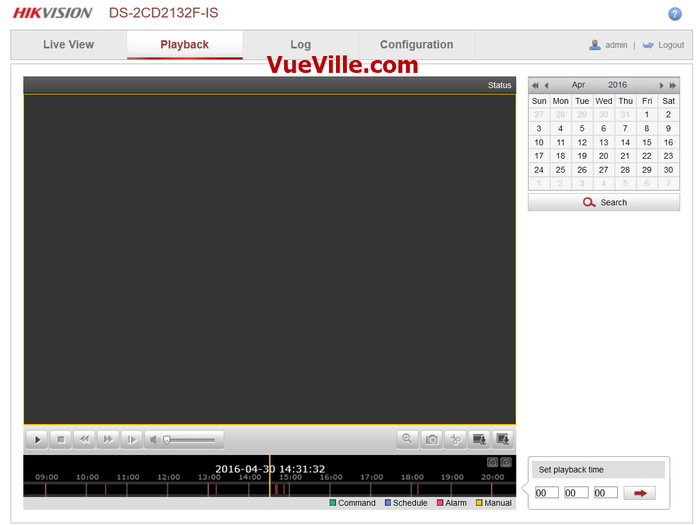
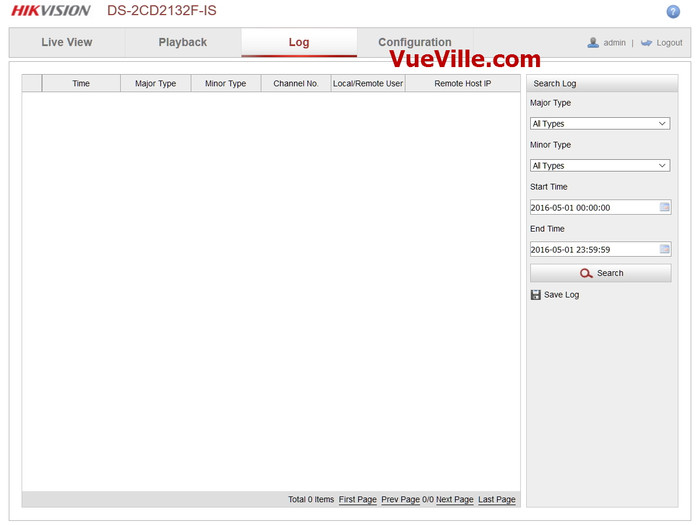
The next tab is the log screen:
The final tab is the Configuration tab, which has subsections that can be opened using the tree menu on the left:
- Local configuration – defines the location for saving snapshots and videos from the playback tab.
- Basic Configuration – Simple configuration options.
- Advanced Configuration – Advanced configuration including events such as in-camera motion detection or line detection.
We recommend doing the local configuration, then the basic and finally the advanced configuration to get the most out of your Hikvision IP camera.
Basic Configuration
Under Basic Configuration, the System tab shows you the camera’s physical connections, firmware version, time settings and reboot options.

The Network screen lets you select the ports you want to use – this is identical to the Network page under the Advanced Configuration section, so we will check it out later.
The Video/Audio page lets you define the video bitrate, resolution and other details.

The Image sub-section lets you adjust image exposure properties such as brightness, contrast etc.

Finally the Security sub-section lets you create additional users, for purposes such as a mobile phone monitoring software.

Advanced Configuration
Some of the settings pages in this mode are exactly the same as those under Basic Configuration, so we will skip those that are common.
Let’s start with the Network sub-section. Here you will find a whole host of settings such as IP settings, DDNS, Email, and FTP settings.

The video settings are exactly the same as under Basic Configuration, so let’s look at the Audio settings:

Of course, these are valid only if you have connected a microphone and/or speaker to the physical connections of the camera.
The Image tab is again similar to the Basic Configuration page, but there are some new settings such as the On-Screen Display that can be used to display text on the video feed:

The Security tab is identical to the one under Basic Configuration, so we will skip it.
Onto the Event sub-sections starting with the Basic Event page. As we always say, motion detection alerts is one of the most enjoyable features of an IP security camera. When the DS-2CD2132F-IWS detects motion as per the defined triggers, it can send an email alert with snapshots and ideally send push notifications also. The Hikvision can do all of this and has all the standard motion events that we have come to expect from good quality cameras. It supports email alerts and can attach snapshots with each motion detection email alert.

This includes simple Motion detection, Video Tampering, external alarm inputs and some miscellaneous alarms that can be run on a schedule to trigger one of the following actions:
- Notify the desktop based Surveillance Center software iVMS-4200
- Send an email (See how you can configure motion detection email alerts)
- Upload to FTP
- Trigger the alarm channel
- Trigger the external alarm connection – useful for Home Automation
Remember you can enable more than one type of event at the same time.
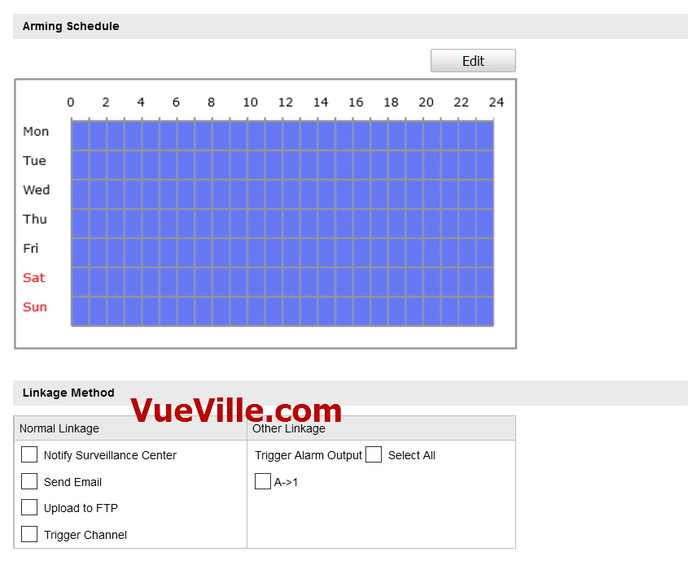
Let’s take a closer look at each one of the motion detection events available:
Simple Motion Detection – This motion detection method simply looks for changes in the scene according to the area defined, the sensitivity and the threshold.
Video Tamper – This method triggers an alert when the camera is blanked out.
Alarm Input – This is where the alarm input connection comes into use. If you have a PIR sensor connected to the camera, you can set up this event to detect motion using the PIR. Since the PIR sensor works on changes in heat and not image based detection, you can cut down the number of false alerts that is the bane of regular image based motion detection.
Network abnormality – This event can be set to trigger if the camera is unable to record to the network storage location (NAS or NVR) – either because of an error or because somebody has tampered with the equipment.
Illegal Access – This event can be set to trigger if the camera detects unauthorised logins such as an invalid username, password or a hacking attempt.
It is however the Smart events that really show off the caliber of this camera:

Line detection and area intrusion detection let you cut down on false alerts that can be generated by the basic events. Intelligent use of these two can vastly reduce the number of false alerts you get.
The final Storage subsection lets you define network based storage settings, such as a NAS.
The first page is the Record Schedule where you can tell the camera whether to record based on event triggers or continuously on a schedule.
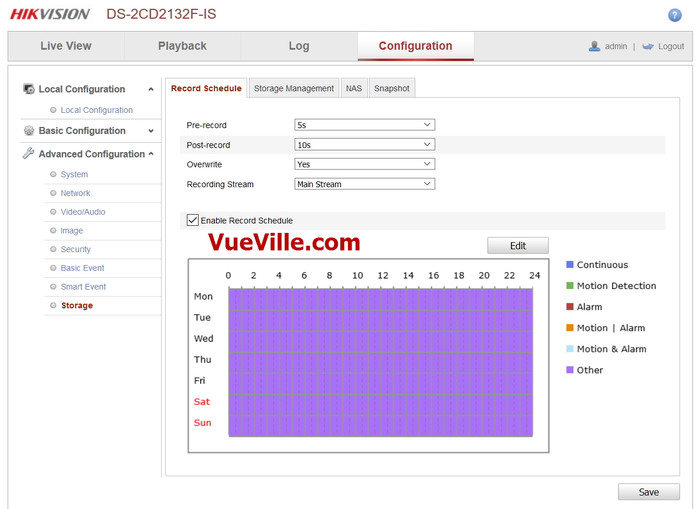
The Storage Management page lets you add network based storage locations.

The NAS page defines the settings for NAS devices, such as folder path.

The final page in this section lets you define snapshot timing intervals.


Recording modes
The DS-2CD2132F-IWS camera can be configured to record event triggered clips or schedule-based clips to an SD card, a network storage location or to the Cloud using services such as Hikvision’s own EzVIZ, or third party services such as sensr.net and Camcloud. The HiDDNS service is different and we do not recommend using it as EZVIZ is better.
- SD Card: We recommend using the SD card only for motion detection or alert snapshot and video recording. 24/7 recording to an SD card is not recommended simply because you will wear out the SD card. The SD card is best seen as redundant storage in case your main storage location fails.
- Our recommended way of using an IP camera is always like this: use it to record 24/7 footage or motion activated video to a network storage location. This could be a NAS, an NVR (see NVR buying guide), or a computer running surveillance software such as BlueIris. This means any damage to your camera or theft doesn’t destroy the evidence!
- Cloud storage: In this mode, your camera will upload motion detection clips, snapshots, or 24/7 recording clips to Hikvision’s EZVIZ service or third party services.
Smartphone apps
Hikvision provides a free Android and iOS app, the iVMS 4500 HD which lets you see your camera’s live video stream, use the 2-way audio feature, and view recorded clips. It also lets you access cameras connected through the EZVIZ system. The stand-out feature is Push Notifications which works quite well. Read our step by step guide to setting up push notifications.
Compatibility with NVR systems
The DS-2CD2132F-IWS supports the ONVIF protocol. ONVIF is an industry standard that enables surveillance equipment from different manufacturers to work together. This means that you can connect the camera to any Network Video Recorder (NVR) or a computer running surveillance software, and the camera should work seamlessly.
Performance
We have been running this camera continuously for a year now and it has not faltered once. It has been 100% reliable and has been even more reliable than our DS-2CD2032-I which needs a reboot every 6 months.
Video Quality
We tested the camera at both 3 Megapixel and 2 Megapixel resolutions. Our test settings were a bitrate of 6 Mbps and 10 fps.
Daytime quality
Daytime quality is excellent with sharp focused video that shows every detail in the scene. Here is a sample video we made:
Night quality
To test the night quality, we used only the built-in IR. No external IR illumination was used. There was a little stray light from an LED street lamp but this was very dim light. At the noise reduction and WDR image settings seen in the screenshots above, the image was slightly grainy but had decent sharpness and clarity. We did not observe any IR bleed issues that some users of the predecessor model experienced. Here is a test video we made:
Verdict
The Hikvision DS-2CD2132F-IWS is one of the best-selling dome-style wireless security cameras. It has definitely improved upon its predecessor, the DS-2CD2132F-IS (Amazon link). No more IR LEDs being blocked by the base or complaints of IR bleed! This camera represents great value for money with all the features that you will ever need from an IP security camera.
Where to Buy
View on your local Amazon Website
Also Consider
From our Best IP Camera Recommendations 2016 list, view these on Amazon:




> We expect Hikvision will soon redesign the web interface in HTML5 to overcome such browser limitations.
>
Unfortunately, it doesn’t look like Hikvision is going to HTML5 any time soon:
http://www.hikvision.com/us/Press-Release-details.aspx?c_kind=34&c_kind2=37&c_kind3=91&id=4158
“For recording solutions, our R&D team has been researching options alternate to the discontinued NPAPI plug-in. We have fully evaluated an HTML5-based solution, but performance results are limited. Because it does not deliver a solution that meets our customers’ expectations, we will not be going forward with HTML5. Instead, we are moving to a more robust platform, Pepper Plug-in API (PPAPI).”
Firefox has disabled support for npapi plugins now, too, so hopefully that redesign isn’t too far off. Of course, in Firefox there’s an option to enable them again, but I think Chrome has removed even the option. I have the 2332-I; I haven’t gotten around to installing it, but (other than needing the plugin to see the live feed) it’s a great little camera.
Fortunately, you can use VLC to view the feed (via RSTP) if you know the URL, but that’s not really ideal and involves (possibly) sending the username and password in plain text over the network.