If some parts of your home are just not reachable via wired Ethernet, wireless IP cameras may be a good alternative. The [easyazon_link identifier=”B07RKJDK65″ locale=”US” tag=”vueville.com-eaz-20″]HeimVision HM241[/easyazon_link] is one such all-in-one surveillance kit which comes with 4 wireless IP cameras and a compatible wireless NVR.
What’s quite interesting about this kit is that the cameras can be wired up through Ethernet where feasible. So you can pick Wi-Fi or Ethernet depending on the install location. This is why we thought we would take a closer look at this system that HeimVision kindly provided for review.
Here’s a detailed hands-on video review or if you prefer to read the whole content is available below also.
HeimVision – Who are they?
Heimvision is a brand of Shenzhen VanTop Technology & Innovation Co. Ltd, a company set up in 2017 and headquartered in China. They have subsidiaries in US and HK, including Heimdarr Vision Tech Co., Ltd.
The PC NVR software used is EseeCloud software. From the licensing terms and conditons, the manufacturer of the software appears to be Guangzhou YueGe intelligence Technology Co., LTD.(also called YueGe).
[text-blocks id=”earning-disclaimer”]
Specifications
[table id=65 responsive=”scroll” /]
Unboxing


Box Contents
- 8-channel Wi-Fi NVR with screws for hard drive
- 4x Wi-Fi IP Cameras with antennae (Model no. [easyazon_link identifier=”B07TD4GK65″ locale=”US” tag=”vueville.com-eaz-20″]CA01[/easyazon_link])
- 1x DC 5V/2A wall adaptor for NVR
- 4x DC 5V/1A wall adaptor for IP cameras
- 4x Screws and rawl plugs for IP cameras
- Waterproofing kit for Ethernet cable
- 1x Ethernet cable
- USB mouse
- Quick Start guide
- QA pass sticker
Design & Features
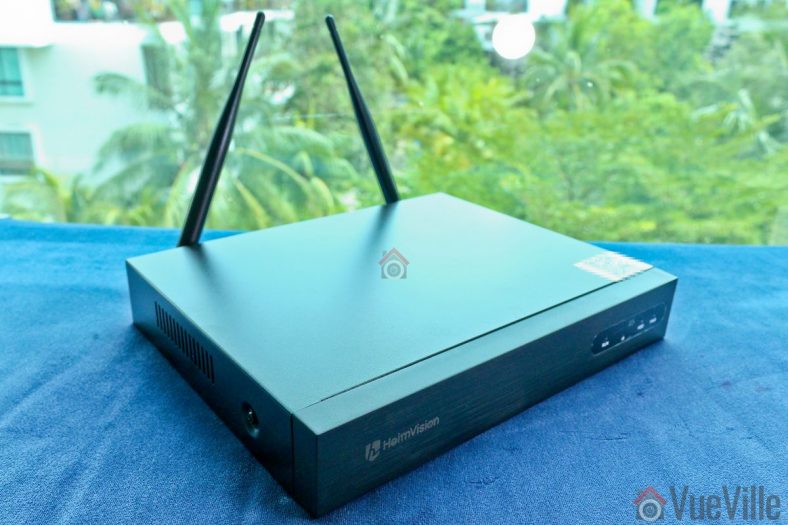
NVR

The 8-channel NVR is quite compact and comes pre-installed with two 5dB antenna at the rear. The front face has no buttons, just the Heimvision logo and a set of indicator lamps.
The top of the NVR also has the cloud ID and a QR code that can be scanned by the mobile app for easy setup.

Under normal operation, the three LEDs RUN, HDD and PWR will blink in sequence. Although the NVR seems to support IR controllers, none were included in the box.

The rear of the NVR houses the two antennae, an HDMI port, a VGA port, a USB port (for mouse/keyboard), an RJ-45 Ethernet port, and the 12V/2A power jack.

The underside of the NVR has a sticker showing the model number, FCC ID and other details. Once the hard drive in installed, you will also see the heads of the screws securing it.

Opening up the NVR shows that most of the space inside the NVR is actually unused and left empty for the hard drive. The NVR is powered by the popular Hi3536DV100 H.265/H.264 system-on-a-chip decoder and processor module. This system used an ARM Cortex A7 processor with one SATA hard drive interface.
The NVR firmware identifies the NVR model as the K8204-W.
Heimvision told us that neither this NVR nor the included wireless cameras support ONVIF.
Here’s a list of the various NVR features:
- 2.4GHz Wi-Fi for camera connections
- 8 channels supported
- Decoding: 4CH 1080P@20FPS or 8CH 720P@20FPS
- Real time Playback (Max 8ch)
- Mobile push alerts
- Email alerts
- P2P for remote access
Camera
Four Wi-Fi IP cameras are included with this NVR. The NVR supports 4 more channels, so you could theoretically add more cameras.
You can also buy this camera (model no. CA01) separately from the Heimvision website or [easyazon_link identifier=”B07TD4GK65″ locale=”US” tag=”vueville.com-eaz-20″]Amazon[/easyazon_link], but note that they will work only with specific Heimvision NVRs. They do not officially have ONVIF compatibility.

The IP camera has a metal body and is IP66 weather-rated. Each camera comes with a 5dB antenna, a 12V/1A power adaptor, and screws to wall-mount it. The design seems to be inspried by the compact bullet-camera style of the latest Hikvision and Dahua cameras. Overall, the camera has a solid high quality feel to it.
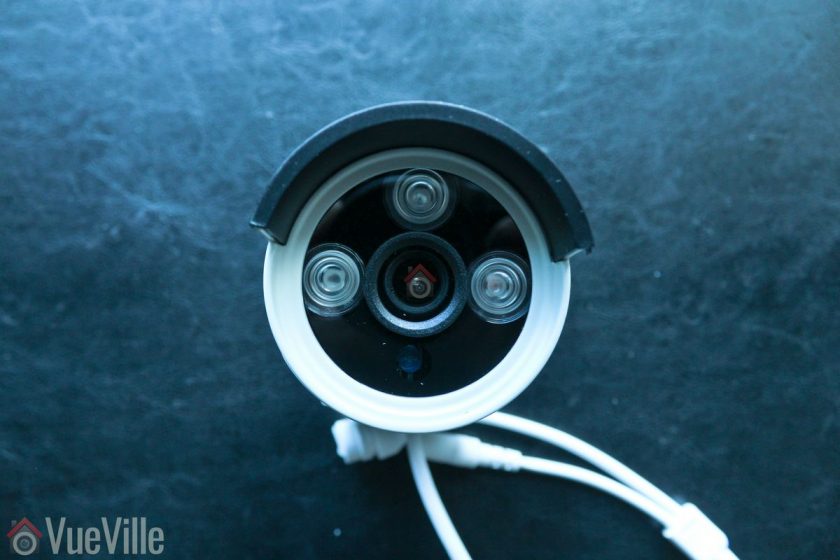
The front of the camera has the 3.6mm fixed lens, and three 850nm EXIR LEDs. I am happy to see that Heimvision chose the more powerful EXIR LEDs instead of the usual ring-type LED arrangement. The daylight sensor is placed just below the lens.
On the features side, the image sensor has a 1080p resolution. The 3.6mm lens has a wide viewing angle of 110°. You won’t find any advanced image processing features like WDR here. Simple motion detection is possible at the NVR end, but not by the camera.

The camera mount is of the 3-axis type, so you can orient the camera in just about any position you want.

While the camera doesn’t support Power-over-Ethernet, it does has an Ethernet port. The camera is wirelessly paired with the NVR at the factory and so is ready to use in Wi-Fi mode. But the Ethernet port allows you to use it as a wired camera if you have an Ethernet point available near the installation site.

I recommend using wired Ethernet as much as possible and to use Wi-Fi only for those parts of your home that are not wired up for Ethernet.
An interesting feature is that the cameras can create something of a mesh network to extend wireless range. Here’s how it works: a camera that is too far away from the NVR can till connect to the NVR through another in-range camera. So the intermediate camera which is in range of the NVR acts like a repeater. This is not automatic though, it has to be set up manually in the GUI.
All in all, the wireless camera feels very solid and like it is built to last. The essential features are there and some innovative features help distinguish it from similar offerings in the market.
Installation & Setup
The included user manual is one of the best I have seen from a Chinese manufacturer.
There are no grammatical errors, the language used is professional and natural, illustrations are clear and the booklet is printed in colour. Other Chinese manufacturers should take note!
Setting up the IP Cameras
Initial setup is super easy because the wireless cameras are paired to the NVR at the factory itself. By default they are set up to create a subnet in the IP range 172.20.14.30-33. I did not see any option to expose the cameras directly to my network beyond the NVR.
- Pick an installation location that’s not too far away from the NVR. Don’t install the camera right away though. With wireless cameras, you need to ensure you have a strong connection to the NVR before you permanently install the camera.
- Screw the included antenna on to each IP camera.
- Plug in the included 12V/1A power adaptor and turn on the power.
Setting up the NVR
If you just plug in the NVR and turn it on, you will see your camera streams on screen in a few minutes. But without installing a hard drive, you won’t be able to record or playback.
So before turning it on, the first thing to do is install a hard drive in the NVR. Heimvision doesn’t provide one, so I used a [easyazon_link identifier=”B008JJLW4M” locale=”US” tag=”vueville.com-eaz-20″]WD RED 3TB[/easyazon_link] drive. I wanted to test the performance of the NVR and didn’t want the drive to be the bottleneck. See my recommendations for NVR hard drives.
-
- The manual has very clear installation steps which is very helpful if you are doing this for the first time. I added my photos below to show you exactly how I did it.
- Unscrew the 4 screws from the top and sides of the NVR and slide off the black NVR cover.

- The SATA data and power cables are already attached to the main board. Connect these to your hard drive.

- Screw the hard drive to the NVR – for this align the hard drive screw holes to the NVR base. Then from the other side, screw the provided screws into each hole one by one.

- For continuing the setup I strongly recommend hooking up the NVR using the HDMI or VGA port. Most of the settings are accessible only through the NVR’s built-in GUI.
- Connect a mouse to the USB port.
- Turn on the NVR with the hard drive installed, it will automatically connect to all the wireless IP cameras and start continuous recording of all channels at 1080p.
- Format the hard drive

- After a few minutes, you should see the ‘Format successful’ message. Now your cameras are being recorded to the hard drive.

How I connected the NVR to my network
The Heimvision NVR has a built-in virtual network switch and automatically places all the Heimvision wireless cameras in it’s own subnet. How did I know this? Because my Unifi Network Management interface can see the IP addresses of all the wireless cameras: 172.20.14.30 to 172.20.14.33.
As detailed in my DIY Smart Home Security post, I have wired Gigabit Ethernet throughout my home using Unifi PoE Switches and the Unifi USG firewall. All my existing wired security cameras are already in a VLAN – VLAN number 3 in the network map below.
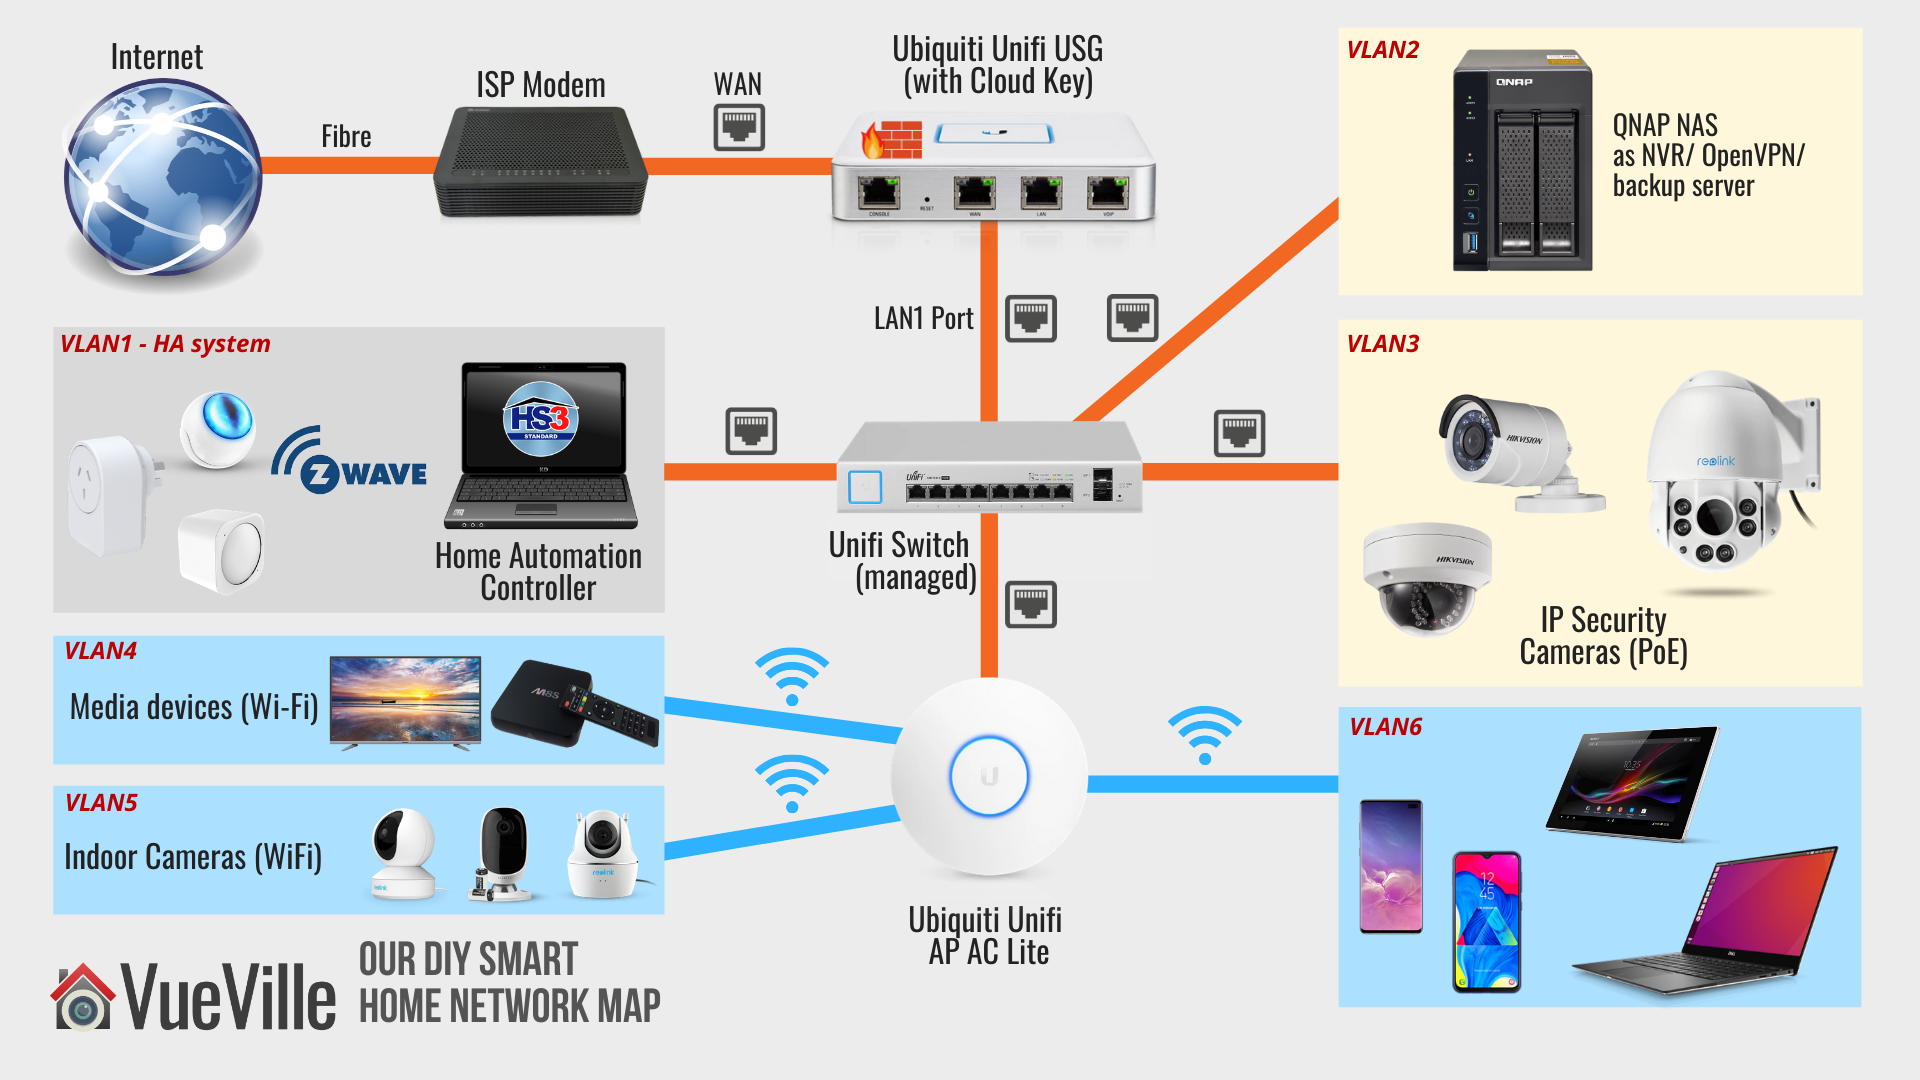
A quick reminder of my network config: VLAN3 is set up to only accept connections from my LAN, not from the Internet. It is also set up to allow only RTSP streams to go out to the QNAP NAS (VLAN2) and personal devices (VLAN6). I am able to set up such precise rules because I use the Unifi US-8-60W managed switch and the Unifi USG firewall.
So I added the NVR to VLAN3 using Ethernet. Now comes the fun part – accessing the NVR from the rest of my network.
The only thing I wanted to pull from the Heimvision NVR are the RTSP video streams. But the NVR currently doesn’t support RTSP streams – Heimvision tells me this is coming soon. So my alternative for now is to use the EseeCloud PC software. This software requires a specific port to be open on the NVR to connect to it.
By inspecting the packets between my laptop (VLAN6) and the NVR, I saw that EseeCloud uses port 10000 of the NVR. So I created an additional USG rule to allow outgoing (established) connections from the NVR only on port 10000, to VLAN6. Boom! EseeCloud was up and running securely.
Strictly for the purposes of this review, I also allowed port 80 on the NVR to use the browser admin page of the NVR and for the HeimKits mobile app to work.
For the cloud P2P option to work, I tested the NVR in a totally separate VLAN with full access to the Internet. This was the easiest way to allow P2P cloud connections between the NVR and Heimvision servers.
Live viewing the cameras
There are a few different ways of interacting with the NVR and video streams:
- Connect the NVR to a TV or monitor
- Use the PC NVR software
- Use the mobile app
- Access the built-in management web page of the NVR
The user manual details each of the methods and how to set them up.
Live viewing the cameras using HDMI/VGA
HDMI is the easiest way to hook up the NVR to your TV. The NVR’s built-in interface is the most polished option and has the most features.
You can configure the cameras, live-view them, set up motion detection and play back recorded footage.

Live viewing the cameras using the EseeCloud PC Software
Here are the steps I used to set it up.
- As per the manual, I downloaded and installed the EseeCloud software.
- On opening the software, I logged in with the default username (admin) and password (blank).
- Click Add at the top right
- I entered the IP address, and changed the number of channels to 4, all others were left at default
- You will see a message at the bottom right – “Added the device successfully”
- Also you should see your NVR listed at the top right. Click on each channel to activate it.
- Clicking the ‘Device Management’ option will prompt Windows to allow the software through the firewall.
- Clicking on ‘Playback’ will open the video review section
Reviewing recorded footage
There are three ways to view the recorded footage – on a TV/monitor through HDMI/VGA, the PC NVR software, and mobile app.
I recommend the HDMI/VGA method because of two major reasons:
- This is the only way to fast forward (scrub) through footage quickly, at upto 32x speeds.
- Simultaneous playback of all 4 channels works well only in this method.
- You can select individual video files and back it up to a USB drive.
Whichever method you choose, the timeline shows 24/7 recording (red), motion detection triggers (green) and alarm triggered recording (blue). This is extremely useful when you are looking for motion detection events to review.
The PC software method (EseeCloud) is great for directly exporting videos and screenshots directly to your PC hard drive. But otherwise it doesn’t offer you any advantage over the HDMI/VGA method.

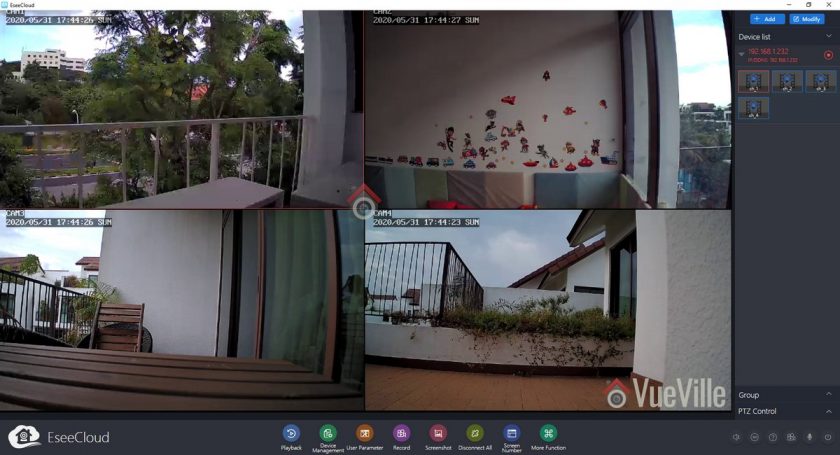
You can start each channel’s playback manually and switch each channel’s main stream and sub stream by clicking the SD/HD button.
Synchronous playback is possible by checking the button highlighted in the screenshot above.
However playing more than 2 channels’ main streams (1080p) simultaneously slows down the playback of all the channels. The NVR is powerful enough to handle this while connected through HDMI/VGA. So I conclude that this is just the EseeCloud software not being up to scratch. I had to use the sub stream (SD option) on all channels if I wanted simultaneous playback.
Another limitation is that you cannot increase the playback speed, in other words you cannot fast forward. This is a basic feature and it is disappointing to see it missing in this rather good-looking software.
Performance
Video Quality
1080p is the bare minimum I recommend for home CCTV surveillance. The cameras produced sharp, crisp video during the daytime.
At night, noise was well controlled and detail was high. The powerful EXIR LEDs helped illuminate the scene evenly and I was glad to not see the dreaded flashlight effect that the conventional ring-type LEDs produce.
There are no settings to control the brightness of the LEDs and there are no advanced features to dynamically control the infrared light output.
Motion detection
The Heimvision HM241 is able to do both pre-recording and post-recording. This means the NVR is able to record not just what happens after motion was detected but a few seconds before the trigger as well. This is a great feature and something that I always look for in a security camera system.
The post-record feature lets you decide how many seconds the camera should record after the last motion trigger. The default is 15 seconds.
Wireless performance
Being a wireless surveillance system, the cameras are limited to 1080p resolution. While 3MP or 4MP are great, 2.4GHz Wi-Fi is simply not fast enough to reliably carry that bandwidth over large distances.
You could ask why not use 5GHz? Well the useful range of 5GHz Wi-Fi is very low and frankly useless for video surveillance. If you have solid concrete walls, 5GHz Wi-Fi again becomes pretty useless over any reasonable distance.
I placed the Wi-Fi cameras at varying distances from the NVR, with varying number of internal and external walls in between them.
My objective was to stress test the cameras and see how far away I could place the cameras and still enjoy a stable wireless connection.
Cam1: 30 feet, one external concrete wall, two solid brick walls
Cam2: 10 feet and 1 solid brick wall
Cam3: 20 feet and 2 solid brick walls
Cam4: 10 feet, 1 floor above the NVR, through a solid concrete floor and one external concrete wall
All the cameras were able to push full 1080p video at the default VBR setting. Even though CAM1 was at the limit of the camera’s Wi-Fi range, the NVR was able to maintain the full 2 Mbps bitrate. The ability of the signal to penetrate multiple solid brick and concrete walls is very impressive.
I would imagine the wireless range can easily go to 50+ feet in a timber frame house, given the strong performance in my house which has very thick concrete and brick walls.
Mobile App
For testing the mobile app as most users would, I allowed the NVR full access to the Internet. This is also required for the P2P cloud features of the camera to work. A free HeimVision P2P cloud server account is required to receive real-time push notifications as well.
You can use the app as anonymous user without creating an HeimVision cloud account, but then you won’t get push notifications.
Live view and Playback
So what should you be looking for when it comes to push notifications? The speed and reliability of the push notifications reaching you. You want the NVR to send you push notifications immediately after it detects motion.
I installed the ‘HeimKits’ mobile app as per the instruction manual and took it for a whirl.
- Download and install the app from your mobile phone’s app store.
- Tap the + button to add your NVR
- Select Kit and an automatic scan will start. This will find the kit and set t up for most people. In my case since I had put the NVR in a different subnet from my main LAN, the scan failed.
- I tapped the ‘Add Manually’ button and again tapped the other ways to add button to get the local setup option. If you want to set up the NVR so that you can access it remotely and are hapy to use HeimVision’s P2P servers, use the cloud setup option. This is also the default.
- I entered all the details and tapped complete.
- I was then taken to the live view page. Success!
The mobile app did ask for all sorts of permissions on Android, but the only one needed for the app to function is ‘Storage’. I denied access to the Camera, Microphone and everything else. Call me paranoid but that’s how we roll at VueVille!
The interface is very modern and had a very polished look and feel. This felt like a properly thought-through app with a good design language and flow.
You can live view cameras in groups of 1, 4, 6 or 8. Landscape mode is supported. You can also switch between the SD and HD streams. It is also possible to take a screenshot or a video clip of any channel straight to your mobile phone.
On the playback screen, the view is limited to one camera at a time. No simultaneous playback here! But the timeline is super responsive and motion detection events are marked clearly on the timeline. One gripe is that I could not directly download the motion detection video clip I was viewing to my phone. However there is a (well-hidden) export feature on the top left menu where you can specify a channel and a time range to search. This will bring up all the clips and then you can download the one that contains the time period of interest.
Push Notifications
To get push notifications to the HeimKits mobile app, you need to do a few things:
- Access the NVR settings using an HDMI/VGA cable and a TV:
- Enable motion detection for each channel
- Define the arming time schedule for each channel
- Turn on ‘App alarms’ for each channel
- Create a Heimvision cloud account and login with that to add your NVR. Anonymous mode is not enough.
- Enable push notifications in the mobile app settings
Once you have done all that, you are ready to go! In my testing, I got push notifications in the HeimKits app instantaneously. The success rate of receiving the push notifications over multiple motion triggers was also very good.

Touching the notification takes you to a list of all the alerts received in descending order of time. Touch the alert you want and then you are taken to a quick preview of the alert clip. If you want to see what happened just before the motion was detected, tap ‘Full Video’. Yes, the NVR supports pre-recording, not just post-recording. So you won’t miss the crucial few seconds before motion is detected.
Security & Privacy
For using push notifications, you need to activate the free HeimVision cloud P2P service. This does provide fuss-free remote access for live view, playback and live streaming.
The two things we didn’t like are:
- You cant get even local network push notifications without activating the cloud feature
- The cloud features requires you to create an account (free of charge)
If you are concerned about using the Cloud P2P service for privacy reasons, it is not enough to simply disable the cloud service. You have to place the NVR behind a firewall and configure firewall rules properly so that only connections you want are allowed.
See how we built our DIY home CCTV system to be 100% safe and secure. Here are some more articles to explore:
- Secure Remote Viewing of Home Security Cameras: Port forwarding vs. P2P vs. VPN
- How to Block IP Cameras from Accessing the Internet
- 5 Reasons you should Self-host your DIY Smart Home
Verdict
The HeimVision HM241 is a high quality starter NVR kit with strong wireless performance and a good feature-set for a great price. Setup is easy and fuss-free, and takes just minutes thanks to the wireless cameras being pre-configured with the NVR. We would still like to see a variant with an included hard drive to make the setup fully plug-and-play.
Video quality is great at 1080p FullHD, and the powerful IR LEDs provide good illumination at night. The mobile app is a joy to use; you can live-view, receive instantaneous push notifications and review footage with ease from anywhere in the world using the free cloud P2P service.
If you decide to go wired in the future, the system can grow with you – the wireless cameras have Ethernet ports as well.
For the price point it targets, its fine to not have advanced motion detection or redundant storage. However we were not pleased to see that push notifications don’t work unless the cloud P2P service is used. This rules out receiving push notifications locally in your home network or via a VPN connection.
Video quality is great at 1080p FullHD, and the powerful IR LEDs provide good illumination at night. The mobile app is really good; you can live-view, receive instantaneous push notifications and review footage with ease.
In conclusion, the HeimVision HM241 is a very affordable wireless home surveillance kit and is fantastic value for money.
[review]
Where to buy
[easyazon_link identifier=”B07RKJDK65″ locale=”US” tag=”vueville.com-eaz-20″]Check Price on your local Amazon site[/easyazon_link]
Alternatives
The nearest competitor is the [easyazon_link identifier=”B07VWHXF4C” locale=”US” tag=”vueville.com-eaz-20″]Reolink RLK4-211WB4-S[/easyazon_link] which has a similar price point and very similar features.
The next step up would be the Amcrest [easyazon_link identifier=”B0785GZ88X” locale=”US” tag=”vueville.com-eaz-20″]NV2104-IP2M-852W4[/easyazon_link] which is significantly more expensive but supports ONVIF and has a 4K NVR.
Leave a Reply