
One of the most common questions I have been getting about our DIY Home Security system is this: How to setup a VLAN and firewall rules to block IP cameras from accessing the Internet?
Wondering why you would want to do that? Here are a few good reasons:
- Most security cameras like to phone home to their manufacturer’s servers. There’s no need to, it’s not good for your privacy or your network’s security.
- Most security cameras have poor security and can be easily hacked, and none of us want someone spying on our indoor security cameras!
- Moreover, security cameras are at risk of being hacked to join botnets, which then attack other devices on your network or the Internet.
For the longest time, I was put off by my perception that firewalls and VLANs are too complex for me. Looking at most networking gear, I would be right.
The beauty of the Ubiquiti Unifi system I now use is that you don’t need to be a networking wizard to secure your security cameras and your home network. Using the excellent Unifi Controller GUI, I was able to block my security cameras from the Internet without getting a university degree in networking.
So in this tutorial, I am going to show you how to:
- Create a Virtual LAN (VLAN) for your wireless security cameras
- Create a dedicated Wi-Fi network for your wireless security cameras and assign this network to the VLAN
- Create 3 firewall rules to prevent the cameras accessing the Internet (but allow other devices on your network to access them locally or just for pulling the RTSP video streams)
NOTE 1: I use the example of wireless cameras in this how-to guide, see this guide for grouping wired cameras in a VLAN and blocking them from accessing the Internet.
NOTE 2: This tutorial is for those who only access their IP cameras via the local IP (such as 192.168.X.X). So for remote access, you would VPN into your home network and then access your cameras using their local IP address. If you require your cameras to be exposed to the Internet using P2P or DDNS, this tutorial is not for you! Most camera apps that have a plug ‘n play setup option use remote P2P servers! Blocking internet access to these cameras will cause them to fail.
Okay, so if you are accessing your IP cameras through the local IP address (from home or remotely via a VPN such as OpenVPN), let’s continue!
What you will need
You will need the [easyazon_link identifier=”B086967C9X” locale=”US” tag=”vueville.com-eaz-20″]Unifi UDM Pro[/easyazon_link] which is a very versatile networking device along with at least one other Unifi Wi-Fi Access Point (WAP) such as the [easyazon_link identifier=”B08QG92M83″ locale=”US” tag=”vueville.com-eaz-20″]Unifi AP 6 Lite[/easyazon_link].
Preparation: Planning your home network
To make sense of this topic, we need a basic understanding of how network connections and firewalls work. I am assuming your security camera has an RTSP video stream and that’s what we are trying to view.
The relevant networking terminology is:
- WAN (Wide Area Network) refers to the Internet.
- LAN is your local home network.
For simplicity, let’s assume your mobile phone is connected to your general Unifi Wi-Fi network. In the Unifi world, your phone is therefore in the LAN group. By default, devices in the LAN group can access any part of the local network and the Internet.
When you use your mobile phone IP camera app (like tinyCAM Monitor Pro) to view the stream of your wireless IP camera, the phone sends an RTSP connection request to your IP camera. The camera accepts it and sends the stream back out to your phone.
Now, the idea here is to segment your home network into different groups, based on what type of access control you want to impose on those devices. In networking parlance, you would create a Virtual LAN or VLAN to group these devices together.
When you create a VLAN in the Unifi Controller software and assign a device to it, the router will tag each data packet of that device with a VLAN ID.
How do VLANs work in practice? How do I assign a device to a VLAN?
For wired devices, you can assign each port of a managed switch to a specific VLAN. Then all devices connected to that network will be in the same VLAN. That’s what happens with a Unifi Switch. So if you connect your wired PoE IP cameras to a port that’s assigned to VLAN 25, all those IP cameras are now in VLAN 25.
For wireless devices, you create separate Wi-Fi networks for different groups of devices and then assign a VLAN ID to each Wi-Fi SSID you create. So you would create a Wi-Fi network called ‘IP Cameras’, assign that Wi-FI SSID to VLAN 35, and connect all your wireless cameras to that network. All those wireless cameras are now in VLAN 35.
Then you can create firewall rules for each VLAN to control data flow in very granular detail (if you choose to!).
In summary, segmenting your home network into different VLANs allows you to precisely control how and where data is allowed to go.
Further reading: Unifi Guide to VLANs
What are some good ways to group devices?
For example, you may want your media boxes to reach the Internet to access Netflix, Amazon Prime, Hulu etc. But you may not want them to access the rest of your network. Why? Because your cable provider’s cheap no-name box probably has weak security and may be the easiest way for hackers to get inside your home network. So that’s one VLAN for your media boxes.
If you are using wired PoE cameras outside your home, anybody can access your entire home network through that network cable! So you should put wired cameras also into their own VLAN and isolate it from the rest of your network.
Its also a very good idea to make all your security cameras fully local by blocking them from the Internet. Many of them phone home regularly and are also easy targets for botnets and the like.
I have created separate VLANs for my PoE cameras and Wi-Fi cameras. I also have separate VLANs for my home automation system and the default VLAN Unifi created for the guest Wi-Fi network. Please note that I have an older Unifi setup that involves a USG and switch combo, which you can simply replace with a single [easyazon_link identifier=”B086967C9X” locale=”US” tag=”vueville.com-eaz-20″]Unifi UDM Pro[/easyazon_link] device!

Our DIY Smart Home Network Map in 2022
What’s in scope of this tutorial
To keep this tutorial easy to follow and understand, I am not going to show how to replicate my entire network setup. That would be a 10,000 word post at least and this tutorial is already long enough as it is!
You will learn the core ideas here and then you can create more VLANs and more firewall rules to suit your specific needs. Just ask me in the comments section if you have any questions.
If you want your camera to send ONVIF motion detection notifications to your NVR, you need to create additional firewall rules to allow outgoing connections from the camera’s ONVIF port (usually port 80, some Reolink cameras use port 8000). Consult your IP camera manual to see which ports are used for these features.
Step 1. Create a VLAN for your security cameras
For simplicity, I will take the example of creating a VLAN and Wi-Fi SSID for wireless cameras.
In the Unifi world, a VLAN is the same as a ‘network’. So you have to create a ‘network’ with a VLAN ID of your choice.
- Log into your Unifi controller and navigate to Settings > Networks. I am using the classic settings view.
- Click on ‘ + Create New Network’
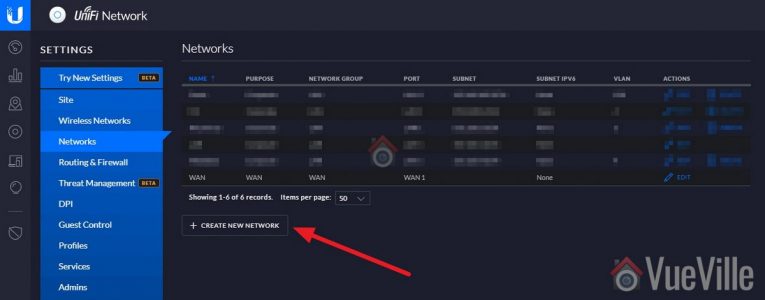
- Enter a name, I chose ‘IPCameras’
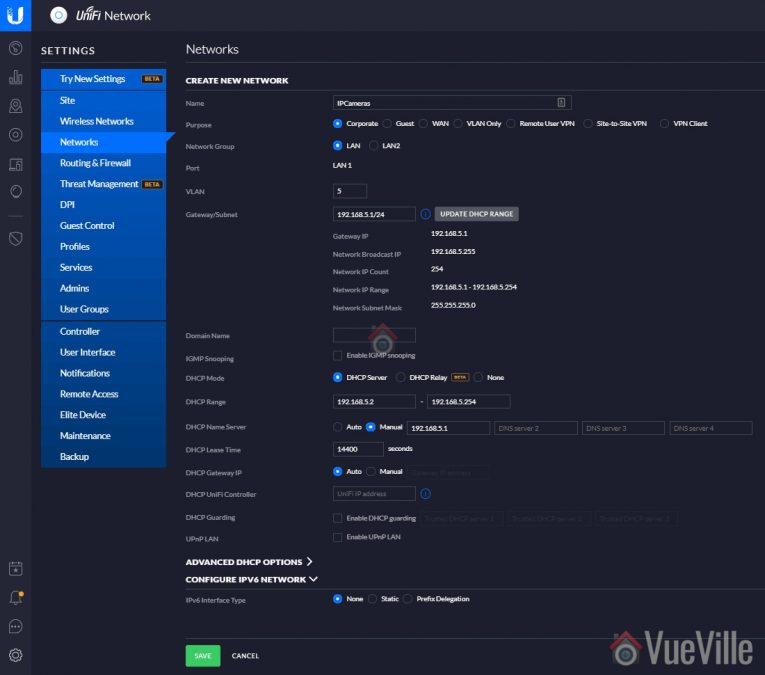
- Leave all the settings at defaults except the following
- VLAN: Select a number, I used 5 as per my home network plan. For convenience, it’s a good idea to keep the VLAN ID same as the subnet you choose in the next step.
- Gateway/Subnet: My main network is 192.168.1.X, so I chose a subnet of 192.168.5.X for this VLAN. So enter your desired subnet followed by ‘/24’. So I entered: 192.168.5.1/24
- DHCP Range: 192.168.5.2 – 192.168.5.254 (replace 5 with your selected subnet number)
- DHCP Name Server: Choose manual and enter 192.168.5.1 (replace 5 with your selected subnet number)
- DHCP lease time: 14400 sec
- Hit Save


Step 2. Create a dedicated Wi-Fi network for your security cameras
Next let’s create a Wi-Fi SSID for your wireless cameras to connect to, and assign this SSID to the ‘network’ created earlier.
- Navigate to Settings > Wireless Networks. I am using the classic settings view.
- Click ‘+ Create New Wireless Network’

- Under the ‘Create New Wireless Network’ section
- Enter the SSID name you want, I chose ‘WirelessIPCameras’
- Choose WPA Personal security and enter a security key (password for this Wi-Fi network)
- Don’t apply guest policies

- Expand the ‘Advanced Options’ section to reveal it
- Select VLAN and enter the VLAN ID you have chosen. I entered 5.
- Hide SSID – select this for better privacy
- If you have created a user group, you can assign one here. Useful for bandwidth rate limiting etc but not relevant in our case.
- Combine Name/SSID: Select this. If your camera supports the 5 GHz band, it will be used instead of the slower 2GHz band. Most security cameras do not.
- Leave all other settings at default

- Hit Save


Wait a few minutes for the Unifi controller to provision the new wireless network.
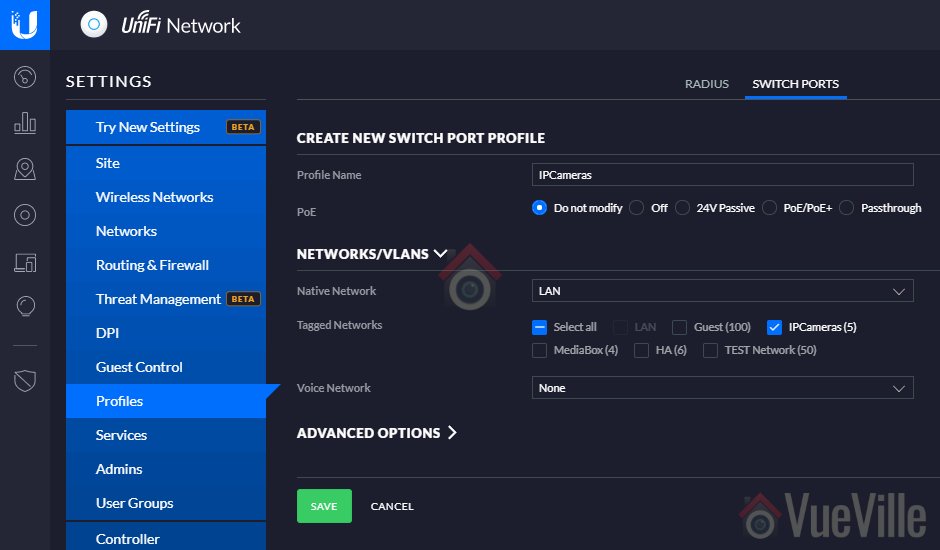
Note: If you are looking to use only wired cameras, the concept remains the same but in this step 2 you will tag specific Unifi switch ports with the VLAN ID from step 1. Here’s a tutorial on grouping wired PoE cameras into a VLAN.
Step 3: Create 3 Firewall rules to block camera access to the Internet
We will create 3 firewall rules for our security camera VLAN and those rules will apply to all the cameras in this VLAN.
The logic behind our firewall rules
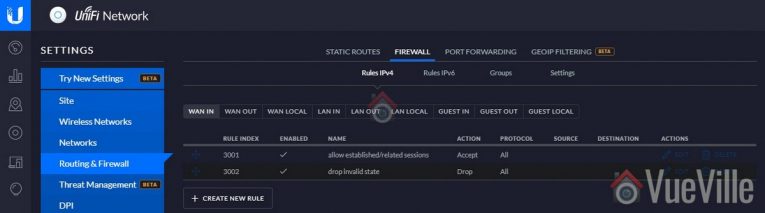
We will be editing the WAN OUT (connections going out to the Internet), and LAN OUT (connections going from inside a VLAN to the rest of your local network or Internet). We will use the default rules for LAN IN (connections coming into a VLAN from the rest of your local network or the Internet):
- We do not want our cameras to accept connections from the Internet. We want to allow only connections from the local network. You can achieve both of this through a single firewall rule, but we don’t need to create it manually. The Unifi USG firewall by default ‘drops’ or ignores all unsolicited incoming connections from the Internet. Any good firewall will do this by default. You can find this default rule under then WAN IN section of the firewall rules.
- We also do not want the cameras to initiate connections to the Internet (WAN). In other words, we do not want them to ‘phone home’ to the manufacturer’s servers. So we will define a WAN OUT rule blocking all outgoing connections initiated by this VLAN. That’s Rule 1.
- To further tighten up things, even when a connection request is received by this VLAN from anywhere else in the local network, I want the firewall to allow the cameras only outgoing RTSP connections. That’s another LAN OUT rule and rule no.2 for today.
- We also don’t want the cameras to initiate any other connection to the rest of the local network (LAN). So we will define a LAN OUT rule blocking all outgoing connections initiated by this VLAN. That’s Rule 3.
Whom this tutorial/approach is not for
Do you want to use your camera manufacturer’s P2P-based mobile app (Dahua P2P, Reolink P2P etc.)? Then this tutorial will not help you – blocking Internet access for the cameras will kill the P2P feature also.
This tutorial is only for those who only want to use the RTSP video stream of their cameras (use all 3 rules below) OR want to use a mobile app set up using a local IP address (use only rule 1 below).
Creating the rules
Right, let’s do it.
- Navigate to Settings > Routing & Firewall. I am using the classic settings view.
- Select the Firewall tab and then Rules IPv4
- Rule 1 – Block access to the Internet (WAN)
- Select the WAN OUT tab, and click ‘+ Create New Rule’
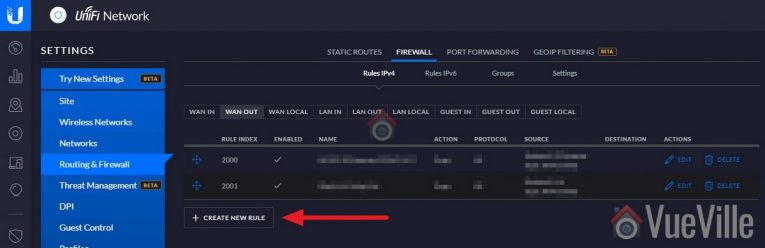
- Name this rule ‘Block IPCameras going out’
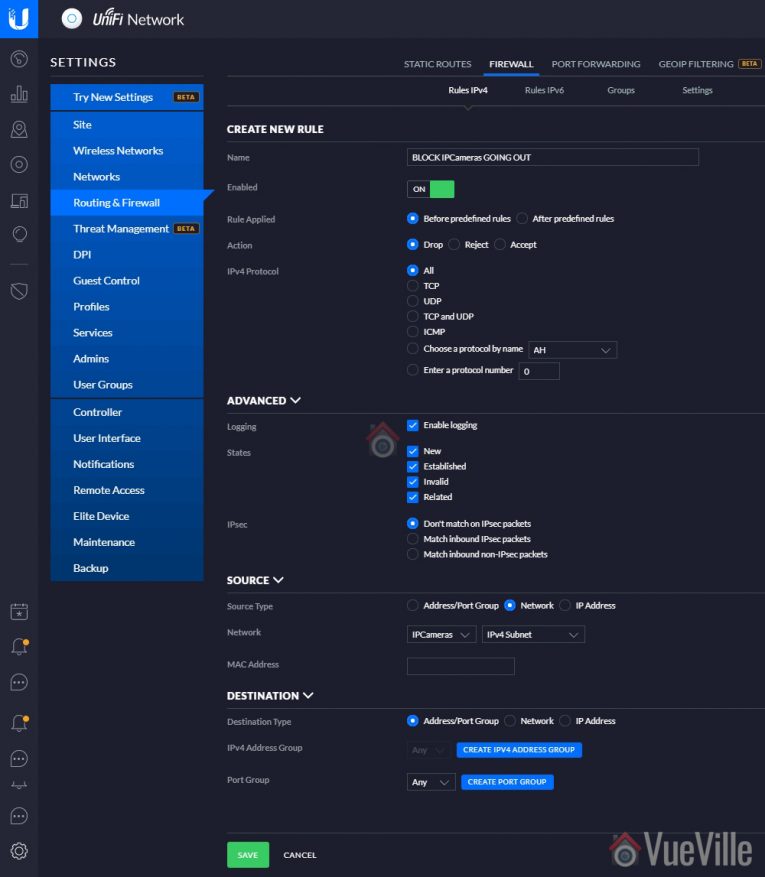
- Under Advanced, enable logging and select all the states
- Under Source, select Network and pick the VLAN network you created earlier (IPCameras in the step 1 above). Ensure IPv4 subnet is selected in the dropdown next to it.
- Leave everything else at defaults
- Hit Save
- Select the WAN OUT tab, and click ‘+ Create New Rule’
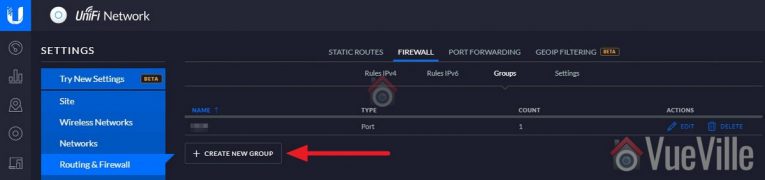
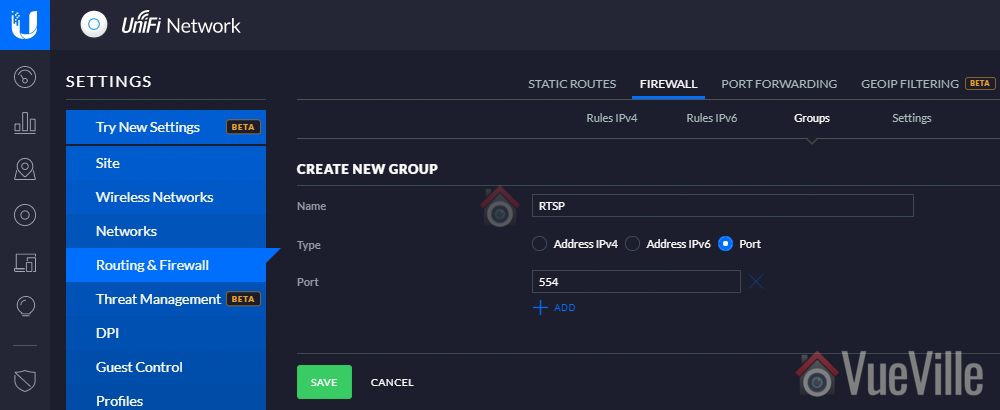
- Create a port group for rule 2
- Navigate to Firewall > Groups
- Click on ‘+Create New Group’
- Name it ‘RTSP’ and enter port as 554 (or whichever port your camera uses for RTSP)
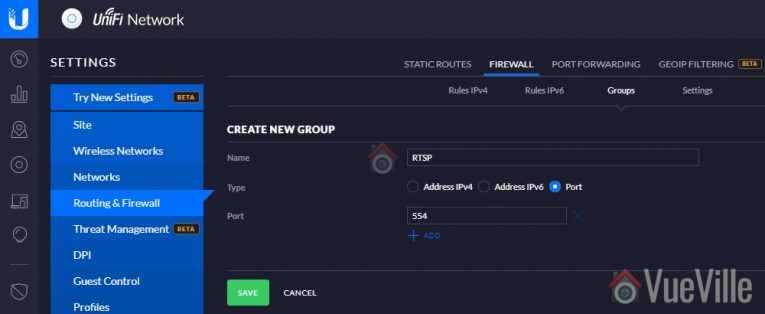
- Hit Save
- Rule 2 – Allow only RTSP outgoing connections in response to incoming requests from the LAN
- Select the LAN OUT tab, and click ‘+ Create New Rule’
- Name this rule ‘Allow only RTSP port 554 out established’
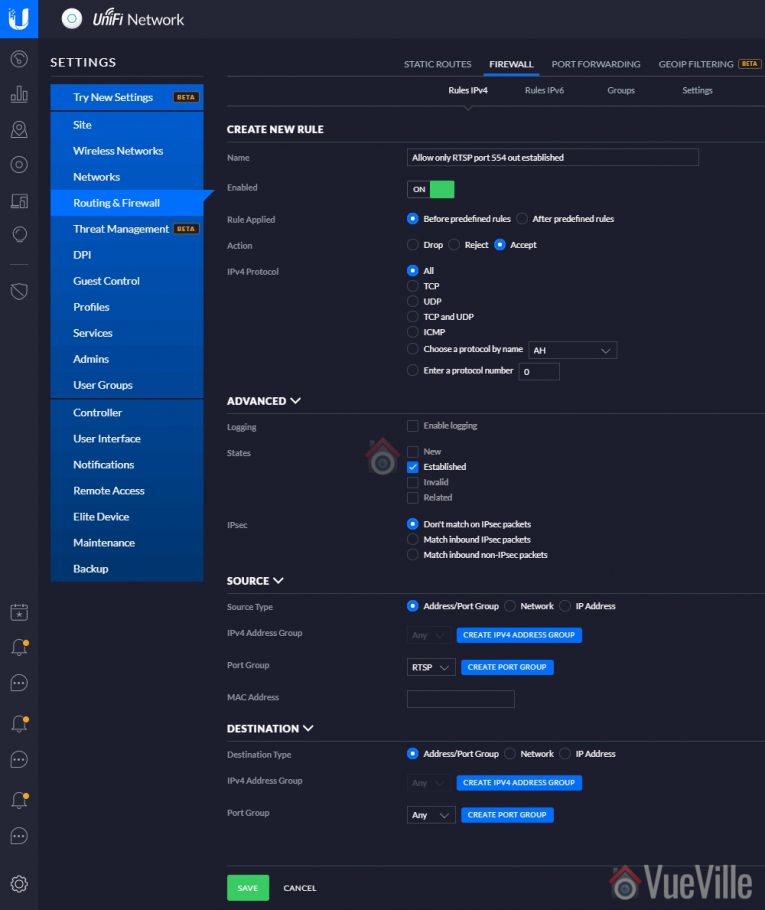
- Select state ‘Established’
- Select Source type ‘Address/Port Group’
- Under port group, select the RTSP port group you created earlier
- Leave everything else at defaults
- Hit Save
- Rule 3 – Block access to the rest of your home network (LAN)
- Select the LAN OUT tab, and click ‘+ Create New Rule’
- Name this rule ‘Drop all outgoing’

- Under Advanced, select all the states
- Under Source, select Network and pick the VLAN network you created earlier (IPCameras in the step 1 above). Ensure IPv4 subnet is selected in the dropdown next to it.
- Leave everything else at defaults
- Hit Save


The order of these rules is very important – after creating the rules above, make sure that under the ‘LAN OUT’ section rule 2 is on the top of the list and rule 3 should be after it. Because that’s the order in which the firewall will process the rules.
Now let’s test the rules to see whether they are working as intended. Temporarily connect a laptop or mobile phone to the Wi-Fi SSID you created. You should not be able to reach the Internet or access any other local network resource such as the Unifi controller dashboard. If all is well, disconnect from the Wi-Fi network.
Now simply connect your wireless cameras to the Wi-Fi SSID. Re-connect your mobile phone or laptop to your regular Wi-Fi network. Now try to access the RTSP stream of your cameras – you should get a video stream.
Congratulations! You have now secured your security cameras and your network is a whole lot safer.

Do you have the tutorial on how to tag specific Unifi switch ports with the VLAN ID?
Not yet, but try this Unifi guide.
If your “Allow only RTSP port 554 out established” rule doesn’t seem to be working, check to make sure that it is higher up on the list of rules than your “Drop all outgoing” rule. You can click the little multi-direction arrow symbow to the left of the Rule Index column to drag and re-arrange the rule orders.
(The rules are checked in order from top to bottom, and stops when it finds one that matches. So if the “drop all” rule is higher up, it will always trigger and it won’t ever get a chance to check if the traffic is RTSP, which it should be letting through.)
Thanks for this – I mixed up rule 2 and 3! Fixed now.
Hi,
Thank you for this write up. What rules need to be set to allow the QNAP and cameras to talk to each other?
You’re welcome! For the QNAP surveillance centre (or any NVR software) to successfully add an IP camera and configure it, you need to allow ‘established’ outgoing LAN connections from the camera’s ONVIF port (usually port 80 but it may be different for your IP camera). So just create a LAN OUT rule similar to the RTSP rule in the article, but specify the ONVIF port number instead.
If your NAS/NVR is in a VLAN and you have locked that VLAN down too, then you need to add similar firewall rules for that VLAN too (like I have). Here, the NAS needs to be able to make outgoing LAN connections to the IP Camera VLAN on the ONVIF port (at least). You could also simply allow the NAS to access any port on the IP camera for simplicity.
Sorry, also noticed you’ve said you’ve locked down the VLAN for the NAS/NVR. Are you preventing that VLAN from seeing other VLANs? If so, does that cause any issues for using the QNAP as your NAS, as that was my plan as well. Thanks again.
I meant that I have set it up such that 1)the NAS cannot access the Internet (no WAN access) and 2)the NAS can only initiate an outgoing connection to the cameras VLAN and a few other specified VLANs. For those VLANs (such as my personal devices), the NAS can only accept an incoming connection from the rest of the LAN and respond to it. The reasoning here is that I don’t want the NAS to start accessing my personal devices without me asking it to (like when I open an Excel file on the NAS or when an automatic backup starts from my mobile phone using the QFile app).
Is there any risk to simply create two LAN IN rules allow the QNAP and Camera VLANs to communicate without specifying specific ONVIF ports?
Also, would you be able to make a post explaining the OpenVPN on the QNAP a little more? Is this simply a way to access your home network remotely or have you set up the OpenVPN on the QNAP so that it is the DNS server for your devices instead of the USG? Are you then conditionally assigning the QNAP to port back to the USG for local area network? Thank you!