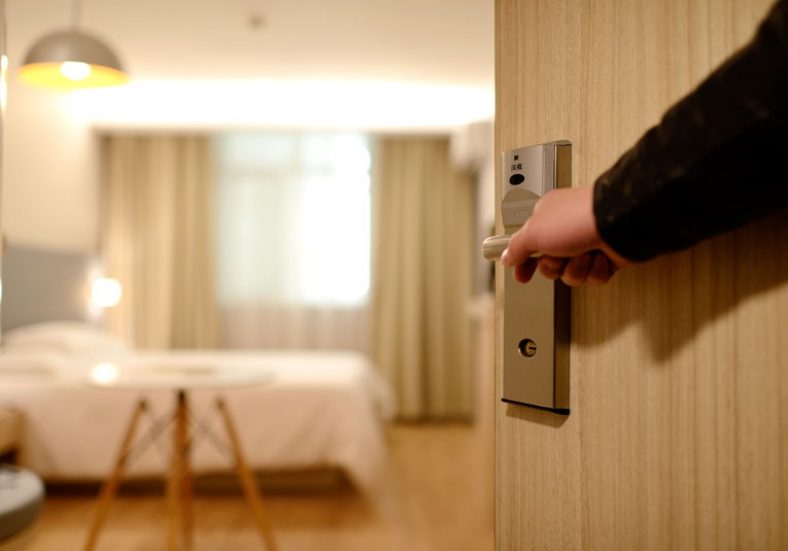
One of the great things about using a Z-Wave based home automation system is the sheer choice of accessories available for everything from door sensors to motion detectors.
The Z-Wave door/window sensors we will look at today are perfect for automating your smart home. Here are some of the things these door sensors can do through your a Z-Wave based smart home hub:
- Turn down the thermostat automatically if external doors or windows are open for too long.
- Give voice alerts or send push notifications to your smartphone if a window is open past a particular time of the day
- If there’s a door that shouldn’t normally be opened, use one of these door sensors to keep an eye on it!
- Make a mailbox sensor so that you can get voice and push alerts for new mail
Remember you should not use Z-Wave door/window sensors as your primary means of securing your property. It is best practice to use dedicated alarm panels for home security which can also interface with your Z-Wave hub. Examples are the alarm panels and systems from DSC and Honeywell.
[wpsm_titlebox title=”Contents” style=”main”][contents h2][/wpsm_titlebox]
A quick note: As an Amazon Associate I earn from qualifying purchases. This post contains affiliate link(s). An affiliate link means I may earn advertising or referral fees if you make a purchase through my link, at no extra cost to you.
How do Z-Wave door sensors work?
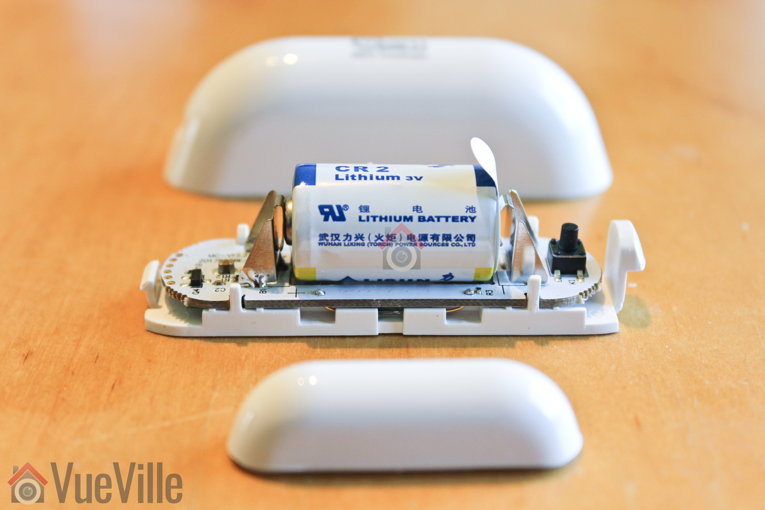
You may have heard them being referred to as contact sensors, but door sensors don’t actually touch each other. All door sensors will also have two halves – a main sensor body containing the battery and electronics and a magnetic half. These can be separated by a small gap of not more than an inch or so. Whenever the gap between the two halves exceeds this limit, ‘magnetic contact’ is broken and they report an ‘open’ status change to your Z-Wave hub.
What are the different types of Z-Wave door sensors?
Depending on the form factor, we can group them into the following categories:
- Door and Window Sensors
- These come in two halves – the main sensor housing with the battery and the smaller magnet. One half goes on the door frame and the other half goes on the door.
- Recessed Door Sensors
- These also come in two halves, but the larger half contains the battery and is recessed into the door frame. The smaller magnet is recessed into the door.
Regardless of which form they take, some models can measure not just open/close (or magnetic contact), but also temperature or humidity. An example is the [easyazon_link identifier=”B00K252JV6″ locale=”US” tag=”vueville.com-eaz-20″]Philio Door/Window Multisensor[/easyazon_link]. If you would like to learn more about multisensors, check out this post.
How do I install a Z-Wave door sensor
Like any Z-Wave device, you have to ‘include’ them in your Z-Wave network by following the manufacturer’s inclusion method.
From years of experience working with Z-Wave, I have two tips I would like to mention:
- Factory reset the device before you start the inclusion process. This step alone has saved me hours of frustration while setting up a Z-Wave device
- Put the device as close as possible to the Z-Wave hub while performing the inclusion process. Definitely aim for <1 metre distance between the two. This should also help with the common issue where the device gets included but in non-secure mode.
What should I look for in a door sensor?
- Size: If you are after discreet sensors, your options may be limited but they do exist.
- Z-Wave Plus: The newer Z-Wave Plus standard comes with improved wireless range, longer battery life and secured communications. Most Z-Wave sensors come with Z-Wave Plus certification these days but its good to check anyway.
- Sensitivity: Because door and window sensors work on magnets, there is a limit to how far apart you can place the two halves of the sensor. For example, the [easyazon_link identifier=”B01E0OMQR6″ locale=”US” tag=”vueville.com-eaz-20″]Aeotec Door/Window Sensor 6[/easyazon_link] can work over a gap of up to 2.2 cm or 0.87 inches. Also be aware that if your door or window doesn’t close flush with the frame, the two halves end up ind different planes, sensitivity will be lower and as a result the maximum effective gap reduces.
- Battery life: Typically 1 – 2 years, the smaller door sensors have smaller capacity batteries and thus lower battery life. Some have up to 3 years battery life. Rechargeable models are rare but do exist – see the Aeotec rechargeable door sensor.
[text-blocks id=”5527″ slug=”earning-disclaimer”]
Best Z-Wave Door/Window Sensors for 2024
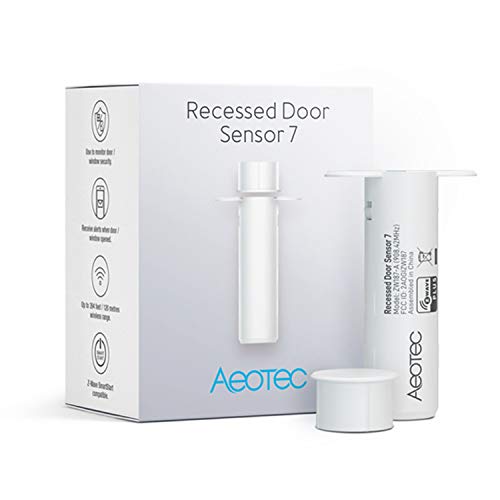
Aeotec Door/Window Sensor 7 (ZWA008)
[easyazon_image align=”center” height=”500″ identifier=”B07PDDX3K6″ locale=”US” src=”https://m.media-amazon.com/images/I/41oiOWeenXL.jpg” tag=”vueville.com-eaz-20″ width=”500″]
The Aeotec Door/Window Sensor 7 is a sleek and stylish sensor that has 3 sensors actually – the magnetic contact sensor, a tilt sensor and a dry contact sensor. Unlike its predecessor which came with a sealed rechargeable battery, this new iteration uses a single 1/2 AA battery.
The sensor consists of 2 parts. The main body uses two magnetic reed switches placed along its edge and is triggered by the 20 mm wide magnet which can be placed up to 15mm away.
The ZW-120 was another Aeotec model that did not use a rechargeable battery. But that has now been discontinued.
Full specs:
- Simple DIY installation with screws or double sided tape
- Transmits open/closed status
- Z-Wave Plus certified
- Size of sensor: Height – 19mm/0.75inches, Width – 71mm/2.8inches, Depth – 18mm/0.7inches
- Size of magnet: Height-8mm/0.13inches, Width-20mm/0.78inches, Depth-11mm/0.43inches
- Weather rating: IP20
- Tamper-proof
- Operating range of 150 metres (492 feet) point to point
- Over the Air (OTA) firmware upgrade
- S2 Security
- AES 128 bit security encryption
- Paintable for invisible installation. Crafted from acrylonitrile butadiene styrene (ABS) plastic
- Compatible with Samsung SmartThings, Vera, Zipabox, HomeSeer, Ring, Open Z-Wave, Nexia, Domoticz and other Z-Wave hubs
[easyazon_link identifier=”B07PDDX3K6″ locale=”US” tag=”vueville.com-eaz-20″]View on Amazon[/easyazon_link]
Fibaro Z-Wave Plus Door/Window Sensor with Temperature Measurement (FGK-101 ZW5)
[easyazon_image align=”center” height=”483″ identifier=”B074FCG1PF” locale=”US” src=”https://m.media-amazon.com/images/I/415bIRSwT1L.jpg” tag=”vueville.com-eaz-20″ width=”500″]
Fibaro is another favourite brand of mine. These guys have a wide range of high quality, well-built yet affordable Z-Wave products.
This door/window sensor has a small footprint and comes in 7 different colours – white, grey, black, cream, and 3 shades of brown. But that’s not all, it has an ace up its sleeve – it can also measure temperature.
A small blue LED lights whenever contact is made or broken, a nice visual indicator that the device is functional.
Full specs:
- Transmits open/closed status
- Z-Wave Plus certified
- Size: 76 x 17 x 19 mm
- Tamper-proof
- ER14250 ½ AA battery
- 12-24 months battery life
- Weather rating: Indoor, 0-40°C operating temperature
- Operating range of 50 metres (164 feet)
- AES 128 bit security encryption
- Potential-free input allowing to connect a button or binary sensor
- Compatible with the DS18B20 temperature sensor
- Works with Samsung SmartThings, Vera Plus and other Z-Wave hubs
[easyazon_link identifier=”B074FCG1PF” locale=”US” tag=”vueville.com-eaz-20″]View on Amazon[/easyazon_link]
Ecolink Zwave Plus Door & Window Sensor (DWZWAVE2.5-ECO)
[easyazon_image align=”center” height=”500″ identifier=”B01N5HB4U5″ locale=”US” src=”https://images-na.ssl-images-amazon.com/images/I/21gnASMGHSL.jpg” tag=”vueville.com-eaz-20″ width=”274″]
Ecolink is a leading manufacturer of low power wireless systems and have been in the game for over 20 years. They claim that they use rare earth magnets in their door sensors to improve accuracy.
This sensor has a glossy white coating that makes it stand out a bit from the rest of its ilk. Tool-free access enables you to quickly open it if required. An interesting feature is the input on the sensor to which a non-powered external contact can be connected. It will also report a tamper state whenever the cover is opened.
The maximum gap possible between the two sensor halves is 5/8″, and Ecolink claims that this makes it ideal for commercial or double hung windows.
To include the sensor in your network, first put your Z-Wave hub in inclusion mode. Pull out the plastic pull-tab from the back of the sensor, thus activating the device. The sensor should automatically start the inclusion process and when complete, the red LED will become solid red and then go out. Now test the sensor by bringing the two halves togther and then apart, the red LED should blink once. If it blinks 5 times instead, the inclusion process failed and needs to be repeated. I would suggest resetting the sensor and include it by keeping it not more than 1 metre from your Z-Wave hub.
Full specs:
- Transmits open/closed status, tamper notification, battery status and low battery alert
- Z-Wave Plus certified
- Attach with provided adhesive pads, screws or glue
- Tamper-proof
- 3 years battery life
- 1x CR123A battery
- Size: Sensor Body: 3 x 1.1 x .75 in, Magnet Piece: 3 x .5 x .75 inches
- Weather rating: indoor only, Operating temperature: 0° to 49°C
- Up to 30 m/100 ft maximum range outdoors
- Works with Samsung SmartThings, Vera Plus and other Z-Wave hubs
[easyazon_link identifier=”B0722H445L” locale=”US” tag=”vueville.com-eaz-20″]View on Amazon[/easyazon_link]
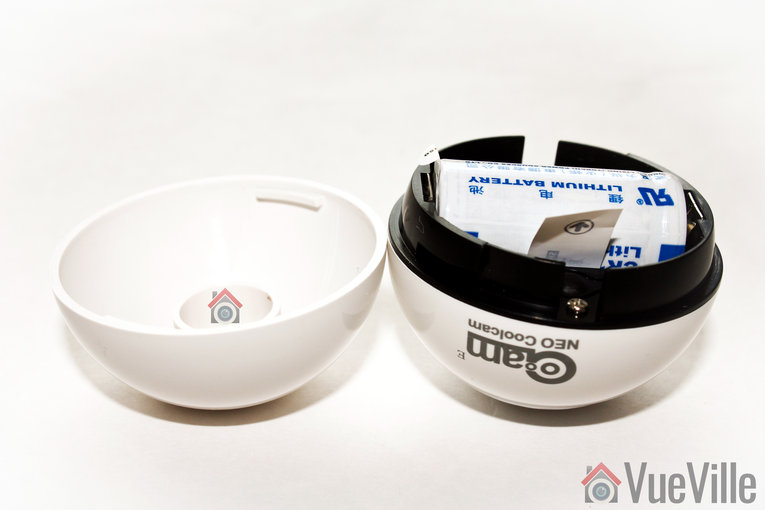
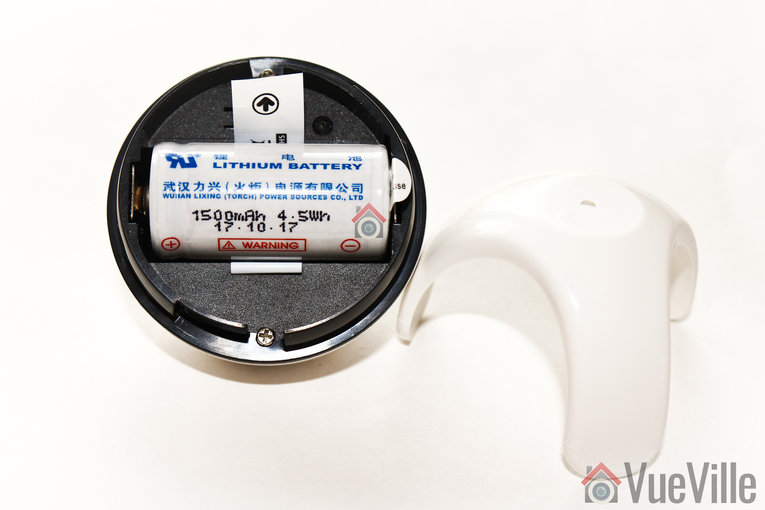
Neo Coolcam Z-Wave Door/Window Sensor
[easyazon_image align=”center” height=”500″ identifier=”B07QDS5DZ4″ locale=”US” src=”https://m.media-amazon.com/images/I/31MrRLqmkCL.jpg” tag=”vueville.com-eaz-20″ width=”500″]
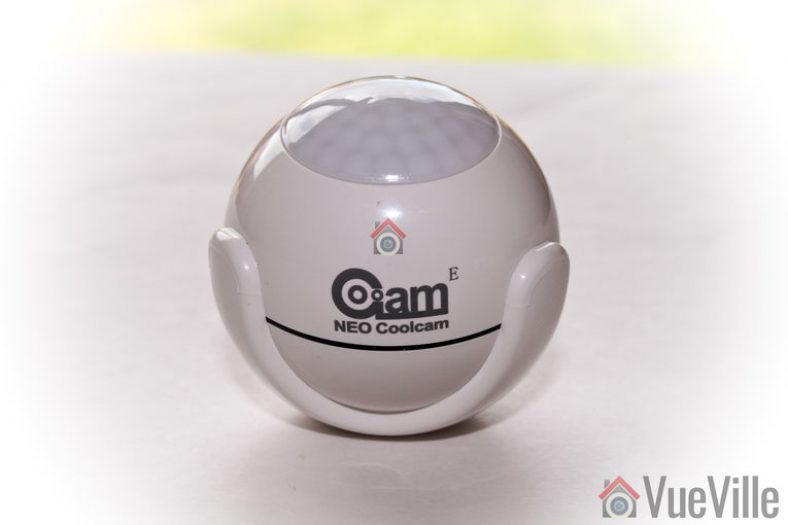
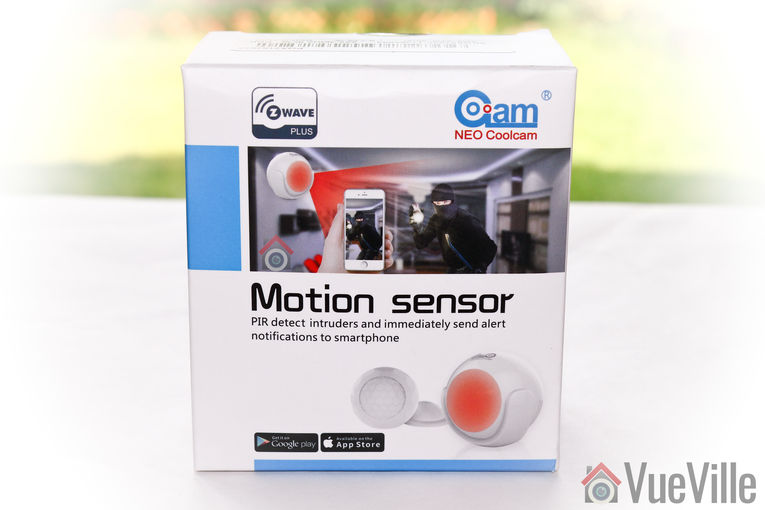
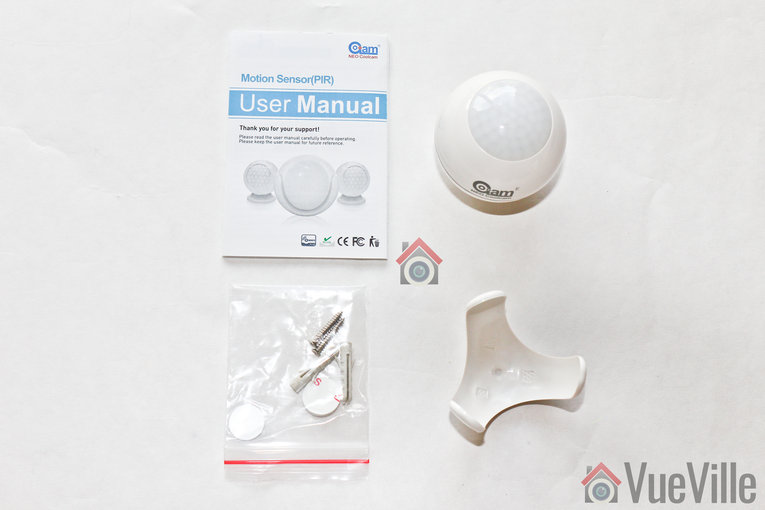
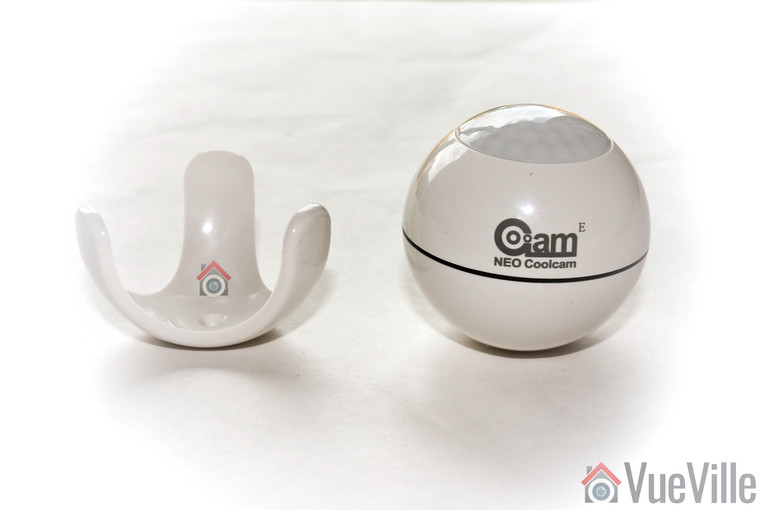
Neo Coolcam is a Chinese brand that has been launching affordable Z-Wave gear recently. We have tested and reviewed their motion sensor, siren alarm and their door sensor products.
The Neo Coolcam door/window sensor is a glossy white affair with a concealed RED LED that activates whenever contact is made or broken. We have been using this sensor for 6 months and have been very impressed by its reliable performance and battery life. The only negative is that it doesn’t have tamper detection sensor.
Read our hands-on review in details here:
[wpsm_top postid=5930]
Full specs:
- Transmits open/closed status & battery status
- Z-Wave Plus certified
- Attach with glue or screws
- Size: 71 x 20 x 22 mm (main body), 40 x 11 x 11 mm (magnet)
- 1x CR2 battery
- 12-24 months battery life
- Weather rating: IP20 outdoor rated, operating temperature: 0° – 40°C
- Operating range of 60 metres (200 feet)
- Works with Samsung SmartThings, Vera Plus and other Z-Wave hubs
[easyazon_link identifier=”B07QDS5DZ4″ locale=”US” tag=”vueville.com-eaz-20″]View on Amazon[/easyazon_link]
Monoprice Z-Wave Plus Door and Window Sensor (24259)
[easyazon_image align=”center” height=”375″ identifier=”B073WFL9SC” locale=”US” src=”https://images-na.ssl-images-amazon.com/images/I/31Aku3Q1VlL.jpg” tag=”vueville.com-eaz-20″ width=”500″]
Monprice has a great line-up of Z-Wave products. I have been using a few of their cheap and cheerful 4-in-1 multisensors with great results, and now here we have their door window sensor.
This is not a fancy sensor and its designed to get the job done at the lowest possible cost. So it looks very industrial, is not particularly small but surprisingly is not light on features.
It does have the latest Z-Wave Plus chip though, and has a very good operating range of 300 feet. It does use 2x AAA batteries, and this could be the secret of its 1 year battery life. An LED is present which indicates opening or closing. You also get tamper detection.
Full specs:
- Transmits open/closed status & battery status
- Z-Wave Plus certified
- Attach with glue or screws
- Size: 3.0″ x 1.1″ x 0.7″ (75 x 28 x 18 mm) sensor, and 3.0″ x 0.5″ x 0.7″ (75 x 12 x 18 mm) magnet
- LED indicator
- 2x AAA battery
- 12-24 months battery life
- Weather rating: Indoor only, operating temperature +32 ~ +104°F (0 ~ +40°C)
- Operating range of 30 m indoors (98 feet), 100 m outdoors (328 feet)
- Tamper detection
- Works with Samsung SmartThings, Vera Plus and other Z-Wave hubs
[easyazon_link identifier=”B073WFL9SC” locale=”US” tag=”vueville.com-eaz-20″]View on Amazon[/easyazon_link]
Philio Z-Wave Multi-sensor (PSM01)
[easyazon_image align=”center” height=”500″ identifier=”B00K252JV6″ locale=”US” src=”https://images-na.ssl-images-amazon.com/images/I/41lwJ%2BKlEZL.jpg” tag=”vueville.com-eaz-20″ width=”464″]
Philio is a Taiwanese manufacturer that has been in business since 2012. They make a range of home automation and security products including cameras, sensors, controllers, smart plugs and even door locks.
The PST02 series of sensors comes in three models indicated by the suffix A, B or C after the model name. A indicates the 4-in-1 model which has sensors for motion, illumination, temperature and the door/window open/close detection, B loses the open/close sensor, whereas C loses the PIR motion detector. All three models have the latest Z-Wave 500 series chip allowing concurrent multi-channel support to reduce interference, improved RF range, and up to 100kbps transmission speed.
The Philio Tech multisensor comes pre-installed with a CR123A battery. The included user guide is very detailed, accurate and well-written. Adding the Philio sensor to your Z-Wave sensor is just like adding any other Z-Wave device – but the sensor makes it even easier and auto-starts the inclusion process when you pull off the insulation mylar. The device also supports the exclusion, reset and association modes as expected.
There are also two tamper-proof switches at the back and the front which are great considering you will have it installed on doors or windows. Some other interesting features are the OTA (Over The Air) firmware upgrade and a DIP switch to put the device into Test mode. Test mode allows you to test the device functionality without actually installing it.
Full specs:
- Motion, Light, Temperature, Open/Close
- Indoor only
- 1x CR123A Battery (up to 2 years life)
- Tamper-proof
- Up to 40m range indoors
- Works with Samsung SmartThings, Vera Plus and other Z-Wave hubs
[easyazon_link identifier=”B00K252JV6″ locale=”US” tag=”vueville.com-eaz-20″]View on Amazon[/easyazon_link]
HomeSeer HS-DS100+ Z-Wave Plus Door/Window Sensor
[easyazon_image align=”center” height=”500″ identifier=”B0722H445L” locale=”US” src=”https://images-na.ssl-images-amazon.com/images/I/41svTTbJvWL.jpg” tag=”vueville.com-eaz-20″ width=”500″]
I use the HomeSeer HS3 software to control my Z-Wave network and for home automation. HomeSeer also makes Z-Wave accessories such as this HS-DS100+ door/window sensor.
Full specs:
- Transmits open/closed status, tamper notification, battery status and low battery alert
- Z-Wave Plus certified
- Attach with provided adhesive pads, screws or glue
- Tamper-proof
- 12 months battery life
- 2x AAA Battery (up to 2 years life)
- Size: Sensor Body: 3 x 1.1 x .75 in, Magnet Piece: 3 x .5 x .75 inches
- Weather rating: indoor only, Operating temperature: 0° to 40°C
- Up to 300ft maximum range outdoors
- Works with Samsung SmartThings, Vera Plus and other Z-Wave hubs
[easyazon_link identifier=”B0722H445L” locale=”US” tag=”vueville.com-eaz-20″]View on Amazon[/easyazon_link]
Haozee Z-Wave Door/Window Sensor
[easyazon_image align=”center” height=”500″ identifier=”B07BK65MLH” locale=”US” src=”https://images-na.ssl-images-amazon.com/images/I/31y1LshBHZL.jpg” tag=”vueville.com-eaz-20″ width=”500″]
The Haozee Z-Wave door sensor seems to be a rebranded Neo Coolcam Door/Window sensor. As such it has the same features as that sensor.
Full specs:
- Transmits open/closed status & battery status
- Z-Wave Plus certified
- Attach with glue or screws
- Size: 71 x 20 x 22 mm (main body), 40 x 11 x 11 mm (magnet)
- 1x CR2 battery
- 12-24 months battery life
- Weather rating: IP20 outdoor rated, operating temperature: 0° – 40°C
- Operating range of 60 metres (200 feet)
- Works with Samsung SmartThings, Vera Plus and other Z-Wave hubs
[easyazon_link identifier=”B0722H445L” locale=”US” tag=”vueville.com-eaz-20″]View on Amazon[/easyazon_link]
GoControl Z-Wave Door/Window Sensor (WADWAZ-1) (Also branded as Linear)
[easyazon_image align=”center” height=”500″ identifier=”B00MNYSEF4″ locale=”US” src=”https://images-na.ssl-images-amazon.com/images/I/31UmxyKkaqL.jpg” tag=”vueville.com-eaz-20″ width=”500″]
GoControl is a popular brand owned by California-based Nortek Security and Control. They produce a huge range of home automation products ranging from smart bulbs, switches, doorbells to Z-Wave sensors.
The WADWAZ-1 Door sensor is a reed-switch type sensor and can operate at a maximum gap of 0.75″ between the sensor body and the magnet. Powered by a single CR-123A battery, it can operate for up to 1 year continuously.
A red LED is included on the main sensor body to indicate open/close sensing. When you first insert the battery, this LED will start flashing slowly indicating that it is not part of a Z-Wave network yet. Put your hub into inclusion mode. Inclusion will start automatically and is complete when the red LED stops flashing. If automatic inclusion didn’t work, you can attempt manual inclusion by holding the program/tamper switch for 1 second and releasing. When inclusion is successful, the LED will stop blinking.
This is the only sensor I have come across that can monitor an additional opening, such as an external normally closed switch contact which is connected to the sensor’s external input terminals.
Full specs:
- Transmits open/closed status, tamper notification, battery status and low battery alert
- Can monitor an additional wired contact sensor
- Z-Wave certified
- Attach with provided adhesive pads, screws or glue
- Tamper-proof
- 1x CR123A battery
- Up to 100ft maximum range outdoors
- Works with Samsung SmartThings, Vera Plus and other Z-Wave hubs
The GoControl door and window sensor is also marketed as the [easyazon_link identifier=”B00MOF2IPY” locale=”US” tag=”vueville.com-eaz-20″]Linear Z-Wave Door/Window Sensor[/easyazon_link].
[easyazon_link identifier=”B00MNYSEF4″ locale=”US” tag=”vueville.com-eaz-20″]View on Amazon[/easyazon_link]
BeSense ZWave Plus Door and Window Sensor (IM20)
[easyazon_image align=”center” height=”310″ identifier=”B073RV9VYC” locale=”US” src=”https://images-na.ssl-images-amazon.com/images/I/216eFyQe0TL.jpg” tag=”vueville.com-eaz-20″ width=”500″]
BeSense is a developer of low power wireless IoT systems. Their Z-Wave Plus door sensor has a unique design with a slit like red LED on the main sensor body. They have very clear instructions for both Samsung SmartThings and Vera Plus on their website and in the included user manual.
Running off 2x AAA batteries, BeSense says the sensor will last for up to 3 years. There is an anti-tamper sensor which is great. The maximum distance between the two halves of the sensor is 5/8″.
Full specs:
- Transmits open/closed status, tamper notification, battery status and low battery alert
- Z-Wave Plus certified
- Attach with provided adhesive pads, screws or glue
- Tamper-proof
- 2x AAA Battery (up to 3 years life)
- Size: 80 x 50 x 20 mm
- Weather rating: indoor only, Operating temperature: -10° to 50°C
- Up to 30 m (100 ft) maximum range outdoors
- Works with Samsung SmartThings, Vera Plus and other Z-Wave hubs
[easyazon_link identifier=”B073RV9VYC” locale=”US” tag=”vueville.com-eaz-20″]View on Amazon[/easyazon_link]
Zipato Z-Wave Door/Window Sensor (VS-ZD2102.US)
[easyazon_image align=”center” height=”500″ identifier=”B00Q68IXSQ” locale=”US” src=”https://images-na.ssl-images-amazon.com/images/I/41svTTbJvWL.jpg” tag=”vueville.com-eaz-20″ width=”500″]
Zipato is an IoT plaform business started in 2010. They have a complete Z-Wave based home automation offering but it is Interet-reliant. However their accessories are compatible with any Z-Wave hub.
My first thought was that the Zipato door and window sensor looks a lot like the Neo Coolcam sensor. In any case this is a Z-Wave Plus device that is missing quite a few features – there’s no tamper detection, no external sensor input, and no temperature sensor.
Full specs:
- Transmits open/closed status, battery status and low battery alert
- Z-Wave Plus certified
- Attach with provided adhesive pads, screws or glue
- 1 year battery life
- 1 year warranty
- 1x 3V CR2 battery
- Size: Sensor Body: 71 x 20 x 22 mm, Magnet Piece: 40 x 11 x 11 mm
- Weather rating: Indoor only, Operating temperature: 0° to 40°C
- Up to 60m maximum range outdoors
- Works with Samsung SmartThings, Vera Plus and other Z-Wave hubs
[easyazon_link identifier=”B00Q68IXSQ” locale=”US” tag=”vueville.com-eaz-20″]View on Amazon[/easyazon_link]
Enerwave Z-Wave Door and Window Sensor (ZWN-BDS)
[easyazon_image align=”center” height=”500″ identifier=”B00JWVNJ88″ locale=”US” src=”https://images-na.ssl-images-amazon.com/images/I/319H6pKCO8L.jpg” tag=”vueville.com-eaz-20″ width=”500″]
The Enerwave ZWN-BDS is a Z-Wave Plus door sensor that can provide open/close status for monitoring doors and windows whenever the magnetic contact is broken. The maximum possible gap between the two halves of the sensor is 1/2″. I was surprised to see a 2 year warranty on offer, this is definitely a plus.
This sensor supports Network Security but does not support S2 Security or AES-128 Security S0.
Full specs:
- Transmits open/closed status, tamper notification, battery status and low battery alert
- Z-Wave Plus certified
- Z-Wave Device Type / Role Type: Notification Sensor / Reporting Sleeping Slave
- Attach with provided adhesive pads, screws or glue
- 1x CR2 battery (1 year battery life)
- Size: 2.02” x 1.71″ x 0.62″
- Weather rating: indoor only, Operating temperature: 32°F – 104°F (0°C -40 °C)
- Up to 30 m (100 ft) maximum range outdoors
- Supports Z-Wave associations, can send commands up to 5 associated Z-Wave devices
- Remotely monitor sensor status from a computer, tablet or smartphone
- 2 years warranty
- Works with Samsung SmartThings, Vera Plus and other Z-Wave hubs
[easyazon_link identifier=”B00JWVNJ88″ locale=”US” tag=”vueville.com-eaz-20″]View on Amazon[/easyazon_link]
Dome Z-Wave Door/Window Sensor (DMWD1)
[easyazon_image align=”center” height=”500″ identifier=”B01JGMZNNG” locale=”US” src=”https://images-na.ssl-images-amazon.com/images/I/41cSQBv5ohL.jpg” tag=”vueville.com-eaz-20″ width=”500″]
The Dome brand of home automation gear is one that you may not have heard of before, but they have a range of high quality products with comprehensive documentation. This DMWD1 door sensor is Z-Wave plus certified and has a remarkably long battery life of 3 years.
But the similarity to the Neo Coolcam range is unmistakable. Doesn’t bother me too much though as long as they work reliably and are affordable!
Full specs:
- Transmits open/closed status, battery status and low battery alert
- Z-Wave Plus certified
- Attach with provided adhesive pads, screws or glue
- 1x CR14250 3.6V battery (up to 3 years battery life)
- Size: Sensor: 2.75” x 0.8” x 0.8” (70 x 20 x 20 mm), Magnet: 1.3” x 0.5” x 0.5” (40 x 11 x 11 mm)
- Weather rating: indoor only, Operating temperature: 32 – 104 °F (0 – 40 °C)
- Up to 150ft maximum range outdoors
- Works with Samsung SmartThings, Vera Plus and other Z-Wave hubs
[easyazon_link identifier=”B01JGMZNNG” locale=”US” tag=”vueville.com-eaz-20″]View on Amazon[/easyazon_link]
Monoprice Z-Wave Plus Door and Window Sensor (10795)
[easyazon_image align=”center” height=”375″ identifier=”B00IACIVKQ” locale=”US” src=”https://images-na.ssl-images-amazon.com/images/I/214hzsxwf7L.jpg” tag=”vueville.com-eaz-20″ width=”500″]
Monoprice has another door sensor on offer – this one goes for the long narrow body approach instead of the wider shorter sensor we saw earlier. It also has a more prominent LED to indicate open/close detection.
This door sensor uses the ZM3102N Z-Wave chip meaning its not a Z-Wave plus sensor. That’s not great for operating range or for battery life. It also means secure communications are not possible.
The maximum possible gap between the sensor body and the magnet is 19mm (0.75″). An interesting feature is that you can connect a wired contact sensor to connection points on the internal board of this sensor.
Full specs:
- Transmits open/closed status & battery status
- Z-Wave certified
- Attach with provided adhesive pads, screws or glue
- Size: 1.8 x 4.1 x 1.4 inches
- 1x CR123A battery
- 12 months battery life
- Weather rating: indoor only, Operating temperature: -15° to 60°C
- Operating range of 30 metres (100 feet)
- Works with Samsung SmartThings, Vera Plus and other Z-Wave hubs
[easyazon_link identifier=”B00IACIVKQ” locale=”US” tag=”vueville.com-eaz-20″]View on Amazon[/easyazon_link]
Schlage Nexia Z-Wave Door and Window Sensor (RS-100)
[easyazon_image align=”center” height=”250″ identifier=”B008Q5CTBE” locale=”US” src=”https://images-na.ssl-images-amazon.com/images/I/21vyePskE5L.jpg” tag=”vueville.com-eaz-20″ width=”350″]
Schlage is owned by the Fortune 150 company Ingersoll Rand which acquired it in 1974. Within the home automation space, Schlage are better known for their impressive Z-Wave range of door locks. But they also sell other Z-Wave products under the Nexia brand which unfortunately follows the monthly subscription model.
However this RS-100 door sensor does not require a Nexia hub to work and is compatible with any Z-Wave hub. The main sensor body has an LED to indicate sensor status. The maximum gap between the main sensor body and the magnet should not exceed 19mm (3/4″).
Full specs:
- Transmits open/closed status
- Z-Wave certified
- Attach with glue or screws
- Size: 3.5” x 1.75” x 1”
- 3V Lithium CR123A
- 24 months battery life
- Weather rating: Indoor only, operating temperature: 0° – 49°C, 32° – 120°F (ambient temperature)
- Operating range of 30 metres (100 feet)
- Reports tamper alarm if cover is opened
- Works with Samsung SmartThings, Vera Plus and other Z-Wave hubs
[easyazon_link identifier=”B008Q5CTBE” locale=”US” tag=”vueville.com-eaz-20″]View on Amazon[/easyazon_link]
(* = affiliate link / image source: Amazon Associates Program)
Conclusion
We hope you found this comprehensive review of Z-Wave door sensors useful. Please leave a comment below – which door/window sensors do you use, what’s your experience been using these sensors, or have we missed your favourite sensor?