If you are thinking of setting up a Zigbee network for your Home Assistant installation, the USB dongle (co-ordinator in Zigbee-speak) you choose will have a significant impact on how reliable your network ends up being. Which in turn impacts how much time you spend trying to troubleshoot your smart home!
That’s why I recommend choosing your co-ordinator software first – Zigbee Home Automation (ZHA) or Zigbee2MQTT. Then pick a Zigbee dongle that is supported properly by your choice of co-ordinator software. Not all Zigbee USB dongles are supported by both.
If you are going with ZHA which is the default integration in Home Assistant, the Aeotec Zi-Stick is a new option from a smart home company that has been around for a long time. My Z-Wave network has always been powered by Aeotec – initially by the Z-Stick Gen 5 for many years, and now by the excellent Z-Stick Gen 7. The Zi-Stick is Thread-ready and so also supports Matter through a potential future firmware update.
So let’s take a closer look at how the Aeotec Zi-Stick performs and how it compares to my current Zigbee USB dongle – the Sonoff Dongle-P.
A quick note: As an Amazon Associate I earn from qualifying purchases. This post contains affiliate link(s). An affiliate link means I may earn advertising or referral fees if you make a purchase through my link, at no extra cost to you.
Aeotec – who are they?
The Aeotec brand used to belong to Aeon Labs, a company that was founded in 2006 and based out of Silicon Valley. Aeotec is now headquartered in Hamburg, Germany. In 2018, they acquired the German automation brand Popp.
Zigbee Basics
If you’re new to the world of Zigbee like I am, here’s a primer on what you need to know.
Just like Z-Wave, Zigbee is also a mesh wireless protocol. This is one of the best things about Z-Wave that allowed me to create a strong reliable mesh network among all my Z-Wave devices. This is not possible with Wi-Fi or Ethernet where each device requires a direct connection to the router (although multiple WAPs can somewhat alleviate this).
So what does this mean in practice? Suppose your Zigbee coordinator sits in the garage with the rest of your tech gear, like mine is. And at the other end of your home, you want to place a temperature and humidity sensor like the Sonoff SNZB-02.
With Wi-Fi, you would need to be within range of your Wi-Fi router or have a WAP nearby. With Zigbee again the ideal scenario is if the sensor can connect directly to the Zigbee coordinator. But if its not, the mesh network comes into play. Most mains powered Zigbee devices such as smart bulbs or smart relays are able to act as ‘routers’ by relaying signals between the coordinator and other Zigbee devices. Do note that being mains powered does not automatically make a Zigbee device a router!
So our battery powered sensor can connect to the nearest Zigbee router and thus communicate with the coordinator. Thus our sensor here is an ‘end device’. Such battery powered Zigbee devices are usually not able to act as routers.
Now the biggest downside of Zigbee is that it uses the same frequency as 2.4 GHz Wi-Fi. This creates the potential for interference between your 2.4GHz band Wi-Fi network and your Zigbee network. I have learnt after much research (Metageek is an awesome resource) and quite a bit of fiddling that the best way to ensure your Zigbee and WiFi networks can coexist is by ensuring the specific frequencies (i.e. channels) they use do not overlap.
One thing to watch out is that the ‘channel’ numbering that WiFi and Zigbee use are similar and so you may think the frequencies won’t overlap. But they do! For example it may seem that Zigbee channel 11 uses the same frequency as Wi-Fi channel 11, but they don’t! In fact, Zigbee channel 11 overlaps Wi-Fi channel 1. The Metageek resource linked above explains it very well.
So my suggestion is:
Put your WiFi access points on channel 1 (if you have more than one WAP, use 6 for the one that’s furthest from the Zigbee coordinator and 1 for the WAP that’s closest to the Zigbee coordinator).
Put your Zigbee coordinator on channel 25 (or 20 if you are in the US).
This configuration ensures minimal overlap between your Wi-Fi network and the Zigbee network.
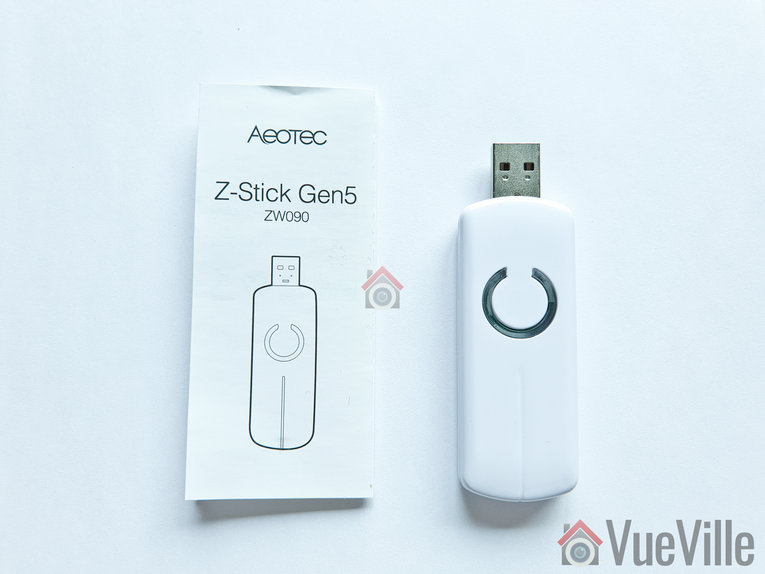
What’s in the Box
The Aeotec Zi-Stick box consists of the Zi-Stick USB dongle itself and a user manual.
Specifications
[table id=92 responsive=scroll /]
Taking a closer look at the Aeotec Zi-Stick
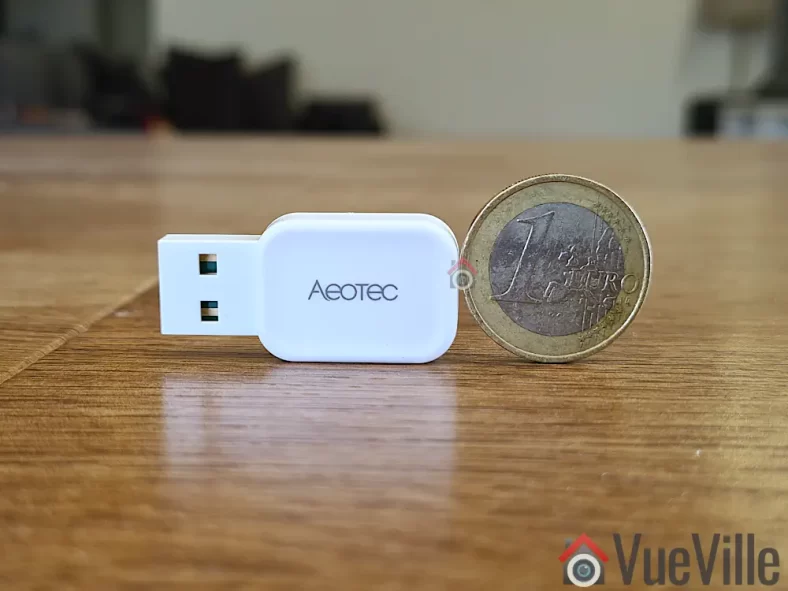
Just like the Gen7 Z-Wave Aeotec Z-Stick, the Zi-Stick is tiny. Compared to the Sonoff ZBDongle-P, it is less than half the size at at just 37 mm long and 17 mm wide.
The body is an all-plastic affair but feels sufficiently strong and seems built to last. After all, it is going to remain plugged into your smart home controller for the whole of its working life.
The front side simply sports the Aeotec logo whereas the rear side shows details such as the model number and applicable certifications.
The USB-A port should be plugged only into a shielded extension cable on a USB 2.0 port. USB 3.0 ports can cause interference with Zigbee networks, and is probably the root cause of many complaints about poor reliability when using Zigbee USB dongles.
Aeotec says this on their website: “Zi-Stick hardware is Thread ready and will be upgradeable via firmware update. With this future update, Zi-Stick will be able to control Thread Matter-based devices.”
Setting up the Aeotec Zi-Stick
Home Assistant offers 2 different integrations for Zigbee: the official Zigbee Home Automation (ZHA) built into HA, and the community integration called Zigbee2MQTT. I generally recommend Zigbee2MQTT because it has slightly wider device support and is generally quicker to add support for new devices as well. Unfortunately the Zi-Stick is officially supported only in ZHA, so that’s what we will be using for this review.
To briefly recap my HA setup, I have my primary HA server in the garage and a remote Raspberry Pi4 at the center of my single-floor home. The remote RPi4 runs ZWaveJS and Zigbee2MQTT as Docker containers, with an Aeotec Z-Stick for Z-Wave and Sonoff ZBDongle-P for Zigbee.
Since ZHA is part of HA, I decided to use the Aeotec Zi-Stick with the HA server in the garage. I plugged it into an extension cable off a free USB 2.0 port of the HA server (a NUC11i5 Mini-PC).
Plug in the device into your Home Assistant. Make sure you use a USB 2.0 port and a good quality extension cable. USB 3.0 ports cause interference and an extension cable minimises interference as well.
Navigate to Settings > Devices & Services > Add Integration
Type in “Zigbee Home Automation” and select ZHA from the list
Next you will see the “Select a serial Port” screen. I selected /dev/ttyUSB0 – USB serial. If you have other USB dongles plugged in it might say USB1 instead of 0. Just select that instead.
Next is “Network Formation”. I chose “Erase Network Settings and create a new network”. Wait for around 3 seconds and you should see a success message.
Click Finish, and you should now see the ZHA integration in the list. If you click on the ZHA device list, you can then see the Zi-Stick’ and its HA’s device page.
To ensure a solid and reliable Zigbee network, it is advisable to change the Zigbee channel to one that doesn’t interfere with Wi-Fi in your home. I have learnt after much research (Metageek is an awesome resource) and quite a bit of fiddling that the best way to ensure your Zigbee and WiFi networks can coexist is by ensuring the specific frequencies (i.e. channels) they use do not overlap.
One thing to watch out is that the ‘channel’ numbering that WiFi and Zigbee use are similar and so you may think the frequencies won’t overlap. But they do! For example it may seem that Zigbee channel 11 uses the same frequency as Wi-Fi channel 11, but they don’t! In fact, Zigbee channel 11 overlaps Wi-Fi channel 1. The Metageek resource linked above explains it very well.
So my suggestion if your using only the Zi-Stick in your home:
Put your WiFi access points on channel 1 (if you have more than one WAP, use 6 for the one that’s furthest from the Zigbee coordinator and 1 for the WAP that’s closest to the Zigbee coordinator).
Put your Zigbee coordinator on channel 25 (or 20 if you are in the US).
This configuration ensures minimal overlap between your Wi-Fi network and the Zigbee network.
What if like me you already have another Zigbee network in the home? Then I recommend you put the Zi-Stick on Zigbee channel 20 instead of 25.
Zigbee Pairing using ZHA & Wireless Range
To test the Zi-Stick, I decided to pair it with their latest Pico Switches that I have also reviewed separately in detail. Head over to that review to read more about the pairing process.
Here’s a network map produced by ZHA that shows the link quality and the routes between each device:
ZHA Network Visualisation for the Aeotec Pico and Pico Duo Switches
One Pico switch was installed in a concrete wall right next to the Zi-Stick. So that would naturally be the router through which the second Pico switch finds a connection to the co-ordinator. So everything is as expected in the network map above.
The second Pico Switch is 3 concrete walls away from the co-ordinator, but it still managed to establish a direct connection (strength 74/32 up and down) which is quite impressive.
Product prices and availability are accurate as of the date/time indicated and are subject to change. Any price and availability information displayed on https://www.amazon.com/ at the time of purchase will apply to the purchase of this product.
Ever since I started setting up the VueVille DIY Smart Home, I have been focused on Z-Wave. Back in 2017 when I was starting out, Z-Wave was the only reliable DIY option for smart home enthusiasts who didn’t want to rely solely on Wi-Fi.
Zigbee was beginning to make a mark but lax compliance with the standard meant that you couldn’t count on Zigbee devices to work well together. But things are very different now and that’s what made me revisit my decision now. Zigbee has come a long way and after just 1 month of exploring the Zigbee ecosystem, I can confidently say that its worth considering for us Z-Wave holdouts. Not as a Z-Wave replacement, but rather to complement it. More on that later.
The first bit of kit that I purchased is the product I am reviewing today: a Zigbee USB stick called the SONOFF ZigBee 3.0 USB Dongle Plus (model ZBDongle-P). Its essentially similar to a controller in the Z-Wave world, but in the Zigbee world a controller is called a coordinator. This particular model comes pre-flashed with the Zigbee coordinator software so is plug and play with Home Assistant ZHA and Z2MQTT.
Please note that there is another model called the ZBDongle-E, but this uses a newer less supported chip and currently is not recommended for use with my preferred Zigbee integration in Home Assistant: Zigbee2MQTT.
A quick note: As an Amazon Associate I earn from qualifying purchases. This post contains affiliate link(s). An affiliate link means I may earn advertising or referral fees if you make a purchase through my link, at no extra cost to you.
Zigbee Basics
If you’re new to the world of Zigbee like I am, here’s a primer on what you need to know.
Just like Z-Wave, Zigbee is also a mesh wireless protocol. This is one of the best things about Z-Wave that allowed me to create a strong reliable mesh network among all my Z-Wave devices. This is not possible with Wi-Fi or Ethernet where each device requires a direct connection to the router (although multiple WAPs can somewhat alleviate this).
So what does this mean in practice? Suppose your Zigbee coordinator sits in the garage with the rest of your tech gear, like mine is. And at the other end of your home, you want to place a temperature and humidity sensor like the Sonoff SNZB-02.
With Wi-Fi, you would need to be within range of your Wi-Fi router or have a WAP nearby. With Zigbee again the ideal scenario is if the sensor can connect directly to the Zigbee coordinator. But if its not, the mesh network comes into play. Most mains powered Zigbee devices such as smart bulbs or smart relays are able to act as ‘routers’ by relaying signals between the coordinator and other Zigbee devices. Do note that being mains powered does not automatically make a Zigbee device a router!
So our battery powered sensor can connect to the nearest Zigbee router and thus communicate with the coordinator. Thus our sensor here is an ‘end device’. Such battery powered Zigbee devices are usually not able to act as routers.
Now the biggest downside of Zigbee is that it uses the same frequency as 2.4 GHz Wi-Fi. This creates the potential for interference between your 2.4GHz band Wi-Fi network and your Zigbee network. I have learnt after much research (Metageek is an awesome resource) and quite a bit of fiddling that the best way to ensure your Zigbee and WiFi networks can coexist is by ensuring the specific frequencies (i.e. channels) they use do not overlap.
One thing to watch out is that the ‘channel’ numbering that WiFi and Zigbee use are similar and so you may think the frequencies won’t overlap. But they do! For example it may seem that Zigbee channel 11 uses the same frequency as Wi-Fi channel 11, but they don’t! In fact, Zigbee channel 11 overlaps Wi-Fi channel 1. The Metageek resource linked above explains it very well.
So my suggestion is:
Put your WiFi access points on channel 1 (if you have more than one WAP, use 6 for the one that’s furthest from the Zigbee coordinator and 1 for the WAP that’s closest to the Zigbee coordinator).
Put your Zigbee coordinator on channel 25 (or 20 if you are in the US).
This configuration ensures minimal overlap between your Wi-Fi network and the Zigbee network.
What’s in the box
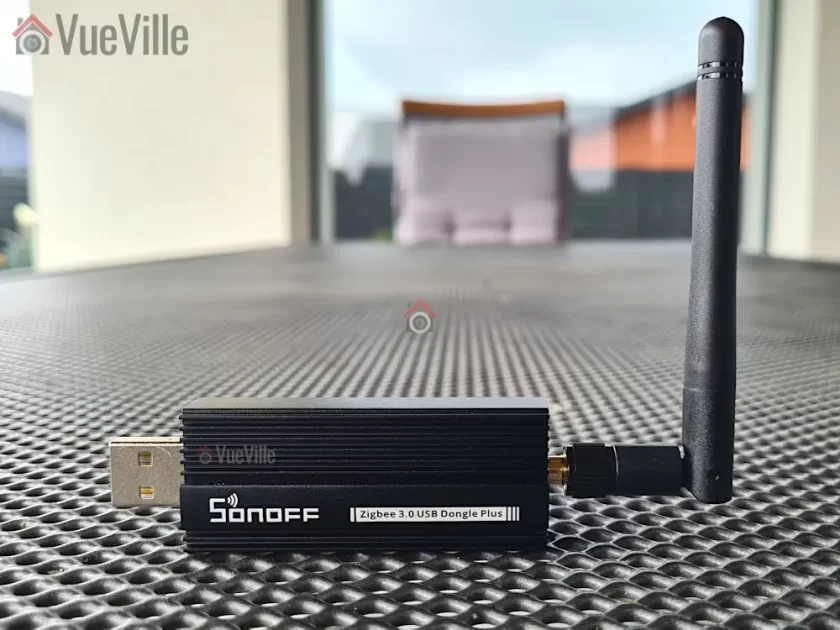
The Sonoff Zigbee USB stick’s retail package is very compact and has an unusual blue color. Unusual for Sonoff with their trademark orange branding you’d find for Zigbee gear.
Inside the box we find the following:
ZBDongle-P USB coordinator
Antenna that you can screw on
User manual
Specifications
[table id=87 responsive=scroll /]
Taking a closer look at the Sonoff Zigbee Dongle
The Sonoff ZBDongle-P has a metallic body and feels reassuringly solid in the hand. The front design looks a bit like a heat sink, which is a smart thing to do with a metal enclosure. You just need to screw on the included antenna and the dongle is ready for use.
The ZBDongle-P uses a CC2652P based System on a Chip (SoC) design. The P in the CC2652P model number refers to the power amplifier this chip has onboard. It allows up to a 20dB signal output power but the outdated default firmware Sonoff has pre-flashed this dongle with seems to support only 5dBm. This can be rectified by flashing a newer firmware (which I detail below) and can be easily adjusted in Zigbee2MQTT.
The USB-serial interface is handled by the CP2102(N) chip.
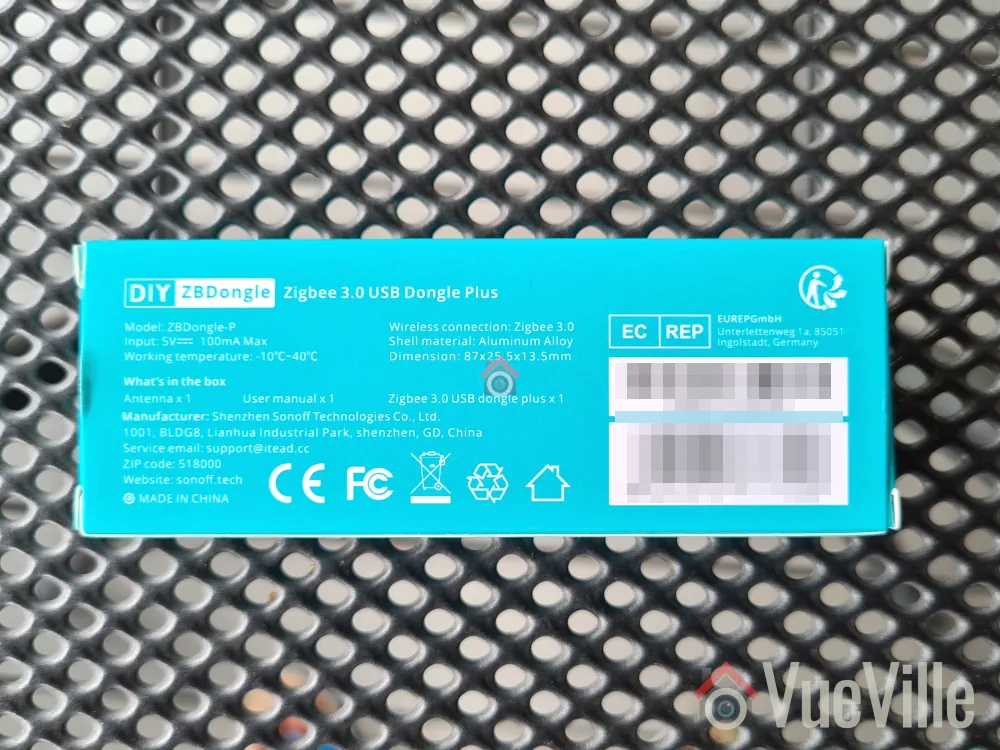
The backside sports the model name, safety and regulatory information.
The USB-A port should be plugged only into a shielded extension cable on a USB 2.0 port. USB 3.0 ports can cause interference with Zigbee networks, and is probably the root cause of many complaints about poor reliability when using Zigbee USB dongles.
Setting up the Sonoff Zigbee Dongle
With Home Assistant, there are 2 integrations you can choose to build your Zigbee network around: the official ZHA integration and the community effort called Zigbee2MQTT. I recommend Zigbee2MQTT because it has slightly wider device support and is generally quicker to add support for new devices as well.
I run Home Assistant on a Raspberry Pi4 (running DietPi Linux distro) with an SSD connected via USB 3.0. I also have the Aeotec Z-Stick 7 plugged into a USB 2.0 port. Everything works well without the need of a USB powered hub. That left me with 2 free ports on the Pi – 1 USB 2.0 and 1 USB 3.0.
So I happily proceeded to plug the Sonoff dongle into an extension cable off the free USB 2.0 port. My troubles began here because I foolishly assumed that just because Linux could see the device plugged into a USB port would mean that Home Assistant would also be fine with it. Big mistake. I spent a couple of hours checking everything until I realised the Sonoff dongle is probably not getting enough power from the Pi’s USB bus. So I moved the Sonoff to an externally powered USB hub and BOOM, Home Assistant immediately recognised the Sonoff!
So here is a summary of the steps I followed to set up the Sonoff dongle:
Plug in the device into your Home Assistant. Make sure you use a USB 2.0 port and a good quality extension cable. USB 3.0 ports cause interference and an extension cable minimises interference as well.
Home Assistant’s built-in Zigbee integration called ZHA will recognise the Sonoff and offer to set up the integration – click Ignore to cancel the ZHA setup.
Install the ‘MQTT Broker’ addon
Install the ‘Zigbee2MQTT’ addon
Create a Home Assistant user for Z2M to use to connect to the MQTT broker
Configure Z2M with: 5.1 the user and password details you created above 5.2 Find the USB port ID using this command in a terminal window dmesg | grey tty
Go to Addons -> click Enable watchdog for MQTTbroker and start it
Go to Devices & Services -> Click configure on MQTT, click Submit and again click Submit & finally click Finish.
Go to Addons – > click Enable watchdog for MQTTbroker and start it
Click Zigbee2MQTT on the sidebar, and change the Zigbee channel to 25 in settings (20 if you are in the US as channel 25 has a lower maximum power limit by law).
IMPORTANT: Do this before pairing devices! If you try to change the Zigbee channel later, you will have to repair all your devices!
Add your first device: In Zigbee2MQTT, click permit join at the top and follow the device instructions to join a Zigbee network
I found that my Sonoff dongle came flashed with the ZStack firmware version 20210708. I first tested the dongle with this default firmware and then tried the latest 20230507 version as well. More on that later.
Zigbee Pairing with Zigbee2MQTT & Wireless Range
I purchased a variety of Zigbee devices and was able to pair all of them without any issues whatsoever:
Sonoff Power Plug
IKEA Vindstyrka
Sonoff Motion Sensor,
Sonoff Temperature and Humidity Sensor, and
Sonoff Door/Window Contact Sensor
The best practice when starting a new Zigbee network is to pair the wired mains-powered devices first. This will create a strong mesh network that the battery powered devices can then be added to.
So I first paired the Sonoff power plug and then the IKEA Vindstyrka. Both devices were paired easily and without any fuss. They were both detected as router devices, thus creating and extending the Zigbee mesh network. All the sensors were detected automatically and Home Assistant created the device entities correctly.
On to the battery powered devices now. Here, there were two things I wanted to test.
Adding battery-powered Sonoff devices directly to the coordinator – I did this for sensors that were at most 10 metres away with 1 or 2 concrete walls in between.
Adding battery-powered Sonoff devices through the router devices – I chose this option for those devices that were at the other end of the home and had 3-4 concrete walls in between.
I added over 6 Sonoff sensors in all, in their final installation locations and every time it was smooth sailing. No pairing errors, and I;ve not experienced any sensor dropping off the Zigbee network.
Here’s a network map produced by Zigbee2MQTT that shows the link quality and the routes between each device:
My Zigbee Network Map in Zigbee2MQTT – click to enlarge
A few things struck me as very odd when I first saw this network map and the link quality information. The Sonoff Smart Plug (powering the garage door opener) is located in the garage along with the Sonoff Zigbee co-ordinator, whereas the Ikea Vindstryka is at the other end of the house with 3 concrete walls in between. But the Ikea link quality is way better at 96 compared to the 72 of the Sonoff Smart Plug.
The other thing worth noting is that the Garage-Laundry door sensor is a Sonoff Door/Window sensor also placed in the same garage right next to the Zigbee dongle. But with the ‘permit join all’ option in Zigbee2MQTT, it chose to connect through the Sonoff Smart Plug instead of directly to the Zigbee co-ordinator. I wonder why that is. Also, the link quality is only 29 from the Sonoff Smart Plug to the Sonoff Door sensor even though they are in the same room! Interestingly, a similar door sensor from Sonoff placed in the same room as the Ikea Vindstryka has a far better link quality of 159. My conclusion here is that the Ikea Vindstryka is a superior router device. So I won’t be buying any more Sonoff smart plugs with the intention of using them as a router – they are clearly not very good at this.
Updating the firmware
I was wondering whether the 2+ year old Z-Stack 20210708 firmware version on the device was the culprit. This fimrware had a +5dB limit on the antenna gain instead of the +20dB the hardware is capable of.
So I flashed the latest 20230507 firmware using the excellent instructions on post #2 of this HA community forum thread. This firmware has a default antenna gain of +9dB and further allows it to be raised all the way to +20dB if needed. I didn’t have to repair my devices which was great, and here’s the new network map:
Zigbee Network Map on firmware 20230507
The most striking difference is that the co-ordinator now had much higher link quality to both the router devices. For example the linkquality for the co-ordinator and Ikea pair went from 96/29 to 132/46. If you are not familiar with this figure, linkqualiy for a router is always expressed two figures separated by a slash. The first figure is the strength of the link as seen by the co-ordinator and the other is that as seen by the router device.
Some other devices saw improvements as well, whereas a Sonoff door sensor got worse. The link quality reporting overall still seems a bit off to me.
Overall I was quite happy with the firmware upgrade. I have a feeling as the Zigbee mesh adjusts to the new firmware, the link quality may improve further.
What I didn’t like about the ZBDongle-P
While all my devices worked as expected and I didn’t experience any devices dropping off the Zigbee network, I couldn’t help but wonder about the link quality reporting of the dongle. The dongle seems to be reporting much lower values than even the Ikea which is just a router device.
Now it could all simply be down to the way the dongle calculates link quality is not a 100% correct. Indeed, this Home Assistant community forum thread seems to be suggesting so.
Still, this does make me wary of relying on the reported link quality numbers to design my Zigbee network.
Verdict
[review]
The ZBDongle-P is a tried and tested Zigbee co-ordinator and is on the list of recommended USB dongles for Zigbee2MQTT. It also works well with Home Assistant’s built-in Zigbee integration called ZHA.
If you are keen on Zigbee2MQTT, the ZBDongle-P is the better choice as the ZBDongle-E is not yet fully supported in that integration. However if you prefer ZHA, both are good options.
I found the ZBDongle-P to be an easy to setup and easy to use USB adaptor with good wireless range. The only major hiccup I had was my Pi4 not supplying enough power to the dongle but this was resolved by using a powered USB 2.0 hub. After that, I was able to pair all the devices I tried without any fuss and I have a solid Zigbee network in my home as a result. Upgrading the firmware brought a welcome improvement in mesh quality and I highly recommend this step if your device comes with an outdated version as mine did.
Product prices and availability are accurate as of the date/time indicated and are subject to change. Any price and availability information displayed on https://www.amazon.com/ at the time of purchase will apply to the purchase of this product.
If you are planning to build your own DIY Z-Wave gateway with a laptop or Raspberry Pi and home automation software such as HomeSeer HS3, openHAB, Home Assistant or Domoticz, you will need a USB Z-Wave stick/adapter/dongle.
These USB Z-Wave sticks are not a solution in and of themselves. They are just a tool to enable your Home Automation software to send and receive Z-Wave signals to/from your Z-Wave devices.
When I moved from the Vera Plus to HomeSeer, I got an Everspring SA413 USB stick off eBay. The Everspring is actually a ‘Sigma Designs UZB’ and that’s how my HA software, HomeSeer HS3 identifies it too. It served me well all these years and has always been very reliable.
So when Aeotec kindly sent me the latest model of their [easyazon_link identifier=”B00X0AWA6E” locale=”US” tag=”vueville.com-eaz-20″]Z-Stick Z-Wave Gen5 USB stick[/easyazon_link] which has several innovations such as a built-in rechargeable battery, I was keen to put it through its paces.
Aeotec used to belong to Aeon Labs, the company founded in 2006 and based out of Silicon Valley. But Aeotec no longer belongs to Aeon Labs. They also have another brand that’s popular in the smart home market – Popp.
Aeotec are also an OEM for other brands such as Oomi.
Unboxing
The Aeotec Z-Stick Gen5 comes in an attractive sleek package. It is no larger than it needs to be and avoids needless plastics and packaging. The front of the box highlights the main features such as the built-in diagnostic tool and the multi-coloured signal strength LED.
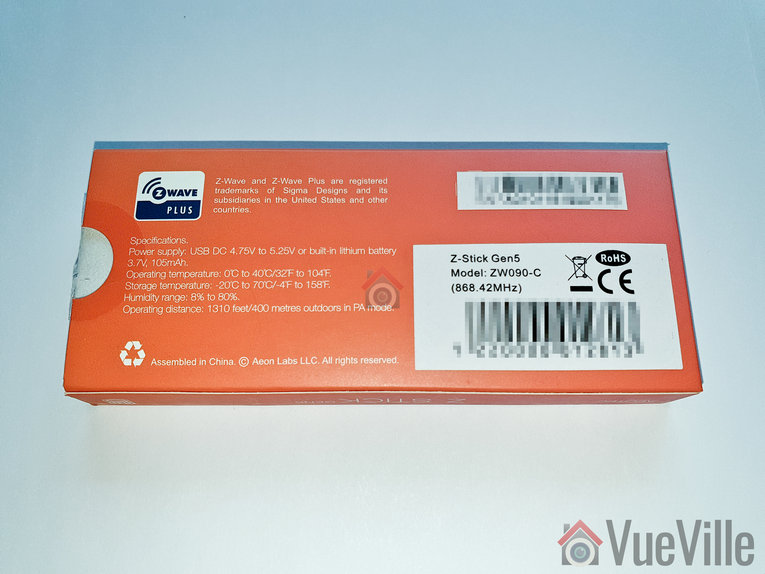
The rear side lists the specifications and model number of the Z-Stick.
As you can see, the ZW090-C model above is for countries using the Z-Wave frequency 868.4 MHz. This includes Europe and some Asian countries. The ZW090-A model is designed for countries using the 908.42 MHz Z-Wave frequency such as the USA.
Opening the box yields the Z-Stick and a concise quick start guide.
Specifications
Z-Wave Gen5 chipset
Brand Name: Aeotec
Product Identifier: ZW090-C
Z-Wave hardware platform: ZM5101
Z-Wave Plus Version: 1
AES-128 bit encryption
Can control up to 232 Z-Wave devices
Over the air firmware updates for Z-Wave devices
Built-in Z-Wave network diagnostic tool
Z-Wave signal strength LED
Power Supply: USB DC 4.75V to 5.25V;
Built-in rechargeable lithium battery 3.7V, 105mAh, 15 days backup power
Max Standby Current: 30uA
Max Operating Current: 98mA in PA mode or 40mA in normal mode
Operating Temperature: 0 to 40°C
Storage Temperature: -20 to 70°C
Operating Distance: Up to 492 feet/150 metres outdoors in normal mode, 1310 feet/400 metres outdoors in PA mode.
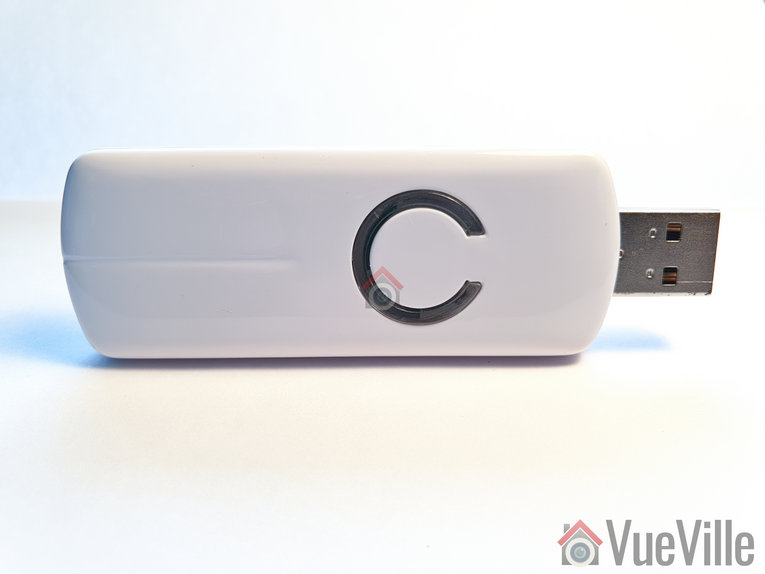
Design and Hardware Features
The Z-Stick Gen 5 differentiates itself visually with the unique LED on its top face which surround the action button. According to the manual, the LED behaves differently depending on what you are doing:
When you press the Action button, the LED blinks blue slowly
When you are including a device to your Z-Wave network, it will blink blue fast during discovery and stay solid on successful inclusion
When you remove a device from your Z-Wave network, the LED will blink orange
Troubleshooting network issues
In my experience with HomeSeer HS3, the LED has done only two things though: cycle through red, blue and amber all the time, and turn solid red if a Z-Wave command failed to reach a device.
The bottom of the Z-Stick has a physical reset button.
Software Features
Z-Wave features
The Aeotec Z-Stick is a self-powered Z-Wave USB adapter with remote network creation capabilities. This means it can function independent of external power and a host system such as a computer. This is all thanks to the 105mAh built-in rechargeable battery.
Being able to remotely include or remove Z-Wave devices greatly simplifies Z-Wave network installation. For devices that are far away from your main controller, you can unplug the Z-Stick from USB and take it to the device that you want to include.
Z-Wave network troubleshooting
In Serial API Mode and acting as a primary controller, it can measure the network health for each device in the network – the colour indicating the signal quality between the Z-Stick Controller and devices in the network.
When the Z-Stick acts an independent/secondary controller that has been unplugged from USB, it can measure the health of your Z-Wave network. The LED colour indicates the communication quality between the Central Controller and the current location of Z-Stick in the network. This is great for troubleshooting your device and is why it has a battery built-in.
OTA Firmware Updates
One of the reasons you may want to get the Z-Stick is to update the firmware of other devices such as the [easyazon_link identifier=”B0151Z8ZQY” locale=”US” tag=”vueville.com-eaz-20″]Aeotec Multisensor 6[/easyazon_link].
Compatibility with HA Software
HomeSeer HS3 natively supports Aeotec Z-Stick and has a specific selection for it in the Z-Wave interfaces list. Moreover Aeotec has tested and confirmed compatibility of the Z-Stick with HS3, InControl and Indigo7. The openHAB and Home Assistant community have developed plugins to allow the Z-Stick to work with their software too.
Installation and Setup
The Z-Stick works in 3 different modes: Inclusion-Mode (standalone), Removal-Mode (standalone) and Serial API Mode (plugged into USB of your HA gateway).
In the following setup process, I had the Z-Stick plugged into my HA laptop running HomeSeer HS3 all the time i.e. in Serial API mode.
Setting up the Z-Stick with HomeSeer HS3
As I have just moved home, I wanted to set up my home automation system again from scratch. This meant a fresh install of HomeSeer HS3 – what better time to test a new Z-Wave USB stick!
So after installing HS3, I activated the official Z-Wave plugin. I then plugged in the Z-Stick into a USB3.0 Hub. Windows recognized the Z-Stick immediately and assigned the COM-3 port to it. The COM port number Windows assigns depends on the USB port you lug the Z-Stick into. So if you switch USB ports, that will be why your HA software can’t find the Z-Wave dongle any more.
Now as we saw earlier, HS3 fully supports the Aeotec Z-Stick so setting it up was a breeze.
I clicked ‘Add a Z-Wave Interface’, gave it a name, selected the Z-Stick from the drop-down menu and selected the only COM port shown – COM3.
On clicking the ‘Add’ button, HS3 started initializing the Z-Stick.
After a few seconds, HS3 displayed a success message. I clicked on the activate interface green tick box and setup was complete!
Now I expected the flashing red, blue and amber LEDs on the Z-Stick would then become a solid green or at least stop flashing. But they didn’t.
I couldn’t find any reference to this in the user manual, so I asked Aeotec. They replied that this flashing behaviour of the LED indicates normal operation. Also, if the Z-Stick is under heavy load, the LED will flicker between 2 different LED colors rapidly. This is potentially useful if you have a large Z-Wave network with hundreds of devices that need polling.
In my testing, the LED also became solid red momentarily if a Z-Wave command was sent to a Z-Wave device but it didn’t respond.
I tested the Z-Stick by adding an [easyazon_link identifier=”B00VQISQW4″ locale=”US” tag=”vueville.com-eaz-20″]Aeotec LED Bulb 6[/easyazon_link] to my Z-Wave network. These are the steps I took:
As per the quick start guide, I inserted the LED Bulb 6 into a table lamp.
I then had to set HS3 into ‘Inclusion mode’. For this I navigated to Plugins > Z-Wave > Controller Management. Under Actions, I selected ‘Add/Include a Node’ and clicked the Start button.
I turned on the power to the LED Bulb 6. It turned solid yellow for a few seconds and then did a colour dance, flashing rapidly between white and green. At the same time I could see that HS3 had added the LED Bulb 6 as a new node. Then the bulb turned solid yellow again.
As per the manual, the bulb had been successfully included in my Z-Wave network.
Performance
I tested the Z-Stick Gen5 extensively with the [easyazon_link identifier=”B00VQISQW4″ locale=”US” tag=”vueville.com-eaz-20″]Aeotec LED Bulb 6[/easyazon_link], an [easyazon_link identifier=”B01NCEJAOD” locale=”US” tag=”vueville.com-eaz-20″]Aeotec Wallmote Quad[/easyazon_link], and an [easyazon_link identifier=”B07PB2HN6D” locale=”US” tag=”vueville.com-eaz-20″]Aeotec Doorbell 6[/easyazon_link].
Wireless Range
The Z-Stick has very good range is and comparable to the Everspring SA-413 I was previously using. My current home is of solid concrete construction and the Z-Wave signal could penetrate 2 solid concrete walls successfully. The mesh network design of Z-Wave networks is how my whole home is reachable with just one Z-Wave controller. Every powered Z-Wave device acts as a repeater.
Responsiveness and Reliability
I observed no noticeable delays or issues during the course of testing.
Compatibility
All the Z-Wave devices I used were successfully included and there were no compatibility issues at all.
Verdict
[review]
Where to Buy
Buy the Aeotec Z-Stick Gen 5 from [easyazon_link identifier=”B00X0AWA6E” locale=”US” tag=”vueville.com-eaz-20″]your local Amazon store[/easyazon_link].
Alternatives
[easyazon_link identifier=”B00VKEH1BQ” locale=”US” tag=”vueville.com-eaz-20″]Z-Wave.me USB Stick[/easyazon_link]
[easyazon_link identifier=”B01GJ826F8″ locale=”US” tag=”vueville.com-eaz-20″]GoControl Z-Wave/Zigbee USB Stick[/easyazon_link]
[easyazon_link identifier=”B07QMP1Y6G” locale=”US” tag=”vueville.com-eaz-20″]HomeSeer SmartStick+[/easyazon_link]
[easyazon_link identifier=”B07GNZ56BK” locale=”US” tag=”vueville.com-eaz-20″]Zooz USB Stick ZST10[/easyazon_link]
I have always wanted a smart home. Even back when I was a kid, I dreamt about being able to just say things and then have it happen. A bit like Knight Rider, but with my house. Thanks to the rapid advancement of technology resulting in amazing gadgets like the Vera Plus, that dream is now coming true for me and many other tech geeks.
I have been writing this post over a few months. I started writing it when I first purchased the Vera Plus. But as I knew very little about home automation back then, I decided I would first use it extensively, see if it could do everything I wanted it to do and then write a detailed review about my experience. And that time has come, 6 months on.
So what did I want my Vera Plus to do? And how did it do?
Zone-based fully automatic thermostat-based smart heating that I can control from anywhere in the world – Check*
Report on the motion/temperature/humidity/light levels of various rooms and then take action based on it – Check
Turn on and off appliances using smart plugs – Check
Be able to interface with my IP cameras and take snapshots, record videos – Check
Create fancy scenes for my home theatre at the push of a button – Check
Have a tablet on the wall showing the vital stats of my smart home – Check
Be able to control everything from my smartphones anywhere in the world – Check
Speak to my phone and make things happen around the house – Check 😀
Regular updates to support new devices – Check
No monthly fees – Check
*Using additional paid PLEG plugin
[toc]
Z-Wave – my Home Automation standard of choice
As explained in my Home Automation 101 article, never before has there been so much choice if you are looking to make your home ‘smart’. Z-Wave, ZigBee, Wi-Fi, Lightwave RF, WeMo, Apple HomeKit, Amazon Echo (Alexa), and it goes on and on. I will quickly summarize my advice: not all home automation products can talk to each other and work well together. So consider carefully all the systems that you want to automate in your home and choose a HA standard that is:
Mature, tried-and-tested, and reliable
Wireless so that you don’t need to rip up walls
Low power usage so that you don’t need to change batteries often
Enjoyes wide industry support
Wide variety of affordable products that support it
Z-Wave is emerging as the industry standard that meets all of the above. The Vera HA controllers are the best in my opinion because they can communicate over not just Z-Wave but Bluetooth and ZigBee also.
MiCasaVerde, Vera Control – Who are they?
MiOS Ltd. is a Hong Kong-based business that owns Vera Control Ltd., the company that owns the Vera brand. It was started in 2008 by co-founders Aaron Bergen and Lewis M. Brown.
Vera Control Ltd. used to be known as MiCasaVerde and you may find references to this name across the Internet and even on this very blog. Vera got in touch with me after this post was published and commented that three years ago they changed their name to Vera Control.
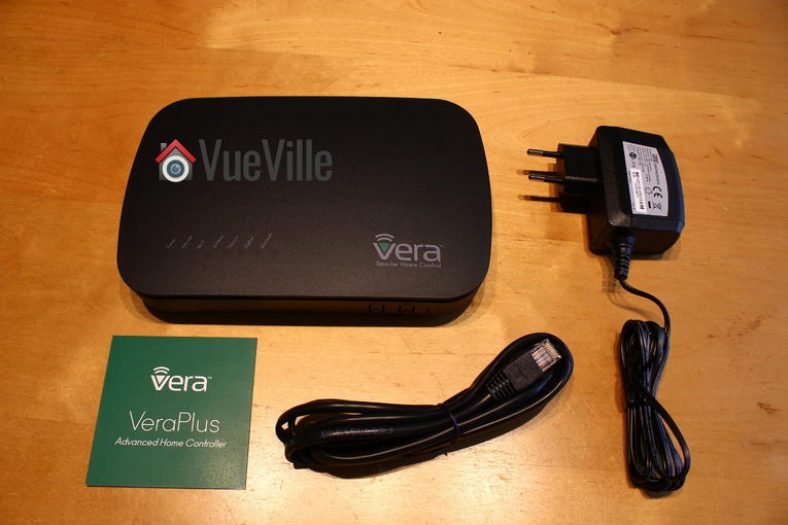
What’s in the box
The Vera Plus comes in an attractive green box packaging that prominently highlights some of its main selling points:
No monthly fees
Supports 1500+ devices
Z-Wave/ZigBee/Bluetooth and Wi-Fi compatibility
On unboxing, you will find the following contents:
To start the setup process, I followed the Quick Start Guide, plugged it into my Netgear network switch with the supplied RJ-45 ethernet cable an powered it up. In no time, the Vera Plus booted up and I went to https://home.getvera.com as instructed by the guide.
I was then presented with the T&Cs which I accepted. I then chose Vera Plus from the list of devices, and it found the Vera automatically on my network. For some reason, it didn’t work the first time for me, so if it fails the first time, just wait for 2-3 minutes and click retry.
I was then asked to continue setting up my account while the device software was being updated. This is where I hit the first roadblock. I didn’t appreciate being forced to enter not just my full name, email address, and password, but my full street address and mobile number as well! Absolutely unnecessary to require this level of personal information for a home automation controller that claims to protect users’ privacy by not needing the cloud to work. Since the Vera wouldn’t let me continue without entering all this private information, I obliged by entering some fake information. If you force people to part with their privacy to use your product, there’s every chance users enter gibberish. Not only does that mess up a company’s CRM data accuracy, it also undermines the main selling point of the Vera – security conscious people like me choose the Vera because it can work without the cloud, and we don’t want to part with any more data than we need to. There’s no monthly subscription fee, so then why does Vera need my personal details? This is the main reason I didn’t go for Samsung Smart Things, it is crippled without cloud access.
After about 5 minutes, the software update completed, and a ‘Go to Dashboard’ button appeared at the top right (it is easy to miss!).
This took me to a dashboard with the Vera listed and a ‘Complete Setup’ button. Clicking this takes you to the UI7 dashboard and asks you to verify your contact details and email address. I skipped the part where it wanted to verify my mobile number by SMS. Then you get to name your Vera, yay!
Adding devices to your Z-Wave network
The next step in the wizard is adding devices. In Z-Wave lingo, this is called inclusion. Essentially before you can use a device, it has to be paired with the Vera controller, just like a Bluetooth headset needs to be paired to your phone before you can use it.
If you want to remove a device from your Z-Wave network, you will need to ‘exclude’ it. There’s a step-by-step wizard for that too.
Adding a Fibaro Motion Sensor
The first sensor I bought to go with the Vera Plus is the Fibaro 4-in-1 multi-sensor (which I reviewed recently), but it was not yet in the list of devices supported by Vera. I could choose to add it as a generic Z-Wave device, but I chose the closest option, a 3-in-1 Fibaro sensor. This meant that the vibration sensor was not detected and added as a Vera sensor, but this was fixed in subsequent software updates. The Z-Wave inclusion process went very smoothly, but I was a bit baffled why the sensors didn’t seem to show any data, but after a minute or two, the temperature showed up, albeit in Fahrenheit. Motion was also detected and reported in the form of a motion icon.
Another thing I noticed is that the default temperature unit was Fahrenheit even though I had chosen the UK time zone and set my location to UK. I expected the unit to then change to Celsius. I was able to change this in the settings, but the Fibaro temperature was still in Fahrenheit. As I was quickly learning, I just needed to wait for a few minutes again. The F symbol was soon replaced with a C, so my temperature weirdly became 72C. Again, sure enough, in another 2 or 3 minutes, the temperature was reported as 23.2 deg C. Being an absolute newbie to Z-Wave, I realised that some settings don’t immediately take effect, presumably as the sensors touch base with the Vera only every few minutes.
So all was good, my motion and temperature sensors were up and running. What about the lux sensor of my Fibaro? All this time, there was just nothing there. Blank. After some googling, I found that putting it under a bright source of light helps speed up the calibration process. Sure enough, after around 30 mins, I started getting a lux reading.
Adding IP Cameras
Next I added my Hikvision IP cameras. The Vera Plus doesn’t support RTSP streams but it supports only the MJPEG protocol. All the cameras were added successfully but the camera images seemed a bit slow to load. That’s when I got a notification to install the latest firmware. Once that was done, the first thing I did was return to the camera sections and immediately everything worked so much faster.
The Vera Plus can record the camera streams or take snapshots based on rules (scenes) that you can create.
The Imperihome app I use can pull RTSP streams directly from the cameras instead of pulling MJPEG streams from the Vera Plus. So this is the way to go if you absolutely need RTSP streams.
Adding non Z-Wave devices
One of the interesting features of UI7 is that it can send http commands. This means you can control devices on your network that are not Z-Wave based but have the ability to receive http commands. For example, my Panasonic smart TV and my Denon AVR support http commands. So I have integrated them into my smart home network very easily. This is also how it sends voice alerts to my Imperihome tablet announcing that the boiler is being switched on, or that its time to close a door that has been open for too long.
Features
UI7
MCV calls its latest operating system the UI7. This is the software that runs on its Vera devices including the Vera Plus. It is a web-based interface which is very modern and user-friendly. Various options are laid out logically and in a very intuitive manner. The thing with home automation is that once you set up your devices and schedules, you rarely need to go into UI7. You will most likely monitor and operate devices from your smartphone or a wall-mounted tablet.
You can access the UI7 interface by typing in the IP address if you are inside your network, or remotely through Vera’s cloud servers if you are outside your home network.
Vera House Modes
Since the Vera Plus can also be used to either control your existing home alarm system or become your smart alarm system, it naturally supports the arm/disarm feature. This is achieved by having modes that your smart home can be in – by default the system is in Home mode. Which translates to disarmed.
Arming is achieved by using one of the other modes – Away, Night or Vacation. All your smart devices are aware of the house modes and you can use these in the scene wizard or any of your plugins.
Vera UI7 Plugins
Just as most modern platforms, MiOS has a core of supported plugins and a huge number of plugins created by individuals. Since the Vera supports uPnP, plugins are available for almost any device you can think of. For example, my GC-100 Ethernet to Infrared hub is not supported by the Vera but there is a 3rd party plugin that does. So you can use plugins to extend the functionality of your Vera Plus.
Geo-fencing
This is a much hyped feature that many people desire. It goes like this – you pull up into your drive and your smart home knows you are near, and will trigger a welcome home scene – turn on the porch light, disarm the alarm system, turn up the heating or cooling based on the time of the year, turn on the coffee machine, you get the idea.
Vera uses the app on your phone to detect when you are within range of your home network. So the moment your phone logs onto the Wi-Fi at home, the Vera Plus knows you are home. I personally don’t use this feature but its quite cool – I may start doing it soon.
Programming the Vera Plus
The primary method of programming the Vera Plus in UI7 to do things is by creating rules or scenes as UI7 calls them. Scenes are basically if-this-then-that type of scenarios where a trigger causes a device or set of devices to perform specific actions. The trigger may be a device in your network and/or a particular time of the day. You can create scenes using the excellent scene creation wizard or write your own LUA code which is the engine that powers Vera’s scenes.
Vera Plus and sensors
You can get very creative with a home automation controller like the Vera Plus and sensors. One of the scenes I have created is based on the hallway Fibaro Sensor detecting motion between the hours of 11PM and 6AM in the living room as a trigger. This then fires an action of turning on the hallway light for someone hankering for a midnight snack!
Since the Vera also knows when it is day and night anyway, I could also just set the time restriction as ‘day time’ or ‘night time’ or ‘1 hour after sunset till 1 hour before sunrise’, and the Vera won’t skip a beat. This sort of functionality is what makes the Vera Plus so easy to use for anybody.
Vera Plus and IP Cameras
I haven’t set up any specific scenes for cameras, I added them to the Vera just to quickly see all the streams in one Imperihome page. You can however use the LUA code feature to automate arming and disarming of the cameras, integrate the Surveillance Station of your QNAP NAS, and so on.
Vera Plus and home heating controls
One of the main reasons I got the Vera Plus was to add smart heating to my home. I had just replaced my dodgy old boiler with a spanking new one and it seemed to be the right time to go fully smart. Extensive research led me to the Secure SSR302 2-channel Boiler Receiver which has been well received by the Z-Wave community.
It has two separate channels, so I can control my central heating and hot water channels separately. Installation was plug and play and I was soon on my way creating scenes to schedule hot water and central heating.
But I soon realized that my vision of an ultra-automated zone-based smart heating system that automatically maintains the set temperature across my home was beyond the reach of Vera’s scene wizard. This is because the scene wizard does not have the ability to program using logical AND operations. This severely limits your ability to create complex scenes.
Hours of research ensued and culminated in me stumbling across the excellent PLEG plugin. PLEG allows for conditional logic on steroids and transforms the Vera Plus from a capable HA controller to a fire-breathing monster. Mastering PLEG is a steep learning curve but oh the smart heating system that I was able to build with Vera and PLEG was worth the effort. I have since published a post on how I built it with all the logic rules so that you can just copy and paste it into your Vera!
Mobile Apps
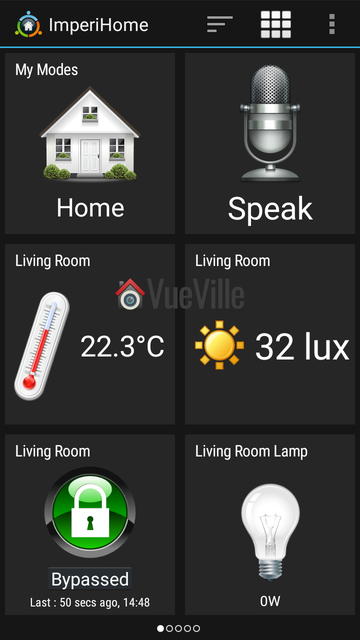
Although the Vera smartphone app is perfectly adequate, after some research I decided to use the Imperihome app to control my smart home. The Imperihome app has been around for some time and is a visually appealing way to easily build a dashboard to monitor and control your smart devices. Did I say it supports audio alerts through Text to Speech? So you can set up the Vera to push audio notifications to devices around the home! This is very cool and never fails to impress friends and visitors.
Here are some screenshots of my Imperihome dashboard pages:
As my first Z-Wave controller, I didn’t really know what to expect from the Vera Plus. Having used it over 6 months, I can say that I am very please with the Vera Plus. I have since added many devices to my Z-Wave network: the Fibaro Z-Wave 4-in-1 sensor, an Aeotec MultiSenor 6-in-1, five GreenWave Node smart power plugs to control lamps , three Hikvision cameras, an Amcrest PTZ Wi-Fi camera, the Secure SSR302 2-channel Boiler Receiver and the Global Cache GC-100 Infrared Network Adaptor (to control older units in my home theatre via Infrared).
The Vera Plus has seamlessly integrated all these devices transforming my home into a truly smart home. Everything has just simply worked with no issues whatsoever. Reliability has been a 100% and any changes I make from the Imperihome app instantaneously take place. For example, there is virtually no delay between pressing the switch to turn the lamp on and the lamp actually turning it on.
On that note, one of the wonderful things about Z-Wave is that it is always aware of the actual state of a device, or in other words Z-Wave supports 2-way communication or status reporting. So if a lamp is on, it actually shows that the lamp is on and using the GreenWave power plug’s power meter feature, it can measure actual power consumption and do things with it.
You may think, duh status reporting is a necessary feature to know the state of a device without actually being in front of it to see it. I agree, a big part of home automation depends on knowing the current state of a device! Well my friend, you may be surprised to hear that while all home automation protocols can only send an on/off command, some cannot actually then query the status to see if the command was successfully received. For example Lightwave RF does not support status reporting.
Remote Access
What about accessing the Vera Plus from outside the home? By default, the Vera Plus registers itself with MiCasaVerde’s cloud platform. So you can login to your Vera from any where in the world and check on or control your smart home. Since I run my own OpenVPN server at home, I haven’t needed to rely on this but it has worked very well when I tested it remotely.
Verdict
I strongly believe that Z-Wave is the best Home Automation protocol and that the Vera Plus is the best Home Automation controller for beginners to home automation. With HA, you want a mature technology that you and your family can depend on day and night. That’s what Vera Control has delivered with the Vera Plus. It is indeed a wonderful time to be alive, where such awesome technology costs just a few hundred dollars!
I have since moved to the HomeSeer HS3 software as the level of complexity that my smart home has to deal with was difficult to attain with Vera. But the Vera Plus is a lot more accessible if you are new to smart homes and home automation.
[review]
Where to buy
[easyazon_link identifier=”B01BX9P89Y” locale=”US” tag=”vueville.com-eaz-20″]Check Price on your local Amazon site[/easyazon_link]
The Competition
Samsung SmartThings vs. Vera Plus
A smart hub that started out strongly but under Samsung’s watch has become a total mess. The culprit is its reliance on the cloud for processing rules/scenes. Just head over to the Smart Things forum and have a look at what the owners are going through. The poor extremely poor and unreliable cloud platform and utter disregard for existing users is what put me off Samsung SmartThings and I am glad.
Heck, it doesn’t even have a proper rules/scenes engine after the excellent 3rd party developer of Rules Engine was forced to stop development!
[wpsm_quote author=”Business Insider” float=”left” width=”100″]
SmartThings, Samsung’s smart home subsidiary, has had a large number of complaints about glitches with its smart home hub posted on its community message board and Reddit in recent weeks. Users called the system “fatally flawed,” and reported that their devices randomly disconnect from the system or turn on or off without command. One user, Shelley Powers, wrote that the hub repeatedly made her lights switch on and her home alarm system go off for no reason, CNET reported.
Rule Machine, a smart home app for making smart home devices perform complex tasks, withdrew support for SmartThings last week, citing these technical problems.
[/wpsm_quote]
This is another Z-Wave smart home controller that is often compared to the Vera Plus. Even if performance, features and reliability were comparable (and they are not), the Vera Plus costs a fraction of the HC2. So the Vera Plus is much better value of money. [text-blocks id=”4426″]


 [/wpsm_column]
 [/wpsm_column]
 [/wpsm_column]
 [/wpsm_column]