Are you looking for a reliable wireless security camera that can act as a baby monitor, a nanny camera, or just to talk to your dog while you are away? The Amcrest ProHD IP2M-841 Wireless Indoor IP Security Camera is what you need: a feature-rich network camera which has great video quality, excellent night vision and crystal clear two-way audio capability. I have been using it for over a year now and here is a hands-on review based on my experience of using it day in and day out.

[text-blocks id=”5527″ slug=”earning-disclaimer”]
Making sense of the Amcrest naming convention
If like me, you have been struggling to figure out which Amcrest camera you really need or what the letters and digits in the model number mean, simply refer to our easy-to-use guide to Amcrest cameras. It has a comprehensive list of all the Amcrest security cameras, neatly categorized by indoor/outdoor use and features such as WiFi, PoE.
Briefly this camera has two models based on the colour. Check out the IP2M-841B on Amazon for the black colour model and IP2M-841W on Amazon for the white colour model.
What is the Amcrest ProHD IP2M-841 suitable for?

The Amcrest ProHD IP2M-841 is a versatile surveillance device and its applications are only limited by your imagination! The most common residential indoor security camera applications are:
- As a baby monitor in a nursery (it supports 2-way audio), this is what I use it for
- As a nanny monitor for peace of mind (it is discreet and small enough to be hidden),
- General home security – monitor and secure rooms, hallways, corridors, access and exit points, guesthouses, garages and outhouses (the pan-tilt function gives you installation flexibility).
The common business uses for this sort of IP camera are:
- Monitor and secure office areas, stores, warehouses etc.,
- Observe employees and customers,
- As a visible deterrent against criminal activities.
What’s in the box – Unboxing


Main specifications
| Image Sensor | 1/2.7 ” 2 Megapixel progressive scan CMOS |
| Minimum illumination | 0.1Lux (Colour), 0Lux (IR On) |
| IR LED Range | 10m |
| Focal length | 4mm |
| Angle of view | 90 degrees |
| Bit rate | H.264, 16 – 8192Kbps |
| Ethernet | 10/100 RJ-45 |
| Wi-Fi | 802.11 b/g |
| Protocols | ONVIF, CGI, uPNP, H.264 |
| Storage | SD Card, up to 32GB. |
| Other Connections | Alarm in/out, 3.5mm Audio in/out |
| Power consumption | <7.5W |
| Main stream Frame rate | 1080p/720p @ 30fps |
| Sub stream Frame Rate | VGA/QVGA @ 30fps |
| Audio support | 2-way audio using built-in Mic and Speaker, or 3.5mm Audio in/out connections |
Camera Design


Installation
Amcrest claims that this camera is a doddle to set up and we agree. The camera has a standard camera tripod screw hole (1/4-20 UNC thread) for mounting. The mounting bracket should be able to take at least 3 times the weight of the camera.
Also note that this camera has alarm in and out connections. This means you can use a PIR sensor with this camera instead of relying on software based image detection. Using a PIR will drastically reduce the number of false alerts you may get with just image based motion detection.
Using the Alarm Out connection, you can then make the camera trigger another device to take action such as start recording, send email or push alerts, or execute home automation tasks such as turn on outdoor and indoor lights.
Software Setup
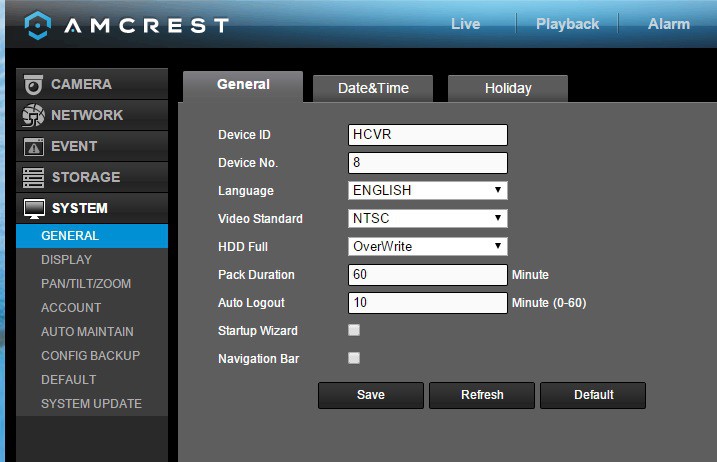
For initial setup, you have to hook up the camera to a power source and connect it to your router via an ethernet cable. The username and password are both ‘admin’. The camera will prompt you to change these, which is an excellent security measure and we commend Amcrest for taking this step. Too many IP cameras connected to the internet still have the default login details and this is an open invitation for hackers, especially if simple port forwarding is in place.
The web administration portal is elegant and thoughtfully laid out with all the options you expect in the right places. However the interface uses an NPAPI plugin like almost all inexpensive security cameras which work only with Internet Explorer and Firefox. It does not work on the Chrome browser but this is not strictly the camera’s fault. Google has decided not to support this plugin in Chrome. Just as other security camera manufacturers will soon have to, we expect Amcrest will redesign the web interface from the ground up in HTML5 to overcome such browser limitations.
The rest of the setup process is where some users seem to get tripped up. So we have provided our own little overview of how to set up the Amcrest ProHD 1080p camera. Depending on how you want to use the camera, there are different routes to completing the setup process:
Local viewing only (unless you port forward):
- Ethernet cable using IP Config tool, then WiFi, then apps:
- Ethernet cable, IP config tool, change camera’s IP address to your sub-net so that you can access the web setup page.
- Login to web admin page and add WiFi details.
- Install apps on phone, add camera in phone apps:
- Without ethernet cable or IP config tool, using only WiFi:
- Install smartphone apps.
- Scan the QR code and add camera to the app.
Local and Remote viewing, without using Port forwarding:
- P2P setup:
- Connect the camera to your router via ethernet or WiFi(Method 2 above has to be performed first if connecting through WiFi).
- Add camera either via Serial No. or the QR code.
- Amcrest Cloud setup for recording video clips and snapshots to the cloud
- Connect the camera to your router via ethernet or WiFi(Method 2 above has to be performed first if connecting through WiFi)
- Visit www.Amcrest.com/Cloud to add the camera to your cloud account
- Web Access setup (essentially the same as Method 1 but using Amcrest’s servers instead):
- Connect the camera to your router via ethernet or WiFi(Method 2 above has to be performed first if connecting through WiFi)
- Visit www.AmcrestView.com to add the camera to your cloud account
Once the initial setup is complete, you can switch to using the camera’s built-in WiFi.
Here’s a video that walks you through one way of setting up the camera:
Camera Features
Hardware
The Amcrest ProHD IP2M-841 has a 2 Megapixel sensor which lets you record at 1920×1080 resolution and 30 frames per second(fps). This is perfect for home surveillance because you get that much more clarity and sharpness in the recorded videos and images.
The on-board IR has a good range of 10 metres which is standard for this class of IP camera. The lens fitted to the camera has a focal length of 4mm which provides a very good 90 degree field of view. The camera’s pan and tilt functions allow you to point the camera at the area or object of interest.
The camera is capable of recording up to a bitrate of 8Mbps. We recommend a minimum of 4Mbps for ensuring you get a good level of detail. The IP2M-841 supports Wi-Fi upto 802.11g speeds of 54 Mbps. This is more than enough for the camera’s video stream to be sent wirelessly so faster protocols such as 802.11n or ac are not necessary.
What we really like about this camera is that it has an SD card slot, so you have the option of using this camera in a standalone manner. It doesn’t have to be connected to a network device for recording alert videos or images.
Two-way audio is present and is perfect for using the camera as a baby monitor or a wireless doorphone. Watermarking and text overlays are also supported.
Recording modes
The camera can be configured to record 24/7 to the built-in SD card, a network storage location or to the Cloud.
- SD Card: We recommend using the SD card only for motion detection or alert snapshot and video recording, and not 24/7 recording. This is because you will wear out the SD card quicker if you record to it 24/7. Think of the SD card as redundant storage in case your main storage location fails or is stolen.
- The recommended way of using an IP camera is this: use it to record 24/7 footage or motion activated video to a network storage location. This could be a NAS, an NVR (see NVR buying guide), or a computer running surveillance software such as BlueIris.
- Cloud storage: In this mode, your camera will upload motion detection clips, snapshots, or 24/7 recording clips to the Amcrest Cloud.

4 hours of cloud storage are included with the camera, and this should be sufficient for most people intending to use only motion detection recording.

Motion Detection and other event alerts
Motion detection alerts is one of the most enjoyable features of an IP security camera. When an IP camera detects motion as per your pre-defined rules, it should be able to send an email alert with snapshots and ideally send push notifications also. The Amcrest can do all of this and has all the standard motion events that we have come to expect from good quality cameras. It supports email alerts and can attach snapshots with each motion detection email alert. You can also set up each event to be active based on a schedule. An interesting feature of the Amcrest ProHD is that you can also set it up to do a Pan-Tilt tour when it detects motion. Remember you can enable more than one type of event at the same time. Let’s take a closer look at each one of the motion detection events available.
Simple Motion Detection
Amcrest calls it ‘Motion Detect’, this motion detection method simply looks for changes in the scene according to the area defined, the sensitivity and the threshold.
Video Tamper
This method triggers an alert when the camera is blanked out.
Audio Detection
A useful event mode that as the name suggests will trigger an alert and alert actions based on sounds detected by the onboard mic or the audio input.
Alarm
This is where the alarm input connection comes into use. If you have a PIR sensor connected to the camera, you can set up this event to detect motion using the PIR. Since the PIR sensor works on changes in heat and not image based detection, you can cut down the number of false alerts that is the bane of regular image based motion detection.
SD Card abnormality
This event can be set to trigger if the camera is unable to record to the SD card – either because of an error or because somebody has removed the SD card illegally.
Network abnormality
This event can be set to trigger if the camera is unable to record to the network storage location (NAS or NVR) – either because of an error or because somebody has tampered with the equipment.
Illegal Access
This event can be set to trigger if the camera detects unauthorised logins such as an invalid username, password or a hacking attempt.
Smartphone apps
Amcrest provides a free Android and iOS app, the Amcrest View Lite which lets you see your camera’s live video stream, pan and tilt the camera lens, and use the 2-way audio feature. However the free Lite version is missing some important features such as alarm push notifications. The paid Pro version adds alarm push notifications, image and video file sharing, exporting MP4 video, and exporting images to your phone storage. This surprised us because most other manufacturers offer all the Pro version’s features in their free apps. Some users have found the apps to be a bit glitchy though.
Compatibility with NVR systems
The Amcrest ProHD IP2M-841 supports the ONVIF protocol. ONVIF is an industry standard that enables surveillance equipment from different manufacturers to work together. This means that you can connect the Amcrest to any Network Video Recorder(NVR) or a computer running surveillance software, and the camera should work seamlessly.
The camera also supports the RTSP protocol so you can also access the video stream using a video player like VLC on your computer. This is the URL to use: rtsp://login:pass@xxx.xxx.xxx.xxx:PORT/cam/realmonitor?channel=1&subtype=1
The x’s are your camera’s IP address.
Performance
The camera has very good daytime quality thanks to the 1080p image sensor. Videos in low light and at night are also of high quality thanks to the built-in IR LEDs.
I am using my Amcrest as a baby monitor and I’m constantly amazed by how clearly I can see my baby – I can even see his chest moving as he breathes in and out. If you are a parent of an infant, you know how reassuring that can be!
The microphone is super-sensitive and picks up sounds not only in the same room but also from all over the house. So its also a great camera if you want to check in on your house while on vacation.
The builtin speaker is surprisingly loud and I can clearly speak to baby as I make my way to his nursery.
Verdict
The Amcrest ProHD IP2M-841 is one of the best-selling wireless security cameras at the moment. The considerable array of feature such as 1080p FullHD resolution, pan-tilt feature, SD card slot, two-way audio, alarm connections, support for FTP, and configurable event modes in a high quality package represents real value for money.
Note that the only feature this camera is missing in my opinion is PoE. But Amcrest has thought about this already – there is a PoE model, check out the Amcrest ProHD IP2M-841EB on Amazon. The E at the end of the model number indicates that the camera has the PoE feature, the B is just the colour. However it then loses the WiFi ability. Amcrest doesn’t currently make IP cameras with both WiFi and PoE, which is a shame.
Where can I buy one?
We recommend Amazon as they are an authorized retailer of Amcrest security products.
Check Price on your local Amazon Site
Also Consider
- Canary All-in-One Home Security Device

- Belkin NetCam HD+ Wi-Fi Surveillance Camera (added advantage of working with WeMo)
- D-Link DCS-942L Wireless Day/Night Network Surveillance Camera with mydlink-Enabled


Daniel
Something for your readers:
http://forum.micasaverde.com/index.php?topic=38406.msg302328#msg302328
I posted a method to use Vera to trigger PIR motion-based recordings on the camera and the NVR.
Great idea to force the Amcrest into an alarm state – I am happy you got the concept to work!
hmmm… it looks like the text editor deleted what I typed in front of the @ sign… You need to put the username:password after the // and before the @.
Hello Daniel
Thanks for all your posts & responses. I now have a functioning NAS/NVR and home automation system (with PIR motion/Fire & CO/Door & Windows sensors and wall mounted light switches), all of the elements accessible remotely via VPN. I’m now creating Scenes in the automation system to integrate the sensors with the cameras. And I’ve run into a couple of questions…
First, here is my setup:
QNAP TS-231+ / Amcrest IP2M-841E PTZ camera / Hikvision DS-2CD2T42WD-I5 4MM camera / VeraEdge controller (running 1.7.2406). I use Firefox to access the Vera to set it up.
Questions:
Q1: When I am logged into Vera and select Cameras from the menu, often the screen image for a camera will say “Invalid credentials”. If I reselect Cameras from the menu (or sometimes just by waiting a few minutes) the message goes away and I see the video feed. Have you encountered this issue? (Note: this may be related to question 2.)
Q2: When I select a specific Camera, and then click on Live, I receive this message:
“You are seeing the video in emulation mode. The camera doesn’t support or has trouble loading up the continuous streaming. You can try to load it again by clicking Retry or you can click Close and continue watching it as it is.”
This happens every time and the message never clears. Any idea why I can’t get Vera to see the live stream? (This is affecting my ability to get Vera to launch a recording. I can get Vera to take a snapshot, but not a recording.)
(Note: When processing the inclusion of the IP cameras into Vera, there was no selection available for Amcrest nor Hikvision cameras so I had to use “Other IP Camera”. Vera never detected the cameras, so I had to add them manually. When adding manually, you cannot enter the IP address. You have to pick from a list of IPs that Vera finds (none of which are actually the camera IP addresses, so you just pick one at random) and then use “Other IP camera” as the “Select camera type”. Vera forces you to enter a URL rather than the IP. I used http://192.168.1.144/cgi-bin/snapshot.cgi for the Amcrest camera and http://192.168.1.145/Streaming/channels/1/picture for the Hikvision camera. I was successful in getting the cameras paired, but I think I lost some functionality by having to do the manual pairing using the URL. I can manually take a snapshot from the camera, but manually recording does not work, presumably related to the error message I note above.)
Q3: In the post above, you indicated you used a custom config file to enable the PTZ function of the Amcrest camera. Can you share that or point me to a link where I can get it? (I’ll also need to figure out how to load it and use it…any tips would be appreciated!)
Nice to hear about your setup, I went for the Vera Plus. Which wall switches did you get? I have been looking for a decent one but haven’t found any I like.
Q1: I remember seeing this initially but as I dont use the Web interface for anything other than adding new devices or programming, its not bothered me much. It has no effect on the usability of the camera feed in the Imperihome phone app.
Q2: Yes I get this too but again I just ticked the box and its been fine since.
I addressed this in another reply but for some cameras, Vera needs some manual configuration under device properties to force it to pull the RTSP stream from the Amcrest not the MJPEG one. But I feel this is unnecessary as I would rather stream the camera straight to my Imperihome/tinyCam Monitor Pro/QVR Client apps.
Q3: The config files and steps are here.
After thinking about this more, I don’t think I need or want Vera to be showing a live video stream (too much load on Vera, and I can view live streams through VMobile mobile app or QVR PC app), which makes Q2 no longer applicable.
I also did some research and found the http command to tell the camera which preset to pan to:
http://:@/cgi-bin/ptz.cgi?action=start&channel=0&code=GotoPreset&arg1=0&arg2=1&arg3=0
where…
&arg2= is the preset position number to pan to
I can issue that command from a browser window and it moves the camera to the preset.
Now… I just need to figure out how to get Vera to issue that command upon motion detection in a scene before Vera tells the camera to take a 20sec mpeg video (which will require yet another http command yet to be determined…)
Any tips on how to invoke these commands via Vera?
For getting the PTZ controls of the Amcrest working inside the Vera Web interface, I followed the instructions on here.
You are right about RTSP, I have come to the same conclusion after fiddling with it for some time – I wouldn’t task the Vera with handling live RTSP streams. I use the Imperihome app on my phone and it can stream RTSP directly from the camera to your phone, bypassing the Vera. If you must though, you can manually force the Vera to pick the RTSP stream instead of the MJPEG by changing device variables.
Hi Nathan,
Sorry I couldn’t reply sooner. Its my last couple of days before I finish for Christmas and it has been so hectic!
You have made a lot of progress in a very short time! Yes the Vera can send http commands to any device on your network, but the built-in scene editor lets you do it without using the http command also. I use this easier method to control my Denon receiver. Here’s how you do this: Assuming you are using the default Vera scene creator, start creating a scene using your desired trigger, and in “Step 3: Finish the Scene” click on ‘Advanced Editor’. Then ‘Add Action’, choose the Amcrest camera device. Now another drop down will appear and you will see a long list of actions you can tell the camera to do. One of them is “GoToPreset” and then you can enter your preset number in the box. Click ‘Add’ and Done. This should now do what you want.
You can invoke http commands but using the LUUP code option in the scene editor, but this is a bit more difficult. Hope this helps.
Ok…some more trial and error and I got it to work… the link you provided solved my issues. I can now pan/tilt via Vera’s Camera Live view and the Scene fires the GoToPreset position I select in the advanced editor.
BTW, to answer your question I am using GE Smart Switches.
Now – on the the next challenge. This is my ultimate objective:
Define the following Scene in Vera:
When PIR motion sensor detects motion (DONE)
Send command to specific camera to pan/tilt to specific preset position (DONE)
Send command to specific camera to take a snapshot with Vera (DONE)
Send command to specific camera to send Motion Detected event to Surveillance System / NVR so that a marker can be placed on the 7/24 recording (perhaps by Vera triggering the Amcrest camera Motion Detection event??)
Send command to specific camera to record 60 seconds of video to SD card installed in camera (this is probably done within the Camera setting, triggered by the same Motion Detection event sent to the NVR)
Send email to specific user with the 60 second video from the SD card attached
Thanks for the info.
I actually did try the method you describe above (using the Scene Advanced Editor and Add Action). I selected “GoToPreset” from the “Service” “urn:micasaverde-com:serviceId:PanTiltZoom1”.
It did not work. I think the issue is caused by something wrong with the camera config itself. If adding the “GoToPreset” works for you, then your camera XML files are probably different than mine. (I’m also not sure where the API you reference in the previous post comes into play when using the Scene editor option.)
Here is my camera config and the changes I have tried:
Go to Cameras>cameraX>Settings>Advanced>Extra Parameters
….Params tab:
device_type = urn:schemas-upnp-org:device:DigitalSecurityCamera:2
altid = null
ip = 192.168.1.144
mac = null
manufacturer = null
model = null
id_parent = 0
embedded, disabled, restricted are all disabled
device_file = D_DigitalSecurityCamera2.xml
impl_file = null
category_num = 6
device_json = D_DigitalSecurityCamera2.json
I have not edited any of the above – these are the values created when I added the camera.
….Variables tab:
URL = cgi-bin/snapshot.cgi
Commands = camera_full_screen,camera_archive_snapshot,camera_preset
Note: I added “camera_preset”, which added preset buttons to the Live view of the
camera, but when I click a preset number, I get an error message “Error sending
command. Please try again.”
Timeout = 5
ModeSetting = 1:;2:;3:;4:
PolRatings = 4.70
PanToPreset1 = http://username:password@192.168.1.144/cgi-bin/ptz.cgi?action=start&channel=0&code=GotoPreset&arg1=0&arg2=1&arg3=0
GoToPreset01 = http://username:password@192.168.1.144/cgi-bin/ptz.cgi?action=start&channel=0&code=GotoPreset&arg1=0&arg2=1&arg3=0
I added the last two variables manually on the “New Service” tab. The first one I added to a New Service I titled “APanToPreset1“. I can now see this new service “APanToPreset1“ in the Scene editor>Advanced Editor page in the 2nd drop down list…but it does not list the variable I defined. Actually, I think that list is showing commands rather than variables…but I don’t see how to add a command thru the UI.
The second variable I added to a New Service using “urn:micasaverde-com:serviceId:PanTiltZoom” which is an existing service. But, it does not include the new variable in the list of options on the Scene Editor page 2nd drop down list.
I suspect that I need to learn how to edit the xmls, find the appropriate xml file(s) for the camera (or create a special one for this camera), insert the HTTP string as a command…and then associate the camera with the customized xmls….
Thoughts? Did you have to do all this, or did yours work with no xml changes? If so, which camera device did you select when you added your Amcrest camera to Vera? I’m thinking about uninstalling the camera and then reinstalling using a camera that Vera prefers (has predefined parameters).
Hi Nathan,
Sorry you are having to jump through hoops to get it working. No I didn’t have to do anything other than upload the xml file in the forum post to the Vera. Unless you want the Vera to respond to motion detection triggers from the Amcrest you don’t need to do anything else. I didnt add or edit any service or variable – I don’t think you should have to. All the custom settings are in the customised xml file already. You will know if the uploaded xml file is active if in the camera view in Vera Cameras section, you see the pan controls and 8 separate preset buttons -> these too work for me by the wya.
I tried again the advanced scene editor method I described earlier and it simply works for me. I have a few presets defined in the Amcrest Camera management portal. When I run the scene that uses the GoToPreset command, the camera moves to the presets I have defined. I am a 100% sure the xml file should just work – others have also used this xml file successfully. I can only suggest removing the camera, deleting the xml file you previously uploaded to the camera, and redo it all over again, but without touching any of the settings?
Thanks for the detailed response…much appreciated.
On a side note… as I am shopping for the components for my system, I am noticing that several of the Hikvision cameras on Amazon are from “suspect” suppliers…when you read reviews and Q&As it is difficult to ascertain if the camera is a legitimate product straight from Hikvision, or a non-USA hacked unit (which is not firmware upgradable), or is a knockoff look alike.
Have you noticed this? Does anyone know of a reputable seller out of all the ones listed when you search by a camera part number?
Hi,
Hikvision doesn’t maintain an authorised reseller list so its impossible to say whether a seller on Amazon is an authorised reseller or not. An example is Nelly’s Security who sell on Amazon but do not appear on any Hikvision list.
If you want to make sure its a US market unit, the only way is to order direct from a distributor on Hikvision’s authorised distributor’s list.
Daniel