When I started thinking about getting into home automation and building my smart home, I spent months researching everything ZWave. One name kept popping up again and again, Fibaro. Owned by the Polish Fibar Group, the Fibaro brand is one of the most popular home automation brands around today.
You would be mistaken for thinking you are getting a bargain with a Fibaro product, it being Polish and all. But no, they are not exactly cheap, just look up their flagship ZWave hub, the Fibaro Home Center. It can easily cost three times as much as the Vera Plus. I don’t think its particularly good value either, but that’s a topic for another day. Question is how will the Fibaro Motion Sensor fare?
After living with the [easyazon_link identifier=”B01CPR7VX4″ locale=”US” tag=”vueville.com-eaz-20″]Fibaro Z-Wave Motion Sensor Gen5 (FGMS-001)[/easyazon_link] for 3 years, I can say this multi-sensor is quite decent if not exactly great value for money. Its a stylish, well-made, reliable ZWave sensor with very good battery life. Would I get another one? Only if I can find one significantly cheaper than my current favourite, the [easyazon_link identifier=”B0151Z8ZQY” locale=”US” tag=”vueville.com-eaz-20″]Aeotec MultiSensor 6[/easyazon_link].
If you are just starting your Home Automation journey, let me backtrack a bit and explain my approach. I chose to build my home around the ZWave standard. I did so largely because its a mature standard, enjoys wide industry support and there is a huge range of ZWave products to choose from including multi-sensors, door locks, alarm systems etc. For a complete overview of the various choices of Home Automation standards and devices, read my guide here.
While you can get a simple ZWave motion detector, a multi-sensor like the Fibaro is more interesting and ultimately more useful. When we talk about making a home smart, its about understanding what’s happening inside a particular room and then the house automatically taking action based on predefined steps:
On motion being detected in a hallway, my Vera Plus would ask the indoor Amcrest PTZ camera to move to a watch the doorway, take a snapshot, record a clip and email it to me.
Or when the temperature falls below a particular point, the temperature sensor in the room would ‘call for heat’ and my Vera Plus hub would respond by turning on the boiler.
Or when the light falls below a certain level, I can ask my Vera Plus to turn on my bedside lamp starting at 20% brightness. It could even ramp it up slowly over 30 mins, and then ramp it down later on as I go to bed. If the humidity goes above a certain level, my Vera Plus can turn on the smart plug into which my dumb dehumidifier is plugged in.
So as you can see, its very nice to have certain sensors in each room of the house – motion, light level, temperature, humidity etc. That’s why manufacturers like Fibaro have made multi-sensors, a single device which can typically monitor a few different environmental factors. All in one convenient small device that can be hidden away anywhere. You can see why I love these cool little devices!
The Fibaro Motion sensor is a universal ZWave device, so it will work with any ZWave hub such as the Vera Plus, the Vera Edge, or the Samsung SmartThings.
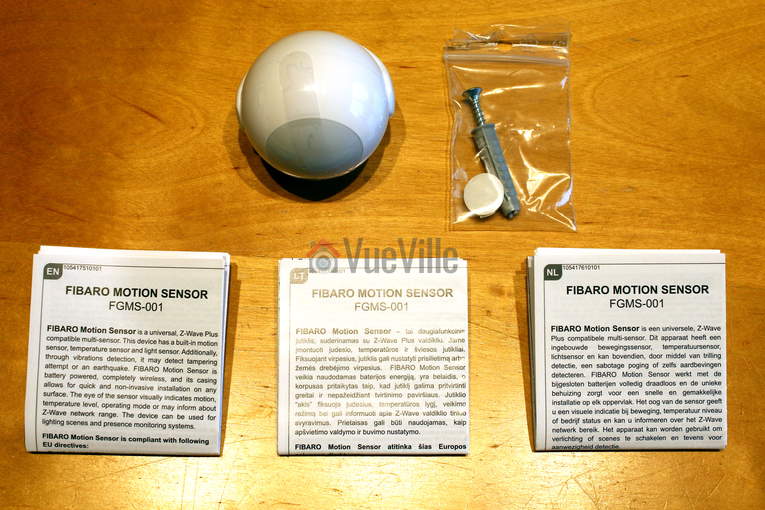
Unboxing the Fibaro Z-Wave Motion Sensor
The Fibaro Motion Sensor comes in a colourful high quality box.
You can see the model number FGMS-001 and the firmware version of the sensor printed outside the box.
The box contains the following:
Fibaro Gen5 Motion Sensor
Holder to attach the sensor to the wall
Installation screw and rawl plug
Instruction manuals
One CR123A battery
Design
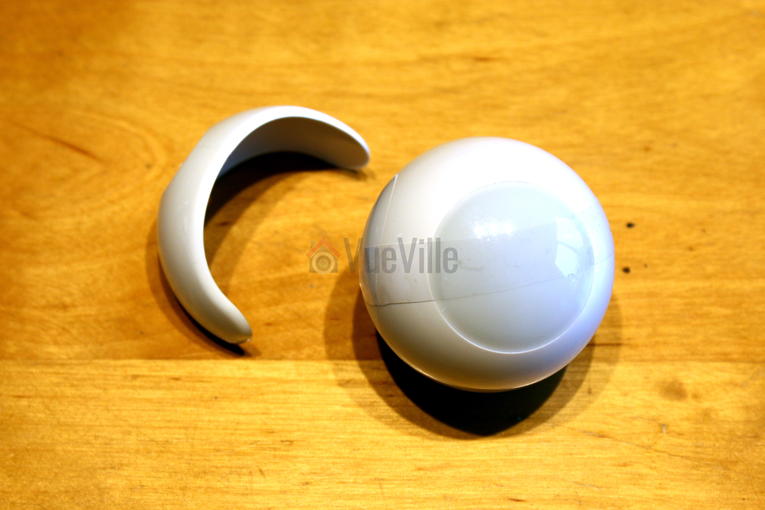
The Fibaro sensor is a tiny round globe with a multi-colour LED inside. I knew it was a compact device but when I first opened the box, I was really surprised to see just how small it was. It measures just 46 mm (1.8 inch) across.
There is a very distinctive cat-eye shaped LED light behind the Passive InfraRed (PIR), and it lights up whenever it detects motion. The colour of the LED depends on the temperature in the room and the light intensity. So when you walk into a room, it will light up and then you will easily know whether its too cold or too warm. Turn the cover counter-clockwise and the sensor opens to reveal its innards.
A CR123A battery is pre-installed, which is very welcome. A note on the battery: after 3 months of use in our hallway, my Vera Plus reports the battery life at 100%. I am not sure how correct that is but it bodes well for the little Fibaro sensor – Fibaro claims a 2 year battery life. The motion sensor measures the battery level every 24 hours and reports it to the ZWave hub or your Apple device if you are using HomeKit. If the battery level drops below 15%, the sensor will also send a low battery warning.
Installing and configuring the sensor
One of Fibaro’s promotional videos shows the sensor being used in an outside porch and the specs mentioning outside range, which makes me wonder whether I can use it outdoors and how water-proof it is. But the manual is clear the Fibaro is intended to be an indoor device and that’s where I am using it. Of course, you can’t really place the Fibaro sensor on a shelf because its round. But its very easy to install with only a single screw needed. The sensor’s range is quite good at 50 metres. I have moved mine all over the house and it has been brilliant. It never once lost the wireless connection to the ZWave network.
Now the sensor has a few tricks up its sleeve – it can help you scout out the perfect installation location. Clicking the B-button once wakes up the device, but if you hold it, you can access its menu! Yes the sensor has its own little menu which will help you do a ZWave range test or reset the device. The range test is particularly cool as the sensor will indicate the strength of the network using its LED. You can use this feature to troubleshoot other misbehaving devices on your network too.
The inclusion process into my ZWave network was quick and went off without a hitch. There is a button inside the sensor that Fibaro calls the B-button. After putting your ZWave controller into inclusion mode, press the B-button on the sensor 3 times quickly. Your hub should detect the sensor and add it to the ZWave network.
My inclusion process was successful but only 3 devices showed up in my Vera control panel: one for each sensor except the accelerometer. I haven’t investigated this further but I am guessing its because the Vera UI7 doesn’t recognise that particular sensor.
Features & Performance
Motion Detection
The Fibaro Motion Sensor claims to be able to detect motion within a 7m range, but I think this is too optimistic. I have found the Fibaro to be able to detect motion accurately and quickly within a 3-4 metre range which is less than the claimed 7m range but in reality is perfectly adequate for me. I have mine installed at a 2.4m height as recommended in the user manual.
Temperature and Light level
Although its primary function is motion detection, the Fibaro is a 4-in-1 sensor. It can monitor ambient temperature between 0 to +40°C with an accuracy of ±0.5°C and the light level between (0 – 32,000 Lux). I found the ambient temperature and light level measurements to be inline with other sensors. There’s even a temperature offset feature which can take care of the difference in temperature between the lower level of the room (where you and I will be at) vs. the higher level where the sensor may be installed.
However as is common with other battery powered devices, I found that the Fibaro will report a change in temperature or light levels only if it changes by a certain amount (0.5 deg C and 200 lux apparently). This helps conserve the battery but you lose real-time monitoring. If this is a deal-breaker, consider other multi-sensors such as the Aeon MultiSensor 6 which can do real-time monitoring with a USB power option.
Accelerometer
The 4th and final sensor is the accelerometer. The accelerometer is useful in case somebody tries to tamper with the sensor. If you physically touch the device, the accelerometer will get activated and flash the LED in all its colours rapidly.
Other features
Now this is something I look for in every device – a reset button. The Fibaro motion sensor has one. Surprisingly enough some companies think its fine to make their substandard devices without a reset button (Popp, I am looking at you).
You may have noticed the Gen5 at the end of the Fibaro’s model name – this refers to the latest generation ZWave 500 chipset (as opposed to 300). This version has improved range and battery life, so is a good feature to look for.
There are some other features that work only with a Fibaro Home Center hub:
People counting if you have more than one Fibaro sensor
Inactivity detection
Fibaro 4-in-1 Motion Sensor vs. Aeon Labs Aeotec Multisensor 6
One sensor the Fibaro is missing is the humidity sensor. This is very useful for me as we have a little baby and that’s why I ended up getting the Aeon Labs Multisensor 6 for the nursery. They are very similarly priced which makes the Fibaro less value compared to the Aeon Multisensor.
Verdict
My main gripe with the Fibaro Motion Sensor is that it is expensive compared to the Aeon Labs Multisensor 6 which has two additional sensors (humidity and UV level).
[review]
Where to buy
[easyazon_link identifier=”B01CPR7VX4″ locale=”UK” tag=”vueville.com-eaz-21″]Check Price on your local Amazon site[/easyazon_link]
Network cameras have become incredibly popular with security conscious homeowners over the last couple of years. Quite a few manufacturers have tried to jump on the bandwagon in 2016 and I would argue none has been more popular than Amcrest. The shortsightedness of industry leaders like Hikvision and Dahua in restricting authorized sales to distributers only instead of including more popular retail channels like Amazon, eBay, and Walmart is a golden opportunity for smaller players like Amcrest, Reolink and many others. Amcrest have seized this opportunity with open hands and are reaping the rewards.
So who is Amcrest? This is a question that I am asked often by my readers. The short answer is that Foscam US re-branded themselves as Amcrest Technologies in early 2016. Foscam US ( Foscam Digital Technologies) used to be an independent distributor for the Chinese manufacturer/supplier Foscam Shenzhen. However in 2016, the Chinese supplier started undercutting Foscam US. Foscam US had no choice but to cut all ties with Foscam Shenzhen and go it alone as Amcrest Technologies.
Foscam vs. Amcrest
Foscam security cameras never had a great reputation and once Amcrest launched their own products, they have quickly overtaken Foscam both in quality, reliability, support service levels, and reputation. Well-deserved too, I might add.
On their website, Amcrest divides their security cameras into two very broad following categories:
Indoor and Outdoor Wireless IP Cameras
Indoor and Outdoor POE IP Cameras
Their website doesn’t currently have any filters, so its quite difficult to narrow your search down to cameras with specific features. So we have grouped Amcrest’s very diverse network camera range to help you easily find the model you are looking for:
A few things stand out when you study the Amcrest security camera product range:
All cameras have either WiFi or Power over Ethernet (PoE), but not both features.
WiFi cameras top out at 3MP, if you want 4MP you have to go PoE
All the indoor cameras have 2-way audio and a local storage option.
All the indoor cameras except the new Hex Cube models have the Pan-Tilt feature.
All the outdoor cameras have at least an IP66 weather rating.
Most cameras are available in a choice of colours: black, white and silver.
None of the outdoor PoE cameras have a local storage option such as a microSD card slot -> this was the biggest surprise for us, and is an obvious gap in their product lineup.
If you want a no-frills outdoor security camera from Amcrest, we recommend these models:
1080p Bullet: IP2M-842EB (PoE), IP2M-842B (WiFi)
1080p Dome: IP2M-844EB (PoE), IP2M-844B (WiFi)
Amcrest NVRs
HD over Analog (HD-CVI) NVR
Coming soon
WiFi NVR
Coming soon
POE NVR
Coming soon
Amcrest Complete Security System Kits
HD over Analog (HD-CVI) NVR
Coming soon
WiFi NVR
Coming soon
POE NVR
Coming soon
Where can I buy them?
We recommend Amazon they are one of the authorized worldwide sellers of Amcrest products.
Your phone buzzes to let you know you have a message from your security camera. Someone’s at the door. You open the notification to see a live video stream of your front porch and you can hear them too. What’s more, you can have a conversation with the visitor. Except, you need not be at home. You can be at work, on vacation, or literally anywhere in the world. Sounds good? This is exactly what you can do with a security camera with a built-in speaker and microphone.
The beauty of the world of security cameras is that there is such an amazing range of models and features to choose from. However if you are new to this, you can easily get lost among the hundreds of brands and models available. The good news is that I have done all the hard work for you and have created this comprehensive guide into the best outdoor security cameras with audio features to help you.
The key learning for me over the course of my research is that the best outdoor security cameras such as the ones from Hikvision tend to not have an on-board speaker but allow you to connect one yourself. The more mainstream models such as the Nest Outdoor Cam and the Ring Stick Up Cam have an on-board speaker but then design the camera to be reliant on their paid cloud servers for what are standard features in the Hikvision for example.
So if you go for a ready-made cloud solution like the Nest Cam, you pay a monthly subscription to get the same features you get free with the DIY route (Hikvision / Dahua / D-Link). The choice is yours, but you know my suggestion – go DIY if you can and avoid the cloud.
Best Outdoor Security Cameras with Audio 2017 Recommendations: Summary
Outdoor security cameras with built-in Microphone and Speaker for 2-way audio:
[table id=22 responsive=scroll /]
Outdoor security cameras with built-in Microphone only:
[table id=23 responsive=scroll /]
Methodology
Whenever I start researching products for myself, friends and family, or readers of my blog, I try to create a system of categorizing all the products. This is very useful when you are struggling to see some order and structure in the way products are designed and marketed.
So if I were to group the outdoor surveillance cameras with audio, I would do it this way:
Outdoor security cameras with built-in Microphone and Speaker
Outdoor security cameras with built-in Microphone only (may or may not have speaker out connection)
Outdoor security cameras with audio in and audio out connections only
The above order is reflective of the number of security camera models you can find in each category too – there are very few weatherproof or waterproof security cameras with both an on-board microphone and speaker. There are a few more weatherproof security cameras in the market with just a microphone, while there are tons of weatherproof security cameras on sale with audio in/out connections.
I will talk about the features I think are important for you to look for in each category, followed by my recommendations for the best outdoor security cameras with audio based on many days of intense research.
Best Outdoor Security Cameras with a Microphone and Speaker
The most important must-have features to look for in an outdoor security camera with audio are:
Video Resolution – at least 720p resolution, 1080p Full HD resolution (2MP) for increased chance of positive identification of faces
Night vision – at least have InfraRed LEDs for true night vision with true IR cut filter
Field of view – at least 90 degrees, depends on focal length of camera lens
Weather proofing – Expressed in IP ratings, the first digit is the solid ingress rating and the second digit is the water ingress rating (higher is better always). An X instead of a number indicates a product is unrated for that component. An IP weather-proof rating is preferable, IP66 is the standard for good security cameras.
Audio – Microphone and speaker built-in
Live streaming so that you can check in any time to see what’s going on
Cloud reliance – Can the security camera function without an internet connection? Is this important to you? What happens if your Internet connection fails? Is there a local storage option to fall back on? Do you have to pay a monthly subscription for core features such as recording video clips, storing them, accessing them later on, for motion detection? These are the questions I will ask of each product.
The nice-to-have features to consider are:
Wireless – Support for WiFi, Bluetooth
Continuous Video Recording instead of just automatic event triggered or manual recording
Software features – Live view capability, Email alerts on motion detection, Push notifications to smartphone app ideal
Local storage – in the form of a microSD card slot, or internal flash storage
Motion detection method – PIR motion sensor is preferable to cut down on false alerts
Power source – Ethernet port preferable with PoE (Power over Ethernet) support, internal battery good for power backup purposes
Advanced features:
Preferably API available for interfacing with home automation controllers
Preferably RTSP stream capable, ONVIF support ideal
So here are my picks for the best outdoor surveillance cameras with a microphone and speaker in 2017:
The D-Link DCS-2310L looks like an indoor cube camera but it is a very capable outdoor camera too. This is the only camera equipped with an Ethernet port in our roundup today, and what’s more, it supports Power over Ethernet (PoE) – 802.3af PoE Class 2. So you have some added flexibility when it comes to positioning your camera. It can also take a power input of 5 V DC, 1.2 A.
Alas the resolution tops out at 1280 x 720 (720p) due to the 1/4” 1 Megapixel progressive scan CMOS sensor. It supports H.264/MJPEG encoding of the video streams. The focal length is an unusual 3.45 mm, while the aperture is a standard F2.0. Practically this means the closest it can focus is 500 mm in front of the camera. The field of view is 70 degrees which is very low but nowhere near the Nest cam’s 130 degrees.
The camera has infrared LEDs that can let the camera see in total darkness. It also has a true IR cut filter, so that daylight colours remain true to life without compromising sensitivity to infrared light at night.
A standout feature of the D-Link camera is a real PIR sensor with a 5m range. This should drastically cut down on false motion alerts, provided you are using the camera in an enclosed space like a porch. The DCS-2310L has an IP65 rating, thus earning it’s weatherproof credentials. It can operate within a temperature range of -25 to 45 °C (-13 to 113 °F).
Let’s take a look at the software features now. Right off the bat, the ability to provide an RTSP stream catches my eye. I hate being locked into any manufacturer’s proprietary video viewing or mobile app interface. With my Vera Plus home automation controller, I can easily pull the D-Link’s RTSP stream into my single unified smart home interface – my definition of smart home bliss! Moreover the camera is ONVIF compliant, which means plug and play compatibility if i want to do more than just pull the video stream from the camera. For example, my QNAP NAS can easily configure and setup the D-Link camera automatically due to the ONVIF protocol support.
What about activity alerts or event alerts? The D-Link is described as a cloud camera but unlike most cloud cameras, it actually does all its processing locally, not in the cloud. A free mydlink cloud account is available which allows you to view and manage D-Link cameras remotely. The advantage of the cloud account is that you can watch all your D-Link cameras in one place, which is very convenient if you have only D-Link cameras.
If you don’t want to use the cloud (like me), there is a local microSD card storage option. I would set up the camera to send motion and event triggered emails with attached snapshots and use a Sandisk 64GB SD card in this slot as a secondary record location. The camera can send alerts based on the defined motion detection rules and if it detects a sound. The camera also supports saving JPEG snapshots to an FTP location.
The Toucan brand is the result of a partnership between Toucan Solutions and the popular Kuna brand. A similar security camera is also sold under the Maximus brand at HomeDepot in the USA.
The Toucan outdoor security camera from Kuna is an interesting product – it is designed to be used in conjunction with an existing outdoor light fixture. There are two parts to the product – the camera itself and a screw-in part which Toucan calls a ‘smart socket’ which goes in between your existing light’s bulb holder (E26 holder) and the bulb (40W max / 10W LED). The screw-in ‘smart socket’ provides power to the camera via a 100cm/40 inches long microUSB cable. This solves the power supply issue and does away with the need for batteries. A bonus is that you can then remotely control the bulb that is screwed into the screw-in part, thus making the screw-in socket ‘smart’! It also has a dusk to dawn timer feature. Quite clever really.
Looking at the video features, the camera sports a wide-angle HD camera sensor, and a Passive Infrared (PIR) sensor. Again 720p resolution is below my recommended minimum of 1080p, but the saving grace is an expansive field of view (116 degrees diagonal). The camera supports live view so you can connect to the camera from the mobile app to check your front door any time. The PIR sensor allows you to configure the camera to send alerts only when there is real motion, not when a cloud passes overhead or branch moves slightly.
On the audio front, the camera features a 100 dB speaker/siren (to scare off intruders) and a microphone. So you can have 2-way audio conversations with someone at the door while you are vacationing in Ibiza! The camera doesn’t have an Ethernet port so all communications are wireless – it supports both WiFi and Bluetooth.
The mobile app is well designed and is a real highlight of the product. Clearly a lot of thought has gone into the software side of things. However the only way to use the camera is from the app – there is no web browser interface.
The Kuna security camera is reliant on the cloud for its basic operations, it will stop working if your internet connection is interrupted:
“Kuna safely stores every captured event in our secure cloud, allowing for uninterrupted video in the case of network connection issues.”
The biggest downside I see with this camera is the lack of a continuous video recording feature as suggested by the lack of a local storage feature like an SD card slot. So you cannot watch a continuous recording of the last 24 hours for example. However this is mitigated slightly by the fact that it can pre-record 10 seconds of an event taking place, but only if you have a premium cloud subscription. So it is actually using the cloud to continuously record, not just store event clips. Why the company doesn’t then take the logical next step of allowing that continuous video to be accessed is not clear to me.
So what can you do with the camera if you don’t want to pay for a cloud subscription?
720p HD Live View – you can check into the Kuna cam to see what’s going on
Basic motion sensing and push alerts to your smartphone
Any captured footage is stored on the cloud for 2 hours after capture
3 complimentary cloud downloads per month
Two-way audio: Talk and listen through the built-in microphone and speaker
The following features are available with the optional cloud:
Events kept on the cloud up to 30 days
Smart Event Detection: 10 seconds pre-record and post-record for events
Everyone knows about Nest right? Well, that may well be true for the Nest Thermostat, but the Nest Outdoor Security Camera is the often overlooked member of the Nest family. If you already have a Nest thermostat, want to remain in the Nest ecosystem and most importantly want the easiest to use system, the Nest cam is an option.
But let me be clear, its not my top recommendation for the fact that its functionality is crippled unless you pay for a cloud subscription. Yes all the ease of use comes at a price. Sadly this is the trend among mainstream security products – the initial purchase price is quite attractive but then you become a source of recurring revenue for the camera maker.
Being a wired camera, it is capable of 24/7 video streaming, meaning you get live view, which purely battery powered cameras such as the Netgear Arlo can’t do.
Interestingly, the camera has a 1/3-inch, 3-megapixel sensor but the video tops out at 1080p resolution which is the bare minimum in my opinion for a security camera. It also has 8 InfraRed LEDs (850nm) on-board for night view, and a true IR cut filter for true-to-life colours during the daytime without compromising infrared sensitivity for night view. The 130° field of view is also very good. It has a built-in speaker and a microphone so you can have 2-way audio conversations.
Even though it is a mains powered security camera, it has only a wireless interface for data communications – it supports the Wi-Fi 802.11a/b/g/n standards as well as Bluetooth Low Energy(BLE). So no Ethernet port or Power over Ethernet on offer here – you will need a power socket near the installation point. Since there is no Ethernet port, you can’t even use a passive PoE injector to get power to the camera which is a shame.
Nest recommends a minimum broadband upload speed of 2Mbps for using the live streaming and cloud storage features:
“With Nest Aware, your camera will stream all video to the cloud for secure offsite storage. At 720p, each camera could use 60 GB to 160 GB of upload bandwidth per month. At 1080p, each camera could use 140 GB to 380 GB of upload bandwidth per month.”
The Nest Cam has 128-bit AES with TLS/SSL security in case you are wondering about how secure it is with everything going to the cloud. The camera is weatherproof with an IP65 rating. While IP66 is better, water ingress to IP65 standards is acceptable. The temperature rating is very good, going from -4 to 104°F (-20 to 40°C).
The downside is that there is no local storage option – you have to pay for Nest’s cloud service called Nest Aware if you want the following features:
to record 24/7 continuously and to store that recorded video
advanced motion detection such as person detection which will be performed by Nest’s cloud servers
define specific activity zones for motion detection
timeline feature called ‘Sightline’ which helps you find recorded event clips quickly
time-lapse feature letting you see 24 hours video in a few quick seconds
automatic zooming into scenes with something worth seeing
create and share recorded video clips
Nest Aware comes as a free 30 day trial with any Nest product. After that it is $10 a month for a 10-day video history and $30 a month for 30-day video history. There are discounts for additional cameras you add to the cloud.
So what can you do with the camera if you don’t want to pay for a cloud subscription?
1080p Full HD Live View – you can check into the Nest cam to see what’s going on
Basic motion sensing and push alerts to your smartphone
Two-way audio: Talk and listen through the built-in microphone and speaker
Public or password-protected live streams for friends, family or the whole Internet (not recommended for security purposes!)
Nest has been very stingy with the free cloud services as other camera makers provide something like video storage for clips fro the past day.
The Ring video doorbell is one of the most popular video doorbells around, but did you know about the Ring Stick Up Cam? It is a standalone security camera that is fully wireless thanks to its 5200mAh rechargeable battery that lasts a claimed 6-12 months under regular usage. If you would rather like it powered by mains power, a USB cable is included in the box. Again there is no ethernet port, so a passive PoE injector is not an option.
Most battery powered security cameras don’t have the juice to provide a live view feature. But the Ring Stick Up Cam manages to do the Live Streaming (or Live View) gig even on battery power. That’s pretty impressive if it can still last 6-12 months out in the cold. It can also do two-way audio while on battery power.
One major criticism is that the video resolution is on the low side, only 720p (HD). This is not acceptable in 2017 and I can only hope Ring plans to update it soon. So it misses one of my key requirements – 1080p Full HD video. The field of view is also on the narrow side with only 80 degrees field of view. Infrared LEDs are available to provide a well-lit night image.
While Ring doesn’t quote an IP rating, the Ring Stick Up Cam is weatherproof and will operate in a range of -20.56ºC to 48.89ºC.
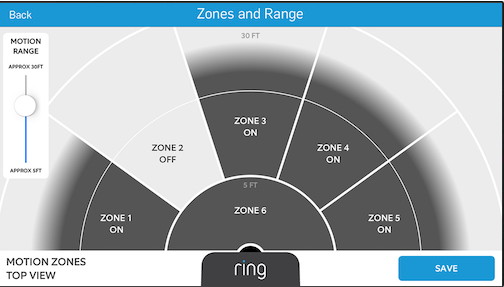
One of the highlights is the 5-zone motion detection feature. You can set the sensitivity and range of each zone so that you can cut down on false alerts – the bane of a security camera user’s existence!
There is no local storage option, so if you want to take advantage of the very advanced motion detection features of the camera, you will have to pay a monthly fee for the Cloud Video Recording feature. (currently £2.50 a month or £24.99 annually). A 30 day trial is included but a free 7 day storage option would have been a nice to have. The premium feature will let you access and download motion-detection recordings up to 6 months old in a nice timeline based interface.
If you want to go green or simply don’t have a power socket near the intended installation location, there is a solar power option. So you can make the Ring Stick-Up Cam a solar powered outdoor wireless IP camera. The Ring Solar Panel can keep the internal battery topped up with just a few hours of direct sunlight everyday.
No API for interfacing with home automation controllers
[/wpsm_cons][/wpsm_column]
[easyazon_link identifier=”B07H163S6J” locale=”US” tag=”vueville.com-eaz-20″]View on Amazon[/easyazon_link]
Best Outdoor Security Cameras with a Microphone for 2017
While there are not many outdoor surveillance cameras with a speaker and a microphone, there are plenty of cameras with only an on-board microphone and no speaker. So the range of options is huge and it can be quite difficult to separate the good ones from the rubbish ones.
Here are my recommendations for outdoor security cameras with a microphone only:
Best Value: Reolink RLC-410WS 4MP Wireless Outdoor Security Camera
[easyazon_image align=”center” height=”500″ identifier=”B019MMABCI” locale=”US” src=”https://images-na.ssl-images-amazon.com/images/I/410ZfYPdQCL.jpg” tag=”vueville.com-eaz-20″ width=”500″] Reolink is a rising star in the world of home surveillance. They have a wide range of models with almost any combination of features you may desire at reasonable prices.
The Reolink RLC-410WS is an outdoor bullet that has a very high resolution of 4 Megapixels from its 1/3″ CMOS sensor. This means you can get videos and snapshots of 2560 x 1440 (1440p) resolution. A substream for mobile view is also available at 640*360 resolution. The lens has a focal length of 4mm and an aperture of 2.0 which gives a field of view of 80 degrees.
It is also a wireless camera as it supports both 2.4GHz and 5GHz WiFi using its dual antennae. It also has as many as 36 InfraRed LEDs which Reolink claims will provide a night view range of 100 feet. It also has an InfraRed Cut filter to give excellent night time images and true colours during the day.
The built-in microphone provides audio recording capability, but there is no on-board speaker.
On the software side, the camera supports motion detection email alerts and push notifications to the Reolink smartphone app. It can save 30 second event clips to its built-in 16GB SD card, attach snapshots to an email, FTP them to your server, and upload them to a cloud service. It also supports RTSP streaming and the Onvif V2.1 protocol – you can easily use it with any 3rd party security or home automation app, Synology or QNAP NAS or your DIY NVR.
The URL for grabbing the Reolink’s video stream is http://(ip address)/cgi-bin/api.cgi?cmd=Snap&channel=0&rs=(any combination of numbers and letters)&user=(user name)&password=(user password)
The metal housing is IP66 weather proof rated, which is great. This RLC-410WS model doesn’t have PoE but the RLC-410S model gains PoE and loses the WiFi feature. If you want a security camera that has both a PoE capable network port and WiFi, it seems you will have to go with the Hikvision that is next in the list below.
The Presence is Netatmo’s first foray into outdoor security cameras and like its weather stations, is absolutely different from anything else you may have seen before. Looking more like an 80’s flashlight than a security camera, its actually a security light with a camera built in. Or is it a security camera with a light built-in? Either way, if you need an outdoor light and a security camera, kill two birds with one stone and get the Netatmo Presence. It doesn’t have a built-in speaker, but it does have microphone on-board.
An aluminium body helps the Netatmo Presence to be weatherproof using a proprietary coating called HZO. It is a thinfilm nanotechnology coating which provides protection equivalent to IP67 which is very impressive.
What’s its signature feature, you ask? Person detection, or human detection as some other manufacturers crudely say. In fact, it can make out cars, animals and humans within 20 metres / 65 feet. Because these are the three types of creatures that your security camera will often encounter. In the day time, the camera looks like an innocuous lamp but you can check in and watch any time. Motion detection alerts can also be sent telling you whether it is a person, a car or an animal that has triggered the alert. In the night, you can watch using the built-in InfraRed lamps or turn on the floodlight if you want to annoy your neighbours! Note that although the Netatmo Presence has a mic, it doesn’t have sound triggered alerts.
You would be forgiven for thinking Netatmo would force you to use the cloud – it has a local storage option in the form of a microSD card. You can also use FTP to transfer images to a server for backup.
Apart from supporting Netatmo’s own eco-system (such as door/window sensors), the Presence supports IFTTT (IF This Then That) for integration with a wide range of devices and platforms.
[easyazon_link identifier=”B01L25GOGA” locale=”US” tag=”vueville.com-eaz-20″]View on Amazon[/easyazon_link]
The Hikvision DS-2CD2542FWD-IWS is my front door camera since last summer and I have been very impressed with the excellent video clarity and sound features. It has an on-board microphone but no speaker. However you can always add your own external powered microphone and speaker.
Check out my in-depth hands-on review for more information:
[wpsm_top postid=2525]
Please ensure you are buying the camera from an authorized dealer if you are concerned about warranty issues – I am personally happy to take the big discounts I get on Amazon vs. the authorised dealers who often charge a lot more.
Dahua is the second major player in the global security and surveillance industry. This turret or mini-dome IP camera from Dahua is one of the latest 2018/19 models.
It has a 1/3″ 4 Megapixel sensor which is again the latest trend in the home security scene. At this resolution it can do 20 frames per second. At 2.8mm focal length and an aperture of 2.0, the angle of view is a very good 110 degrees. The focus can be adjusted manually. Check out the sample video below that also shows the performance of the built-in microphone:
After installation, the camera can be adjusted by up to 360° horizontally and up to 65° vertically. While I am not thrilled with the plastic base of this IP camera, it is IP67 weather proofing rated which is better than most. It has a single EXIR LED which is as good as a whole ring of the standard LED bulbs, it even has a claimed 50 metres range.
Coming to the software side of things, standout features are the true 120dB Wide Dynamic Range. The camera is also unique in that it can drive not just two streams at different resolutions, but 3 in total:
Main Stream: 4MP (upto 20fps)/3MP (upto 30fps)
Sub Stream: D1/CIF (upto 30fps)
Third Stream: 720P (Upto 8fps with WDR on, upto 18fps with WDR off)
Another interesting feature is that the Dahua IPC-HDW4431C-A can produce a video stream with a bitrate of up to 32Mbps.
It has advanced motion detection algorithms such as face detection, line (tripwire) detection, intrusion detection, missing/abandoned object detection in addition to standard motion detection. You can mask up to 4 separate areas for privacy or to comply with local regulations.
[easyazon_link identifier=”B06X93JQH4″ locale=”US” tag=”vueville.com-eaz-20″]View on Amazon[/easyazon_link]
Outdoor security cameras with only audio in/out connections
As I said earlier, the majority of outdoor security cameras have audio in and out connections, to which you can attach your own powered external microphone and a speaker if needed. Most of the cameras reviewed in our latest IP camera round-up are capable of doing this.
What about video doorbells?
The first thought that I had when I wanted a security camera with audio was – a video doorbell. A video doorbell would be ideal for a CCTV camera with audio right? After all, the most common use case for an IP camera with a mic and speaker is as a front door camera. And a video doorbell is specially designed for this purpose. Its true, a video doorbell will help you achieve a 2-way audio conversation, but there are certain challenges you need to bear in mind before getting a video doorbell:
The biggest issue I have with doorbells though, is that they are largely reliant on the cloud for all their smart features and lack local storage options.
A video doorbell has a specific purpose and that is to capture only what is directly in front of it, especially when the doorbell is pushed. So you don’t have a lot of flexibility in positioning them, such as angling them out and away from the wall they are fixed to. This also means the camera is vulnerable to tampering.
Most video doorbells top out at 1080p (2MP) resolution, which is just too bad if you were itching for a 3MP or 4MP camera.
Another drawback is that while they can provide a video stream on demand, video doorbells typically cannot continuously record video 24/7. This also means they do not have a pre-record feature where it can show you the 15 seconds or so before motion was detected.
Video doorbells typically do not provide RTSP streams – this makes them difficult to integrate with existing video monitoring systems, NVRs, NAS devices, and home automation systems.
You can’t put most video doorbells in direct contact with the elements.
I hope this write-up has been helpful in discovering the world of outdoor security cameras with audio features. Please let me know what you think and especially if you have tried any of the cameras above, I would love to hear from you!
One of the hottest developments to hit the smart home market has been smart video doorbells. Not only are they handy to stop parcel thieves, they also add that cool factor to your smart home.
Until that is, you find that many wireless doorbells are useless without a paid cloud subscription. Can you believe it – some doorbells that are sold as ‘smart doorbells’ are anything but smart unless you pay a monthly fee forever. No thank you! So here are my picks for the best wireless smart video doorbells without a monthly fee.
A quick note: As an Amazon Associate I earn from qualifying purchases. This post contains affiliate link(s). An affiliate link means I may earn advertising or referral fees if you make a purchase through my link, at no extra cost to you.
The inherent advantage a doorbell has in becoming a smart video enabled device is the excellent vantage point. The doorbell is typically at the right height to get a clear face shot of anybody who shows up at your door. They are also then in good proximity for 2-way audio.
So you could answer your door as if you were at home, but without being at home! This is what a good smart video doorbell should be able to do. The experience should be so seamless that it should never occur to your visitors that you may actually not be in the house. What better way to scare of potential intruders casing your home and checking whether someone is at home.
All the doorbell cameras featured below support RTSP video streams, so you can add them to Blue Iris or other surveillance software to integrate with your own DIY CCTV or Home Automation System.
Wireless Smart Video Doorbells – What to look for
The features to look for in a wireless smart video doorbell are:
Video Resolution – You should aim for a minimum of 1080p resolution. Also called Full HD / 2MP resolution, the higher level of details captured increases the chance of law enforcement making a positive identification of faces. 4MP and 5MP is on offer these days, and higher is better! Though you should consider a wired PoE Smart doorbell if you go for those higher resolutions.
Night vision – An absolute must in a security camera, it should have InfraRed LEDs for true night vision. A true IR cut filter is good to have because this will ensure good night vision and true daytime colours (you don’t want that cheap looking purple hue!)
Field of view – Measured horizontally, it should be at least 90 degrees. This depends on the focal length of the camera lens. Increasingly vertical field of view is also important to catch parcel thieves.
Weather proofing – Good doorbells will have an IP rating which indicates its resistance to water ingress. Worth getting one with a rating as then you know your smart doorbell won’t fail in a particularly bad storm and become a very dumb and very dead doorbell.
Audio – A smart doorbell should have a microphone and speaker built-in
Local storage – in the form of a microSD card slot, or internal flash storage is very desirable because it means you don’t need to necessarily pay for a cloud storage subscription.
Software features – Live streaming capability is pretty much standard these days but the continuous recording feature is not. Email alerts on motion detection are essential, push notifications to smartphone app is ideal so that you know as soon as somebody is at your door regardless of whether they actually push the button.
Cloud reliance – ideally not reliant on the cloud for operation, mainly because it introduces lag into your conversation.
Motion detection method – PIR motion sensor preferable to cut down on false alerts
Power source – Ethernet port preferable with PoE (Power over Ethernet) support, internal battery is good for power backup purposes
Wireless – Support for WiFi, Bluetooth
Advanced features:
Preferably ONVIF or API available for interfacing with NVR / home automation controllers.
Preferably RTSP stream capable so that you can use 3rd party applications such as tinyCam Monitor Pro. ONVIF support is ideal as it means it can interface with home automation controllers such as my Vera Plus, and my existing DIY home NVR security system.
Best Wireless Smart Video Doorbells with No Monthly Fee – 2024 Recommendations
Best Budget Wireless Smart Doorbell – XTU Smart Video Doorbell Camera (J5)
Existing mechanical doorbell power supply needed (12-24V AC, 12V DC)
VueVille Smart Home Verdict:
Local storage available: Yes
Advanced motion detection: PIR, Blue Iris
Cloud reliant: Only initial setup
Battery backup: No
Self-monitoring works without Internet? Yes
Smart home compatibility: ONVIF & RTSP supported
XTU is a relatively new market entrant and differentiates its J5 doorbell camera by supporting both ONVIF and RTSP officially. This is 1 of the handful of smart doorbells I could find on the market that officially supports ONVIF.
The J5 has a 3 MegaPixel (MP) sensor which is an acceptable resolution for security purposes. Video quality is excellent and the company’s Cloudedge mobile app is better than most. Physical installation and the app-based setup is easy and the J5 scores points here because this can be a challenge with other doorbells.
On the smart home front, the J5 officially supports ONVIF & RTSP, so you can add this camera directly to any 3rd party NVR that supports ONVIF & RTSP.
So you can view doorbell’s video easily on your existing mobile apps if you prefer. The RTSP stream addresses are:
The J5 thus works with QNAP QVR Pro, Synology Surveillance centre, and you can also use Blue Iris or Home Assistant add-ons to perform advanced motion detection.
Main stream rtsp://::8554/Streaming/Channels/101
Sub-stream rtsp://::8554/Streaming/Channels/102
If you don’t have an ONVIF compliant system, just wire a [easyazon_link identifier=”B004Z0W1LM” locale=”US” tag=”vueville.com-eaz-20″]relay[/easyazon_link] in parallel. When the doorbell is pressed, the voltage drop will trigger the relay. Use a Z-Wave sensor to detect this and fire off an event to your HA controller. You can even accomplish this wirelessly – this particular bell push actually sends a 433MHz signal that you can pick up using a Sonoff bridge flashed with Tasmota.
2 years in, there are plenty of reviews on Amazon also that confirm this is a quality video doorbell at a great price.
Please note that not all XTU doorbells support RTSP and ONVIF, the J5 does support these protocols, but most other products in the XTU doorbell family do not!
[easyazon_link identifier=”B091H47Q4J” locale=”US” tag=”vueville.com-eaz-20″]View price on Amazon[/easyazon_link]
Best Wireless Smart Doorbell – Amcrest SmartHome Video Doorbell Camera (AD410)
[wpsm_titlebox title=”VueVille Smart Home Verdict” style=””]
Local storage available: Yes
Advanced motion detection: PIR, RTSP enables 3rd party analysis
Cloud reliant: Only initial setup
Battery backup: No
Self-monitoring works without Internet? Yes
Smart home compatibility: Home Assistant, Alexa, Google Assistant, Amcrest SmartHome
[/wpsm_titlebox]
Over the years, Amcrest have built up a solid reputation for their high quality IP cameras. Last year Amcrest ventured into the smart home space with a new product line simply called ‘Amcrest Smart Home’ with a new companion mobile app. This relatively new product line was a bit sparse at launch with just the 1080p AD110 model launched last year along with some battery powered cameras. But now they have added more stuff and a premium wireless doorbell to the family – the AD410 in review here.
The reason I like this wireless video doorbell is that it doesn’t force you to pay a monthly fee for storing and viewing video clips or motion detection events (unlike Ring, Zmodo, Simplisafe, Eufy and the Remobell). Cloud storage is fully optional, and for some may be a decent off-site backup solution. I still don’t like storing footage from my home on the cloud, so the local storage option is a must-have in my book.
Last year we noted the unmistakable similarities between this Amcrest doorbell and the [easyazon_link identifier=”B083KNPG7L” locale=”US” tag=”vueville.com-eaz-20″]Dahua DHI-DB11[/easyazon_link]. But this new AD410 model seems to be an entirely in-house model.
For the AD110 launched last year, Amcrest added the older but very useful PIR sensor method that detects heat signatures for reliable motion detection. Not the software based method that is set off by clouds, shadows, trees another inanimate objects.
Still the PIR sensor cannot distinguish between people and animals. So the AD410 has dispensed with the PIR sensor in favour of the much more convenient software-based person detection.
On the smart home front, you can pull an RTSP video stream from the camera. While the cheaper AD110 doesn’t officially support ONVIF, the AD410 does support it. The AD410 also officially supports Blue Iris and allows 2-way audio through that interface too. So you can use Blue Iris to perform advanced motion detection.
You can also access the doorbell from Alexa, Google Home and Google Assistant. But do note the only available action is to utter a phrase to view the stream on-demand.
[wpsm_column size=”one-half” position=”last”]
[wpsm_titlebox title=”VueVille Smart Home Verdict” style=””]
Local storage available: Yes
Advanced motion detection: PIR, Blue Iris
Cloud reliant: Only initial setup
Battery backup: No
Self-monitoring works without Internet? Yes
Smart home compatibility: Alexa, Amcrest SmartHome
[/wpsm_titlebox]
[/wpsm_column]
It was only a matter of time before Amcrest ventured outside of security cameras. They have built up a solid reputation for their IP cameras, and look set to repeat this with their smart home product line. This new product line is a bit sparse at the moment, with just some battery powered cameras and this Wi-Fi doorbell available at the moment.
The reason I like this wireless video doorbell is that it doesn’t force you to pay a monthly fee for storing and viewing video clips or motion detection events (unlike Ring, Zmodo, Simplisafe, Eufy and the Remobell). Cloud storage is fully optional, and for some may be a decent off-site backup solution. I still don’t like storing footage from my home on the cloud, so the local storage option is a must-have in my book.
Amcrest generally re-brands Dahua cameras, and they seem to have stuck to the winning formula again. The similarities between this Amcrest doorbell and the [easyazon_link identifier=”B083KNPG7L” locale=”US” tag=”vueville.com-eaz-20″]Dahua DHI-DB11[/easyazon_link] are unmistakable. Both doorbells are 1080p, have a viewing angle of 140°, have an SD card for local storage, and are IP55 weather-rated. They also share 2.4 GHz Wi-Fi support.
For 2021, Amcrest has the much vaunted PIR sensor that detects heat signatures for true motion detection. Not the software based method that is set off by clouds, shadows, trees another inanimate objects.
On the smart home front, you can pull an RTSP video stream from the camera. But sadly, ONVIF is not enabled (just like the Dahua it is based on) and even the Amcrest API is not supported. Happily though, this Amcrest doorbell officially supports Blue Iris and allows 2-way audio through that interface too. So you can use Blue Iris to perform advanced motion detection. Here’s hoping Amcrest adds ONVIF support so that you can detect the bell push also.
There are no alarm out ports for home automation integration. But there’s a far simpler way to integrate any doorbell with your HA system – just wire a [easyazon_link identifier=”B004Z0W1LM” locale=”US” tag=”vueville.com-eaz-20″]relay[/easyazon_link] in parallel. When the doorbell is pressed, the voltage drop will trigger the relay. Use a Z-Wave sensor to detect this and fire off an event to your HA controller.
If there’s one reason to go for the Amcrest and not the Dahua it is based on, it’s because Dahua doesn’t support retail customers like Amcrest does. Dahua’s customers are primarily integrators and installers, not people like you and me. But if you are willing to brave it, you can buy the Dahua doorbell from B&H Photo who are official retailers of the device.
[wpsm_column size=”one-half” position=”last”]
[wpsm_titlebox title=”VueVille Smart Home Verdict” style=””]
Local storage available: Yes
Advanced motion detection: PIR, Blue Iris
Cloud reliant: Only initial setup
Battery backup: No
Self-monitoring works without Internet? Yes
Smart home compatibility: Yes, RTSP, Blue Iris, IFTTT, Alexa, Google Home
[/wpsm_titlebox]
[/wpsm_column]
While doorbells with RTSP, ONVIF and API support have been around for some time (think [easyazon_link identifier=”B012Z5X0FE” locale=”US” tag=”vueville.com-eaz-20″]Doorbird[/easyazon_link]), Hikvision took their time to launch a wireless video doorbell. But DIY enthusiasts all over the world were rewarded by their patience with the Hikvision DS-HD1.
The retail version of the DS-HD1 is the EZVIZ DB1 – EZVIZ being the retail brand of Hikvision and the one that they want people like you and me to buy. It has a very high pixel count for a video doorbell, 3 MP at a resolution of 2048×1536. The lens used is 2.2 mm @ f2.4. As more people fall prey to parcel theft, its important to get a full 180 degree view. Manufacturers have realised this and so the EZVIZ DB1 has a vertical viewing angle of 180°, and a decent horizontal viewing angle of 105°.
Importantly, it has a PIR sensor to reduce false motion alerts and recordings. The night vision range of 16 feet is pretty good and you can define custom motion detection zones.
How about local streaming of video? The DB1 supports RTSP and so you can pull the video feeds using the standard Hikvision URL format in Blue Iris or any other software that can accept an RTSP stream. You also get onboard microSD card storage as well.
Sadly there is no ONVIF support but you can get it by flashing the LaView firmware. This also lets you use the PIR motion sensor of the DB1 as a recording trigger in Blue Iris or other supported software. You can also grab JPEGs the same way you would with any other Hikvision camera.
Google Home and Echo Show support has also been added. Interestingly using Monocle the Echo Show can directly pull the camera video stream without routing it through the cloud. Of course I have no interest in letting an Echo device into my home, so I won’t be testing that.
The Hikvision DS-HD1 has also been re-branded as the [easyazon_link identifier=”B07GN355R6″ locale=”US” tag=”vueville.com-eaz-20″]RCA HSDB2A[/easyazon_link], [easyazon_link identifier=”B07XZMQZXW” locale=”US” tag=”vueville.com-eaz-20″]Nelly’s Security NSC-DB2[/easyazon_link], [easyazon_link identifier=”B07LFP9C9C” locale=”US” tag=”vueville.com-eaz-20″]LaView One Halo[/easyazon_link], [easyazon_link identifier=”B07TS91DV7″ locale=”US” tag=”vueville.com-eaz-20″]Winic NDB313-W[/easyazon_link], and LTS LTH-7132-WIFI (now discontinued).
All of them are virtually the same Hikvision OEM camera and even the firmware are interchangeable. They all support RTSP and flashing the LaView One firmware adds ONVIF. But I would strongly recommend going with the EZVIZ brand if you can, simply because it is the official Hikvision retail brand.
The Hikvision DS-HD1 is the model that the EZVIZ DB1 above is based on, so it has the same features. You won’t get retail support from Hikvision unless you buy it from an authorised dealer such as BH Photo. Even then, the US government is getting touch on Chinese state-sponsored security camera companies like Hikvision and Dahua. So if you do opt for these brands, make sure you isolate the doorbell properly so that it cannot access the Internet or even the rest of your network.
[easyazon_link identifier=”B0837BTDT2″ locale=”US” tag=”vueville.com-eaz-20″]View price on Amazon[/easyazon_link]
Doorbird WiFi Video Doorbell – A feature-packed PoE but cloud-reliant doorbell
The Doorbird is a very interesting doorbell that is developed, engineered and manufactured in Germany. It differentiates itself from the rest by having an insane amount of features. It has an RTSP stream, and can work with any app that can receive an RTSP stream (like tinyCam Monitor Pro). The RTSP stream can be accessed at rtsp://<device-ip>:<device-rtsp-port>/mpeg/media.amp
It also has an Ethernet port which supports Power over Ethernet (PoE 802.3af Mode-A) so is the perfect choice if you want to add a video doorbell to your existing standards compliant CCTV system (Synology or QNAP NAS/Hikvision NVR, Blue Iris etc.).
The camera is only 720p which is only average, however it has a hemispheric lens which provides a brilliant 180 degree field of view just like the Skybell video doorbell. The vertical field of view is also a very good 90 degrees. 12 InfraRed LEDs provide very good night vision with a true IR cut filter.
Two-way audio is standard along with noise cancellation and echo reduction features.
On the communications front, it has WiFi, Bluetooth (optional) and uniquely an RFID system using a 433 MHz transceiver. This adds compatibility with Volkswagen, digitalStrom, Control4, RTI, Elan, URC, Nuki, and Zipato. It also has its own API which should be of interest to home automation fans.
Cloud features
Just as most of these smart video doorbells, the Doorbird is reliant on the cloud for advanced operations:
“Our products are cloud-based solutions (see also NEST, Dropbox, etc.). For reasons of reliability and security no port forwarding is conducted through the internet (using NAT or DynDNS). Our products establish an encrypted VPN tunnel connection to our cloud server (located in a highly secured data centre in Germany). Our products rely on the same secure communications technology used by financial institutions for online banking (SSL). The remote access via our cloud-server is free of charge. It is not technically possible to use our products autonomously without internet access or without access to our cloud servers, as otherwise key functionality like, for example, push notifications (special server security certificates required by Apple and Google), remote access, periodic free software updates etc. would not be available.”
Reliant on the cloud for operation/motion detection
No internal battery
[/wpsm_cons][/wpsm_column]
Ring Video Doorbell Pro – A popular yet flawed 1080p cloud doorbell
The Ring Video Doorbell Pro is the latest model in the Ring family of doorbells and was launched in March 2016. It is dependent on a power supply. It differs from the standard Ring WiFi doorbell in that it doesn’t have a battery but has an upgraded 1080p sensor. It can also send you motion detection alerts to your email or smartphone if it detects motion in front of it. However it cannot record video continuously.
No API for interfacing with home automation controllers
[/wpsm_cons][/wpsm_column]
Check out my review below for more information: [wpsm_top postid=1994]
I do not recommend the original Ring WiFi doorbell either because it works only on an internal battery and is limited to a 720p resolution.
One point to note is that Ring doesn’t claim any weatherproof rating for its doorbells, which is one of my biggest bugbears with their video doorbells. The company seems to have been overwhelmed by the incredible popularity of its products, with customer service being less than stellar of late.
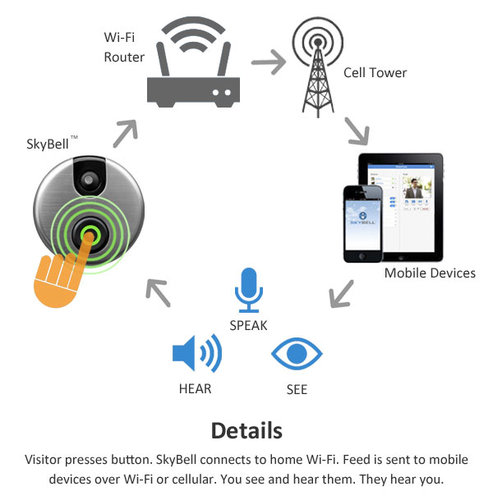
Skybell Wi-Fi Video Doorbell – Another Full HD 1080p cloud doorbell
The Skybell is one of those rare products that is designed and manufactured in the USA. California to be exact. For many, that itself is a great advantage when buying a tech gadget.
The Skybell HD is a very small unit at 2.8 inches across and just 0.9 inches deep. It is a straight replacement for your existing wired doorbell if it uses a transformer. It comes with a mounting plate, so it is quiet easy to install to any surface.
The camera of the doorbell can do up to 1080p Full HD video, which is very good. It also has a class-leading 180 degree field of view. It has the standard features you would expect such 2-way audio using a microphone and a speaker. It has a unique multi-colour bell push button that can do 16 million colours, a nice personalisation touch to make your doorbell truly yours. Additionally it has a real PIR sensor which should aid massively with motion detection.
Alas the doorbell doesn’t have true night vision because it doesn’t have Infrared LEDs. Instead it has a standard white LED light to light up the person in front of the doorbell. This is fine if its a person standing right in front of the doorbell, but limited by the 15 feet range of the PIR sensor for triggering an alert at night. It doesn’t have a local storage option such as an SD card so all video is routed through their cloud servers. This means you need a decent internet connection with an upload speed of at least 1.5 Mbps.
The Skybell HD has an IPX4 weather proof rating, which means it is not rated for solid ingress but is protected against splash water from any direction. It is claimed to work between -40 and 140 degrees F.
So how does it work? There are 3 ways you can use the Skybell HD video doorbell:
A visitor presses the bell button and you get a call on your smartphone.
A visitor doesn’t press the button, but the PIR motion sensor detects motion and alerts you.
Live view – you can check in any time to see what’s going on at your front door.
This image below should explain the details:
How about compatibility with home automation? It supports IFTTT, Alexa, Nest and many other home automation protocols and controllers.
Reliant on the cloud for operation/motion detection
No ethernet port/No PoE
No internal battery
No ONVIF support, not RTSP stream capable
No API for interfacing with home automation controllers
[/wpsm_cons][/wpsm_column]
Vuebell WiFi Video Doorbell (Hardwired) – A cheap 720p doorbell that is cloud-reliant
Vuebell is a brand owned by the Chinese manufacturer, Netview Technologies (Shenzhen) Co. Ltd. They have been in business since June 2010 and their camera are sole on Amazon and HomeDepot.
The Vuebell consists of an outdoor unit and an optional indoor chime unit. At just over 3.1 inches x 3.1 inches, the Vuebell’s outdoor unit has a very attractive design and looks very much a premium device. It is smaller than the standard video doorbell. Even so, it sports Infrared LED lights, a microphone, a speaker, and a Passive InfraRed (PIR) detector.
The video sensor has a max resolution of 720p which is about par for video doorbells but has an outstanding 185 degrees field of view. You can get a live view on your smartphone whenever somebody presses the doorbell, when the PIR detects motion within its range of 3 metres or you can simply check in any time to watch. It can send you motion detection alerts and save clips on either a micro SD card or on the free cloud storage account.
The outdoor unit of the Vuebell is very easy to install as it is a straight replacement for your existing hardwired doorbell. It just uses your existing hardwired doorbell transformer.
The indoor unit is a great touch and has a range of chimes. The chime volume can be adjusted and can be very loud if you need it to be.
The August Wi-Fi Video doorbell was one of the first smart video doorbells to hit the market. So its features now look a bit dated compared to the latest gen models such as the Ring and Skybell doorbells. It is designed to work with the optional Smart Lock so that you can answer the door and then unlock it if desired. With its smart industrial design and sleek looks, it won over many looking for a stylish and smart video doorbell.
The August Wi-Fi Video doorbell was selected by Fortune magazine as the Best Doorbell. However I find that very strange because it doesn’t have Infrared LEDs, it relies on a standard white LED for lighting the scene at night. This is fine for lighting up somebody right in front of the camera but in the absence of a PIR motion sensor, makes the camera very poor at detecting motion in the night.
Reliant on the cloud for operation/motion detection
No PIR motion sensor
No ethernet port/No PoE (Power over Ethernet)
No internal battery
No ONVIF support, not RTSP stream capable
No API for interfacing with home automation controllers
[/wpsm_cons][/wpsm_column]
Conclusion
I researched dozens of wireless smart video doorbells and rejected most of them before arriving at the list above. Sadly, the trend of not letting customers watch recorded clips without a cloud subscription is increasing.
Another rising trend is locking away smart features behind a monthly subscription. This is simply unacceptable as more and more homes are getting smarter with a multitude of smart devices that all need to communicate with each other. That’s why I always check whether a product can work locally without cloud reliance and supports industry standards such as RTSP or ONVIF.
So the smart doorbell market still has some way to go before it catches up with proper security cameras when it comes to integrating with a smart home. But now is as great a time as any to get your toes wet. So please let me know which smart doorbell you are going for, I would love to hear from you!
For quite some now, I have been looking for an IP camera to watch my front door. I already have a Hikvision DS-2CD2132F-IS dome camera on my front driveway, so a more discreet mini-dome type camera seemed perfect for the job. So when Hikvision announced their new 4 Megapixel [easyazon_link identifier=”B017DB3CZ8″ locale=”US” tag=”vueville.com-ref-20″]DS-2CD2542FWD-IWS[/easyazon_link] with 120dB Wide Dynamic Range (WDR), I was very keen on getting my hands on it and putting it through its paces.
So here’s my hands-on review after living with the camera for a month. The HomeDefense subreddit on Reddit helped me out with what they would like to see in the review, and I have tried to cover as many requests as I could.
[wpsm_toplist]
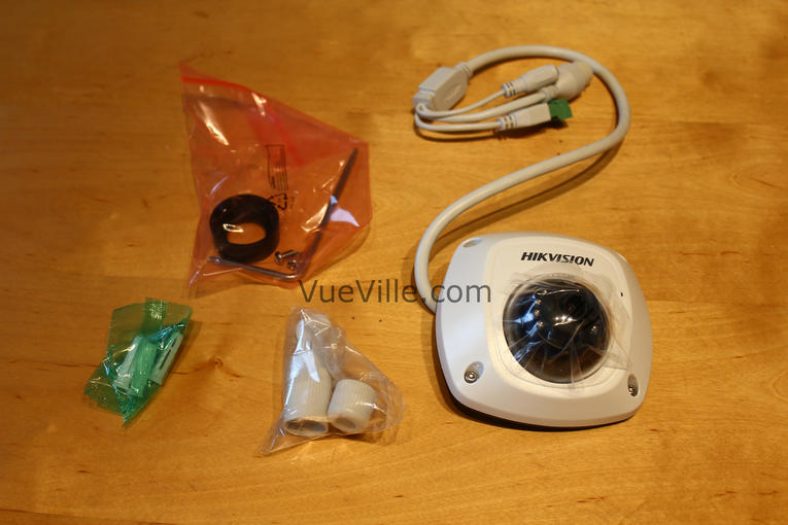
What’s in the box
[wpsm_quick_slider ids=”2582,2583″]
[wpsm_list type=”arrow”]
Hikvision DS-2CD2542FWD-IWS 4MP Mini-Dome IP Camera
Waterproofing kit
Base for fixing camera
Screws and Rawl plugs
Lens adjustment tool
Drill template
Instruction booklet
Software CD
EZVIZ booklet
[/wpsm_list]
Design and Appearance
Design
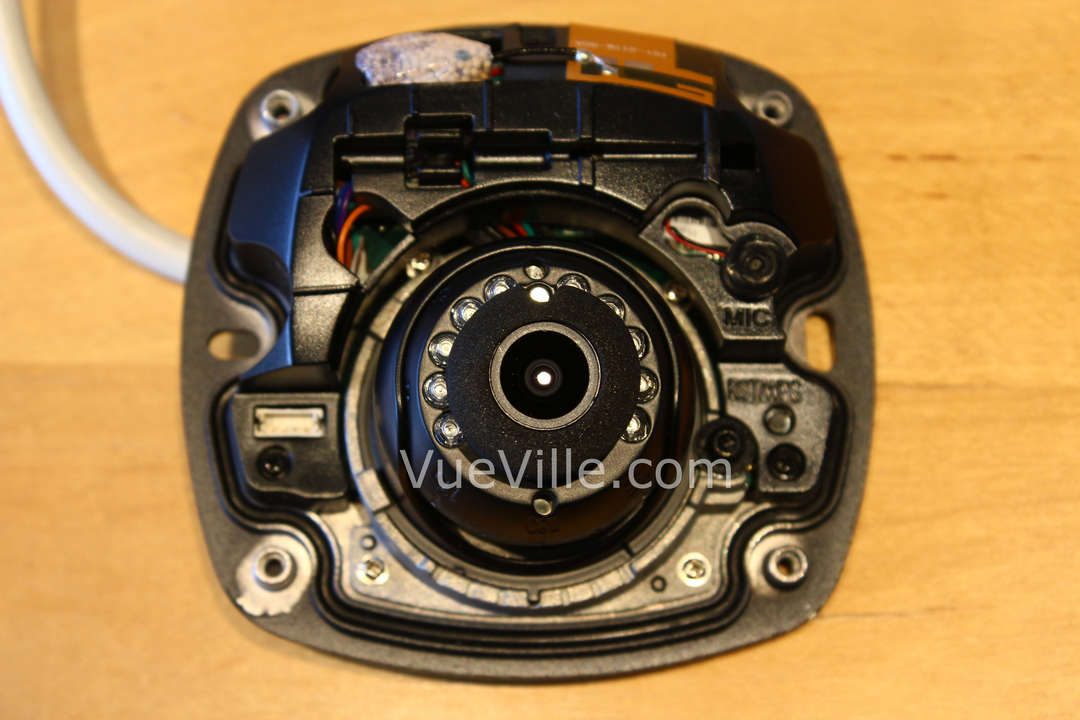
The DS-2CD2542FWD-IWS is much smaller in size than most other Hikvision cameras. It has a low-profile form that lends itself to being fixed unobtrusively. The fully metal body gives the camera a very solid feel. Here’s a photo with the dome-cover off.
You can see the on-board microphone which is labelled MIC, the button that does double duty as the RESET and WPS for quick WiFi setup.
There are only 10 Infrared LEDs placed in a semi-circle around the lens. Its worth noting that the LEDs seem to be half the size of the standard camera IR LEDs. One potential issue is that the LEDs seem to be partially obstructed by the soft foam around the lens. The purpose of the foam is to prevent the Infrared illumination from intruding into the lens. But in this case, the foam seems to be doing too well a job, and limiting the output of the LEDs. Could this be the reason for the weak IR output illumination I observed? More on that later.
The DS-2CD2542FWD-IWS is a Power-over-Ethernet (PoE) camera. But the PoE module is outside the camera. So bear this in mind while deciding how to install the camera. There is a separate power input plug if you do not have PoE in your installation location. The cable with the green connector block is the input/output for the alarm triggers and the audio.
Main Specifications
The standout feature of this camera is the true Wide Dynamic Range (WDR) feature indicated by the ‘WD’ in its model number DS-2CD2542FWD-IWS. Other key features are the 4MP sensor, on-board WiFi, on-board microphone and SD card support for local storage.
For a key to deciphering the rather cryptic Hikvision model naming system, refer to our Hikvision IP Camera Guide.
[table id=21 /]
Setting up the camera
Physical setup
The camera comes with two instruction manuals – one is a 41 page quick start guide booklet and the other is a booklet that shows you how to set up the camera on EZVIZ. EZVIZ is Hikvision’s cloud P2P service which lets you use your camera locally and remotely without have to port forward.
Since I wanted to set up the camera without using EZVIZ, I opted for the 41 page quick start guide. There are clear illustrated instructions for mounting the camera in a variety of ways – ceiling mounting, ceiling mounting with a gang box, pendent mounting and wall mounting. You can see an extended 165 page manual online.
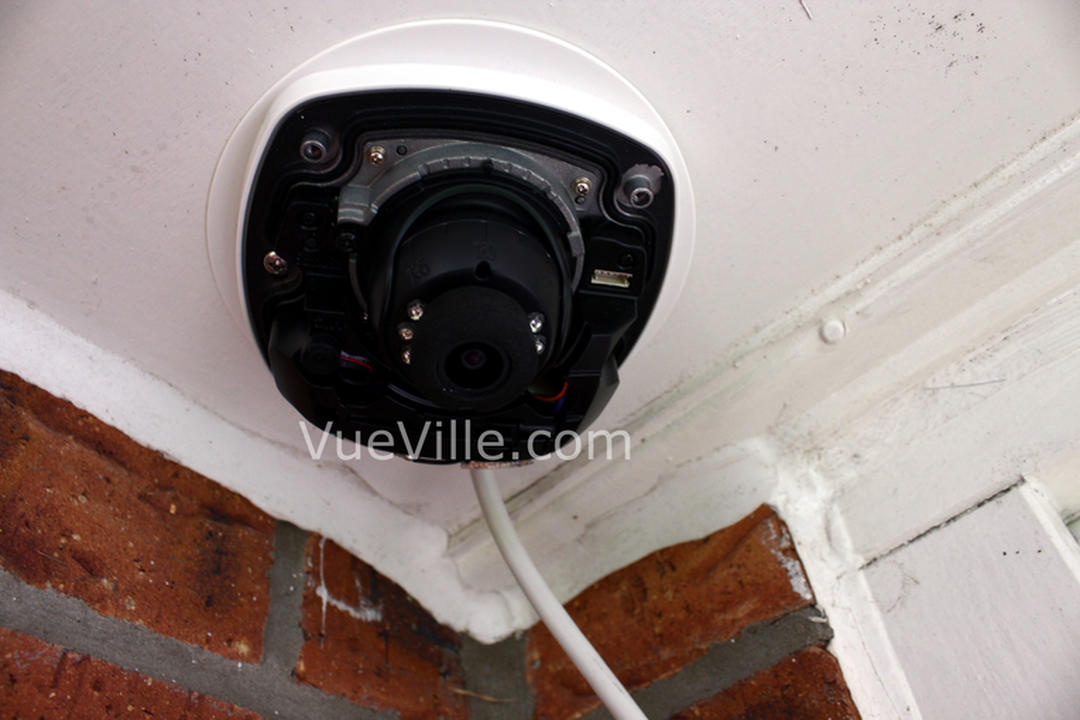
I followed the ceiling mounting instructions and also added the 64 GB Sandisk SD Card that I purchased at the appropriate step mentioned in the guide. I opted not to use the included water proofing jacket for the cables because I didn’t want to cut the Ethernet cable and crimp it, plus I was going to install it well away from the elements.
In the quick start guide, only one way of continuing the setup is described – “Setting the Network Camera over the LAN”. This is how to setup the camera when it is physically connected to your network. The booklet doesn’t mention setup for a remote camera, but the extended manual I mentioned earlier does. However, there is no way of setting up the camera on WiFi right from the start – you have to set it up through a wired connection and then switch to using WiFi if needed.
Now I had two choices for continuing the setup:
Setup the camera using a web browser
Setup the camera using the SADP software
Since the camera comes pre-configured with an IP address of 192.168.1.64 that already matches the IP range in my network, I went with option 1. The default IP address of the camera is mentioned in the quick start guide and is also printed on the outside of the retail package box. The default username of admin is also printed on the outside of the retail packaging box.
If your home network IP is different from 192.168.1.xxx, you will have to use the included SADP program which will find the camera on your network and let you change the IP address. This is quite painless and takes only minutes.
The reason Hikvision chose this particular IP address as the default is that, the 192.168.1.XXX sub-net is the most common [1. http://www.techspot.com/guides/287-default-router-ip-addresses/] default setting in wireless routers. So most people should not have to mess with changing the sub-net, they can simply plug and play.
Since my browser of choice, Chrome, doesn’t support Hikvision’s NPAPI-based plugin anymore, I had to use Firefox. Internet Explorer is the other option but no way was I going to use that!
Interface and Configuration
On pointing Firefox to 192.168.1.64, I was greeted with a popup asking me to set a new password for the default admin account. Now that’s a good security feature as it stops less security-conscious users from just continuing with a default username and password.
On activating the Hikvision plugin, I was asked to update the plugin to the latest version. Clicking OK then downloads a file from the Hikvision web site. It then took me to the Live View screen and I could see the video stream.
What struck me immediately was the clarity of the video and the near lack of digital noise. I was beginning to really like this camera!
The other thing I noticed was the redesigned interface that looked very modern and fresh compared to the web interface on my older 3MP Hikvision cameras.
The slide-out panel with Pan-Tilt-Zoom (PTZ) controls is a nice touch, even though they are useless for this camera which doesn’t have PTZ.
There are four tabs: Live View, Playback, Picture and Configuration.
On the configuration page, a menu on the left side neatly categorises the various settings under Local, System, Network, Video/Audio, Image, Event, and Storage.
I took the following steps in the Configuration tab to customise the camera to my liking:
Network>Basic Settings>TCP/IP>LAN>IPv4 Address: I changed it to match the rest of my IP cameras. There is a helpful button that can test whether your desired IP address is already in use. Changing the static IP address will trigger a reboot of the camera.
System>System Settings>Time Settings: Even though this is an original Hikvision camera for the US/UK markets, the default time zone was Beijing. I changed this over to GMT and set the correct time.
System>Maintenance>System Service>Hardware> Enable IR Light check box: It was on by default.
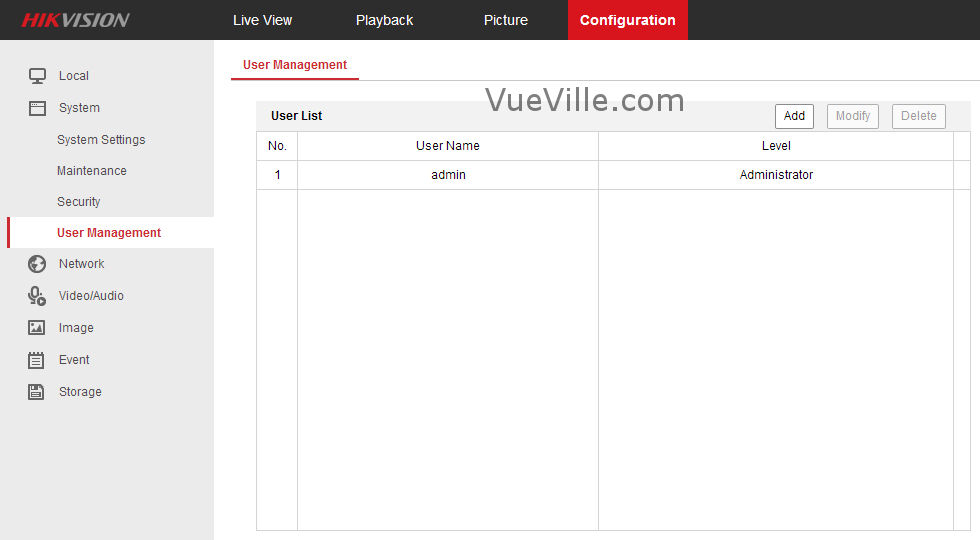
System>User Management> User List: I created some view-only ‘User’ accounts for my smartphone and tablet. I also created an ‘Operator’ account for my QNAP NAS which I use as my DIY NVR.
Video Stream Settings
When setting up a camera, the areas I am most interested in are the video and image settings.
Hikvision puts all the strictly video stream related settings under the Video section. You may mistake ‘Image Settings’ as the area to configure snapshots, but no, that’s where Hikvision keeps all the video quality settings that affect both video and the snapshots (brightness, contrast, Wide Dynamic Range etc.).
The Hikvision has two streams that you can independently configure. The Main Stream is the default channel 1 of the camera (if you use a third party app to view camera streams, you will recognise this as the primary stream or the High Bandwidth stream). The Sub Stream is channel 2, also referred to as the Low Bandwidth/Secondary/Mobile Device stream by other apps. So hopping over to Video/Audio, I found the default settings to be mostly what I wanted.
The default settings were:
[wpsm_list type=”arrow”]
Primary Stream: 4MP (2688×1520), variable 6144 Kbps @ 20 fps with an iframe interval of 50.
Secondary stream: 640×360, variable 1024 Kbps @ 20 fps with an iframe interval of 50.
[/wpsm_list]
Now since I record all my cameras 24/7 on the QNAP, I have to optimise the disk space required by each camera. Of course, I also want to maintain a high level of detail in the video stream. From 2 years of experience with running IP cameras, I settled on the following video settings that give a good level of detail at an acceptable rate of disk space usage.
[wpsm_titlebox title=”Recommended Video Stream Settings” style=”1″]
Primary Stream: 4MP (2688×1520), constant 6144 Kbps @ 10 fps with an iframe interval of 10.
Secondary stream: 640×360, variable 512 Kbps @ 10 fps with an iframe interval of 10.
[/wpsm_titlebox]
Video Quality settings – what Hikvision calls Image settings
This is where we can adjust the settings that affect the picture quality of the video and snapshots.
The default exposure time of 1/25 is fine, I wouldn’t go below that as motion will start to get blurry.
Interestingly Gain was set to 100 by default, the maximum value. On my 3MP cameras, this would have resulted in unacceptable noise, but the DS-2CD2542FWD-IWS image seemed absolutely fine.
Here’s a video of the camera in total darkness inside my garage. The garage door is about 15 feet from the camera. The full 4MP video has a resolution of 2688 x 1520. Even though Youtube only supports videos up to 1440p, you can still see the quality of the video:
In my test image, you can see that there is a lot of IR light on the cane furniture placed close to the right of the camera’s field of view. This is great for testing the Smart IR feature. What this does by default is when an object (like a human face) is close to the camera, it will reduce the output power of the onboard IR lights to avoid washing out the image. This is a very useful feature.
However, at first I couldn’t find it. I then realised Hikvision has renamed this to ‘Smart Supplemental Light’ from Smart IR. In any case, turning this on and off didn’t seem to do anything, so I left it off for the rest of my testing.
Under Image Enhancement, Digital Noise Reduction is turned on by default and set to a mid value of 50.
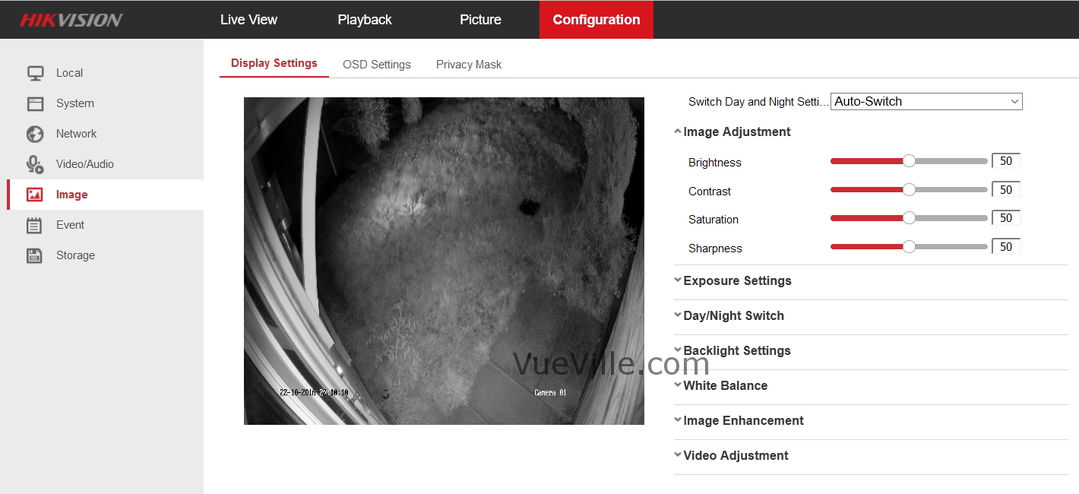
One particular feature that is very useful is the ability to set different settings for day and night. However this is available only if you go for a Scheduled Switch between day and night, not the auto-switch. My older Hikvisions have the same style of working, and I find it quite annoying. Why can’t I have day/night auto-switch and separate settings for day and night? Come on Hikvision, you can do better than this!
Performance
Daytime Video quality
I was very happy with the picture quality of the camera’s daytime videos. Video was sharp with a lot of detail thanks to the 4 MP sensor. The 120dB true Wide Dynamic Range (WDR) which is the key feature of this camera seems to work well in daylight. WDR helps a surveillance camera to deal with images that have high contrast – such as a scene where there is a bright light source in the background. In our residential setting, this could be early morning when the sun comes up full against the camera or late evening when long shadows are cast across a scene.
What WDR does is recover the details lost in areas of the video that are blown out, while at the same time brightening the darker areas such as shadows. Hikvision lets you control the aggressiveness of the WDR algorithm from 0 (OFF) to a maximum of 100. You can see the effect of varying the strength of WDR in the following test videos:
[wpsm_tabgroup]
[wpsm_tab title=”WDR at 0″][wpsm_video]https://youtu.be/zjaE7Fs2BcQ[/wpsm_video][/wpsm_tab]
[wpsm_tab title=”WDR at 20″][wpsm_video]https://youtu.be/x1O2GFy4rNQ[/wpsm_video][/wpsm_tab]
[wpsm_tab title=”WDR at 50″][wpsm_video]https://youtu.be/A8p71V5S_P4[/wpsm_video][/wpsm_tab]
[wpsm_tab title=”WDR at 75″][wpsm_video]https://youtu.be/U5GMxtTNm1s[/wpsm_video][/wpsm_tab]
[wpsm_tab title=”WDR at 100″][wpsm_video]https://youtu.be/nD12ePtBI34[/wpsm_video][/wpsm_tab]
[/wpsm_tabgroup]
Night Video quality
When it comes to night time video quality, the camera really shines. Thanks to its true IR cut filter, daytime colours look very good and at night the camera is super -sensitive to Infrared illumination. Because of the increased pixel count, I expected worse night-time performance than my Hikvision 3MP 2032 bullet. But I was pleasantly surprised with the very clean images produced at the default noise reduction level of 50.
I was curious to see what effect turning on WDR would have on the night time quality, especially as it seemed to be very useful during the day.
In the camera’s Backlight settings, I had noticed that WDR was off by default. And now I could see why. With WDR on at my usual starting point of 20, the brightness in the lit areas increased but in the shadows it got considerably darker. Upping the WDR to level 50 yielded negligible changes. Going from level 20 to 50, and then to 100 again showed very little change in the image brightness.
Here are the videos at WDR values of 0, 20, 50, 75 and the maximum value of 100. Make sure you view it full screen at 1440p quality.
Also strangely the sharpness of the overall image seemed to reduce whenever WDR was on at night.
So overall, I was quite disappointed by the WDR as it made the otherwise very good image quality considerably worse at any setting.
Another observation is that the on-board IR illumination provided by the mini-LEDs is predictably weak. External IR illumination is very much required if you are going to install this camera in a very dark area with no streetlights. I did experiment with the Smart Supplemental Light feature but I eventually turned it off because it made absolutely no difference at all.
Wireless Performance
Just like most wired IP cameras that also have a wireless function, the camera has two separate network interfaces for the ethenet connection and for the WiFi connection. The manual doesn’t do a very good job of explaining how to configure the WiFi, so here are the steps I took:
Login to the web admin portal and go to Basic Settings > TCP/IP > Wlan
If you wish to give your camera a static IP (recommended), uncheck DHCP and enter the IP address here
Enter the subnet and gateway details.
Now go to Advanced Settings > Wi-Fi
Choose your wireless network from the list and select the security of your network as configured in the router.
Enter the Wi-Fi key and hit Save
The camera should now connect to your wireless network.
I wanted to check how good the Wi-Fi quality and range are. The camera was installed outside the front door, so it was around 20 feet from my 802.11ac capable BT HomeHub. The camera connected only at 802.11g speeds of 54 Mbps and the signal strength as reported by the camera was 70. I expected it to use the 802.11n protocol but really a max of 54 Mbps was more than enough for my 6Mbps stream.
Viewing the RTSP stream over the wired interface on VLC player for ten minutes, I observed 0 lost frames, and 0 discarded or dropped packets. For a good camera, I expect similar results over Wi-Fi. So I used VLC to connect wirelessly to the camera and pulled the RTSP stream again. I was happy to see no frames were lost, and no packets were dropped or discarded over a 10 minute stream.
So the wireless works well, but your mileage may vary depending on the distance of the camera from your router, the number of walls between them, and the ability of your router to handle multiple wireless clients.
Audio Performance
By default, the audio feature is disabled in the camera settings. To turn it on, go to Configuration > Video/Audio > Video. Then for the main stream and sub-stream, change the video type to “Video & Audio”. If you do not do this and try to access the audio in the Live View screen, you will get a rather unhelpful “Audio On Failed” error.
I tested the built-in mic of the camera and found it to be quite sensitive. Turning on the “Environmental Noise Filter” under Configuration > Video/Audio > Audio reduces the ambient white noise which microphones are very good at picking up.
If you add a speaker using the audio output connection of the camera, you can have 2-way conversations. If I am nitpicking, I did note the lack of an audio detection alerts that Amcrest cameras have. Still, in my state it is illegal to record audio in a public place, so I don’t need this feature. All in all, I am very satisfied with the audio capabilities of this camera.
Motion Detection Alerts
One of my favourite features with the Hikvision cameras is the degree of control you have over the motion detection alerts. Many cameras have very simple motion detection where the most control you have is the parts of the scene that can trigger an alert and the sensitivity to the changes in those areas. Let’s face it, software based motion detection is not great on most cameras simply because any and every change in light levels, clouds, or wind can cause a ‘change’ in the scene and trigger tons of false alerts.
Short of going with external PIR motion detectors, the only real alternative is smarter motion detection algorithms or events. This is where Hikvision IP cameras shine. I almost exclusively use the Line Detection and Intrusion detection events to generate email alerts with snapshots of the images. This vastly reduces the number of false alerts and I would highly recommend trying them instead of the simple motion detection event.
Verdict
The DS-2CD2542FWD-IWS is a very capable IP camera with excellent image quality both during the daytime and at night. The Wi-Fi works well and can help you install the camera where you may not be able to route an ethernet cable. The advanced motion detectiom alerts are very useful and reduce the number of false alerts.
However I was disappointed with the night time WDR performance. It is simply unacceptable that the image quality should degrade to such a degree. However daytime WDR works well and you can turn on WDR just for the daytime. This workaround overcomes the problem but you will lose the auto-switch between day and night feature. I suspect the WDR issue can be fixed through a firmware update, but until then it stops it from being the best it could be.
[review]
Where to buy
Individuals like you and me are not Hikvision’s target market and so they are not widely sold at retail stores. One method is to source them from Amazon which is my preferred route for cost reasons. But note that unless you buy from an authorized reseller, Hikvision will not honour the warranty. At the time of publishing this article, Hikvision doesn’t publish a list of authorized resellers, only that of distributors (who typically will not sell to the public). So the only way to ensure you are getting the genuine article with a warranty that will be honoured by Hikvision is by doing your own research.
[easyazon_link identifier=”B017DB3CZ8″ locale=”US” tag=”vueville.com-ref-20″]Check your local Amazon site[/easyazon_link]
Which is better, a conventional dedicated NVR like the [easyazon_link identifier=”B019LSXU76″ locale=”US” tag=”vueville.com-eaz-20″]Hikvision DS-7608NI-E2/8P[/easyazon_link] or a NAS-based NVR solution from Synology or QNAP? This is something I get asked quite often by readers. It’s also a question that’s been on my mind for some time now. So let’s take an objective look at the pros and cons of each option.
[wpsm_toplist]
The Contenders
To make this a fair fight, we need to pit an affordable NAS against an affordable NVR.
My DIY NVR system is based on a NAS, the [easyazon_link identifier=”B00S0XV0QC” locale=”US” tag=”vueville.com-eaz-20″]QNAP TS-231+[/easyazon_link] and I have been running this CCTV setup for more than a year. I have need of just 2 IP cameras, so the 2 free IP camera licences that came with the TS-231+ have sufficed so far.
The TS-231+ is missing an HDMI port though. This isn’t very surprising as it is a budget NAS. For an apples to apple comparison, we need to choose a NAS with an HDMI port. So I have chosen the [easyazon_link identifier=”B015VNLEOQ” locale=”US” tag=”vueville.com-eaz-20″]QNAP TS-251+[/easyazon_link] on the NAS side of the comparison. This model is quite powerful with a quad-core Intel Celeron processor with 2 GB of RAM.
One of the most popular NVRs among my readers here at VueVille is the [easyazon_link identifier=”B019LSXU76″ locale=”US” tag=”vueville.com-eaz-20″]Hikvision DS-7608NI-E2/8P[/easyazon_link], so it makes sense to choose this 8-channel NVR for the dedicated NVR side of the comparison.
QNAP NAS Surveillance Station
Both Synology and QNAP call their surveillance software ‘Surveillance Station’. Most entry-level NAS units come with 2 IP camera licenses free that you can use with the Surveillance software on the NAS. This essentially makes it a 2-channel NVR. Additional licenses need to be purchased directly from QNAP.
The Surveillance Station software on my QNAP NAS is quite powerful. In my opinion, it is a real alternative to a dedicated NVR system. If you are unfamiliar with the Surveillance Station’s featurs, here are the highlights:
Records up to 8MP (4K UHD resolution), H.264, MPEG-4, M-JPEG, and MxPEG formats supported
Records up to 64 channels (dependent on NAS model)
3000+ IP Cameras supported, ONVIF compatible
Scheduled and manual recording
Smart recording (24/7 recording at lower resolution, switches to higher resolution when motion is detected)
Live View up to 64 cameras simultaneously on a single screen, HDMI port available on some NAS models
Software based motion detection and email alerts, can react to camera triggers
7 types of event actions, including recording, PTZ Control, alarm output, email notification, SMS notification, buzzer notification, and user-defined actions available
Instant playback function (plays recorded video in reverse from live view screen)
Supports PTZ cameras
Regular motion detection and alarm events marked on playback timeline
Synchronized camera playback
Intelligent Video Analytics (IVA) – can find ‘missing’ objects automatically
Check out the QNAP IP camera compatibility list to see whether your existing cameras will work with a QNAP NAS. It is regularly updated as QNAP is quite proud of the wide range of cameras it supports.
Hikvision NVRs stray from the pack when it comes to the IP camera brands they support. While other manufacturers limit the NVR to supporting only their own cameras, the Hikvision supports a wide range of IP cameras from top tier manufacturers such as Bosch, Canon, Sony and Vivotek. Although Hikvision doesn’t officially claim ONVIF support in the spec sheet, they do mention “Third-party network cameras supported”.
The main features of the Hikvision DS-7608NI-E2/8P are:
Up to 6 Megapixel Resolution
80 Mbps Incoming Bandwidth
Supports H.264+ and H.264
Synchronous HDMI and VGA Output 1920 × 1080p Resolution
8-ch Network Cameras Can Be Connected
Up to 2 SATA Interfaces (Note no RAID though)
Plug & Play w/Up to 8 Independent PoE Network Connections
Supports Network Detection, Including Network Delay, Packet Loss
Alarm and Audio I/O
Features – Head to head
[table id=20 responsive=scroll /]
Analysis – Its not that straightforward
The NAS has some very strong advantages:
It supports the industry standard ONVIF protocol. This means virtually any ONVIF-compatible camera can be added to the NAS. That’s an insane level of flexibility you often can’t get with dedicated NVRs because manufacturers like to lock customers into their own product eco-system. The Hikvision NVR actually is the most flexible you will find among dedicated NVRs as it does support a few major 3rd party manufacturers such as Panasonic, Canon, Sony etc.
RAID facility which provides redundant storage. A NAS does this by default, all you need is add a second hard drive and configure it for RAID 1. Most consumer level NVRs just cannot do RAID.
You can use a NAS for a whole lot of other things, such as a VPN server to increase the safety of remote access. Another good use is as a home media server, or a Kodi server.
The dedicated NVR has one very strong advantage and some other minor advantages:
Cost – NAS devices usually only include 2-4 IP channel licenses, whereas with an NVR you get more channels for your money. Each additional channel on a NAS is an extra licence that costs you money.
The NVR does one thing – and since it does one thing only, its likely to be more reliable. A multi-functional device like a NAS runs on complex software and that is a weakness. For example, a less than perfect software update from the manufacturer can cause you headaches if it breaks some NAS NVR functionality such as email alerts. This is the inherent risk of using one device for everything. That said, in the 3 years I have used QNAP NAS’ as my NVR, everything was fine on the software front.
Verdict
As with most things in life, it depends on what you want:
If you want no more than 2 or 3 IP camera channels, go with a NAS, especially if you do not have another device running 24/7 to provide media server or VPN server duties.
If you want 4 channels or more, an NVR starts becoming cheaper. Especially as it avoids having to buy a separate PoE switch. Do take regular backups though as most consumer NVRs will not support RAID disk mirroring.
A hybrid approach is to use a dedicated NVR and then configure it to save the camera streams to a NAS as well. This gives you the best of both worlds – the familiarity of a dedicated NVR and the data safety provided by a NAS. This is probably the setup that I will move towards eventually.
So what do you think? What do you use – a NAS or a dedicated NVR? Let’s discuss!
Video doorbells are a great addition to your home security arsenal. I am just about to embark on my home automation project and the doorbell is one area that I am particularly interested in making smart.
Having already installed a wireless video doorbell for my mom, I would advise looking for the following features as a minimum in a video doorbell:
1080p HD resolution
Night vision capability using IR LEDs, ideally a true IR cut filter so that daytime pictures don’t suffer from false colours
Good field of view, the best in class have up to 180 degrees horizontally
Weatherproof/waterproof rating, ideally at least IP 65
Built-in speaker and microphone
WiFi supported
Live View feature
Video recording feature
The following features are nice-to-have:
Continuous recording feature, preferably without a subscription
Should not be reliant on the cloud for basic functions
Local video storage option in the form of an SD card slot
A PIR motion sensor to cut down on false alerts
Preferably should not rely purely on batteries as saying your smart doorbell isn’t working because you forgot to charge the batteries is pretty dumb
ONVIF support so that you can use the doorbell with any NAS, NVR, or software like ZoneMinder, BlueIris
RTSP stream capable so that even if ONVIF support is not present, you can still pull the video stream and use it
Should integrate with popular HA (Home Automation) hubs and controllers such as the MiCasaVerde Vera Plus – this means that the manufacturer should have a published API in the very least.
Siren for scaring off intruders
Ring – Who are they?
Ring was founded by Jamie Siminoff who is also its CEO. But the Ring Video Doorbell is not their first product. That was the DoorBot, launched in 2014 by Jamie’s earlier venture, Bot Home Automation. It was mostly a success and was then rebranded as the Ring Video Doorbell.
Essentially, the Ring Video Doorbell and the Ring Video Doorbell Pro work on the same concept – a doorbell that is connected via WiFi to your home network. When someone rings the bell at your door, an alert is sent through your home network over the Internet to Ring’s servers and then to your phone wherever it is in the world. Use the app on your phone to then check who is at the door (live video), and if you so desire, you can have a 2-way conversation with them right away using the built-in speaker of the doorbell. The optional Chime wall plug unit will produce a chime as well when the doorbell is pressed. So you can see them but they can’t see you. Also, you can be anywhere – in the house itself, in another city for work, or on holiday in France; but your caller will never know!
If you are not able to answer, you can play a recorded greeting and allow them to leave a message. The event will be captured so that you can check on missed calls later on.
It also has motion detection so that it can sound a chime or send alerts to your smartphone, whenever someone is at the door, even if they don’t press the doorbell. This is why it is billed as a smart home security device – you can know if somebody is snooping around.
The original Ring model was launched in 2014 and was received positively albeit having a few flaws, such as flaky reliability and motion detection, apart from being reliant on a battery that needed charging.
The Pro model under review here is the second product in the Ring family and was launched in March 2016. The main improvements over the Ring model are 1080p HD over 720p HD, 5GHz wifi support and push notifications, custom motion zones, and it is hardwired into your existing doorbell thus obviating the need for batteries.
Since the Ring is dependent on the Internet for smart features such as live view, smartphone notifications, video conversations, a 2 Mbps upload speed is recommended by Ring for best performance. We would say this is the bare minimum and you really need a faster connection.
Ring Video Doorbell Pro – What is it suitable for?
If you want to improve the security of your home by keeping tabs on who’s calling even when you are not at home, the Ring doorbells are perfect for you. If you are renting and cannot rip out your existing dumb doorbell, go for the Ring Video Doorbell which uses batteries. If you are a homeowner and can replace the existing dumb doorbell fully, go with the Ring Video Doorbell Pro.
With its new Ring+ feature, you can integrate it into your home automation system. So you could have WeMo lights going on automatically when someone rings the bell. Or if you have one of the supported hubs, you can create your own custom action trigger.
Main specifications
If you are trying to make up your mind between the Ring WiFi Video Doorbell vs. Ring Video Doorbell Pro, the main differences are the video resolution and the installation method.
ring doorbell pro vs. ring Doorbell compared:
[table id=19 responsive=scroll /]
What’s in the box
The Ring Video Doorbell Pro comes with everything you need to set it up:
Ring Video Doorbell Pro
Four interchangeable face-plates
Drill bit
Mounting screws and anchors
Security screw
Security screwdriver
Pro Power Kit
Wire Clips
Wire Harness
Install instruction guide
Installation
Installation is straight-forward and Ring has provided comprehensive manuals online. The Ring Doorbell Pro requires access to a wired doorbell but is compatible with most mechanical or digital (electronic) doorbell kits that use transformers between 16 and 24 volts AC.
DC transformers or AC transformers below 16 volts AC are not supported at this time. However they are working on connecting it directly to a transformer.
Here is a brief overview of the installation process:
Install the Pro Power Kit – this unit connects to your existing doorbell itself and provides the right power level for the Ring Video Doorbell Pro. Your current doorbell transformer should be of the 16/24 Volts variety, otherwise the Ring just won’t get enough power.
Install your Ring Video Doorbell Pro – You will need to hardwire it into your existing doorbell switch.
Complete the in-app setup and you are ready to go.
One of the main issues with the original Ring was the rather pedestrian 720p HD resolution. The Pro comes with 1080p HD which is a welcome improvement. Higher the resolution, higher the amount of detail you can get to identify shady characters you have caught on video!
Night vision
The Ring Video Doorbell Pro has true night vision using its InfraRed LEDs. So you will be able see clearly what’s going on even in pitch dark conditions, although it will be in black and white.
Field of View
The Ring Pro has a very wide-angle lens with a 160° field of view which is on the higher side. This should make it very difficult for anyone to escape getting caught by the Ring if they are up to no good.
Design
The Ring Pro is very stylish and definitely looks the part. The body is not compact though at 12.65cm x 6.17cm x 2.21cm, and so is not very discreet. The body is not IP rated for water proofing, but Ring says it is resistant to rain water and will even work in freezing temperatures. The recommended operating temperatures range is -20.56 ºC to 48.89 ºC.
Audio features
The Ring Pro has a built-in speaker and microphone for two-way audio conversations.
Wireless
The Ring Pro supports the 5GHz WiFi band in addition to 2.4GHz. However the 5GHz band has shorter range than 2.4 GHz, so unless your router is near the Ring’s intended installation location, use the 2.4 GHz band.
There is no RJ45 ethernet port, hence no Power over Ethernet feature either. It has to be hardwired to your doorbell, so that’s where it gets power from.
Motion Detection
Another weakness with the original Ring was the fixed motion detection zones which has also been improved.
You can now draw custom motion detection zones with the Ring Pro. The sensitivity can also be adjusted.
Live View and Recording
The Ring Pro supports live view without a cloud subscription. However, if you want to record event or motion-triggered clips, you will need to pay the monthly or annual cloud subscription.
Cloud Services
Every Ring doorbell comes with a free trial of the Ring.com cloud recording service. After the 30 day trial, it costs $3 a month (£2.5) or $30 annually (£24.99), per device. Sadly, there is no discount for additional devices on your cloud account.
So what can you do with the camera if you don’t want to pay for the cloud subscription?
1080p Full HD Live View – you can check into the Ring Video Doorbell Pro to see what’s going on
Motion detection zones and push alerts to your smartphone
Two-way audio: Talk and listen through the built-in microphone and speaker
Since there is no local storage option – you have to pay for the cloud subscription if you want the following features:
to record event clips and to store that recorded video for up to 6 months.
permanently save a video by downloading it to your device
timeline feature which helps you find recorded event clips quickly
create and share recorded video clips with friends, family, or law enforcement
Ring recommends a minimum broadband upload speed of 2Mbps for using the live streaming and cloud storage features. [wpsm_video]https://www.youtube.com/watch?v=5QLVliiob8s[/wpsm_video]
Mobile App
The Ring Pro app is available for Android, Apple devices, and Windows 10.
Verdict
The Ring Video Doorbell Pro is a good product that has been well-received by users and this wireless doorbell is the #1 best-seller on Amazon USA. However I am not happy about its reliance on Ring.com servers and the security, privacy and latency issues this introduces into the mix. It is easier to set up due to this reliance on the cloud though.
As a power user, I would have preferred a fully local option where it is not reliant on the Internet to work.
[review]
Where can I buy it?
[easyazon_link identifier=”B01DM6BDA4″ locale=”US” tag=”vueville.com-eaz-20″]View on your local Amazon Website[/easyazon_link]
The 3 Megapixel Hikvision DS-2CD2132F-IWS Network Security Camera under review today is a popular choice among our readers looking for a cheap yet reliable outdoor security camera. It is the dome equivalent of its widely acclaimed cousin, the [easyazon_link identifier=”B00ZZQS1ZU” locale=”US” tag=”vueville.com-ref-20″]Hikvision DS-2CD2032F-IW[/easyazon_link] (Amazon link).
The key feature that makes this network camera a fully standalone solution is the built-in micro SD card slot supporting cards up to 128GB. As you will find from our exhaustive Hikvision Network Camera guide, this is represented by the additional ‘F’ in the model number. This local storage feature enables the camera to record motion detection clips or images without the need of any other device.
Hook up the camera via Power-over-Ethernet (PoE) or via the separate power and network cables, and it will do all of the following without the need of any other device:
record 24/7 or motion detection clips and images to the SD card,
automatically switch between day and night modes using the IR cut filter and built-in IR LEDs, and much more.
Optionally you can also connect the camera to a Network Video Recorder (NVR), a Network Attached Storage (NAS) device or directly to the cloud. But as with any IP camera, there are certain points you need to be aware of before purchasing this camera. Read on to learn what we found in our hands-on review.
The DS-2CD2132F-IWS is ideal for both indoor and outdoor surveillance applications. It is fully weatherproof and so should fare well in all weather conditions. It also acts as an effective deterrent due to vandal-proof design. It is also compact at Φ111 mm× 82mm (4.4” × 3.2”).
Main specifications
As always with Hikvision, there is a camera to suit every use case and every application. There are two variants of the same dome camera which you can view on Amazon: the [easyazon_link identifier=”B0183JPH8E” locale=”US” tag=”vueville.com-ref-20″]DS-2CD2132F-IS[/easyazon_link] model (without the WiFi function) and the [easyazon_link identifier=”B00W43UQ7I” locale=”US” tag=”vueville.com-ref-20″]DS-2CD2132F-IWS[/easyazon_link] which adds Wi-Fi connectivity. In all other respects, these cameras are exactly the same.
We reviewed the non-WiFi DS-2CD2132F-IS model.
[table id=18 responsive=scroll /]
Design
Its impossible to not compare the DS-2CD2132F-IWS to its very succesful predecessor, the DS-2CD2132F-I. Let’s take a look at them side-by-side and see what had changed:
The older DS-2CD2132F-I (right) had an issue where some of the IR LEDs were obscured by the base of the camera. This has been rectified in the new DS-2CD2132F-IWS. The lens is also 3-axis vs. the older model’s 2-axis.
Camera Installation
Dome cameras are not as easy to install as bullets (unless you are using an installation bracket). This is because of the very nature of the camera and the way they are attached to the installation surface (eaves, walls). There are 4 steps for installing this camera:
Unscrew the dome – there are three screws that secure the dome to the camera base. Hikvision has smartly used built-in screws that remain attached to the dome at all times – very convenient when you are trying to hold the camera to the installation surface and putting in the first screw!
Connect the DS-2CD2132F-IWS to your network and hold it in the desired installation position. Check the live view to frame the image. This camera has a 3 axis design (pan/tilt/rotate) so getting the image framed just right is so easy. Also you can mount it on a slanted eave and still get a levelled image.
Secure the camera to the installation surface using the provided rawl plugs and screws.
Put the dome on and screw tight the 3 built-in screws. Again Hikvision has provided a ribbon band that connects the dome to the camera base to make installation easier.
I was able to easily install the camera myself – its a one-man job!
Camera Network Setup
Hikvision cameras come set up with a default IP of 192.0.0.64, which may not be the same as your network’s subnet. If so, you have to use the included Search Active Devices Protocol (SADP) tool to change the IP address and subnet of your camera. Why use the SADP tool? Because if the camera is on a subnet different from your network, it will not be accessible from your laptop or computer.
When you install and launch the SADP tool, it automatically searches for Hikvision cameras connected to your network. You can also click the Refresh button to search manually. When your camera appears on the list, select it and set a new password. Then change the IP address to one in your network’s subnet. We recommend not using DHCP, but rather use a fixed IP address. The default username is ‘admin’ and the password is 12345. This is not secure so you should choose a stronger password.
Once you have done the above, you no longer need the SADP tool to access the camera. You can enter the IP address of the camera in your browser to access the administration portal where you can access the live view and configuration pages.
The web administration portal is easy to use and very functional. However as with most current IP cameras, the interface uses an NPAPI plugin which does not work on the Chrome browser but this is not Hikvision’s fault. Google has stopped supporting this plugin in Chrome as part of its efforts to push developers away from this plugin. We expect Hikvision will soon redesign the web interface in HTML5 to overcome such browser limitations.
Camera Features
Hardware
The DS-2CD2132F-IWS has a 1/3″ progressive scan CMOS sensor with a resolution of 3 megapixels. This lets you record at up to 2048×1536 resolution (20 frames per seconds) or 1920×1080 (30 fps). The increased resolution is very useful for capturing extra detail, hey it may just be the difference between a just-too-blurry video and a crisp close-up that the cops can actually use!
You can order the camera with a choice of lens, from 2.8mm to 6mm. According to Hikvision, the angles of view will be around 98.5°(2.8mm), 79°(4mm) , and 49°(6mm). The camera’s pan (0-355°), rotation (0-355°), and tilt (0-75°) functions allow you to point the camera at the area or object of interest.
The on-board IR has a claimed range of 10-30 metres which is quite standard for this class of IP camera. These are not the EXIR LEDs found in the 2332-I turret model but are bright enough. A true IR-cut filter is present which will give true colour images during the daytime and true night vision images in the dark. This avoids problems such as false colour that cameras without a true IR-cut filter can suffer from.
The camera is capable of recording up to a bitrate of 12Mbps. Our general recommendation is a minimum of 4Mbps to ensure sharp and clear images and videos. Unusually, the DS-2CD2132F-IWS supports Wi-Fi upto 802.11n speeds of 150 Mbps.
Of course there is also the SD card slot, which is so useful for storing motion detection images or video clips. Even if you intned to use this camera with an NVR, the SD card storage is a sensible secondary storage option.
Web Administration Portal
When you go to the IP address you set using SADP for the camera, you are greeted by the login screen.
The default login details are: username = admin and password = 12345. But you should have changed it already using the SADP tool. If not, that’s the first thing to do after logging in.
You will be prompted to install the WebComponents plugin so that the camera video can be displayed. This will automatically be downloaded from Hikvision and installed.
Now you may get a warning in your browser about the plugin like this:
It is perfectly safe to allow the Web Components plugin.
The home screen has 4 main tabs – Live View, Playback, Log and Configuration.
You can control the volume if you have connected a microphone on the camera. You can also push the Mic button to send audio to an attached speaker. You can also take snapshots and videos from the Live View screen. We found the live view screen to be smooth, responsive and stable.
Recorded clips can be viewed by clicking on the Playback tab. You can either search for clips to view by using the calendar or by clicking and dragging the timeline slider. If you are using only event based recording (such as motion detection), the player will automatically advance to the next clip and keep playing till all the clips have been played.
The next tab is the log screen:
The final tab is the Configuration tab, which has subsections that can be opened using the tree menu on the left:
Local configuration – defines the location for saving snapshots and videos from the playback tab.
Advanced Configuration – Advanced configuration including events such as in-camera motion detection or line detection.
We recommend doing the local configuration, then the basic and finally the advanced configuration to get the most out of your Hikvision IP camera.
Basic Configuration
Under Basic Configuration, the System tab shows you the camera’s physical connections, firmware version, time settings and reboot options.
The Network screen lets you select the ports you want to use – this is identical to the Network page under the Advanced Configuration section, so we will check it out later.
The Video/Audio page lets you define the video bitrate, resolution and other details.
The Image sub-section lets you adjust image exposure properties such as brightness, contrast etc.
Finally the Security sub-section lets you create additional users, for purposes such as a mobile phone monitoring software.
Advanced Configuration
Some of the settings pages in this mode are exactly the same as those under Basic Configuration, so we will skip those that are common.
Let’s start with the Network sub-section. Here you will find a whole host of settings such as IP settings, DDNS, Email, and FTP settings.
The video settings are exactly the same as under Basic Configuration, so let’s look at the Audio settings:
Of course, these are valid only if you have connected a microphone and/or speaker to the physical connections of the camera.
The Image tab is again similar to the Basic Configuration page, but there are some new settings such as the On-Screen Display that can be used to display text on the video feed:
The Security tab is identical to the one under Basic Configuration, so we will skip it.
Onto the Event sub-sections starting with the Basic Event page. As we always say, motion detection alerts is one of the most enjoyable features of an IP security camera. When the DS-2CD2132F-IWS detects motion as per the defined triggers, it can send an email alert with snapshots and ideally send push notifications also. The Hikvision can do all of this and has all the standard motion events that we have come to expect from good quality cameras. It supports email alerts and can attach snapshots with each motion detection email alert.
This includes simple Motion detection, Video Tampering, external alarm inputs and some miscellaneous alarms that can be run on a schedule to trigger one of the following actions:
Notify the desktop based Surveillance Center software iVMS-4200
Trigger the external alarm connection – useful for Home Automation
Remember you can enable more than one type of event at the same time.
Let’s take a closer look at each one of the motion detection events available:
Simple Motion Detection – This motion detection method simply looks for changes in the scene according to the area defined, the sensitivity and the threshold.
Video Tamper – This method triggers an alert when the camera is blanked out.
Alarm Input – This is where the alarm input connection comes into use. If you have a PIR sensor connected to the camera, you can set up this event to detect motion using the PIR. Since the PIR sensor works on changes in heat and not image based detection, you can cut down the number of false alerts that is the bane of regular image based motion detection.
Network abnormality – This event can be set to trigger if the camera is unable to record to the network storage location (NAS or NVR) – either because of an error or because somebody has tampered with the equipment.
Illegal Access – This event can be set to trigger if the camera detects unauthorised logins such as an invalid username, password or a hacking attempt.
It is however the Smart events that really show off the caliber of this camera:
Line detection and area intrusion detection let you cut down on false alerts that can be generated by the basic events. Intelligent use of these two can vastly reduce the number of false alerts you get.
The final Storage subsection lets you define network based storage settings, such as a NAS.
The first page is the Record Schedule where you can tell the camera whether to record based on event triggers or continuously on a schedule.
The Storage Management page lets you add network based storage locations.
The NAS page defines the settings for NAS devices, such as folder path.
The final page in this section lets you define snapshot timing intervals.
Recording modes
The DS-2CD2132F-IWS camera can be configured to record event triggered clips or schedule-based clips to an SD card, a network storage location or to the Cloud using services such as Hikvision’s own EzVIZ, or third party services such as sensr.net and Camcloud. The HiDDNS service is different and we do not recommend using it as EZVIZ is better.
SD Card: We recommend using the SD card only for motion detection or alert snapshot and video recording. 24/7 recording to an SD card is not recommended simply because you will wear out the SD card. The SD card is best seen as redundant storage in case your main storage location fails.
Our recommended way of using an IP camera is always like this: use it to record 24/7 footage or motion activated video to a network storage location. This could be a NAS, an NVR (see NVR buying guide), or a computer running surveillance software such as BlueIris. This means any damage to your camera or theft doesn’t destroy the evidence!
Cloud storage: In this mode, your camera will upload motion detection clips, snapshots, or 24/7 recording clips to Hikvision’s EZVIZ service or third party services.
Smartphone apps
Hikvision provides a free Android and iOS app, the iVMS 4500 HD which lets you see your camera’s live video stream, use the 2-way audio feature, and view recorded clips. It also lets you access cameras connected through the EZVIZ system. The stand-out feature is Push Notifications which works quite well. Read our step by step guide to setting up push notifications.
Compatibility with NVR systems
The DS-2CD2132F-IWS supports the ONVIF protocol. ONVIF is an industry standard that enables surveillance equipment from different manufacturers to work together. This means that you can connect the camera to any Network Video Recorder (NVR) or a computer running surveillance software, and the camera should work seamlessly.
Performance
We have been running this camera continuously for a year now and it has not faltered once. It has been 100% reliable and has been even more reliable than our DS-2CD2032-I which needs a reboot every 6 months.
Video Quality
We tested the camera at both 3 Megapixel and 2 Megapixel resolutions. Our test settings were a bitrate of 6 Mbps and 10 fps.
Daytime quality
Daytime quality is excellent with sharp focused video that shows every detail in the scene. Here is a sample video we made:
Night quality
To test the night quality, we used only the built-in IR. No external IR illumination was used. There was a little stray light from an LED street lamp but this was very dim light. At the noise reduction and WDR image settings seen in the screenshots above, the image was slightly grainy but had decent sharpness and clarity. We did not observe any IR bleed issues that some users of the predecessor model experienced. Here is a test video we made:
Verdict
The Hikvision DS-2CD2132F-IWS is one of the best-selling dome-style wireless security cameras. It has definitely improved upon its predecessor, the [easyazon_link identifier=”B00VFBW61O” locale=”US” tag=”vueville.com-ref-20″]DS-2CD2132F-IS[/easyazon_link] (Amazon link). No more IR LEDs being blocked by the base or complaints of IR bleed! This camera represents great value for money with all the features that you will ever need from an IP security camera.
[review]
Where to Buy
[easyazon_link identifier=”B00W43UQ7I” locale=”US” tag=”vueville.com-eaz-20″]View on your local Amazon Website[/easyazon_link]