Category: Blog

  • Why does my IP camera keep going offline?

    Why does my IP camera keep going offline?

    So the one thing you thought would work 24/7 with absolutely zero down-time has just decided it can’t be bothered.

    Before you chuck your seemingly malfunctioning IP camera out of the window, here are a few things you may want to check first. Because you know the VueVille family is frugal and nothing goes into the trash unless its well and truly beyond recovery!

    Why does my IP camera keep going offline/disconnecting?

    So the most obvious reason may just be that the poor thing’s time is up. A lot of electronic devices don’t just die one fine day; rather they die a slow painful death, dragging it out and adding to your frustration. A great example is wireless routers. Some IP cameras are just like that. But before jumping to this conclusion, here are a few things to check.

    Check the strength of your camera’s wireless connection

    If your IP camera is wireless, it is probably too far away from your Wi-Fi router. There are a few things you can do to improve the Wi-Fi connectivity of your camera. If at all possible, move the camera closer to the router or move the router closer to the camera. If this is not an option, make sure your camera is using the 2.4 GHz network, which has better range.

    If this fixes the connection problems, you need to improve the strength of the Wi-Fi at your camera’s loaciton. You can achieve this by using a Wi-Fi extender like [easyazon_link identifier=”B0195Y0A42″ locale=”US” tag=”vueville.com-eaz-20″]this TP-Link model[/easyazon_link] or investigate mesh Wi-Fi options such as [easyazon_link identifier=”B01MAW2294″ locale=”US” tag=”vueville.com-eaz-20″]Google Wi-Fi[/easyazon_link].Still no joy? If the camera has an Ethernet port (RJ-45), temporarily plug it directly into your router using a LAN cable. If this fixes the connection problems, your camera’s Wi-Fi is dying. Yes this can happen! It’s happened to one of my older wireless IP cameras, but the wired LAN connection still works.

    How fast is your home broadband’s upload speed?

    If you are viewing your IP cameras remotely, two things are key – the upload speed of your home broadband and the download speed of your viewing device. Most home broadband connections are not symmetric – they have good download speeds but low upload speeds. When your camera is streaming you live-view video, its mostly using the upload your home broadband connection’s upload bandwidth.

    Speedtest result - Why does my IP Camera keep going offline - VueVille

    Is your camera on the latest firmware?

    Most of us are lazy when it comes to keeping our devices updated with the latest firmware. This is especially true for devices like IP cameras that are pretty much set and forget. After installing my first Hikvision IP camera, I didn’t touch it for over 2 years. And even then, I had to access it because I wanted to re-orient it. So make sure you upgrade the firmware to the latest available version, and see if the performance issues abate.

    Are your Ethernet cables damaged?

    If you are using Power over Ethernet to power your IP camera, try replacing your Ethernet cable. This is especially relevant if you use buried Ethernet cable. Bends or kinks in the cable can damage the copper wiring inside. If this is the issue, make sure you replace the cable with [easyazon_link identifier=”B01JAVMYLM” locale=”US” tag=”vueville.com-eaz-20″]burial grade Ethernet cables[/easyazon_link]

    Check your networking equipment

    How good is your router and other networking gear that you use in your home network? The most obvious culprits are your Wi-Fi router, network switches, and PoE switches. Remove each such equipment from the path between your IP camera and the Wi-Fi router to identify any faulty products.

    Is the IP camera’s power source working properly?

    If you are not using PoE, this is an often overlooked factor. Most IP cameras work at 12V and so the power supply used is a step down transformer. Cheaper power supply transformers probably won’t last more than a few years and may need replacement.

    Did any of the above tips work for you? Or how did you confirm your IP camera has well and truly kicked the bucket? Let us know in the comments below!

    So what if none of the above tips worked? Well, I am sorry to say that’s probably the end of the line for your IP camera. An IP camera that works intermittently is like a door lock that works only half the time. Useless. Time to hit up our recommended indoor or outdoor IP cameras list then!

  • 5 Best Rack Mount NVRs for your Home or Office

    5 Best Rack Mount NVRs for your Home or Office

    Rack Mount NVR - VueVille
    Many a DIY enthusiast has discovered the joy of rack mount servers. Rack mount NVRs are great for all the same reasons:

    • rack mounting your NVR saves valuable space,
    • you will appreciate the unrivaled ease of adding and removing Ethernet PoE cables,
    • rack mount inside a lockable cabinet for extra security,
    • rack mounting provides improved ventilation, which should prolong the life of your NVR considerably.

    Rack Mounting sizes and heights

    The rack that you will mount your NVR on comes in standard 19″ or 23″ sizes. Manufacturers typically denote the height of their NVRs in Rack Units. A 1U NVR is 1 3⁄4 inches or 44.45 mm high. A 2U NVR will be twice as high. A typical full size rack is 42U, or just over 6 feet tall.

    The 5 Best Rack Mount NVRs for your DIY Home Security Camera System

    Qnap VS-8132U-RP Pro+ Viostar 32-channel Rack Mount NVR

    [easyazon_image align=”center” height=”312″ identifier=”B0083H5KBQ” locale=”US” src=”https://images-na.ssl-images-amazon.com/images/I/31XQWadnQtL.jpg” tag=”vueville.com-eaz-20″ width=”500″]

    The QNAP VS-8132U-RP Pro+ Viostar is a feature packed enterprise-grade 32-channel NVR that can record up to 10 MP. That’s more than 4K resolution! The high-end 2U RAID chassis houses a dual-core Intel Core i3 processor and 4GB of RAM. Out of the box, it supports up to 32 IP cameras with max throughput of 400 Mbps. You can purchase additional licenses to take this up to 48 channels. No PC required but if you must, you can use the free QSCM Lite app to pool QNAP NAS and NVRs into a single software interface.

    Full specs:
    – Dual Core Intel® Core™ i3 3.3GHz Processor
    – 4GB DDR3 RAM
    – 8 x 3.5” SATA 6Gb/s, SATA 3Gb/s hard drive
    – 8 x hot-swappable and lockable tray
    – 4 x Gigabit RJ-45 Ethernet port
    – 10 GbE(reserved), Status, LAN, eSATA(reserved), hard drives
    – 2 x USB 3.0 port (rear), 4 x USB 2.0 port (rear)
    – Support USB pen drive, USB hub, and USB UPS etc.
    – Mono-LCD display with backlight
    – 32 IP camera channel licenses included, 48 channels max supported
    – 2U, Rackmount NVR
    – Dimensions: 88(H) x 439(W) x 520(D) mm, 3.46(H) x 17.28(W) x 20.47(D) inch
    – Gross weight: 23.42 kg (51.63 lb)
    – Temperature 0~40˚C/ 32~104˚F, Humidity 5~95% RH non-condensing, wet bulb: 27˚C.
    – Power consumption: 130W Write/Read (with 8 x 1TB HDD installed)
    – HDMI, VGA ports
    – 3 x 6 cm smart cooling fan

    [easyazon_link identifier=”B0083H5KBQ” locale=”US” tag=”vueville.com-eaz-20″]Check price on Amazon[/easyazon_link]

    Synology Rackstation RS816 16-channel Rack Mount NVR

    [easyazon_image align=”center” height=”500″ identifier=”B01K1JSKC4″ locale=”US” src=”https://images-na.ssl-images-amazon.com/images/I/316ESP5fyhL.jpg” tag=”vueville.com-eaz-20″ width=”500″]

    The Synology RackStation RS816 is a 4-bay rackmount NAS NVR that can record up to 16 channels. The maximum resolution supported is 5MP or 2591×1944, and 54 fps. The NAS NVR comes in a 1U rack mount chassis and can be deployed in a 2-post or wall-mount rack. The Marvell Armada 385 chipset that powers the NVR is dual-core and has 1 GB of DDR3 RAM. Note that this NAS comes with only 2x free IP channel licences.

    Full specs:
    – Dual Core Marvell Armada 385 88F6820 CPU
    – 1GB DDR3 RAM
    – 3.5″ SATA HDD, 2.5″ SATA HDD / SSD supported
    – 4 x hot-swappable tray
    – 2 x Gigabit RJ-45 Ethernet port with Link Aggregation & Failover support
    – 1U, Rackmount
    – Dimensions: 44 mm x 478 mm x 327.5 mm
    – System fans: 40 mm x 40 mm x 3 pcs
    – Power consumption: 27.9 W (Access), 12.4 W (HDD Hibernation)

    [easyazon_link identifier=”B01K1JSKC4″ locale=”US” tag=”vueville.com-eaz-20″]Check price on Amazon[/easyazon_link]

    Alibi 5200 Series 32-Channel Rack Mount NVR

    [easyazon_image align=”center” height=”500″ identifier=”B077Z5NNT4″ locale=”US” src=”https://images-na.ssl-images-amazon.com/images/I/31YHVU94m4L.jpg” tag=”vueville.com-eaz-20″ width=”500″]

    The Alibi 5200 series rack mount NVR is a dedicated NVR supporting 32 IP cameras of up to 12 Megapixel resolution. It has 4 hard drive bays that can take a max 8TB drive each. Max incoming bandwidth is 256 Mbps. If you are looking for 4K HDMI display, this is the right NVR for you. H.265, H.264 and H.264 encoding is supported to reduce disk space required for CCTV footage. An interestign feature of this NVR is the integrated 16 PoE ports that are 802.3af and 802.3at compliant. Management is accomplished through the free Alibi CMS software.

    Full specs:
    – Incoming bandwidth of 256 Mbps supports up to 32 IP cameras
    – Up to 12.0 megapixel recording resolution
    – Delivers crisp 4K Ultra-High Definition images over HDMI
    – Synchronous playback of 16 Channel @ 1080p, 4 Channel @ 4K
    – 4 hard drive bays support up to 4 x 8TB hard drives
    – 1 x Gigabit RJ-45 self-adaptive Ethernet interface, 16 independent 10 /100 Mbps PoE Ethernet interfaces (200 W max output)
    – 1 x RS-485, 1 x RS232 ports
    – Local video outputs include HDMI and VGA
    – H.265, H.264 and H.264 codec video compression reduces file size, maximizes recording time, and saves hard drive space
    – Integrated 16 port PoE switch supports 802.3af and 802.3at 3at reduces the need for additional network – switches and offers plugand-play auto connect feature for compatible Alibi cameras
    – 16 alarm inputs and 4 alarm outputs to connect to external devices such as a siren or fire alarm
    – Recording modes: Continuous, Motion Detection, POS, Schedule, and Event
    – Recording features include event search, event log, and email notification
    – Central Management Software helps centrally manage your devices and views up to 64 live cameras
    – Free iOS and Android mobile app for remote viewing of live and recorded video
    – Dimensions: 15.3 ” x 17.5″ x 2.8″ / 388.6 x 444.5 x 71.1mm

    [easyazon_link identifier=”B077Z5NNT4″ locale=”US” tag=”vueville.com-eaz-20″]Check price on Amazon[/easyazon_link]

    Synology RackStation RS3618xs Rack Mount NVR

    [easyazon_image align=”center” height=”155″ identifier=”B07B2XD3R7″ locale=”US” src=”https://images-na.ssl-images-amazon.com/images/I/312WVjSe3LL.jpg” tag=”vueville.com-eaz-20″ width=”500″]

    The Synology RackStation RS3618xs is a 12-bay rackmount NAS NVR that can record up to 75 channels. The maximum resolution supported is 8MP (3840×2160), at 900 fps using H.265 encoding. The NAS NVR comes in a 2U rack mount chassis. The 64-bit Intel Xeon D-1521 chip that powers the NAS NVR is quasd-core and is supported by the 8 GB of DDR4 ECC UDIMM RAM. Note that this NAS comes with only 2x free IP channel licences.

    Full specs:
    – Quad-core Intel Xeon D-1521 CPU
    – 8 GB DDR4 ECC UDIMM
    – 3.5″ SATA HDD, 2.5″ SATA HDD / SSD supported
    – 12 x hot-swappable tray
    – 4 x Gigabit RJ-45 Ethernet port with Link Aggregation & Failover support
    – Optional 10GbE NIC support
    – 2U, Rackmount
    – Dimensions: 88 mm x 482 mm x 724 mm
    – System fans: 80 mm x 80 mm x 4 pcs
    – Power consumption: 142.76 W (Access), 55.05 W (HDD Hibernation)

    [easyazon_link identifier=”B07B2XD3R7″ locale=”US” tag=”vueville.com-eaz-20″]Check price on Amazon[/easyazon_link]

    Owltech 32-channel 6MP Rack Mount NVR

    [easyazon_image align=”center” height=”500″ identifier=”B06XCK4S9W” locale=”US” src=”https://images-na.ssl-images-amazon.com/images/I/51itAY9UQdL.jpg” tag=”vueville.com-eaz-20″ width=”500″]

    The Owltech HD5328HC-L is an 8-bay rack mount NVR that can record up to 32 channels at max 6MP. The NVR supports ONVIF so that you can use any ONVIF-compatible IP camera.

    Full specs:
    – 32 channels at max incoming bandwidth of 200Mbps
    – Decoding: 16ch.D1@30fps / 13ch.720P@30fps / 6ch.1080P@30fps
    – ONVIF 2.3 supported
    – 1x HDMI 1.3a, supports 1920×1080 output, 1 VGA
    – 8x SATA bays ,each bay supports 4TB
    – 1x e-SATA port
    – Hard disk hibernation technology, HDD faulty alarm & RAID alarm
    – Power Consumption : 20W (without HDD)
    – 2 x Gigabit RJ-45 Ethernet ports
    – 2U, Rackmount
    – Dimension(W*D*H) : 2U, 17.32″ x 17.71″ x 3.54″
    – Weight : 14.43 lbs (without HDD)

    [easyazon_link identifier=”B06XCK4S9W” locale=”US” tag=”vueville.com-eaz-20″]Check price on Amazon[/easyazon_link]

  • Weekend Reading: Experts Answer Home Security Questions with Redfin

    Weekend Reading: Experts Answer Home Security Questions with Redfin

    Weekend Reading - VueVilleI have always been an avid reader. From Noddy & Big Ears, to the Famous Five, the Secret Seven & the Hardy Boys and then on to Poirot and Sherlock Holmes in my teenage years, my parents instilled in me a love for reading. As I enter my thirties, I am happy to report I still read a lot, albeit more on a digital screen than on paper.

    So I often come across great blog posts and articles through the week, and would like to share my reading list on a regular basis here. Most have to do with home security, smart homes, technology in general, but may also relate to my other passions of blogging, investing and personal finance.

    So without further ado, here we go!

    Not so long ago, I was approached by Redfin to contribute to a feature on expert answers to the most urgent home security questions that homeowners face. Redfin has done a superb job on interviewing the top experts in the industry such as Frontpoint Security and Ring, and I am honoured to have been included!

    Some of my favourite questions answered in the article are:

    • How often & when should you change your locks?

    Its alarming how many new homeowners overlook this simple tip!

    • What factors should I consider when shopping for a smart lock?
    • How do I prevent Lock Bumping?
    • What are the best places to place indoor cameras throughout your home?

    Yes, this last one was answered by yours truly, so head on over to the Redfin blog post to see my answer!

    What do you think about the article? Leave a comment below! Have a great weekend everyone!

    News

    Nest cameras without 2 Factor Authentication hacked to announce false North Korean missile attack – CBS

    Strangers Might Be Watching Your Ring Videos – Yahoo

    3 ways to protect yourself from home security camera hackers – Digital Trends

    A new tactic for smart-home security: shaming Walmart – Yahoo

    Amazon’s Home Security Company Is Turning Everyone Into Cops – Vice Motherboard

    Do home security cameras actually help stop and arrest package thieves? – KTUL News

    Video shows deputy cover home’s security camera with mud to block view – Fox 5

    Products & Services

    Hubitat Elevation Home Automation Hub – A Z-Wave Hub that has local processing and is not cloud-reliant – Amazon

    Ring adds color night vision to wired security devices and HDR to wireless ones – Digital Trends

    This home security drone will help you tell possums from prowlers – CNET

    ADT’s DIY Play for LifeShield: Why Analysts Are Bullish on the Deal – SecuritySales

    Comment and opinion (from real bloggers)

    Ever thought of getting 20 Megapixel IP cameras? – VueVille

    Follow AutomatedHome.co.uk on their self-build project called Automated Home 2.0 – #05 Choosing Our Architect – Automated Home

    Konnected review – A modern upgrade for your wired alarm system – 24-7-home-security.com

    Gate Smart Lock Review – The Smart Cave

    Sonos Speakers Guide – For the Smart Home

    Home Automation with openHAB – Smart Home Blog

    Are Smart Speakers Invading My Privacy? – Automate Your Crib

    Where is my doorbell transformer? – One Hour Smart Home

    24 Essential Smart Home Projects for Beginners – Smart Home Solver

    Smart Homes For Grandma [Podcast] – One Hour Smart Home

    Weekend deals

    31% off LaView PoE Home Security Camera System on Amazon

    15% off Q-See PoE Home Security Camera System on Amazon

    $70 off Sony WH1000XM3 wireless Bluetooth headphones on Amazon (I have the XM2 and I love it!)

    20% off Beats Solo 3 on Amazon

    20% off Google Wi-Fi on Amazon

    15% off Reolink Argus 2 + Solar Panel on Amazon

    Save 50.0% on select products from Genius with promo code 50VTLYRY, through 2/20 while supplies last – Amazon

    [text-blocks id=”5527″ slug=”earning-disclaimer”]

  • 15 Best-Selling Wireless Outdoor Home Security Cameras

    15 Best-Selling Wireless Outdoor Home Security Cameras

    Best Wireless Outdoor Home Security Cameras - VueVille

    Are you looking for the best bang for the buck wireless outdoor home security camera?

    This is one area where you should definitely not follow the herd. Some of the top-selling cameras have serious drawbacks you should be aware of before buying.

    In this article, we will list the best-selling wireless outdoor home security cameras and identify the ones to avoid and the ones to buy.

    Wireless Outdoor Home Security Cameras

    In this blog post, we are going to briefly review the best-selling security cameras around. There’s a huge variety of features and security capabilities, so we will point out any red-flags as we go.

    Home Security Cameras can be grouped into various categories thus:

    • Indoor or Outdoor – Outdoor cameras should have at least an IP66 rating for weather protection
    • Wired or Wireless – Wired cameras are recommended for reliability, but wireless cameras are fine for difficult to reach spots, and when used alongside wired cameras
    • Local storage or Cloud Storage – Local storage is more reliable vs. using only cloud storage in case of an Internet fault.
    • Smart home compatibility – Some cameras can be controlled directly by smart speakers such as Alexa, or work with smart hubs such as Samsung SmartThings
    • One-time purchase or Subscription model – Some cameras require a monthly subscription too unlock the advanced features such as 24/7 recording or person detection

    The Best-Selling Wireless Outdoor Home Security Cameras

    [wpsm_toplist]
    [text-blocks id=”5527″ slug=”earning-disclaimer”]

    Ring Floodlight Camera Motion-Activated HD Security Cam

    [easyazon_image align=”center” height=”500″ identifier=”B0727XJQLD” locale=”US” src=”https://images-na.ssl-images-amazon.com/images/I/61hFMCfS2LL.jpg” tag=”vueville.com-eaz-20″ width=”500″]

    [wpsm_divider top=”20px” bottom=”20px” style=”clear”]

    The Ring family is a mainstay of the security camera market and the Floodlight Cam is the latest addition to the brood. It certainly fills a void in the mainstream market for those who want a hardwired floodlight camera.

    However the camera is Wi-Fi only, and worryingly cloud reliant. It doesn’t even have an SD card slot, is useless during a power cut and so is not recommended by us.
    [wpsm_divider top=”20px” bottom=”20px” style=”clear”][wpsm_column size=”one-half”]Features:

    • 2MP 1080p CMOS image sensor
    • 140° Viewing Angle
    • 2 LEDs floodlight, 1800 lumens
    • WiFi (802.11 b/g/n, 2.4GHz)
    • Weather resistant, -22°F to 120°F (-30°C to 48.5°C)
    • Two-way talk with noise cancellation
    • Remote-activated siren alarm
    • Power – Hardwired to weatherproof electrical boxes (110-240 VAC)
    • Dimensions – 11 in x 8.25 in x 7 in (28 cm x 21 cm x 17.8 cm)
    • Mounting base – Integrated mounting base with adjustable light and cameras angles. Mounts on 4 inch round weatherproof electrical box (not included)

    [/wpsm_column][wpsm_column size=”one-half” position=”last”]Verdict:

    • Local storage available: No
    • Cloud reliant: Yes
    • Battery backup: No
    • Smart home compatibility: Alexa, IFTTT

    [/wpsm_column]

    [easyazon_link identifier=”B0727XJQLD” locale=”US” tag=”vueville.com-eaz-20″]View on Amazon[/easyazon_link]

    Nest Cam Outdoor Security Camera

    [easyazon_image align=”center” height=”500″ identifier=”B01M66NWOQ” locale=”US” src=”https://images-na.ssl-images-amazon.com/images/I/51UFWyUQouL.jpg” tag=”vueville.com-eaz-20″ width=”500″]

    [wpsm_divider top=”20px” bottom=”20px” style=”clear”]

    Another very popular camera making it to no.2 on the list is the Nest Cam Outdoor Security Camera. The positives are 1080p, and 2 way-audio. However 24/7 recording is available only with a paid Nest Aware subscription. Person alerts are a cool feature but again is a premium option.

    However the camera is Wi-Fi only, and once again worryingly cloud reliant and will not work if your Wi-Fi is not working or if your Internet connection is down. It doesn’t have an SD card slot for local storage. Not recommended.
    [wpsm_divider top=”20px” bottom=”20px” style=”clear”][wpsm_column size=”one-half”]Features:

    • 3MP 1/3″ CMOS image sensor, 1080p H.264 encoding
    • 130° Diagonal Viewing Angle
    • Wi-Fi 802.11a/b/g/n, 2.4GHz or 5GHz (WEP, WPA, WPA2 encryption supported)
      Bluetooth Low Energy (BLE)
    • 8 IR LEDs (850nm) with IR cut filter
    • IP65 weather protection, –4 to 104°F (–20 to 40°C)
    • Two-way talk with speaker, microphone
    • Remote-activated siren alarm
    • AC power adaptor or 5V DC, 1.0A camera power input
    • Dimensions – 2.8 in x 2.8 in x 3.5 in

    [/wpsm_column][wpsm_column size=”one-half” position=”last”]Verdict:

    • Local storage available: No
    • Cloud reliant: Yes
    • Battery backup: No
    • Smart home compatibility: Alexa, IFTTT

    [/wpsm_column]

    [easyazon_link identifier=”B01M66NWOQ” locale=”US” tag=”vueville.com-eaz-20″]View on Amazon[/easyazon_link]

    Arlo Pro Wire-Free Security Camera System with Siren (VMS4230)

    [wpsm_column size=”one-half”]
    [easyazon_image align=”left” height=”375″ identifier=”B01LR8PG6Q” locale=”US” src=”https://images-na.ssl-images-amazon.com/images/I/31S8cYvi-uL.jpg” tag=”vueville.com-eaz-20″ width=”500″]
    [/wpsm_column][wpsm_column size=”one-half” position=”last”]
    [easyazon_image align=”right” height=”500″ identifier=”B01LR8PG6Q” locale=”US” src=”https://images-na.ssl-images-amazon.com/images/I/41vcksI2b%2BL.jpg” tag=”vueville.com-eaz-20″ width=”500″]
    [/wpsm_column]
    [wpsm_divider top=”20px” bottom=”20px” style=”clear”]

    The first battery powered security camera on our best-sellers list is the Netgear Arlo Pro system consisting of 2 Arlo Pro cameras and the base station. These cameras were the first real battery powered security cameras to go mainstream.

    The batteries are rechargeable, the video is HD resolution, you get 2-way audio, night vision IR LEDs, and a smart siren. Pay for the monthly subscription and get the latest person alert feature to reduce false motion detection alerts.

    The downsides are that the system is Wi-Fi only and is totally cloud-reliant even though it has an SD card slot for local storage. Netgear has confirmed that access to the cloud is required and that the local storage is not an alternative to cloud storage, its just a dual recording solution in case the Wi-Fi fails or the Internet connection is disrupted. Not recommended.
    [wpsm_divider top=”20px” bottom=”20px” style=”clear”][wpsm_column size=”one-half”]Features:

    • 720p HD video with H.264 encoding
    • 130° Diagonal Viewing Angle
    • Wi-Fi 802.11n, 2.4GHz
    • IR LEDs (850nm) with IR cut filter, 25 feet range
    • IP65 weather protection, -4 to 113°F (-20 to 45°C)
    • Two-way talk with speaker, microphone
    • Remote-activated siren alarm
    • 2440 mAh rechargeable battery
    • Dimensions – 3.1 in x 1.9 in x 2.8 in

    [/wpsm_column][wpsm_column size=”one-half” position=”last”]Verdict:

    • Local storage available: Yes
    • Cloud reliant: Yes
    • Battery backup: Yes
    • Smart home compatibility: Alexa, IFTTT

    [/wpsm_column]

    [easyazon_link identifier=”B01LR8PG6Q” locale=”US” tag=”vueville.com-eaz-20″]View on Amazon[/easyazon_link]

    Yi Wireless Outdoor Security Camera

    [easyazon_image align=”center” height=”500″ identifier=”B01CW49AGG” locale=”US” src=”https://images-na.ssl-images-amazon.com/images/I/418WDE3ImKL.jpg” tag=”vueville.com-eaz-20″ width=”500″]
    [wpsm_divider top=”20px” bottom=”20px” style=”clear”]

    This is the first non-brand camera on our list. Yi is perfect example of the new crop of Chinese manufacturers who have stormed the home security camera market with cut-price products that are not cloud-reliant. You typically get a lot more features than a branded alternative such as a Nest Cam. For example, this Yi camera has an SD card slot for local storage and they don’t force you to pay a monthly subscription for 24/7 recording. You can pay up if you want cloud backup though.

    The main issue we have with the camera is that it is Wi-Fi only (the wired connection is for power only). There is no Ethernet connection available. Also note that this camera is not smart home compatible as it does not support RTSP, nor does it have native support for Alexa. The other worry is about privacy as there are some signs that the camera may be ‘dialing home’. This should be a concern for all Chinese-made cameras in our opinion. So we suggest you look at the Reolink brand for solid, reliable, yet affordable cameras that do not invade your privacy.

    [wpsm_divider top=”20px” bottom=”20px” style=”clear”][wpsm_column size=”one-half”]Features:

      • 1080p HD video with H.264 encoding, 1/2.7″ CMOS sensor
      • 3.9mm lens, 110° Viewing Angle
      • Wi-Fi 802.11 b/g/n, 2.4GHz
      • 12 IR LEDs (850nm) with IR cut filter, 50 feet range
      • IP65 weather protection
      • Built-in deterrent alarm
      • Two-way talk (half-duplex) with speaker, microphone

    [/wpsm_column][wpsm_column size=”one-half” position=”last”]Verdict:

    • Local storage available: Yes
    • Cloud reliant: No
    • Battery backup: No
    • Smart home compatibility: None

    [/wpsm_column]

    [easyazon_link identifier=”B01CW49AGG” locale=”US” tag=”vueville.com-eaz-20″]View on Amazon[/easyazon_link]

    SV3C Outdoor Wireless Bullet Security Camera

    [easyazon_image align=”center” height=”500″ identifier=”B07789DM4R” locale=”US” src=”https://images-na.ssl-images-amazon.com/images/I/41UX0zTnzVL.jpg” tag=”vueville.com-eaz-20″ width=”500″]
    [wpsm_divider top=”20px” bottom=”20px” style=”clear”]

    This SV3C is a bullet style IP camera. I say IP camera because it supports ONVIF and RTSP. It has a 2 Megapixel sensor that lets it record video at 1080p resolution.

    This is a Wi-Fi only camera (the wired connection is for power only). It does have SD card support so you can record motion detection clips locally. While its not a locked down cloud-reliant camera, it still uses P2P by default to allow remote access form outside your home or office. Again I would recommend disabling P2P access to protect your privacy and keep your home network secure. Also note there is no cloud storage option, should you require it.

    [wpsm_divider top=”20px” bottom=”20px” style=”clear”][wpsm_column size=”one-half”]Features:

      • 1080p HD video with H.264 encoding, 1/3″ CMOS sensor
      • 3.6 mm lens, 70° Viewing Angle
      • Wi-Fi 802.11 b/g/n, 2.4GHz
      • Ring-type 36 IR LEDs with IR cut filter, 67 feet night vision range
      • IP66 weather protection, all metal body

    [/wpsm_column][wpsm_column size=”one-half” position=”last”]Verdict:

    • Local storage available: Yes
    • Cloud reliant: No
    • Battery backup: No
    • Smart home compatibility: Yes

    [/wpsm_column]

    [easyazon_link identifier=”B07789DM4R” locale=”US” tag=”vueville.com-eaz-20″]View on Amazon[/easyazon_link]

    Reolink PoE Dome-style Outdoor Security Camera RLC-422W

    [easyazon_image align=”center” height=”500″ identifier=”B076HLT53N” locale=”US” src=”https://images-na.ssl-images-amazon.com/images/I/41aJLUKg9rL.jpg” tag=”vueville.com-eaz-20″ width=”500″]
    [wpsm_divider top=”20px” bottom=”20px” style=”clear”]

    Now we’re talking. This IP camera is from one of my favourite brands – Reolink. This camera gives you room to grow since you can buy an NVR later on if you want 24/7 local recording without any monthly fee. Adding an NVR will also let you add more such cameras from Reolink to your home and be able to watch them on a single screen. This is the most cost-effective way to get into DIY security cameras.

    The resolution is an impressive 5 Megapixels which is frankly overkill when you think about it, that’s a resolution of 3072×1728. Can your monitor even display that high a resolution? So its good you can fall back on standard 1080p resolution should you need to. This RLC-420 also has a built-in mic for audio recording.

    This camera is not cloud reliant, but Reolink does offer it an option. You get a slick yet effective mobile app through which you can check in remotely using P2P or port forwarding. An SD card slot is available, and a 64 GB SD card is provided too. Since it supports ONVIF and RTSP, you can easily integrate them into you smart home automation system. You can also use 3rd party IP camera viewers such as tinyCAM Monitor Pro.

    Check out our hands-on review of the PoE version of this excellent IP camera.

    [wpsm_divider top=”20px” bottom=”20px” style=”clear”][wpsm_column size=”one-half”]Features:

      • 5MP resolution with H.264 encoding, 1/2.9″ CMOS sensor
      • 2.7 – 12 mm lens, 98-33° Viewing Angle
      • Mainstream: 3072×1728, 2592×1944, 2560×1440, 2048×1536, 2304×1296; Substream: 640×360
      • 24 PCS 850nm IR LEDs with IR cut filter, 30 m / 100 feet night vision range
      • Supported protocols: UPNP, RTSP, SMTP, DDNS, FTP, ONVIF, P2P
      • DC12V power supply
      • IEEE 802.11a/b/g/n 2.4/5.0 GHz Wi-Fi
      • IP66 weather protection, all metal body
      • Operating temperature: -10℃ to +55℃ (14°F~131°F), 10% – 90% relative humidity

    [/wpsm_column][wpsm_column size=”one-half” position=”last”]Verdict:

    • Local storage available: Yes
    • Cloud reliant: No
    • Battery backup: No
    • Smart home compatibility: Yes

    [/wpsm_column]

    [wpsm_column size=”one-half”]

    [easyazon_link identifier=”B076HLT53N” locale=”US” tag=”vueville.com-eaz-bnvr17-20″]Check Price on Amazon[/easyazon_link]

    [/wpsm_column]

    [wpsm_column size=”one-half” position=”last”]

    Check Price on Reolink.com

    [/wpsm_column]

    Reolink Argus 2 Rechargeable Battery/Solar-Powered Outdoor Wireless Security Camera

    [easyazon_image align=”center” height=”500″ identifier=”B0786XGM8M” locale=”US” src=”https://images-na.ssl-images-amazon.com/images/I/51iPkUEcRNL.jpg” tag=”vueville.com-eaz-20″ width=”500″]
    [wpsm_divider top=”20px” bottom=”20px” style=”clear”]

    For quite some time, the Netgear Arlo was the only choice of a totally wire-free security camera. It had several issues, namely that it is a Internet & cloud-reliant camera. That didn’t sit well with us here at Vueville.

    So we rejoiced when Reolink launched the super high-quality Argus which was not cloud-reliant and not Internet-reliant. Now Reolink has released the successor Argus 2 which improves upon its predecessor by adding a rechargeable battery and a solar panel accessory.

    There is one clear downside though – there is no way to directly connect this camera to a home automation system because it doesn’t have an API, doesn’t support RTSP, and doesn’t interface natively with any other system. Even IFTTT is not available, not that I recommend it because it is slow and unreliable.

    [wpsm_divider top=”20px” bottom=”20px” style=”clear”][wpsm_column size=”one-half”]Features:

    • 1080p (2 MP) resolution with H.264 encoding, Starlight CMOS sensor
    • Fixed lens, 130° Viewing Angle
    • IR LEDs with IR cut filter, 10 m (33 ft) night vision range
    • High-quality speaker and microphone
    • PIR sensor, adjustable sensitivity up to 9 m (30 ft)
    • 5200 mAh rechargeable battery, 5V 2A DC adaptor, solar panel also
    • IEEE 802.11b/g/n 2.4 GHz Wi-Fi, WEP/WPA-PSK/WPA2-PSK security
    • Recordable audio alerts, email alerts and push notifications
    • Weatherproof
    • Operating temperature: -10° to 55° C (14° to 131° F)
    • 96 x 58 x 59 mm (3.8 x 2.3 x 2.3 in)
    • 2 year limited warranty

    [/wpsm_column][wpsm_column size=”one-half” position=”last”]Verdict:

    • Local storage available: Yes
    • Cloud reliant: No
    • Battery backup: Yes
    • Smart home compatibility: No

    [/wpsm_column]

    [wpsm_column size=”one-half”]

    [easyazon_link identifier=”B0786XGM8M” locale=”US” tag=”vueville.com-eaz-bnvr17-20″]Check Price on Amazon[/easyazon_link]

    [/wpsm_column]

    [wpsm_column size=”one-half” position=”last”]

    Check Price on Reolink.com

    [/wpsm_column]

    Reolink Bullet-style Outdoor Wireless Security Camera RLC-410W

    [easyazon_image align=”center” height=”500″ identifier=”B07DC2GM5K” locale=”US” src=”https://images-na.ssl-images-amazon.com/images/I/61DAQ69S9vL.jpg” tag=”vueville.com-eaz-20″ width=”500″]
    [wpsm_divider top=”20px” bottom=”20px” style=”clear”]

    The Reolink RLC-410W is a more traditional offering compared to the Argus above, but is also wireless. Available in either 4 MP or 5 MP guise, this camera unusually supports the 5GHz Wi-Fi band. We think its because of the high resolutions involved which necessitates higher bandwidth availability which the 5GHz band can provide. But wireless range will suffer as a result. Lower frequency electromagnetic waves (2.4 GHz) penetrate solid walls better than higher frequency waves.

    [wpsm_divider top=”20px” bottom=”20px” style=”clear”][wpsm_column size=”one-half”]Features:

      • 4 MP / 5 MP resolution with H.264 encoding, 1/2.7″ CMOS sensor
      • 4 mm lens, 80° Viewing Angle
      • Main Stream: 2560 x 1920 (5 MP), 2560×1440 (4 MP); Sub Stream: 640 x 480
      • 18x 850nm IR LEDs with IR cut filter, 30 m (100 feet) night vision range
      • 3D Digital Noise Reduction (DNR), Backlight compensation
      • Auto day/night switch-over
      • Built-in microphone
      • On-board storage: SD card
      • Supported protocols: UPNP, RTSP, SMTP, DDNS, FTP, ONVIF, P2P
      • DC 12V power input
      • 10M/100Mbps RJ45 connectivity
      • IP66 weather protection, all metal body
      • Operating temperature: -10℃ to +55℃ (14°F to 131°F), 10% – 90% relative humidity

    [/wpsm_column][wpsm_column size=”one-half” position=”last”]Verdict:

    • Local storage available: Yes
    • Cloud reliant: No
    • Battery backup: No
    • Smart home compatibility: Yes

    [/wpsm_column]

    [wpsm_column size=”one-half”]

    [easyazon_link identifier=”B07DC2GM5K” locale=”US” tag=”vueville.com-eaz-bnvr17-20″]Check Price on Amazon[/easyazon_link]

    [/wpsm_column]

    [wpsm_column size=”one-half” position=”last”]

    Check Price on Reolink.com

    [/wpsm_column]

    Ubiquiti Networks UniFi Video Camera G3 (UVC-G3-AF)

    [easyazon_image align=”center” height=”500″ identifier=”B077QCR56S” locale=”US” src=”https://images-na.ssl-images-amazon.com/images/I/41h8oovQT7L.jpg” tag=”vueville.com-eaz-20″ width=”500″]
    [wpsm_divider top=”20px” bottom=”20px” style=”clear”]

    The UniFi range of security cameras are usually preferred by those who are already aware of Ubiquiti’s stellar reputation in the wireless network arena. These cameras are equally amazing and are really under-rated.

    These cameras used to come only with Ubiquiti’s proprietary Passive 24V PoE, but now Ubiquiti is making the shift to also supporting 802.3af standards compliant PoE. We welcome this move. So when you buy the G3, make sure you get the model with -AF at the end. Suppliers may still have old stock of the non -AF model.

    The UVC-G3-PRO variant adds a powered 3x zoom lens.

    [wpsm_divider top=”20px” bottom=”20px” style=”clear”][wpsm_column size=”one-half”]Features:

    • 4 MP resolution with H.264 encoding, 1/3″ HDR Sensor
    • 3.6 mm lens, f/1.8 lens, 85° Viewing Angle
    • Main Stream: 1920 x 1080
    • IR LEDs with Mechanical IR Cut Filter
    • 802.3af PoE or 24V Passive PoE
    • Built-in microphone
    • Operating Temperature -20 to 50° C (-4 to 122° F), 20% – 90% relative humidity
    • Maximum power consumption 4W

    [/wpsm_column][wpsm_column size=”one-half” position=”last”]Verdict:

    • Local storage available: No
    • Cloud reliant: No
    • Battery backup: No
    • Smart home compatibility: Yes

    [/wpsm_column]

    [easyazon_link identifier=”B077QCR56S” locale=”US” tag=”vueville.com-eaz-20″]View on Amazon[/easyazon_link]

    Zmodo 1080p Outdoor Wireless Home Security Camera (SD-H2921-H)

    [easyazon_image align=”center” height=”500″ identifier=”B07GVB7PDB” locale=”US” src=”https://images-na.ssl-images-amazon.com/images/I/51HqOAhbljL.jpg” tag=”vueville.com-eaz-20″ width=”500″]
    [wpsm_divider top=”20px” bottom=”20px” style=”clear”]

    This Zmodo camera is a bit of a strange one – cloud storage is optional but it has no local storage. It doesn’t support ONVIF or RTSP either. So you are basically forced to buy their optional cloud service. It doesn’t have any way of connecting to home automation systems either.

    We don’t recommend this camera. Not least for the fact that these have extremely poor security and are easily hacked.

    [wpsm_divider top=”20px” bottom=”20px” style=”clear”][wpsm_column size=”one-half”]Features:

    • 1080p resolution
    • 3.6 mm lens, 96° Viewing Angle
    • IR LEDs with IR cut filter, 65 feet night vision range
    • DC 5V 2A power source needed
    • 2.4GHz WPA/WPA2 WiFi
    • Weatherproof, operating temperature: 14°F to 122°F
    • Size: 2.2″ x 2.1″ x 3.4″

    [/wpsm_column][wpsm_column size=”one-half” position=”last”]Verdict:

    • Local storage available: No
    • Cloud reliant: No
    • Battery backup: No
    • Smart home compatibility: No

    [/wpsm_column]

    [easyazon_link identifier=”B07GVB7PDB” locale=”US” tag=”vueville.com-eaz-20″]View on Amazon[/easyazon_link]

    Amcrest Outdoor Wireless Home Security Camera (IP3M-943B)

    [easyazon_image align=”center” height=”500″ identifier=”B01I01QLTE” locale=”US” src=”https://images-na.ssl-images-amazon.com/images/I/41OAjECh6sL.jpg” tag=”vueville.com-eaz-20″ width=”472″]
    [wpsm_divider top=”20px” bottom=”20px” style=”clear”]

    The 3 Megapixel Amcrest IP3M-943B is a worthy alternative to Reolink’s higher resolution RLC-410W. This Amcrest camera has an Ethernet port in addition to Wi-Fi. So you always have a reliable way of connecting your camera in case Wi-Fi is temporarily unavailable. The lens is wide-angle, there’s onboard SD card storage, the camera supports ONVIF, RTSP and has an API.

    [wpsm_divider top=”20px” bottom=”20px” style=”clear”][wpsm_column size=”one-half”]Features:

      • 3MP resolution with H.264/MJPEG dual-stream encoding, 1/3″ CMOS sensor
      • 4 mm lens, 80° Viewing Angle
      • Main Stream: 2304 × 1296 / 1920 × 1080 / 1280 x 720; Sub Stream: 640 x 480
      • IR LEDs with IR cut filter, 98 feet night vision range
      • Supported protocols: UPNP, RTSP, SMTP, DDNS, FTP, ONVIF, P2P
      • DC12V
      • 10M/100Mbps RJ45 connectivity
      • IP67 weather protection, all metal body
      • Operating temperature: -30℃ to +50℃, <95% relative humidity

    [/wpsm_column][wpsm_column size=”one-half” position=”last”]Verdict:

    • Local storage available: Yes
    • Cloud reliant: No
    • Battery backup: No
    • Smart home compatibility: Yes

    [/wpsm_column]

    [easyazon_link identifier=”B01I01QLTE” locale=”US” tag=”vueville.com-eaz-20″]View on Amazon[/easyazon_link]

    Wansview 1080p Wireless Home Security Camera

    [easyazon_image align=”center” height=”500″ identifier=”B01J0V6C2Y” locale=”US” src=”https://images-na.ssl-images-amazon.com/images/I/41Bd5gfx1ZL.jpg” tag=”vueville.com-eaz-20″ width=”500″]

    We have a confession to make – it was the 720p version that we found on the top-selers list. But 720p is just too low a resolution for a modern security camera, and we recommend at least 1080p resolution (2 Megapixel). Considering how affordable 1080p cameras are, we were really surprised to see this model on the top-sellers list. If you have to buy a Wansview, please do yourself a giant favour and get the 1080p version.

    The camera supports ONVIF and RTSP but has no local storage, so you will have to rely on an NVR, computer or mobile app for recording motion detection clips.

    [wpsm_divider top=”20px” bottom=”20px” style=”clear”][wpsm_column size=”one-half”]Features:

    • 1080p resolution
    • 6 mm lens, 65° Viewing Angle
    • 36 PCS IR LEDs with IR cut filter, 60 feet night vision range
    • Main AC power source needed
    • 2.4GHz WPA/WPA2 WiFi
    • IP 66 weatherproof, operating temperature: 14°F to 122°F
    • ONVIF & RTSP support

    [/wpsm_column][wpsm_column size=”one-half” position=”last”]Verdict:

    • Local storage available: No
    • Cloud reliant: No
    • Battery backup: No
    • Smart home compatibility: Yes

    [/wpsm_column]

    [easyazon_link identifier=”B01J0V6C2Y” locale=”US” tag=”vueville.com-eaz-20″]View on Amazon[/easyazon_link]

    HiKam A7 WiFi Wireless Outdoor Security Camera

    [easyazon_image align=”center” height=”500″ identifier=”B075NYPCN3″ locale=”US” src=”https://images-na.ssl-images-amazon.com/images/I/41pgnUucNjL.jpg” tag=”vueville.com-eaz-20″ width=”474″]
    [wpsm_divider top=”20px” bottom=”20px” style=”clear”]

    We have not come across this brand before, not a huge surprise because we stick to the tried and trusted brands. The Hikam A7 is a feature-rich camera – it supports Alexa natively and has ‘AI-powered’ person detection. Adding AI to the features list is the latest trend, and we are generally skeptical of ‘AI-powered’ claims.

    [wpsm_divider top=”20px” bottom=”20px” style=”clear”][wpsm_column size=”one-half”]Features:

    • 2MP resolution with H.264 encoding, 1/3″ CMOS sensor
    • 3.6 mm lens, 80° Viewing Angle
    • IR LEDs with IR cut filter, 50 feet night vision range
    • Supported protocols: UPNP, RTSP, SMTP, DDNS, FTP, ONVIF, P2P
    • Motion Zone + Person/Human Detection + Motion Detection
    • 10M/100Mbps RJ45 connectivity
    • IP66 weather protection, all metal body
    • Built-in microphone
    • Built-in SD card slot
    • 12V 1A power input, UL listed adapter, 10 ft power cable
    • Operating temperature: -10℃ to +55℃ (14°F~131°F), 10% – 90% relative humidity

    [/wpsm_column][wpsm_column size=”one-half” position=”last”]Verdict:

    • Local storage available: Yes
    • Cloud reliant: No
    • Battery backup: No
    • Smart home compatibility: Yes

    [/wpsm_column]

    [easyazon_link identifier=”B075NYPCN3″ locale=”US” tag=”vueville.com-eaz-20″]View on Amazon[/easyazon_link]

    Netvue Vigil 1080p Bullet Camera

    [easyazon_image align=”center” height=”500″ identifier=”B07B9WNBBT” locale=”US” src=”https://images-na.ssl-images-amazon.com/images/I/51ys5OKYcqL.jpg” tag=”vueville.com-eaz-20″ width=”500″]
    [wpsm_divider top=”20px” bottom=”20px” style=”clear”]

    The latest trend among security cameras seems to be “Works with Alexa”. One can see the attraction – control your security camera with your voice. But that’s just the thing, security cameras are not devices you want to actively control. They should be set up once and then do their job 24/7 whether that be motion detection recording or 24/7 continuous recording to an NVR or DIY NAS NVR.

    However this camera does not currently support ONVIF and RTSP – so its not going to work with any NVR or non-Alexa smart home system.

    [wpsm_divider top=”20px” bottom=”20px” style=”clear”][wpsm_column size=”one-half”]Features:

    • 2MP resolution with H.264 encoding
    • 3.6 mm lens, 110° Viewing Angle
    • IR LEDs with IR cut filter, 60 feet night vision range
    • 10M/100Mbps RJ45 connectivity
    • Built-in microphone and speakrer
    • Built-in SD card slot
    • 12V 1A power input
    • IP66 weather protection
    • Operating temperature: -4°F to 122°F (-20°C to 50°C)

    [/wpsm_column][wpsm_column size=”one-half” position=”last”]Verdict:

    • Local storage available: Yes
    • Cloud reliant: No
    • Battery backup: No
    • Smart home compatibility: Yes

    [/wpsm_column]

    [easyazon_link identifier=”B07B9WNBBT” locale=”US” tag=”vueville.com-eaz-20″]View on Amazon[/easyazon_link]

    Foscam 1080p Outdoor Wi-Fi Security Camera (FI9900P)

    [easyazon_image align=”center” height=”500″ identifier=”B011US2ADK” locale=”US” src=”https://images-na.ssl-images-amazon.com/images/I/41HFoQsi3QL.jpg” tag=”vueville.com-eaz-20″ width=”500″]
    [wpsm_divider top=”20px” bottom=”20px” style=”clear”]

    Once upon a time, the go-to brand for DIY home security cameras was Foscam. But their hegemony was challenged when one of their distributors spun off to create the challenger named Amcrest. They managed to outclass Foscam in every way and dominated the market for some time. Then Reolink came along and undercut Amcrest in price. So there’s a happy balance but with Foscam nearly pushed out of the market.

    They are still around though and seem to have upped their game. The FI9900P has been well-received and is a brisk seller. It has a maximum 1080p resolution, an SD card slot, and supports ONVIF and RTSP.

    [wpsm_divider top=”20px” bottom=”20px” style=”clear”][wpsm_column size=”one-half”]Features:

    • 2MP resolution with H.264 encoding, 1/2.7″ CMOS sensor
    • 2.8 mm lens, 90° Viewing Angle
    • 30 PCS IR LEDs with IR cut filter, 20 metres night vision range
    • Supported protocols: UPNP, RTSP, SMTP, DDNS, FTP, ONVIF, P2P
    • DC 12 V, 1 Amp power source
    • 10M/100Mbps RJ45 connectivity
    • IP66 weather protection, all metal body
    • Operating temperature: -20°C~ 60°C (4°F ~ 140°F), 0-90% relative humidity

    [/wpsm_column][wpsm_column size=”one-half” position=”last”]Verdict:

    • Local storage available: Yes
    • Cloud reliant: No
    • Battery backup: No
    • Smart home compatibility: Yes

    [/wpsm_column]

    [easyazon_link identifier=”B011US2ADK” locale=”US” tag=”vueville.com-eaz-20″]View on Amazon[/easyazon_link]

    Conclusion

    Top-sellers are not always the best, some of them are heavily crippled without a costly monthly subscription. That’s unfortunately the new business model that some companies have adopted. However with some research and the information on this website, you can make an informed decision. Remember local processing and local data storage are the key to a reliable security camera and protecting your family’s privacy.

    Check out the following posts to see our recommendations for the best security cameras that do not require a monthly subscription:

  • 2018’s Safest States to Live In – Crime Heat Map of America

    2018’s Safest States to Live In – Crime Heat Map of America

    Gun crime, shootings, murders, assault… it may seem that the whole country is sinking in crime these days. But that’s not the case and there are still beautiful and safe places that you can choose to live in. How do we know? Because we did the math.

    We wanted to find out for ourselves how safe or dangerous each state in the US is. So we crunched the latest data available to paint a complete picture of crime in America. To ensure a comprehensive ranking that covers all aspects of serious crime as defined by the FBI, we looked at statistics for homicide, murder, manslaughter, sexual assault, robbery, aggravated assault, burglary, and motor vehicle crime.

    Here’s a visual, easy-to-read and up-to-date crime heat map of America. More pretty infographics and tables can also be found below.

    The Safest States to Live In - Crime Heat Map of America - VueVille
    Click to enlarge

    [wpsm_stickypanel][contents h2][/wpsm_stickypanel]

    Main Findings

    The 5 safest states are:

    1. New Hampshire
    2. Maine
    3. New Jersey
    4. Vermont
    5. New York

    The 5 most unsafe states are:

    1. New Mexico
    2. Alaska
    3. Louisiana
    4. Arkansas
    5. Washington

    Insights:

    • New Hampshire is the safest state in the US overall, coming in 3rd for least violent crime, and 1st for least property crime.
    • However, New Hampshire has a surprisingly poor ranking of just 32 for rapes.
    • Ohio best represents the average crime rate (2898 per 100,000 people).
    • New Mexico is the most unsafe state in the US, coming in second-last for violent crime and last for property crime. Only Alaska beat New Mexico in violent crime.
    • New Mexico also tops the charts for both burglary and vehicle crime.
    • Louisiana has the highest murder rate, whereas New Hampshire has the lowest.
    • Alaska is the most unsafe state for women, whereas New Jersey is the safest for women.
    • Alaska tops the charts once again for aggravated assault, whereas Maine is the least violent.
    • Robberies are 21 times more frequent in Nevada than Wyoming which has the lowest robberies per capita (per person).

    Safest States to live in – Ranking

    Please note that the overall ranking is based on the total number of crimes per capita (per person). So for example New Hampshire might have worse violent crime than Maine, but overall the crime rate per capita is still lower than that of Maine’s.

    [table id=49 responsive=scroll /]

    Violent Crime

    Violent crime includes, murder, crimes against women, robbery and aggravated assault.

    Murder

    Safest States to Live In - Murder Rate per Capita in the USA - VueVille

    Crimes against Women (Rape)

    Safest States to Live In - Rapes per Capita in the USA - VueVille

    Robbery

    Safest States to Live In - Robbery per Capita in the USA - VueVille

    Aggravated Assault

    Safest States to Live In - Aggravated Assault per Capita in the USA - VueVille

    Property Crime

    Property crime includes burglary/theft and motor vehicle thefts.

    Burglary/Theft

    Safest States to Live In - Burglary per Capita in the USA - VueVille

    Motor vehicle theft

    Safest States to Live In - Motor Vehicle Theft per Capita in the USA - VueVille

    Source and Methodology

    Our source for this analysis is the 2016 serious crimes data published by the FBI Uniform Crime Reporting (UCR) Program.

    In the info-graphics above, we combined burglary and larceny-theft together under the single heading of burglary/theft as they are very similar.

    Conclusion

    Crime rates vary wildly across the country as our analysis shows above. But armed with the facts, you can make an informed choice about how to best protect yourself and your family.

    Whether you are living in one of the top or bottom-ranked states, its always good to take proper security measures such as a burglar alarm and security camera system.

  • How-to: Build a simple Z-Wave heating system with Vera and PLEG

    How-to: Build a simple Z-Wave heating system with Vera and PLEG

    I cut the cord over a year ago, so I don’t watch much of ‘linear’ TV. But back when I used to, there was a British Gas ad that was always on. It had a catchy jingle and went something like “with Hive you can control your heating from your phone”. The product being advertised by British Gas was the Hive automated heating system, and the message was what if you could adjust your thermostat when you are not at home? Of course the cost had to be an expensive monthly subscription on top of the very expensive hardware you had to buy from British Gas.

    One of my core principles that I have tried to imbibe in this blog is that I do not like to pay monthly subscription fees. There’s simply no need! So I set out to build my own home automation system which could do not just home heating but a whole lot more! So today let’s see how I automated the heating part of my system.

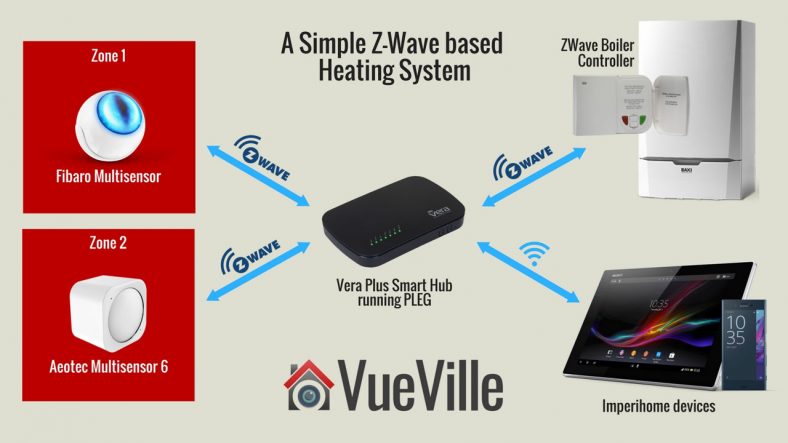
    Simple Vera and PLEG Heating System - VueVille

    [wpsm_stickypanel][contents h2][/wpsm_stickypanel]

    [wpsm_toplist]

    Zone-based heating methods

    The main selling point of plug-n-play heating systems like Hive is that you can create zones in your home and selectively control the temperature in each zone. So I set out to replicate this. There are two ways you can do this:

    1. Z-Wave Temperature Sensor method – Z-Wave sensors are used to create zones. While this method is cheaper and easier to implement, the downside is that you cannot control individual radiators. When one zone of your home needs heat, all the zones will get heated (regardless of their actual call for heat status). This is how it works: you set the desired temperature ‘set point’ on your Z-Wave boiler controller. Then the Vera Plus will turn the boiler on if the temperature reported by any one of your Z-Wave sensors is less than the set point. When all the Z-Wave sensors report a temperature higher than the set point, the Vera Plus switches off your boiler. So each room with a Z-Wave sensor in effect becomes a zone.
    2. Z-Wave TRV method – Z-Wave thermostatic radiator valve (TRV) on each radiator are used to create zones. The advantage here is that you can set different set point temperatures for different zones. This is how it works: each radiator equipped with a TRV take the place of the sensor above. So each room controlled by a TRV in effect can be made a zone. You could also group TRVs together to create a zone if you have a large room with multiple radiators. So you set the desired temperature set point for each zone, on the Vera Plus. Let’s consider one of the multiple zones that will exist, and lets assume this zone has only one radiator with a TRV. If the TRV reports a temperature lesser than the set point for that zone, the TRV will send a call for heat to the Vera Plus and open the radiator valve in expectation of hot water from the boiler. The Vera Plus will then turn on your boiler. Assuming all the other TRVs are not sending a call for heat and remain closed, only the zone that needs heating is heated.

    I went with the sensor-based method because its more wallet-friendly and easier to set up for beginners. You can always add TRVs later on to upgrade to the second method. I divided my home into two zones – the ground floor and the first floor. Since the ground floor is pretty much open plan, a single Z-Wave temperature sensor worked well enough as the goal was to heat the whole ground floor up to a particular temperature.

    On the first floor, I use a single temperature sensor placed in the master bedroom. This means the actual temperature of the other two rooms on the first floor are irrelevant to my heating system. One of them is my office which is usually a bit warmer, so I turned the manual radiator valve down a bit. The guest bedroom is rarely used so I just left the radiator valve in that room at a minimum so as not to waste any heat.

    Equipment needed

    • Vera Plus or Vera Edge or Vera Secure running the UI7 OS – read my Vera Plus review here.
    • A temperature sensor per zone you want to create, e.g. Fibaro or Aeotec Multisensors.
      • In the steps below, the Fibaro Multisensor is used in Zone1 and Aeotec Multisensor 6 is used in Zone2.
    • Optional: A smart phone or tablet to control your heating system and make voice announcements using Imperihome.

    Software needed

    The default Vera software is good for simple scenes but for something more complex such as an automated heating system, you need a plugin called Program Logic Event Generator or PLEG for short. There is a 30 day free trial but its easily the best plugin I have seen for the Vera, so I strongly recommend paying the very fair one-off license fee of $5.50 + tax.

    You will also need the excellent free Multiswitch plugin to create virtual switches that can be used by you and PLEG.

    If you want to control your Vera from a smartphone or a tablet, get the Imperihome Pro app (paid app).

    Setting up the MultiSwitch plugin

    Install the Multiswitch app from the Vera dashboard by going to Apps > Install Apps and search for Multiswitch. Once you install the app and enable it, you can rename the switches you need.

    Vera Plus - Multiswitch - VueVille

    Don’t worry the name you use doesn’t matter as we will be referring to each individual switch using its technical name (Status1, Status 2 etc.).

    Setting up Imperihome Pro

    Imperihome Pro is great for powering a home automation tablet and for voice announcements for your heating system. For example when the house gets too cold and the boiler is turned on automatically, I have added an action to make my tablet announce that the boiler is being turned on.

    Simply follow the steps outlined using the guide here to:

    1. Install Imperihome Pro on your tablet or smartphone and activate the API http server.
    2. Install the Imperihome plugin on your Vera.

    You can then include these devices in your PLEG actions and switch to different pages and use Text To Speech (TTS) to make voice announcements.

    Setting up PLEG

    PLEG requires the Program Logic Core app to work, so install that first under Apps>Install Apps. Then search for and install PLEG the same way. Once the PLEG device has been added to your dashboard, open it and click Edit. This will open the PLEG interface. Under Editor, click Register and click on the Registration portal link to purchase a licence. Pop your licence into the PLEG registration screen and activate your copy of PLEG. Restart your VERA before you proceed.

    PLEG uses logic inputs, conditions and actions to work:

    • Logic Inputs which can be evaluated:
      • House mode: These can reflect Vera’s default house modes (Home, Away, Night or Vacation Mode) or you can create others.
      • Device property: This is a measurement or state of a device, say the ambient temperature reported by a Fibaro Sensor in a zone.
      • Device trigger: This could be something like humidity hits 70% or motion is detected.
      • Schedules & timers: This lets you perform actions at specified intervals or times.
      • Counters: This lets you keep track of events that are repetitive in nature.
    • Conditions need to become true for an action to fire.
    • Actions fire when specified condition(s) become true.

    For our simple heating system, we will make use of device properties, conditions and actions.

    House Modes

    I do not want my automated heating system to function when I am away or on vacation, so I have to make PLEG aware of the current Vera house mode. This can be achieved by creating PLEG house modes to reflect the current Vera mode.

    Create the following modes:

    • M_HomeMode
    • M_AwayMode
    • M_NightMode
    • M_VacationMode

    Now your House modes screen should look like this (click to enlarge):

    Vera Plus - PLEG - HouseModes - VueVille

    Device Properties

    Create the following properties:

    • P_MS_AutoCHControl: This is one of the multiswitches and acts like a master switch that lets us turn our entire PLEG heating system on or off easily.
    • P_BOILER_CH_MODE: This property reflects the current mode of the Central Heating zone of the boiler controller (not to be confused with the physical zones for our heating system). It will be ‘Off’ if the boiler controller is off and ‘HEAT’ if the boiler controller is on.
    • P_CH_SetPoint: This property will reflect the set point of the Central Heating zone of the boiler controller (not to be confused with the physical zones for our heating system).
    • P_MS_CallforHeat: This is one of the multiswitches and will show the current overall call for heat status (this switch also drives the animated flame icon in Imperihome)
    • P_ZONE1_Temp: This property reflects the current temperature reported by the sensor in Zone 1
    • P_ZONE2_Temp: This property reflects the current temperature reported by the sensor in Zone 2

    Now your screen should look like similar to this – click to enlarge (ignore the properties not listed above – they are for my automatic climate control system):

    Vera Plus - PLEG - Properties - VueVille

    Device Schedules

    My Secure 2-channel Boiler Controller has an irritating ‘safety feature’ of shutting down the boiler if it doesn’t hear from the Vera roughly every 20 minutes. So I created a schedule that repeats the current boiler operation instruction every 15 minutes. You may not need this schedule and it is not required for the rest of the logic to work if you have a different boiler controller.

    Vera Plus - PLEG - Schedules - VueVille

    Your screen should look like similar to this – click to enlarge:

    Conditions

    Create the following conditions:
    [table id=40 responsive=scroll /]

    Vera Plus - PLEG - Conditions - VueVille

    Now your screen should look like similar to this – click to enlarge (ignore the conditions not listed above – they are for my automatic climate control system):

    Actions

    PLEG actions don’t have their own names but take the name of the condition that triggers them. Create the following actions, in the following order (they will execute in the order they are created):
    [table id=41 responsive=scroll /]

    Vera Plus - PLEG - Logic Actions - VueVille

    Now your screen should look like similar to this – click to enlarge (ignore the actions not listed above – they are for my automatic climate control system):

    Here’s an example of how to set up one of the actions above:

    Vera Plus - PLEG - LogicActions - Example - VueVille

    So how does it actually work?

    So how do all these properties, conditions and actions work together? If you want to keep it simple and are not too bothered about the details, just check out the flowchart I made below – click to enlarge:

    Simple Z-Wave based Heating System - PLEG Logic - VueVille

    Intrigued? Want to know how it actually works? Okay let’s do this. Let’s start from the end action and work backwards.

    You see the boiler turns on by itself. How did that happen? The boiler controller gets the command to turn on the boiler when action C_Any_CallforHeat fires. The action fires when the condition C_Any_CallforHeat becomes true. The condition C_Any_CallforHeat becomes true when the expression C_MS_AutoCHControl AND C_MS_CallforHeat AND (M_HomeMode OR M_NightMode) returns a value of TRUE. This means each one of the terms in that expression returns a value of TRUE. Let’s break this one down:

    • C_MS_AutoCHControl: Becomes TRUE when our heating system ‘master switch’ (one of the switches of the multiswitch plugin).
    • M_HomeMode OR M_NightMode: I want the heating system to work only if the VERA house mode is one of these, meaning somebody is at home.
    • C_MS_CallforHeat: Becomes TRUE when P_MS_CallforHeat == 1. P_MS_CallforHeat is another one of our multiswitch switches. So when does P_MS_CallforHeat become TRUE? When another condition sets it to TRUE. Looking at the actions list, we can see that P_MS_CallforHeat is set to TRUE when either C_Zone1_CallforHeat or C_Zone2_CallforHeat are TRUE. So if there is a call for heat from either Zone1 or Zone2, P_MS_CallforHeat is set to TRUE, C_MS_CallforHeat then becomes TRUE, and if the master switch is on and somebody is at home, the boiler will turn on!
      • Action C_Zone1_CallforHeat fires when condition C_Zone1_CallforHeat becomes TRUE. Condition C_Zone1_CallforHeat becomes TRUE when (P_ZONE1_Temp < P_CH_SetPoint) i.e. when the ambient in Zone 1 (P_ZONE1_Temp) is less than the boiler controller set point P_CH_SetPoint.
      • Action C_Zone2_CallforHeat fires when condition C_Zone2_CallforHeat becomes TRUE. Condition C_Zone2_CallforHeat becomes TRUE when (P_ZONE2_Temp < P_CH_SetPoint) i.e. when the ambient in Zone 2 (P_ZONE2_Temp) is less than the boiler controller set point P_CH_SetPoint.

    After some time you are feeling all warm and toasty and you hear your Imperihome tablet announcing that its too warm and the boiler turns off by itself. How did that happen? The boiler controller gets the command to turn off the boiler when action C_Boiler_CH_Off fires. Action C_Boiler_CH_Off fires when condition C_Boiler_CH_Off becomes TRUE. Condition C_Boiler_CH_Off becomes TRUE when P_MS_CallforHeat == 0 i.e. property P_MS_CallforHeat is FALSE. P_MS_CallforHeat as we saw above is a switch that is flipped on if there is a call for heat from any zone. Conversely there is an action C_All_StopCallsforHeat which sets P_MS_CallforHeat to FALSE. Action C_All_StopCallsforHeat fires when condition C_All_StopCallsforHeat becomes TRUE. Condition C_All_StopCallsforHeat becomes TRUE when the expression C_Zone2_StopCallingForHeat AND C_Zone1_StopCallingForHeat returns TRUE, i.e. when both zones stop calling for heat.

    • C_Zone1_StopCallingForHeat: This condition becomes TRUE when (P_ZONE1_Temp > P_CH_SetPoint), i.e. the ambient temperature in Zone1 is above the boiler controller set point.
    • C_Zone2_StopCallingForHeat: This condition becomes TRUE when (P_ZONE2_Temp > P_CH_SetPoint), i.e. the ambient temperature in Zone2 is above the boiler controller set point.

    Final Steps

    Once you have loaded in all the settings I have listed above in the PLEG Editor, go to Editor Option > Reload LUA. Then you can close the editor. Wait a few minutes for the Vera to reload the LUA engine and your new automated heating system is now up and running.

    What next? Monitor your system to ensure its working as expected, its easy to make mistakes in programming PLEG so don’t be surprised if everything doesn’t go as planned the first time round.

    I hope this guide helps you in setting up your own fully automated Z-Wave heating system using Vera and PLEG. Please leave a comment or feedback below!

  • How-to: Eliminate false motion detection alerts on your Hikvision IP camera or NVR

    How-to: Eliminate false motion detection alerts on your Hikvision IP camera or NVR

    I have been running my DIY home security camera system with a slew of Hikvison cameras such as the DS-2CD2042WD-I for a couple of years now. The biggest challenge I faced when I set up my system was the incessant false alerts shot off by the cameras whenever leaves moved because of the wind or the sun played hide and seek with the clouds throwing shadows here and there.

    But I soon discovered a few tricks to stop almost all false alerts using Hikvision’s built-in smart events. In this tutorial, I will show you how to set them up properly.

    [wpsm_titlebox title=”Contents” style=”main”][contents h2][/wpsm_titlebox]

    What’s wrong with basic motion detection?

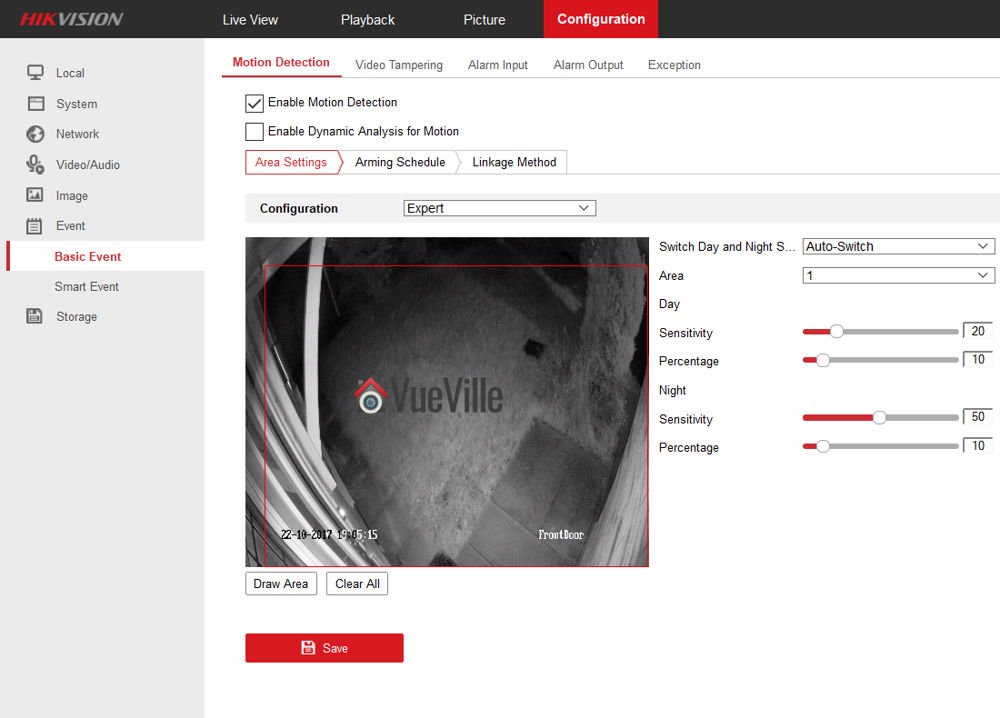
    When you are just starting out the ‘basic event’ feature provided by Hikvision may seem to be sufficient. After all it lets you set the sensitivity level right? And on ‘expert mode’ you can set different settings for day time and night time and even the size of the object to be detected right?

    Basic Event - How to eliminate false motion detection alerts on your Hikvision IP camera or NVR - VueVille
    I tried the Expert mode of the ‘Basic Event’ motion detection – still got tons of false alerts

    Well the basic motion detection event is just that, basic. You can draw an area to monitor and set the sensitivity, and even set different sensitivities for day or night, but you got to remember that all the camera does is use a software algorithm to compare every frame to the previous one and see what has changed. The same settings that worked during the day won’t work and if you explored the ‘expert mode’ of the ‘basic event’, you may have figured out that you could reduce the sensitivity just during the night. But you know what? Even this degree of control and crafty zone drawing skills aren’t going to help in reality. You are still going to get tons of false alerts whenever a fly or insect wanders into the path of your camera’s onboard IR lamps.

    So what’s the solution?

    Let me show you how I have virtually eliminated false alerts from my Hikvision cameras while not missing a single important motion event that I need to be alerted to: Use Advanced Motion Detection events (Hikvision calls this Smart Events) such as Intrusion Detection and Line Crossing Detection.

    Before we proceed, since most modern browsers such as Chrome, Firefox and Microsoft Edge stopped supporting the NPAPI plugin that Hikvision relies on, I recommend the Pale Moon browser which will let you access your Hikvision settings page.

    Most Hikvision NVRs support these smart events, so you could use the techniques I describe below to achieve the same amazing results.

    Intrusion Detection

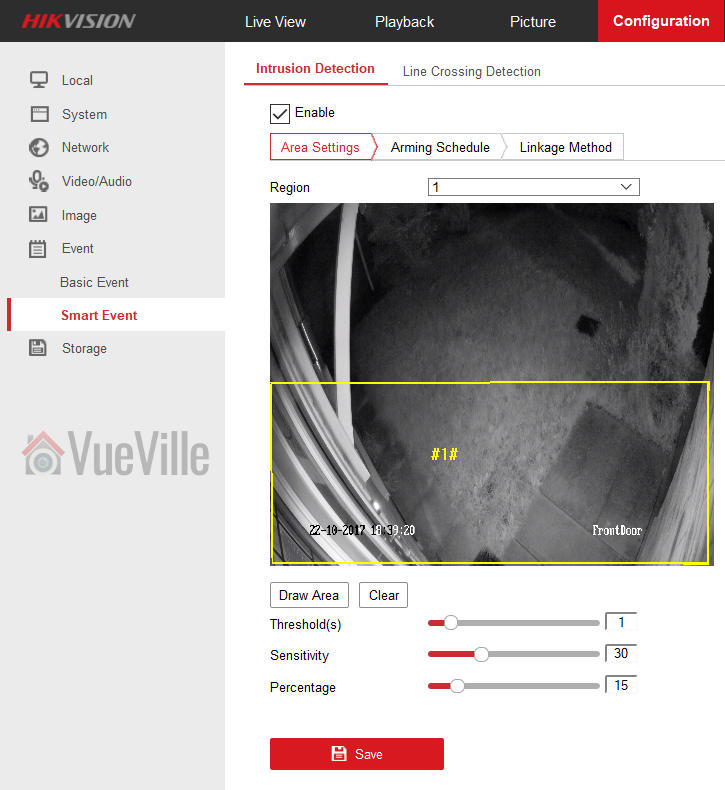
    The idea behind intrusion detection is that a real intruder would move towards and enter specific areas in your scene. Let’s look at an example below from my front door camera, a DS-2CD2542FWD-IWS.

    I only need an email notification from the camera when a person is at the door. When I tried using the basic motion detection event, shadows of clouds passing by would keep triggering the event and send me false positives.

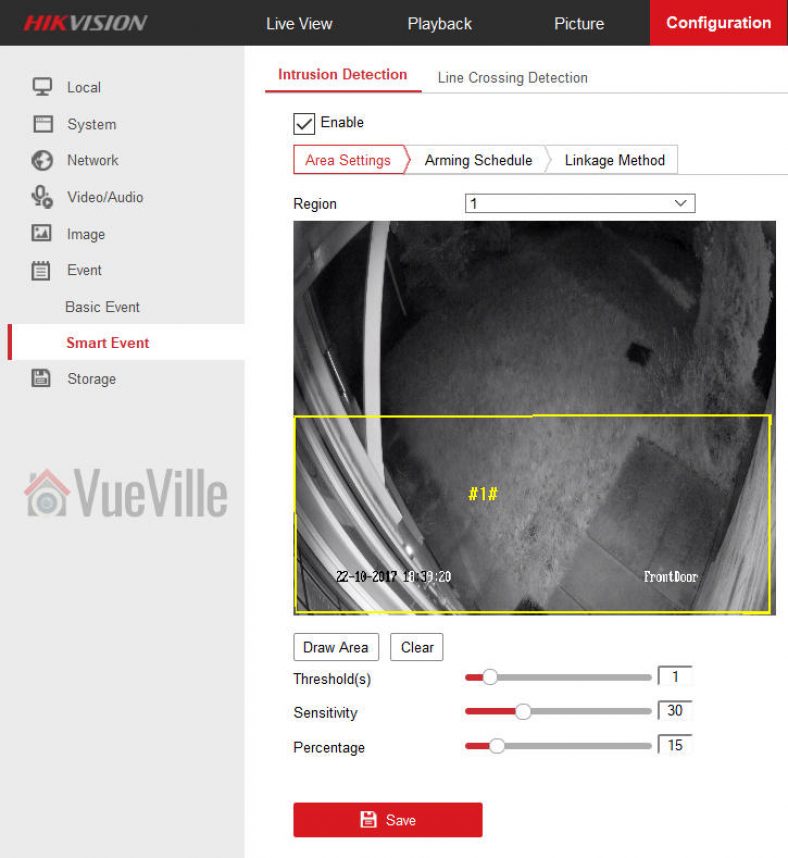
    Intrusion Detection - How to eliminate false motion detection alerts on your Hikvision IP camera or NVR - VueVille

    So what did I do? I needed to define 4 different parameters: the detection area itself, the dwell time in seconds (threshold), sensitivity, and the size of the object defined as a percentage of the total detection area. Whew, that sounds complicated right? How are you supposed to figure out all these things? Chill, I found an easy way of doing this.

    I had the basic event defined for a few days and this gave me a large collection of motion triggered recordings from this camera. I separated these into two categories – the ones with people in them and the ones that were false positives.

    I first looked at the genuine alerts, the ones that were triggered by people, to see what they did and where they stood in the scene. Watching closely where they stood and how they approached the door helped me define the smallest area I needed to draw. This is in the yellow box marked as area 1 (#1#) in the screenshot above. Visually judging how large the area occupied by the person in the scene compared to the yellow boxed area gave me a rough percentage value to use. If you set the percentage too low, you are going to get alerts of animals like cats too. Unless you want to see which of your neighbours’ pet cats is leaving a gift package at your door, don’t set this too low!

    Then I looked at the motion triggered clips that did not have people in them told me that most of the false alerts were triggered by insects and headlights that crossed the scene very quickly (less than 1 sec). So that gave me the threshold.

    That leaves one more setting to define – sensitivity. This is probably the toughest one as its not something you can calculate – you just got to use good ol’ trial and error here. 30 is what I recommend as a starting point.

    Line Crossing Detection

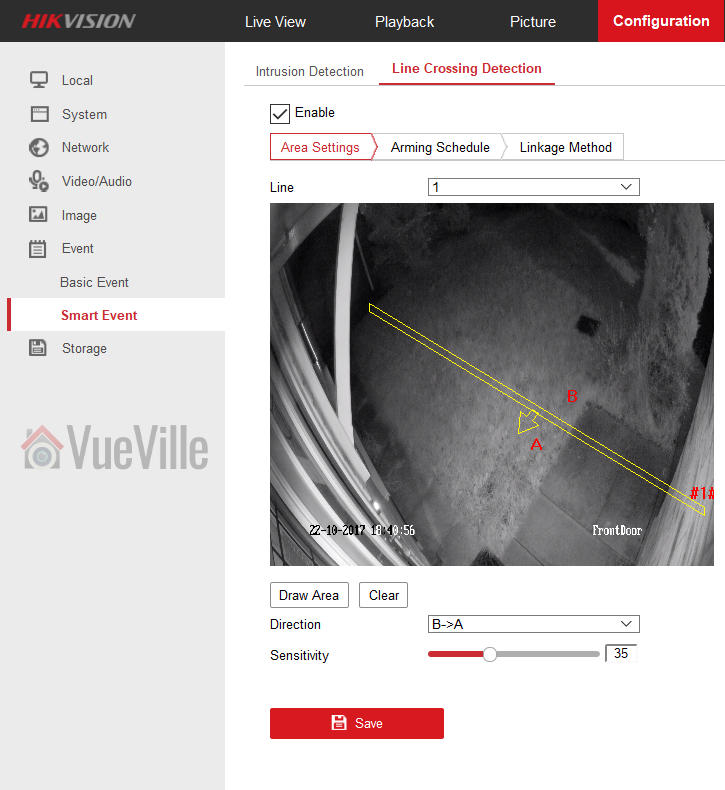
    Okay so if intrusion detection is so great, why do we need another smart event type? Well there may occur situations where a person (read perpetrator) darts into your camera’s scene, does the deed and runs away quicker in less than your dwell period or ‘threshold’ setting. Like when a kid decides to ring your bell and run away. Intrusion detection is going to fail here. That’s where line crossing detection comes in.

    Not only can you define the direction in which the object (perp) needs to enter your scene to trigger the alert, but you can also specify the sensitivity. When you get really specific with your motion detection types, what happens is that you are defining a narrow set of conditions that need to be satisfied to trigger an alert. That’s why the line crossing alert works so well.

    Line Crossing Detection - How to eliminate false motion detection alerts on your Hikvision IP camera or NVR - VueVille

    Conclusion

    Using a combination of advanced motion detection events such as intrusion detection and line crossing detection is very powerful and will drastically cut down, if not eliminate the plague of false alerts from your Hikvision cameras or NVR.

  • How we built our DIY Smart Home Automation System

    How we built our DIY Smart Home Automation System

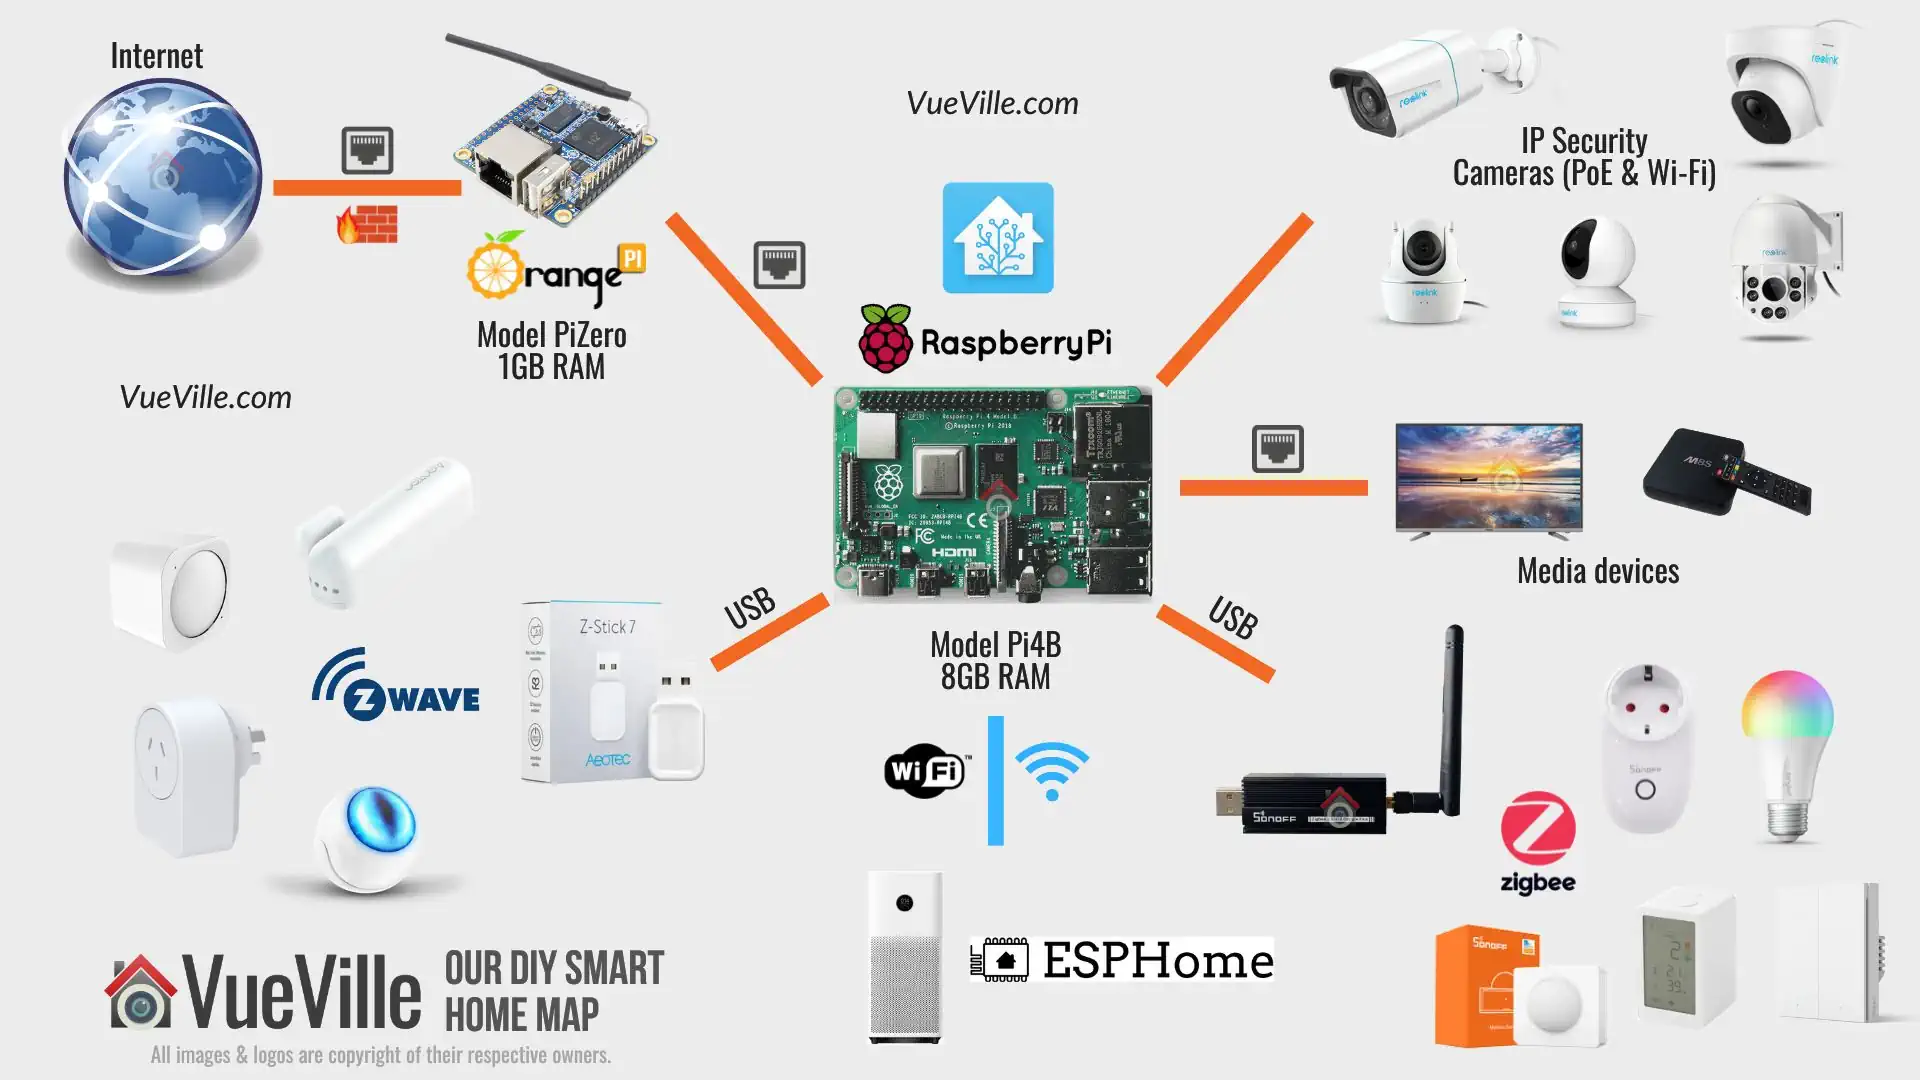
    How we built our DIY Smart Home - 2023 Network Map - VueVille
    Our DIY Smart Home in 2025

    I often get questions from friends, family and colleagues about our cloud-free DIY Smart Home and how they can also get something like it. I have already written a detailed technology guide to home automation but this blog post is about how I put my smart home together and how you can do the same without breaking the bank.

    Home automation is so affordable and accessible these days. Gone are the days when you had to shell out thousands for your own smart home, and even then the end result was far from impressive! You can get fully wireless smart home lighting or security kits for $100-$200 today, instead of the thousands it used to cost! And you don’t need an army of technicians to install it either.

    The focus of my blog is DIY smart home solutions, and you can get your smart home set up yourself for the most part – but you may need a certified electrician if you are not confident enough or your country’s codes require you to use one.

    [wpsm_titlebox title=”Contents” style=”main”][contents h2 h3][/wpsm_titlebox]

    A quick note: As an Amazon Associate I earn from qualifying purchases. This post contains affiliate link(s). An affiliate link means I may earn advertising or referral fees if you make a purchase through my link, at no extra cost to you.

    What does my Home Automation System do?

    When I first started documenting my smart home adventures here on VueVille, we were in an early 2000s home centrally heated by a gas boiler and radiators. But this year we moved to a new sustainable home that is 100% self-sufficient for energy (using solar panels) and meets Passivhaus standards of air tightness! Gone is the gas boiler, and in comes a heat pump and air handling unit to retain all that precious heat (or cool air in summer)!

    So this post will be a running commentary on my progress in making our new home a smart home.

    1. Add sensors to each room in the house – WIP
    2. Setup a Zigbee network for lights and sensors in addition to my Z-Wave network – WIP, see my review of the Sonoff ZBDongle-P
    3. Install Shelly relays (Z-Wave and Wi-Fi) for making dumb switches and lights smart – WIP
    4. Integrate solar inverter into Home Assistant – DONE
    5. Ethernet cabling for outdoor security cameras – DONE
    6. Install outdoor security cameras – WIP, Reolink Duo Floodlight PoE review coming soon!
    7. Integrate Samsung heat pump into Home Assistant, mainly for monitoring – Not started
    8. Integrate SystemAir SAVE VSR-500 air handling unit to retain heat/cooling and maintain air quality – Not started

    Eventually, these are the things I would like it to do:

    1. Turn on/off lights around the house according to the time of the day and the weather OR on demand via smartphone or wall-mounted tablet (no mind-control yet!)
    2. At night, turn the corridor lights on when motion is detected (someone going to the toilet). Switch it off a few minutes after motion is no longer detected.
    3. Automatically turn on/off the humidifier in the baby’s nursery based on the measured humidity in the room.
    4. Interface with the home alarm system so that I can arm it or disarm it from anywhere in the world.
    5. Monitor all my security cameras.
    6. If motion is detected when the alarm system is armed, turn on QNAP QVR Pro camera recording and turn on the nearest outside lights.
    7. Take snaps/record camera security videos based on different triggers such as new post or a doorbell push.
    8. Send me email alerts when anything unusual happens in the house or if the alarm system is triggered.

    Of course there’s a lot more it can do. Even with my current setup, there are probably hundreds of different scenarios I could set up to make my life more comfortable and increase the security of my home – this is what gets me really excited about home automation!

    What I wish I knew when I started on Home Automation

    As discussed in detail in my home automation technology guide, think of different functions in your home as sub-systems. For example, lighting is a sub-system, so are heating, water management, and fire safety. Ultimately you need all your sub-systems to be aware of each other and interact well so that you can actually automate your home, not end up with an expensive collection of stuff that gives you headaches!

    Choose your HA platforms carefully – I chose Home Assistant with Wi-Fi, Z-Wave & Zigbee

    As I say again and again, you have to think long and hard about the basic technology platform that your home automation is built on. If you start buying stuff without considering how they will interact with each other, you will end up wasting your money on kit that works poorly as a whole. With home automation, the attitude has to be ‘set-and-forget’. Your time is precious and should be spent doing what you love with those you love, NOT troubleshooting your smart home all the time. Your smart home should always be working away in the background, doing what you have asked it to quietly and efficiently. It should make its presence felt only when needed.

    What are your options? Even though modern wireless home automation is still in its infancy, there is a bewildering array of home automation platforms:

    • DIY platforms
      • Proprietary cloud-based platforms that allow unrelated smart devices to work together
        • Amazon’s Alexa-powered smart speakers
        • Apple Homekit
        • Google Home
        • IFTTT
      • Cloud-based platforms based on open standards such as Z-Wave and Zigbee
        • Eg. Samsung SmartThings
        • Pros: Cheap, but basic in capabilities
        • Cons: Won’t work without the cloud, not much control in your hands, your data is not yours really
      • Consumer level DIY platforms that are not reliant on the cloud/Internet<- I recommend these
        • Eg. Home Assistant, Hubitat, HomeSeer HS4
        • Pros: Affordable (even free like Home Assistant) and can be very powerful with optional plugins
        • Cons: Varying levels of complexity
    • Professional platforms such as Control4
      • Very costly, very advanced and will need professional installation & support.
    • Managed platforms such as Vivint and ADT
      • Installed and maintained by a 3rd party, costly.

    So what did I go for? As shown in red above, Home Assistant which is a DIY open-source software that is not cloud-reliant, but at the same time is very powerful yet flexible.

    For my sensors and smart home devices, I chose a mix of Wi-Fi, Z-Wave and Zigbee protocols as the foundation of my smart home

    • Z-Wave for critical gear such as in-wall relays controlling dumb switches and dumb lights.
    • Zigbee for smart bulbs, and battery powered sensors.
    • Wi-Fi for certain devices such as my ESPHome DIY sensors, Mi Humidifiers & in-wall relays like Shellys controlling smart lights and dumb switches in detached mode (also called smart bulb mode).

    I mainly use 5GHz Wi-Fi for media, surfing etc. I keep the 2.4 GHz for some Wi-Fi smart stuff (like the Mi Humidifiers), and for Zigbee.

    There are quite a few reasons for choosing Z-Wave and Zigbee wherever possible:

    • They are not one manufacturer’s proprietary standard – means I am not tied into one single company’s products or eco-system (no, I am not an Apple person). Wi-fi devices usually work only with the maker’s cloud apps (the notable exceptions are Shelly & Sonoff flashed with ESPHome).
    • Z-Wave is the industry leading standard with solid reliability and high performance, Zigbee excels at having the best prices.
    • I don’t think Z-Wave & Zigbee are going away anytime soon due to their sizeable ecosystems today.

    My Home Assistant based Smart Home Layout

    How we built our DIY Smart Home - 2025 Network Map - VueVille
    Our DIY Smart Home in 2025

    Long-time readers may be aware that I started out around 8 years ago with the Vera Plus from Vera Controls as my smart home hub. However as the time available to work on my HA system has reduced (I am a father of 2 young kids) and my HA needs have grown, I outgrew the Vera Plus.

    The stock Vera could handle basic to medium-level complexity scenes. So actions such as turning my hot water on according to a schedule was handled fine by the default Vera. But my fully automated central heating control was way too complex for the default Vera scene editor, so I used the PLEG plugin from the community instead. While I was able to create a single-zone automatic heating system using PLEG, the PLEG plugin was clunky and had a very workman-like archaic approach to workflow. This became impossible to deal with as my second child arrived – I simply did not have the luxury of time or the patience.

    After much dithering about the higher cost of HomeSeer software and a laptop to run it vs. my Vera Plus, I finally decided to switch to the HomeSeer HS3 software a few years ago.

    While HS3 was easy to set up and use and extremely reliable, it didn’t have integrations for some newer smart devices I bought such as the Mi Air Purifier and Mi Humidifier. So I moved to the versatile yet powerful Home Assistant software last year.

    Home Assistant is an amazing piece of open source software – it works with nearly any protocol or standard you can think of: Wi-Fi, Z-Wave, Zigbee, Bluetooth, NFC tags, Ethernet devices, Homekit, voice assistants….. there’s an integration for nearly every smart platform you can think of. And what also captured my attention was the fact that I could build my own cheap ESP8266 based sensors such as air quality, temperature and humidity sensors (using ESPHome).

    Home Assistant running on a Raspberry Pi 4 – My Smart Home Hub

    So the heart of my DIY home automation system today is the Home Assistant software running on a Raspberry Pi 4 using an Aeotec Z-Stick 7 Plus USB stick.

    This is a very powerful Z-Wave based solution that connects to a wide variety of devices such as my:

    Z-Wave Interface

    I added a Z-Wave radio to the Pi4 with the Aeotec Z-Stick 7 Plus. This is one of the best Z-Wave USB adaptors I have used and I have had absolutely zero issues with it over the last 3 years. It is fully supported by Z-Wave JS integration in Home Assistant. Highly recommended.

    Aeotec Z-Stick 7 Plus, Zwave Plus USB to Create Z-Wave hub, Gateway Controller with 700 Series ZWave, SmartStart and S2, Works with Raspberry Pi 4, Compatible with Home Assistant
    ×
    Product prices and availability are accurate as of the date/time indicated and are subject to change. Any price and availability information displayed on https://www.amazon.com/ at the time of purchase will apply to the purchase of this product.

    Aeotec Z-Stick 7 Plus

    Check Amazon Price*

    (* = affiliate link / image source: Amazon Associates Program)

    Zigbee Interface

    I use a SONOFF ZigBee 3.0 USB Dongle Plus (ZBDongle-P) as the coordinator of my Zigbee mesh network. I have written an extensive hands-on review of the adaptor including my experience of flashing the firmware to the latest version for improved mesh network quality.

    SONOFF Zigbee 3.0 USB Dongle Plus Gateway, Universal Zigbee USB Gateway with Antenna for Home Assistant, IoBroker, Wireless Zigbee 3.0 USB Adapter(1 Pack)
    ×
    Product prices and availability are accurate as of the date/time indicated and are subject to change. Any price and availability information displayed on https://www.amazon.com/ at the time of purchase will apply to the purchase of this product.

    SONOFF ZigBee 3.0 USB Dongle Plus (ZBDongle-P)

    Check Amazon Price*

    (* = affiliate link / image source: Amazon Associates Program)

    An alternative is the new Aeotec Zi-Stick that I reviewed, this is ideal if you want to use the Home Assistant ZHA integration instead of Zigbee2MQTT.

    Z-Wave Sensors

    I just love these amazing little devices that can sense everything you may want to monitor in your house. Temperature, humidity, light levels, motion detection, vibrations, UV rays – you name it, there’s a sensor for it.

    Based on the readings of the sensor, you can make your Smart home hub heat up or cool down a particular room, switch on lights, open the blinds, send you a text alert, etc.

    These sensors are battery powered so you can place them anywhere in your house. But hey won’t the batteries run out quickly? The beauty of Z-Wave technology is that it’s mesh-based and is ultra low-power, unlike Wi-Fi which requires much more power. So the batteries will last for at least a year.

    I use the Aeotec MultiSensor 7, the Aeotec TriSensor, the older Aeotec MultiSensor 6 and Fibaro Gen 5 MultiSensor – I am very pleased with all of these sensors and would recommend them in a heartbeat.

    6-in-1
    Aeotec Multisensor 7
    Aeotec MultiSensor 7, 6-in-1 Zwave Sensors Contains Monitor Motion, Temperature, Light, Humidity, UV, and Vibration, Z-Wave Plus, Gen7, S2, SmartStart Enabled, Compatible with Zwave Hub Smartthings
    ×
    Product prices and availability are accurate as of the date/time indicated and are subject to change. Any price and availability information displayed on https://www.amazon.com/ at the time of purchase will apply to the purchase of this product.
    6 sensors
    USB / Battery
    Indoor/Outdoor
    4-in-1
    Zooz Multi-Sensor
    Zooz 700 Series Z-Wave Plus 4-in-1 Sensor ZSE40 (Motion/Light/Temperature/Humidity)
    ×
    Product prices and availability are accurate as of the date/time indicated and are subject to change. Any price and availability information displayed on https://www.amazon.com/ at the time of purchase will apply to the purchase of this product.
    4 sensors
    Battery powered
    Indoor only
    3-in-1
    Aeotec TriSensor 3-in-1
    Aeotec ZWA005-C TriSensor, Z-Wave Plus S2 Motion, Temperature, Light Sensor, 4.5 W, 3 V, White, Piccolo
    ×
    Product prices and availability are accurate as of the date/time indicated and are subject to change. Any price and availability information displayed on https://www.amazon.com/ at the time of purchase will apply to the purchase of this product.
    3 sensors
    Battery powered
    Indoor only

    (* = affiliate link / image source: Amazon Associates Program)

    Z-Wave Wi-Fi Relays

    I have a variety of Shelly relays around the home, both Wi-fi such as the Shelly 1PM, Shelly 2.5 and the new Z-Wave based Shelly Qubino Wave 1PM that I reviewed recently.

    Z-Wave & Zigbee Smart Plugs

    Everyone’s heard about Belkin’s WeMo which popularised the idea of making dumb appliances smart by putting a smart plug between the wall and the appliance. Z-Wave smart plugs are similar, but they just work on the far more reliable Z-Wave & Zigbee mesh wireless technology instead of Wi-Fi like the WeMo.

    I currently use the Aeotec Smart Switch 7 to automate my bedside lamps, floor-stander lamps, humidifiers and air purifiers.

    Ethernet-to-IR bridge

    There are a few ways you can control your home theatre devices – gold old infrared which is supported by any device, or sending http commands via a network connection. But I didn’t know that I could make my Smart Home Hub control an infrared emitter to mimic an IR remote control!

    So my first attempt was the http API route. While my Denon AVR fully supported http API commands, my Panasonic Viera LCD TV had a limited http API command set. So this was a no go. Some quick research led me to a plugin for the HomeSeer HS4 that could control an InfraRed emitter from a company called Global Cache. I managed to score one of these Global Cache Ethernet to IR devices on eBay.

    Global Caché GC-100-06 Network Adapter - Connects RS232 Serial and Infrared Devices to a Wired Ethernet (6-Inch)
    ×
    Product prices and availability are accurate as of the date/time indicated and are subject to change. Any price and availability information displayed on https://www.amazon.com/ at the time of purchase will apply to the purchase of this product.

    (* = affiliate link / image source: Amazon Associates Program)

    This is a brilliant device which plugs into a network switch using its ethernet port and will take properly formatted TCP/IP commands and convert it into InfraRed commands that it beams out of one of its three IR emitters.

    They also have a WiFi-to-IR model but I haven’t tried it.

    For these older devices that work very well with the HomeSeer HS4 software, it made sense to stick with the setup. So HS4 continues to run on an old laptop and is integrated with the Home Assistant system using a plug-in.

    Stuff I don’t use since moving to my new self-sufficient sustainable home

    This year we moved to a modern home built to passive home standards. We use only electricity – no gas or solid fuels are used! We are also fully self-sufficient thanks to the 12 kW solar panels on our roof. I am in the process of integrating these into my smart home and will update this post with more details soon!

    Since we no longer use gas, there’s no need of a boiler controller. But in our previous home we had a gas-powered boiler which I had fully automated using the below product.

    Z-Wave Boiler Controller

    Secure 2-ch Boiler Receiver Z-Wave - VueVille


    In a sense my home automation journey started with my boiler controller. When we moved into our new home, I quickly found that the existing boiler controller was outdated and didn’t even have a holiday mode! So instead of replacing it with a new ‘dumb’ controller, I got my first Z-Wave device, the Secure 2-channel boiler receiver.

    In the UK you can get this receiver from Vesternet.

    QNAP NAS as NVR

    My first foray into the world of Network Attached Storage (NAS) was the QNAP TS-231+ many years ago, and was the inspiration behind starting my DIY home surveillance system. Later I upgraded to the much more powerful QNAP TS-253A NAS.

    The TS-253A is my network storage, my NVR (using QVR Pro), and my media streaming server using DLNA. In the past I have used the NAS as my OpenVPN server, but due to security concerns I have moved to using an OrangePi running PiVPN as my VPN server. I use the excellent Wireguard protocol on PiVPN mainly because it has a much lower overhead compared to OpenVPN. This suits a low-power device like the OrangePi.

    BEST 2-BAY
    QNAP TS-262
    QNAP Turbo NAS TS-262-4G SAN/NAS Storage System
    ×
    Product prices and availability are accurate as of the date/time indicated and are subject to change. Any price and availability information displayed on https://www.amazon.com/ at the time of purchase will apply to the purchase of this product.
    2 drive bays
    4 GB RAM
    8 camera licences included
    Smart motion detection
    HDMI 2.0 port
    BEST 4-BAY
    QNAP TS-462
    QNAP TS-462-4G-US 4 Bay Multimedia Desktop NAS with Intel Celeron Dual-core Processor with M.2 PCIe Slots and PCIe expandability and 2.5GbE (2.5G/1G/100M) Network Connectivity (Diskless)
    ×
    Product prices and availability are accurate as of the date/time indicated and are subject to change. Any price and availability information displayed on https://www.amazon.com/ at the time of purchase will apply to the purchase of this product.
    4 drive bays
    4 GB RAM
    8 camera licences included
    Smart motion detection
    HDMI 2.0 port
    BEST 8-BAY
    QNAP TS-873A
    QNAP TS-873A-8G 8 Bay High-Performance NAS with 2 x 2.5GbE Ports and Two PCIe Gen3 Slots
    ×
    Product prices and availability are accurate as of the date/time indicated and are subject to change. Any price and availability information displayed on https://www.amazon.com/ at the time of purchase will apply to the purchase of this product.
    8 drive bays
    8 GB RAM
    8 camera licences included
    Smart motion detection
    HDMI 2.0 port

    (* = affiliate link / image source: Amazon Associates Program)

    Conclusion

    So these are all the various bits of kit that I have added to my Home Automation System right now.

    Got any questions, comments or feedback? Leave a comment below!