If you have read my DIY home security camera system story, you know that I have gone the FullDIY route and created a DIY NAS NVR system. So I have a single box, the QNAP TS-253A running my entire home security system with redundant RAID storage, an OpenVPN server for secure access from outside the home, email notifications, push notifications, and USB backups. And oh, it also serves as my home file server, DLNA server and mobile device backup destination. Did I say I get all of this in one box that costs less than $500? I love my NAS!
So you have bought your QNAP NAS and now would like to setup the NAS as an NVR. Here’s a step-by-step guide showing you how.
Click the Install button and when it is installed, click the open button
Login with your admin account
The next step is to choose a recording folder. I chose to create a new shared folder called ‘Recordings’. Click Apply.
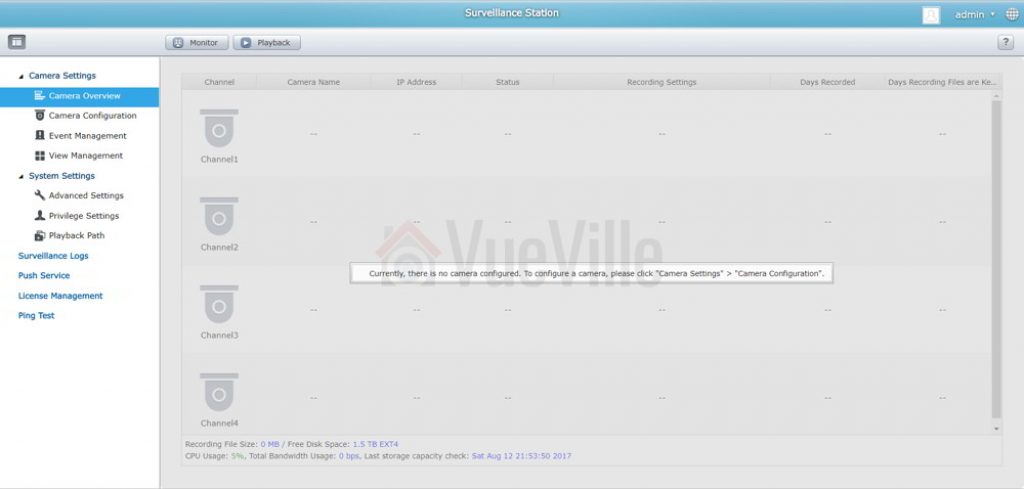
After a minute, you should reach the Surveillance Station home page
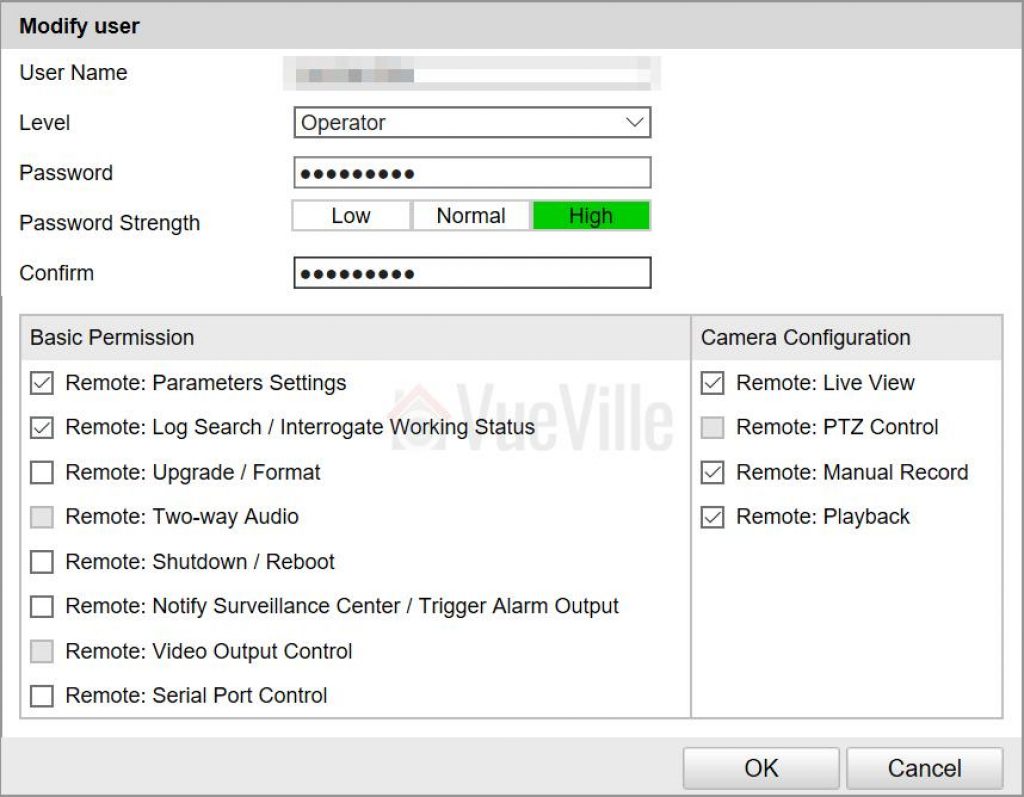
Create a new account with full access in each of your cameras. We will give these login details to Surveillance Station in the next step. Make sure the accounts are of type Operator and not User if you are using Hikvision cameras. Here’s what this looks like in my Hikvision IP camera:Note: If you have trouble getting QNAP Surveillance Station to recognise your cameras, just use the admin account of your camera.
Adding a camera
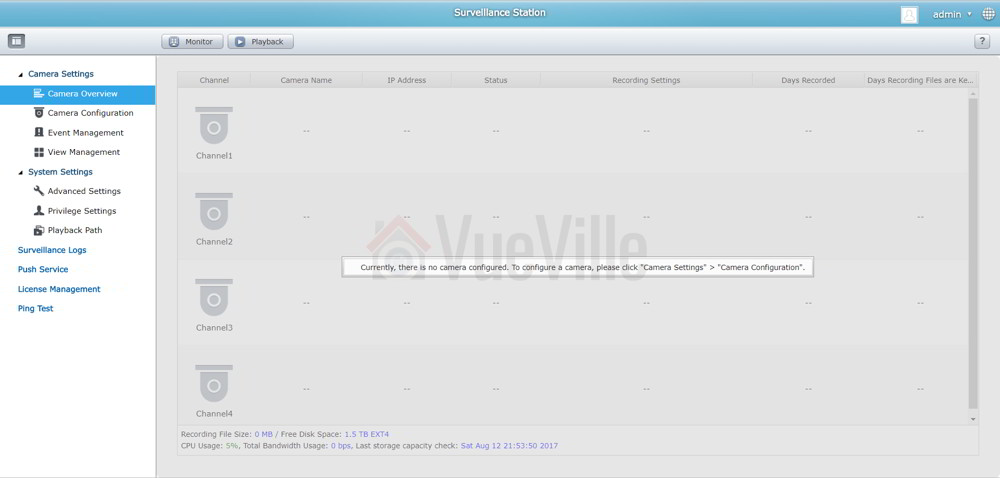
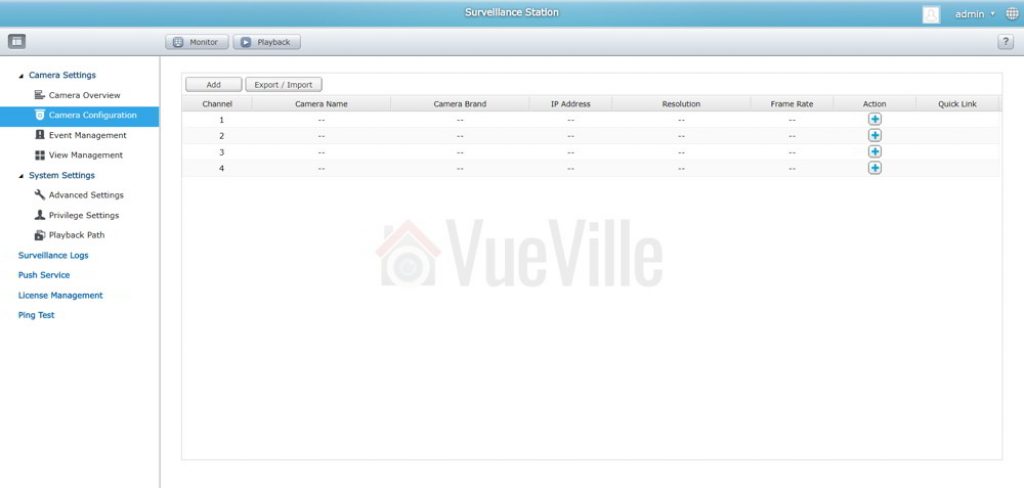
Go to Camera Settings and click Camera Configuration
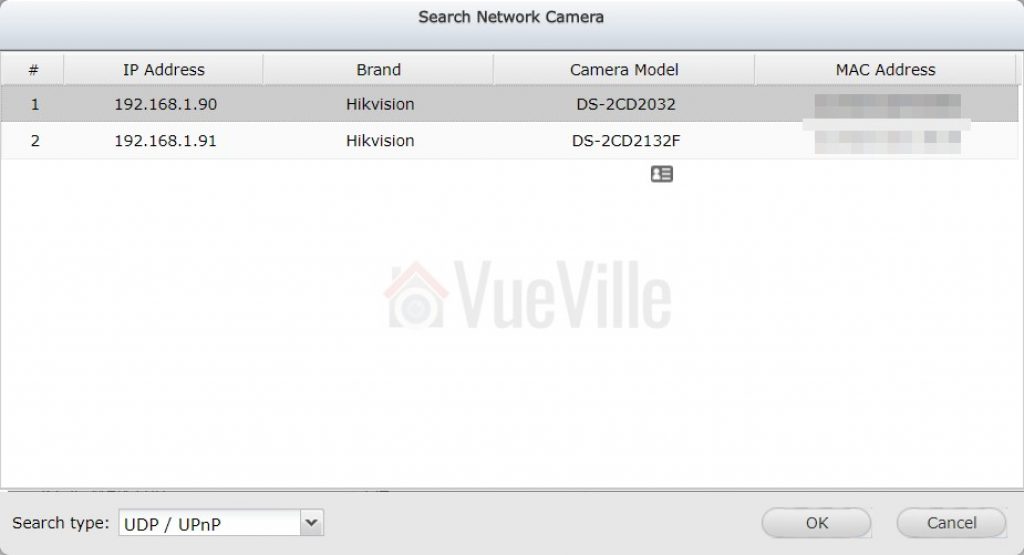
Now click on the Add button. I like to manually configure my cameras, but you can also have the NAS search for them automatically using uPNP or ONVIF. If you have disabled uPNP on your cameras, you will be able to use only the ONVIF or manual setup method.
Select the camera you want to add, enter the camera details and then click TEST. Make sure you use an account with admin privileges, otherwise you will get a question mark instead of the preview image. Click Next.
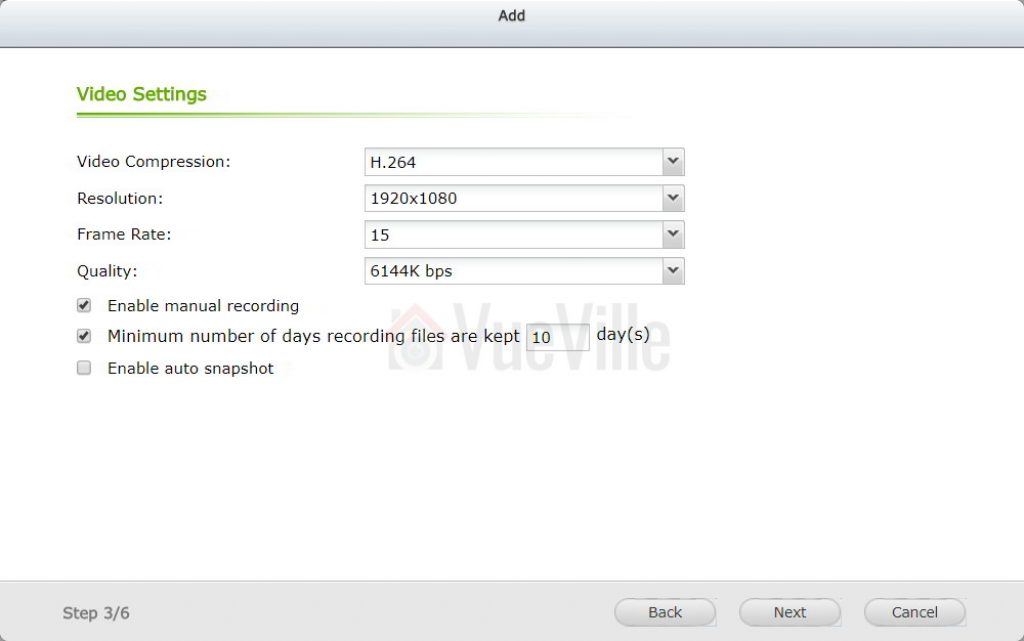
Enter the quality settings as desired. Click Next.
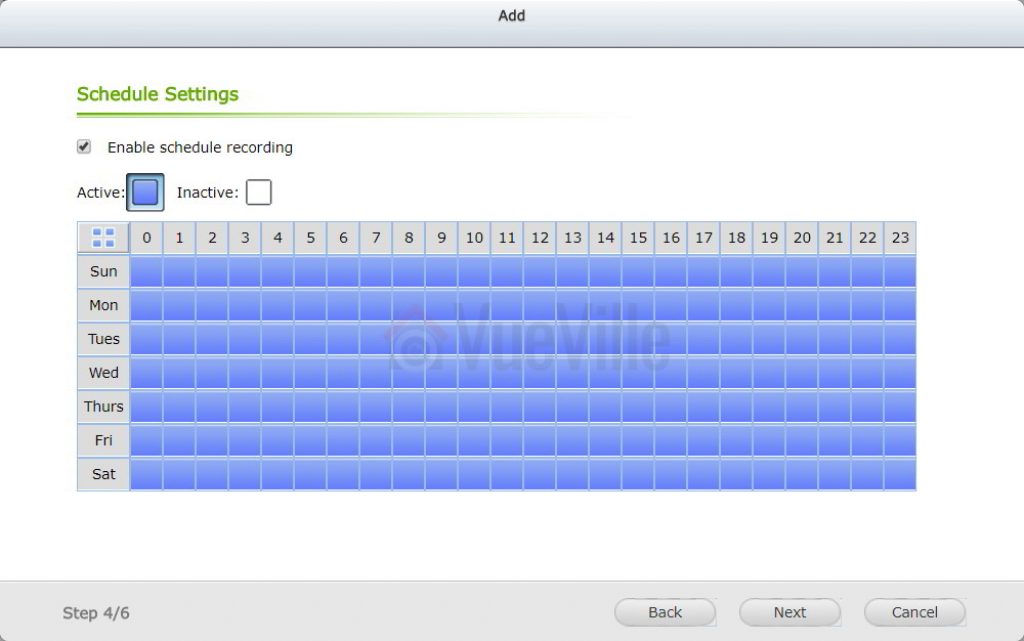
Enable Schedule recording if you wish to record 24/7. Click Next.
Review the settings you have chosen and click Next.
You should now see the success message.
Once you have added all your cameras, the camera configuration page will look like this:
Viewing your cameras
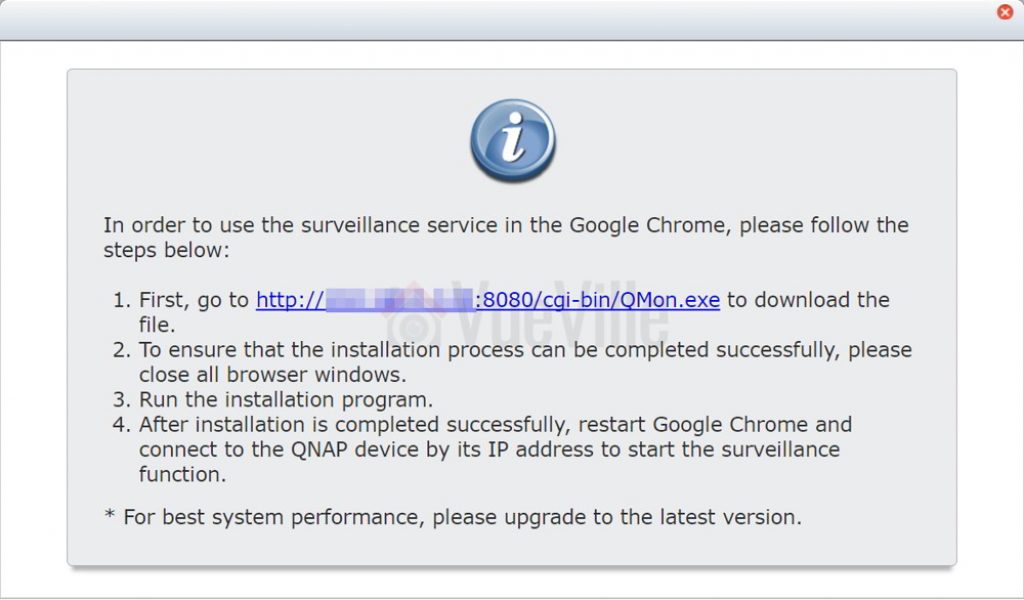
The first time you click on the Monitor button, you will get the following message:
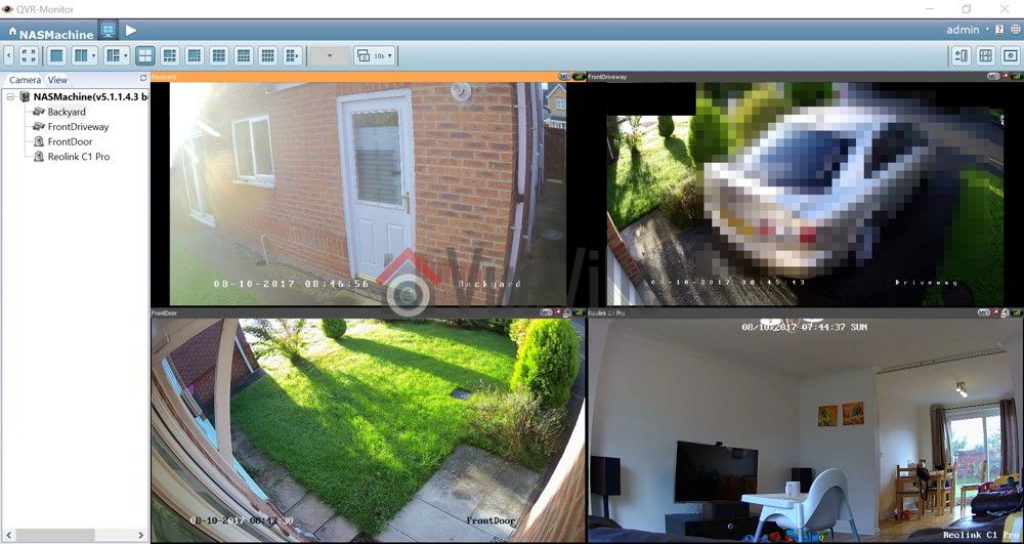
Once you install the QMon plugin, you should be able to view all your cameras simultaneously
That’s it, now you have set up QNAP Surveillance Station to receive video streams from your IP cameras.
When I first started toying with the idea of getting a NAS for our home, I didn’t realise how much a part of our daily life it would eventually become. Let me take you back to where it all began…
The problem
My wife and I have separate laptops and we often need to access common files such as photos, videos, scanned bills, receipts. Storing copies on our separate laptops very quickly became a chore and using an external USB drive was the only real option. But this meant we couldn’t access information wirelessly – yes i tried plugging in the USB disk into the router’s USB port and found it very slow. I was also worried about the safety of the data in case the USB disk failed. All our precious photos and irreplaceable digital documents were in there!
What about Dropbox you ask? After all the cloud hacking that happened recently, I was clear that I didn’t want to trust my data to somebody else and neither did I want to pay a monthly fee!
The hunt for the solution
So I started researching storage options that I could access from across my home network. Before long I had learnt about Network Attached Storage (NAS) options from the likes of Synology, QNAP, Netgear and Asus. It sounded perfect and with redundant storage options such as RAID, I didn’t have to worry about the safety of my data either. One option I quickly eliminated was building my own PC-based NAS because I wanted an ultra low power device that I didn’t have to spend any time building or maintaining.
At about the same time, I had acquired a few security cameras and was thinking of which NVR to buy. So I was absolutely delighted when I learnt most modern NAS could perform the same job as an NVR!
Doing the research led me to settle on the QNAP TS-231+ which was an absolutely brilliant bit of kit and I enjoyed it immensely. It became the central hub of my network serving up photos, videos, to every screen, automatically backing up files from mobile phones and laptops, recording my surveillance cameras and a whole lot more!
Why a new NAS then?
I bought the TS-231+ from Amazon nearly 2 years ago and everything was going well until a month ago when the NAS started restarting on its own. Some basic troubleshooting didn’t go very far so a quick call to Amazon was placed. They referred me to QNAP as the product was still under the 2 year manufacturer warranty. Yes all the QNAP NAS models come with a 2 year warranty which can be extended even further on selected models.
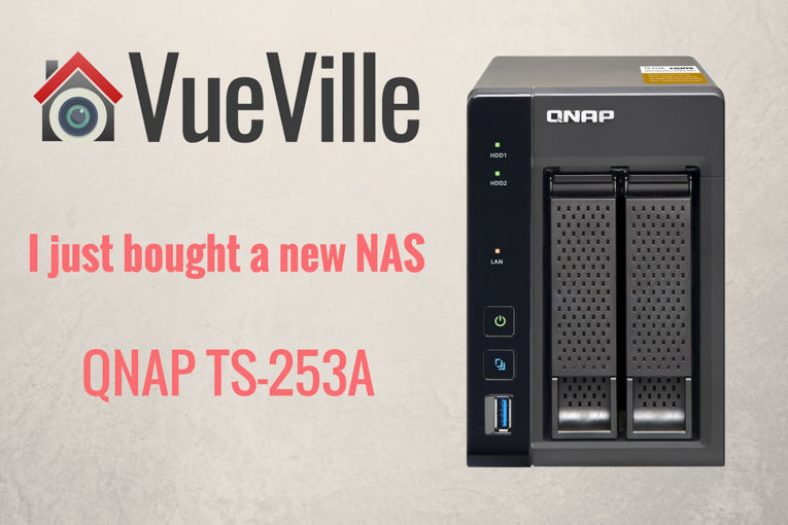
QNAP offered two options – an RMA with me paying for the postage to their nearest depot or a full refund from the seller (Amazon). Naturally I went for the full refund. Now I had just finished my handy 2017 guide to the best DIY NAS NVR, so putting my money where the mouth is, I bought the QNAP TS-253A.
You know what the greatest realisation was for me through this whole episode? How incredibly inconvenient it was to not have a NAS and have to go back to sharing a USB drive between me and my wife!
The QNAP TS-253A has arrived
Yesterday, the QNAP TS-253A arrived! I was surprised to see a package box much smaller than the TS-231+ but the actual NAS was pretty much the same size as the old NAS. Here are the main hardware features of the QNAP TS-253A NAS:
TS-253A-4G model RAM: 4GB (2 x 2GB SODIMM DDR3L-1600)
Hot-swappable 3.5″ or 2.5″ SATA 6Gb/s, SATA 3Gb/s hard drive or SSD
2 x Gigabit RJ-45 Ethernet port
4 x USB 3.0 port (Front:1, Rear:3)
Support USB printer, pen drive, and USB UPS etc.
2 x HDMI, up to 4K 2160P 30Hz Ultra HD support
2 x 6.3mm microphone jacks (dynamic microphones only)
Line Out Jack (for amplifier or headphone amplifier)
IR Receiver
Kensington security slot, console port (system maintenance)
150(H) x 102(W) x 216(D) mm
5.91(H) x 4.02(W) x 8.5(D) inch
System sleep mode power consumption: 1.18W
HDD standby power consumption: 8.38W
In operation power consumption: 14.43W
Whew, that’s a pretty impressive list of hardware features don’t you think? It is actually a fully capable computer that has 4k HDMI capability as well!
On the software front, the NAS runs QNAP’s linux-based OS called QTS. You also get a generous 4 IP camera licenses free with the NAS, which is one of the main reasons I recommended it in my 2017 NAS round-up.
I popped in my existing WD RED 3TB hard drives but the NAS didn’t like them so I went through the process of setting it up as if I had two brand new unused hard drives. Setup was smooth and I then plugged in my backup USB drive to restore my last backup. I was so glad that I had invested in the WD MyBook Studio to be my designated secondary backup drive! It is precisely for these type of situations that secondary backup is recommended! The NAS is currently mirroring my main hard drive to the second one. If you have ever done this, you know it can take quite a while.
I will write an exhaustive hands-on review soon but so far I am loving the QNAP TS-253A!
EDIT: Here’s the long overdue hands-on review! The upshot of my procrastination is that the review takes into account over 9 months of actual daily use.
When I first started using a NAS as my DIY NVR, it was more of an experiment than anything else. I originally purchased the NAS for backing up all our devices and for media serving duties. But I soon realised it could also serve as an NVR. With QNAP now including 8 NVR channels for free in their new QVR Pro NVR app, I have been very happy with my QNAP NAS in my DIY NAS NVR setup.
If you are interested in a similar setup, here are my 2024 picks for a multi-purpose low-power all-in-one DIY NAS NVR.
Product prices and availability are accurate as of the date/time indicated and are subject to change. Any price and availability information displayed on https://www.amazon.com/ at the time of purchase will apply to the purchase of this product.
Product prices and availability are accurate as of the date/time indicated and are subject to change. Any price and availability information displayed on https://www.amazon.com/ at the time of purchase will apply to the purchase of this product.
Product prices and availability are accurate as of the date/time indicated and are subject to change. Any price and availability information displayed on https://www.amazon.com/ at the time of purchase will apply to the purchase of this product.
(* = affiliate link / image source: Amazon Associates Program)
A quick note: As an Amazon Associate I earn from qualifying purchases. This post contains affiliate link(s). An affiliate link means I may earn advertising or referral fees if you make a purchase through my link, at no extra cost to you.
Best NAS for Home Surveillance – 2024 Recommendations Summary & Comparison
[table id=69 responsive=scroll /]
(* = affiliate link / image source: Amazon Associates Program)
Why use a NAS NVR instead of a regular NVR?
If you have IP cameras from different brands in your home and they all support industry standards/protocols such as ONVIF or RTSP, finding an NVR to record all these cameras is a pain. Most NVRs are designed to support only their own brand cameras, such as Lorex or Reolink. Some companies such as Amcrest, Annke, Hikvision support 3rd party cameras but often this is very limited and won’t support AI person or vehicle detection features of the camera.
This is where a NAS NVR really shines – they tick all the boxes for a household that has multiple camera brands and need everything to just work seamlessly:
All major IP camera brands are supported, including AI and smart motion detection methods such as person or vehicle.
The NAS NVR can record to more than 1 disk drive so you always have a redundant copy of CCTV footage.
You can interface the NAS NVR directly to smart home automation software such as Home Assistant, HomeSeer, Hubitiat, Google Home, Alexa etc.
You can keep all your IP cameras and the NAS 100% local-only with no internet access and everything would still work. Only your home automation PC/device needs to have Internet access for notifications etc. Firewall rules using Unifi gear is the solution here.
Choosing the right NAS NVR
The modern household is a tech-heavy environment. Every family member probably has at least a smartphone, and a tablet or a laptop. Sharing media and documents across the home is a challenge without a central media server. This is where a NAS typically comes into the picture.
Providing redundant RAID storage, a NAS can serve up documents, stream music and movies to any device through the DLNA standard. But the humble NAS can do so much more.
A NAS is basically a computer that runs a custom Linux operating system created by the manufacturer (Synology, QNAP, Asus etc.). Most manufacturers offer various apps that can be installed on their devices to add or extend its abilities. These apps are usually called ‘stations’. Examples of such ‘stations’ apps include Photo stations, Video stations, and Backup stations.
Almost every NAS sold today has a surveillance camera feature, but only two companies have software that can really pull it off – QNAP and Synology. NAS manufacturers call each IP camera slot a licence in their software. So 1 licence = 1 channel = 1 IP camera slot.
QNAP currently has two apps for CCTV surveillance – QVR Pro and QVR Elite which are both very capable successors of the old QNAP Surveillance Station app. QVR Pro is aimed at the standard retail user whereas QVR Elite is a more corporate offering. So I will focus only on QVR Pro in this article. Synology has their Surveillance Station app which has been around for ages.
However there is 1 big issue with Synology’s offer that makes QNAP a significantly better deal most of the time:
QNAP QVR Pro by default comes with 8 free QVR Pro camera licences, but these have a small limitation. With these 8 ‘free’ licences, you can view only 14 days of recorded clips inside the app. Any clip older than that needs to be viewed through the File Station app, which is a minor inconvenience.
With Synology, you get only 2 licences (no other constraints though). But you need to pay another ~$350 for an 8-camera licence pack which substantially increases costs or buy into Synology’s own brand cameras (which kinda defeats the whole point of going for a NAS NVR platform).
So to summarize, this is what the NAS NVR landscape looks like:
The best QNAP NAS models are the ones with at least 4GB RAM to run QVR Pro and additionally have 8 fully-fledged QVR Pro camera licences included.
All other QNAP NAS models with at least 4GB RAM can run QVR Pro which by default has 8 free QVR Pro camera licences but with the 14 day viewing limit.
All Synology NAS models come with 2 fully-fledged IP camera licences included, but to add more you need to spend another ~$350 for 8 more channels.
I have considered this very important aspect in my recommendations – hence QNAP being at the top and Synology being more down the list taking value for money into consideration.
How many drive bays do you need in your NAS?
The simple answer is: as many as you can afford! Because you don’t need to fill all the bays for the NAS to work, so its good to have the option to expand later on if needed. You can even start out with 1 drive and add more later, although I strongly recommend going with a clear plan from the start. Most people will be fine with a 2-bay NAS in a RAID1 array (disk mirroring), but you probably have other media storage needs which necessitate a 4-bay NAS. With 4-bays or more, you can have a dedicated RAID-1 array which allows for NVR-focused hard drives but still having NAS-focused hard drives in another RAID array for all other needs.
Product prices and availability are accurate as of the date/time indicated and are subject to change. Any price and availability information displayed on https://www.amazon.com/ at the time of purchase will apply to the purchase of this product.
We used to have the QNAP TS-251+ as our personal favourite on this list for quite some time. But times have changed. Starting off with QNAP’s Home and Personal product line offerings, the TS-262 improves upon the now superseded TS-251+ model. If you want a powerful Intel chip in your NAS, the x62 series are the go-to QNAP models.
I would suggest using both drive bays to create a RAID-1 array for data redundnacy. If a drive fails (and they eventually will), just pop it out and pop a new one in. The NAS will then copy all the data automatically from the existing good drive to the new drive in a few hours. Since QNAP NAS’ all support hot-swapping, you dont even need to shut down the NAS to do all this.
The 4 GB RAM gives your NAS more headroom and performance when running intensive tasks like 4K UHD transcoding or using QVR Pro.
The TS-262 also supports virtualization, so you can run virtual machines. This is great for running different operating systems on your NAS, such as testing/development on Linux or Android.
There is only one 2.5 Gigabit Ethernet port, so link aggregation/failover for network connections is not possible out of the box. But there is a PCIe slot allows you to extend the NAS capabilities by adding 10GbE support, SSD caching, or even a wireless card.
You can run Plex Media Server on this NAS and it supports hardware-accelerated transcoding up to 1080p. But bear in mind that only the QNAP apps work over the HDMI port.
Moving on to the NVR features of this NAS, 8 IP camera licences are included for the QVR Pro NVR app. These are not the time-limited free channels that lesser NAS models have, but proper full-fat licences. An extra 8-camera license pack is also available for purchase if you want even more NVR channels.
QNAP has recently launched the QVR Elite app which offers 2 IP camera channels for free. However this product is subscription-based which I don’t recommend.
Now that QVR Pro supports the advanced motion detection of Hikvision, Dahua, Reolink and all the popular IP cameras, I don’t really need Blue Iris anymore for tying into my home automation system! There is also a Home Assistant integration for QVR Pro that provides smart home compatibility. Super low power consumption of just 15W under load makes this the ideal DIY NAS NVR.
You can live view your IP cameras over the HDMI 2.0 port, unfortunately this feature works only if you upgrade the NAS to 8 GB RAM.
Product prices and availability are accurate as of the date/time indicated and are subject to change. Any price and availability information displayed on https://www.amazon.com/ at the time of purchase will apply to the purchase of this product.
Stepping up to the small business and office product offerings, we find the QNAP TS-464 series. It builds upon the rich feature set of the TS-262, but offers 4 bays, a stronger CPU, and an extra Ethernet port.
The main advantage of 4 drive bays in a NAS NVR is that you can set up two RAID-1 arrays. The first RAID 1 array is for your regular data hoard (using 4 NAS specific drives like the WD RED Plus NAS drive*) and a separate RAID-1 for your NVR (using 2 NVR specific drives such as WD Purple Surveillance drive*). This way, you get the best disks suited for your needs, the NAS focused drives for regular data storage and the Surveillance drive for NVR usage. In this setup you can tolerate 1 disk failure for each array.
The dual Ethernet ports make a few things possible – link aggregation to double network speeds is one option. Another is failover that lets the NAS remain online in case one of the two network ports fail. But probably the use case that is most relevant to a NAS NVR is that your can dedicate 1 network interface to the NVR application. This means that interface can be in the same subnet as the IP cameras, thus maximising network security. See this guide on how I isolate my IP cameras from the Internet using Unifi firewall rules.
Product prices and availability are accurate as of the date/time indicated and are subject to change. Any price and availability information displayed on https://www.amazon.com/ at the time of purchase will apply to the purchase of this product.
The TS-462 is the 4-drive bay version of the TS-262 we saw earlier. It is identical to the TS-262 in all other respects and is a great choice for an affordable 4-bay NAS that can still do hardware accelerated transcoding.
Product prices and availability are accurate as of the date/time indicated and are subject to change. Any price and availability information displayed on https://www.amazon.com/ at the time of purchase will apply to the purchase of this product.
The TS-464 is the 4-drive bay version of the TS-264 we saw earlier. It is identical to the TS-262 in all respects but has only 4 GB RAM instead of 8 GB. Still it is a great choice for a powerful 4-bay NAS that can handle pretty much anything you can throw at it.
Product prices and availability are accurate as of the date/time indicated and are subject to change. Any price and availability information displayed on https://www.amazon.com/ at the time of purchase will apply to the purchase of this product.
The QNAP TS-664 is the 6-bay version of the TS-464 above.
The main advantage of 6 drive bays in a NAS NVR is that you can set up a RAID 10 array for your regular data hoard (using 4 NAS specific drives like the WD RED Plus NAS drive*) and a separate RAID-1 for your NVR (using 2 NVR specific drives such as WD Purple Surveillance drive*). RAID-10 for your regular data storage is preferable to RAID-1, 5 or 6 because of the performance boost offered by RAID-10. In this setup you can tolerate 1 disk failure for each array.
Another option is a RAID-50 array which offers the excellent performance of RAID-10 but with better data redundancy and more usable disk space. Up to 2 disks can fail and the array can still recover all its data.
It supports M.2 NVMe 2280 SSD slots that you can use for SSD cache acceleration. Basically the SSD acts as a cache to speed up data transfer from the NAS to your networked devices.
This NAS has an Intel Celeron CPU that allows for virtualization. Using the multiple 2.5 Gigabit Ethernet ports, you can assign different VMs to different ports for maximum bandwidth. But from a NAS NVR point of view, you could assign one network interface to NVR traffic only.
Product prices and availability are accurate as of the date/time indicated and are subject to change. Any price and availability information displayed on https://www.amazon.com/ at the time of purchase will apply to the purchase of this product.
Click image to view on Amazon
Features
Synology Surveillance Station with 2 channels included
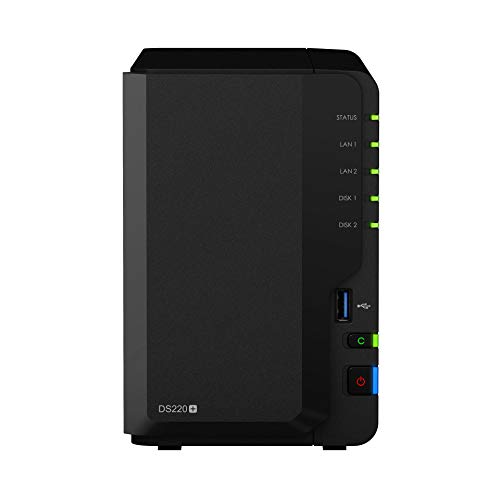
Synology is well-known for its high-quality hardware and very intuitive OS called DSM. The Synology DS220+ is a popular model that was launched in 2020 during the depths of the pandemic.
The DS220+ can serve as your file server, stream media across the home, automatically backup your devices, set up your own private cloud for file-sharing and monitor your IP cameras as well.
The quad-core Intel processor substantially improves performance over the DS220j which is the cheapest Synology product.
While 2 GB RAM is much lower than what QNAP offers in its products, bear in mind that these NAS boxes are basically extremely energy efficient Linux PCs. Linux doesn’t need as much RAM as Windows and so 2 GB RAM is good enough for recording up to 25 IP cameras.
Only 2 IP camera channels are included though, and extra channels cost around $50 each. So factor this into the total cost of ownership. This is also the reason you find this otherwise very good NAS so far down this list.
There is no ready-made Home Assistant integration for Surveillance Station, but manually setting up sensors to detect Synology events is not difficult.
Product prices and availability are accurate as of the date/time indicated and are subject to change. Any price and availability information displayed on https://www.amazon.com/ at the time of purchase will apply to the purchase of this product.
The TS-873A replaces the TVS-873 from last year. It uses a fast and powerful AMD processor with on-board Radeon graphics. This makes the NAS particularly suited to multimedia and surveillance duties.
Even though the NAS is aimed at small businesses, the multimedia features are what makes this NAS box shine. On offer are optional HDMI output, audio in and audio out which can be very useful for surveillance applications, and powerful hardware to keep everything chugging along nicely.
Product prices and availability are accurate as of the date/time indicated and are subject to change. Any price and availability information displayed on https://www.amazon.com/ at the time of purchase will apply to the purchase of this product.
Click image to view on Amazon
Features
Synology Surveillance Station with 2 channels included
If you are a fan of Synology’s DSM OS, need the Surveillance Station app and don’t mind paying up to $350 extra for more NVR channels, the DS923+ is a decent 4-bay option to consider.
Even though there is no integrated GPU, the CPU is powerful enough to handle Plex and some CPU transcoding as needed.
Conclusion
So there you have it, these are my recommendations to build the best DIY NAS NVR in 2024. Leave your thoughts below!
There was a time long long ago when a professionally installed home security camera system was the only option for mere mortals such as us. But today we live in the golden age of DIY. Why pay a ‘professional’ when you can select, buy and build your own custom DIY home security camera system for far less money like I did by picking the best components?
But not everybody has the time or inclination to assemble such a system themselves, and that’s where ready-made NVR and camera kits come in. So in my opinion, these are the best DIY home security camera kits without monthly fees:
Product prices and availability are accurate as of the date/time indicated and are subject to change. Any price and availability information displayed on https://www.amazon.com/ at the time of purchase will apply to the purchase of this product.
Product prices and availability are accurate as of the date/time indicated and are subject to change. Any price and availability information displayed on https://www.amazon.com/ at the time of purchase will apply to the purchase of this product.
Product prices and availability are accurate as of the date/time indicated and are subject to change. Any price and availability information displayed on https://www.amazon.com/ at the time of purchase will apply to the purchase of this product.
A quick note: As an Amazon Associate I earn from qualifying purchases. This post contains affiliate link(s). An affiliate link means I may earn advertising or referral fees if you make a purchase through my link, at no extra cost to you.
(* = affiliate link / image source: Amazon Associates Program)
Best DIY Home Security Camera System: 2024 Recommendations List
I spent many hours researching home security camera kits and documenting what I learnt in this article. But I know such long articles are tiresome to navigate, so here’s a handy table of all the recommendations in this post. Just click on each kit to jump to why I think you should buy it.
[table id=71 responsive=scroll /]
Why go DIY instead of a monitored CCTV service?
Going the DIY route means you get flexibility – you can choose the features you think you need to start off, then upgrade as you learn more. You also save money by not paying a monthly fee. Yes you will still get alerts on your phone and you can live-view the cameras any time from anywhere. If anything, the problem is choice. There are different types of technologies to choose from and then there are dozens of brands across the price spectrum.
The first decision you need to make is: do you want to spec each component in your system (I call this Pro-DIY) OR get a ready-to-use packaged kit that has all the equipment you need along with installation instructions (I call this Easy-DIY). This article explores the various ready-to-use kits that fall under the Easy-DIY category.
If you know you need an Easy-DIY kit, you will find a summary of my Easy-DIY recommendations above in a handy table. If you are unsure, I will help you decide, just keep reading!
Product prices and availability are accurate as of the date/time indicated and are subject to change. Any price and availability information displayed on https://www.amazon.com/ at the time of purchase will apply to the purchase of this product.
Click image to view on Amazon
NVR Features (RLN8-410):
8-channel recording @ 5MP supported
PoE-enabled
2TB hard drive included, max single 4TB HDD
Smart Motion detection (People, Vehicle)
Email alerts and push notification
Remote smartphone access
IP Camera Features (RLC-D500):
5MP CMOS image sensor (2560×1920)
80° viewing angle at 4mm focal length
30m IR range, true IR-cut filter
RJ45 PoE ports
Built-in mic
IP66 Weather-rated
For 2024, Reolink has upgraded this 5MP 8-channel NVR kit to support smart motion detection to reduce false alerts. Meaning it can detect persons or vehicles and send the right alert to the mobile app or your email. The RLC-D500 IP camera included is the 5MP model which can record at up to 8Mbps.
While I recommend 1080p (2MP) as a minimum resolution for security camera footage, 3MP is better for getting additional detail. This is especially useful if your cameras cover a large area like a yard. Every little bit of detail helps. That’s why 5MP is even better. While the cameras can do bitrates of up to 8Mbps, you can set it to around 4-6Mbps to get more days of storage from the included 2TB hard drive.
These cameras do not have on-board storage either and so cannot function as standalone cameras, but they can be used with any ONVIF compliant NVR or DIY NAS system.
The NVR is limited to playing back only 4 channels at 4MP resolution synchronized with each other. The NVR doesn’t officially support the ONVIF standard, but you can try the port change workaround mentioned earlier.
From a Pro-DIY point of view, the system has local storage and local processing but smart home connectivity is again missing. There are no alarm in/out ports (preferred option), nor is there support for Alexa, IFTTT, Google Assistant etc.
Product prices and availability are accurate as of the date/time indicated and are subject to change. Any price and availability information displayed on https://www.amazon.com/ at the time of purchase will apply to the purchase of this product.
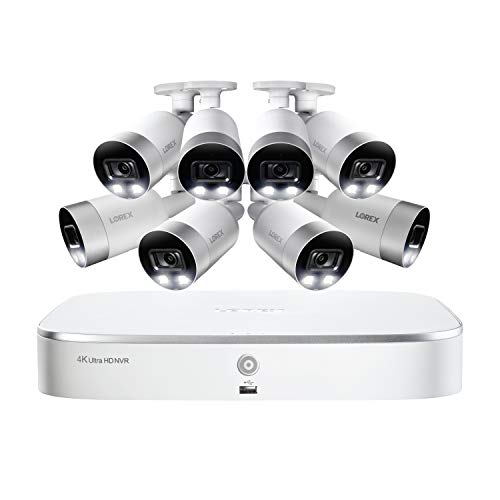
Lorex has recently started opening up their IP cameras by supporting ONVIF. Yes, their NVRs still do not support 3rd-party IP cameras but they do offer an interesting mix of features at a great price point.
For example, the NVR in this kit can record 8MP on all channels simultaneously, albeit at 15fps. And while doing this, you can also live-view or play back 4 channels from the included 2TB hard drive.
In the new Fusion series of NVRs you gain smart motion detection events and smart speaker support but lose a whole host of features: alarm in/out connections, drive mirroring, and Lorex’s pentaplex operation (backup while also managing remote viewing). In my opinion this is a step backwards.
The Fusion NVR supports basic motion detection, customizable motion zones, push notifications to your smartphone and email alerts with snapshot attachment.
The four IP cameras included are 8MP PoE models and are surprisingly capable. Not only do they have HDR but true Wide Dynamic Range (WDR) also at 100dB. Unlike the Lorex NVRs, most Lorex IP cameras are now ONVIF compliant and support RTSP.
So the downsides of this Lorex kit are the NVR’s lack of ONVIF support, the missing advanced motion detection methods, loss of drive mirroring and alarm in/outs. No ONVIF support means you are locked into buying additional cameras from Lorex only. Lorex is now owned by Dahua, so I still hold out hope that they will add advanced motion detection to Lorex NVRs soon.
From a Pro-DIY point of view, smart home connectivity is not great. There are no alarm in/out ports (my preferred option), but there is support for Alexa, Google Assistant and Lorex’s proprietary smart home solution Lorex Fusion.
Product prices and availability are accurate as of the date/time indicated and are subject to change. Any price and availability information displayed on https://www.amazon.com/ at the time of purchase will apply to the purchase of this product.
Click image to view on Amazon
NVR Features (RLN16-410):
16-channel recording @ 5MP supported
PoE-enabled
3TB hard drive included, max. possible are 2x4TB hard drives
Motion detection with email alerts, push notifications
Remote smartphone access
IP Camera Features (B500):
5MP 1/2.7″ CMOS image sensor (2560×1920)
80° Viewing angle, 4mm lens
30m IR range, true IR-cut filter
RJ45 PoE ports
On-board mic
IP66 Weather-rated
Reolink is once again the budget option for 16 channel home security camera systems with their unbeatable price points. Support for 5MP cameras is impressive at this price level, but note that it cannot simultaneously play back more than 4 channels. The hardware is not powerful enough to simultaneously playback 16x 5MP streams.
It is still a great option if you are on a budget but I would encourage you to look at our best value recommendation below.
From a Pro-DIY point of view, smart home connectivity is missing. There are no alarm in/out ports (my preferred option), nor is there support for Alexa, IFTTT, Google Assistant etc.
Product prices and availability are accurate as of the date/time indicated and are subject to change. Any price and availability information displayed on https://www.amazon.com/ at the time of purchase will apply to the purchase of this product.
Just like the 8-ch kit featured earlier, this 16-channel NVR can also record all channels simultaneously at 8MP. The pentaplex operation capability is retained even at the higher workload of 16 channels.
The NVR supports basic motion detection, customizable motion zones, push notifications to your smartphone and email alerts with snapshot attachment. But with this kit, you also get smart cameras that can perform smart motion motion detection. Its smart in that the cameras can distinguish between a person, a vehicle and anything else like trees moving in the wind. This should help reduce false motion detection alerts massively.
Since the NVR sports 4 alarm in and 2 alarm out ports, you can easily switch from easyDIY to ProDIY. Just hook up the alarm out port to a Z-Wave binary sensor and you have instant integration with your Home Automation system. You can even get the NVR to record on demand based on PIR motion sensors this way.
The IP cameras included are 8MP PoE models and are surprisingly capable. Not only do they have HDR but true Wide Dynamic Range (WDR) also at 100dB. Unlike the Lorex NVRs, most Lorex IP cameras are now ONVIF compliant and support RTSP.
The only downsides of this Lorex kit are the lack of ONVIF support and the missing advanced motion detection methods. No ONVIF support means you are locked into buying additional cameras from Lorex only. Lorex is now owned by Dahua, so I still hold out hope that they will add advanced motion detection to Lorex NVRs soon.
From a Pro-DIY point of view, smart home connectivity is pretty good. There are alarm in/out ports (my preferred option), but no support for Alexa, IFTTT, Google Assistant etc.
(* = affiliate link / image source: Amazon Associates Program)
Which DIY route – Easy-DIY or Pro-DIY?
A home security camera system consists of the following essential parts:
The heart of the system, the Network Video Recorder (NVR)
Before the advent of network cameras, the equivalent of the NVR would have been called a DVR which works only with analogue security cameras. An NVR works only with network-based cameras. So remember a DVR works with analogue cameras. and an NVR works with network cameras only. In this article, I will be looking only at NVR based systems.
This is because DVR-based analogue systems are on their way out, they simply cannot compete with the quality and convenience of network cameras and NVRs.
Cameras – Network cameras (a.k.a IP cameras) are fully digital – the image is sent digitally to the NVR through a network cable instead of an analogue BNC cable as in a DVR-based system. This enables resolution higher than 1080p(2MP), and currently you can go up to even 12MP.
The hard drive that will store the recorded video and images – read my detailed guide to selecting the right hard drive.
The Ethernet cables needed to connect the cameras to the NVR
The power adaptors for the cameras (read on to see how you can avoid these)
If you don’t want to deal with different brands for home security and cameras, you should go with Easy-DIY and just get an all-in-one kit. Otherwise there are two ways of choosing the different parts above for your dream DIY home security camera kit – what I call going Pro-DIY.
Easy-DIY – A pre-packaged solution where cameras are bundled with the NVR system
You leave the tough work of building the CCTV kit to somebody else but you pay for the convenience. This is recommended for novices or even experts if you don’t have the time or inclination to do the research. Just pick a brand you are comfortable with, look for the options you want and push the button.
Any NVR kit from a decent manufacturer will use the Power over Ethernet standard. If you are looking for the best PoE security camera system, all the kits I recommend below are PoE-enabled. I wouldn’t have it any other way.
However, bear in mind that there are varying levels of smart home integration features. For example Reolink & Lorex NVRs are more for price-sensitive customers and so have little or no smart home integration at all. On the other hand, Lorex, Hikvision and Dahua have alarm in/out ports that you can hook up to a home automation hub.
Pro-DIY – A fully custom solution where you pick NVR and cameras separately
This is what I have done – I built my DIY NAS-based NVR system, the benefits being maximum flexibility, power and economy. The downside is having to read up on the essentials and ensuring compatibility between all the different bits (but that’s why I am writing this blog: to help you make sense of it all).
A huge advantage of going Pro-DIY is that you can also set up a home automation system that can fully integrate with your CCTV setup (like Home Assistant)!
How to choose your Easy-DIY home security camera system
So you have chosen to go the Easy-DIY Home CCTV route. That’s a great choice if you want to get started right away and don’t want the hassle of researching and understanding how to put a home CCTV system together.
First off, lets get the confusion about names out of the way. Home Security Camera System, Home Surveillance System, NVR Surveillance System, NVR Security System, NVR kit, IP Camera Surveillance Kit – these all typically mean the same, a complete kit that includes everything you need to get up and running.
Choosing your digital network-based home security system depends on the following:
How many cameras do you need? Security camera systems are commonly specified by the number of separate channels they support. This simply indicates how many separate camera video streams they can record. They start from single channel devices going all the way up to 32.
What level of video quality or resolution do you need? My usual recommendation of at least 1080p (2 Megapixels) applies. There are tons of substandard 720p (HD-Ready) systems you can get, but none of them will have the resolution needed to allow law enforcement positive identification of an intruder.
Do you want the ability to use wireless cameras as well? While I generally do not recommend using wireless for critical home systems such as security, there are some situations where a wireless camera makes sense. Now you don’t need a WiFi enabled NVR to use a Wi-Fi camera – this is a common misconception. A Wi-Fi camera can simply connect to your Wi-Fi router and thus be connected to the NVR.
Do you intend to upgrade by adding more cameras later on? If you think you need only 2 cameras now, get a 4-channel system. If you think you need just 4 cameras right now, go for the 8-channel. Once you start enjoying the security provided by your spanking new CCTV system, you will enjoy the option to add more cameras. But if you want that luxury, plan ahead.
Do you want automatic redundant storage? Most NVRs can record only to one hard disk. This means data storage is not redundant – a hard disk failure or theft of the NVR would mean that you lose all your recorded footage. USB backup is supported on most NVRs to mitigate against this risk but ideally the NVR should have at least 2 hard disk bays and automatically write a copy of the footage to the second hard drive. The other option to explore is whether the NVR can write the footage to a remote network location such as a NAS. To learn more about surveillance hard drives, check my latest guide.
Which is better, a conventional dedicated NVR like the [easyazon_link identifier=”B019LSXU76″ locale=”US” tag=”vueville.com-eaz-20″]Hikvision DS-7608NI-E2/8P[/easyazon_link] or a NAS-based NVR solution from Synology or QNAP? This is something I get asked quite often by readers. It’s also a question that’s been on my mind for some time now. So let’s take an objective look at the pros and cons of each option.
[wpsm_toplist]
The Contenders
To make this a fair fight, we need to pit an affordable NAS against an affordable NVR.
My DIY NVR system is based on a NAS, the [easyazon_link identifier=”B00S0XV0QC” locale=”US” tag=”vueville.com-eaz-20″]QNAP TS-231+[/easyazon_link] and I have been running this CCTV setup for more than a year. I have need of just 2 IP cameras, so the 2 free IP camera licences that came with the TS-231+ have sufficed so far.
The TS-231+ is missing an HDMI port though. This isn’t very surprising as it is a budget NAS. For an apples to apple comparison, we need to choose a NAS with an HDMI port. So I have chosen the [easyazon_link identifier=”B015VNLEOQ” locale=”US” tag=”vueville.com-eaz-20″]QNAP TS-251+[/easyazon_link] on the NAS side of the comparison. This model is quite powerful with a quad-core Intel Celeron processor with 2 GB of RAM.
One of the most popular NVRs among my readers here at VueVille is the [easyazon_link identifier=”B019LSXU76″ locale=”US” tag=”vueville.com-eaz-20″]Hikvision DS-7608NI-E2/8P[/easyazon_link], so it makes sense to choose this 8-channel NVR for the dedicated NVR side of the comparison.
QNAP NAS Surveillance Station
Both Synology and QNAP call their surveillance software ‘Surveillance Station’. Most entry-level NAS units come with 2 IP camera licenses free that you can use with the Surveillance software on the NAS. This essentially makes it a 2-channel NVR. Additional licenses need to be purchased directly from QNAP.
The Surveillance Station software on my QNAP NAS is quite powerful. In my opinion, it is a real alternative to a dedicated NVR system. If you are unfamiliar with the Surveillance Station’s featurs, here are the highlights:
Records up to 8MP (4K UHD resolution), H.264, MPEG-4, M-JPEG, and MxPEG formats supported
Records up to 64 channels (dependent on NAS model)
3000+ IP Cameras supported, ONVIF compatible
Scheduled and manual recording
Smart recording (24/7 recording at lower resolution, switches to higher resolution when motion is detected)
Live View up to 64 cameras simultaneously on a single screen, HDMI port available on some NAS models
Software based motion detection and email alerts, can react to camera triggers
7 types of event actions, including recording, PTZ Control, alarm output, email notification, SMS notification, buzzer notification, and user-defined actions available
Instant playback function (plays recorded video in reverse from live view screen)
Supports PTZ cameras
Regular motion detection and alarm events marked on playback timeline
Synchronized camera playback
Intelligent Video Analytics (IVA) – can find ‘missing’ objects automatically
Check out the QNAP IP camera compatibility list to see whether your existing cameras will work with a QNAP NAS. It is regularly updated as QNAP is quite proud of the wide range of cameras it supports.
Hikvision NVRs stray from the pack when it comes to the IP camera brands they support. While other manufacturers limit the NVR to supporting only their own cameras, the Hikvision supports a wide range of IP cameras from top tier manufacturers such as Bosch, Canon, Sony and Vivotek. Although Hikvision doesn’t officially claim ONVIF support in the spec sheet, they do mention “Third-party network cameras supported”.
The main features of the Hikvision DS-7608NI-E2/8P are:
Up to 6 Megapixel Resolution
80 Mbps Incoming Bandwidth
Supports H.264+ and H.264
Synchronous HDMI and VGA Output 1920 × 1080p Resolution
8-ch Network Cameras Can Be Connected
Up to 2 SATA Interfaces (Note no RAID though)
Plug & Play w/Up to 8 Independent PoE Network Connections
Supports Network Detection, Including Network Delay, Packet Loss
Alarm and Audio I/O
Features – Head to head
[table id=20 responsive=scroll /]
Analysis – Its not that straightforward
The NAS has some very strong advantages:
It supports the industry standard ONVIF protocol. This means virtually any ONVIF-compatible camera can be added to the NAS. That’s an insane level of flexibility you often can’t get with dedicated NVRs because manufacturers like to lock customers into their own product eco-system. The Hikvision NVR actually is the most flexible you will find among dedicated NVRs as it does support a few major 3rd party manufacturers such as Panasonic, Canon, Sony etc.
RAID facility which provides redundant storage. A NAS does this by default, all you need is add a second hard drive and configure it for RAID 1. Most consumer level NVRs just cannot do RAID.
You can use a NAS for a whole lot of other things, such as a VPN server to increase the safety of remote access. Another good use is as a home media server, or a Kodi server.
The dedicated NVR has one very strong advantage and some other minor advantages:
Cost – NAS devices usually only include 2-4 IP channel licenses, whereas with an NVR you get more channels for your money. Each additional channel on a NAS is an extra licence that costs you money.
The NVR does one thing – and since it does one thing only, its likely to be more reliable. A multi-functional device like a NAS runs on complex software and that is a weakness. For example, a less than perfect software update from the manufacturer can cause you headaches if it breaks some NAS NVR functionality such as email alerts. This is the inherent risk of using one device for everything. That said, in the 3 years I have used QNAP NAS’ as my NVR, everything was fine on the software front.
Verdict
As with most things in life, it depends on what you want:
If you want no more than 2 or 3 IP camera channels, go with a NAS, especially if you do not have another device running 24/7 to provide media server or VPN server duties.
If you want 4 channels or more, an NVR starts becoming cheaper. Especially as it avoids having to buy a separate PoE switch. Do take regular backups though as most consumer NVRs will not support RAID disk mirroring.
A hybrid approach is to use a dedicated NVR and then configure it to save the camera streams to a NAS as well. This gives you the best of both worlds – the familiarity of a dedicated NVR and the data safety provided by a NAS. This is probably the setup that I will move towards eventually.
So what do you think? What do you use – a NAS or a dedicated NVR? Let’s discuss!
A Digital Video Recorder (DVR) has always been an essential component of a good CCTV security solution. With the advent of network cameras (IP Cameras) however, the humble DVR has given way to the Network Video Recorder (NVR). Whether you are upgrading from a DVR or dipping your toes into home CCTV, we will guide you all the way.
[wpsm_toplist]
DVR vs. NVR – What’s the difference?
How do you distinguish between a DVR and an NVR? A DVR is usually specified by the lines of resolution and the number of cameras that can be connected to it. This is because it is not a network based device and has analog video inputs for each camera it records. An NVR is a network device specified by the bandwidth it can handle and thus the number of video channels it can record. NVRs can do so much more than a DVR that it can be difficult to identify and research the model that best meets your needs. The problem with all the other home security related websites is that they offer no quick and easy way to find an NVR that meets your needs.
This is why we decided to build the ultimate comparison table for NVRs. The table below lets you compare the features of the most popular NVRs from manufacturers such as Hikvision, Dahua, Samsung etc. You can filter using the feature dropdown boxes, search for a specific feature such as 4K, or sort these NVRs by any column. So you can quickly narrow the list to NVRs that have the features you are looking for. We have also explained the comparison criteria in detail just below the table.
We think the most important features that you should look for in an NVR are in the comparison table. Let us know if we can improve this tool in any way. We will soon be adding NVR models from other manufacturers also.
NVR vs. NVR kit
Based on my DIY Smart Home framework, you can go EasyDIY and get a single kit that includes an NVR (read my recommendations), IP cameras and everything else you need to set it up. But if you want to go ProDIY and choose an NVR and the cameras yourself, the table below should be helpful.
NVR Comparison table/matrix
Start by filtering the table by using the dropdown boxes or the search box. Simply click on the required column header to sort by that criteria. To reset the table, just reload this page by clicking your browser’s refresh button or pressing F5 on your keyboard.
I have included NVRs from Hikvision, Dahua, Amcrest, Reolink and LaView below.
Category: We have grouped the NVRs into categories so that you can easily drilldown to the exact type of NVR you are after.
Model: This is the exact model number of the NVR as described by the manufacturer.
Price: To provide you with up-to-date prices, we have linked the NVRs to Amazon. Please note that this is an affiliate link which will provide us a commission if you decide to buy from Amazon.
Number of channels: This is the maximum number of separate channels the NVR supports.
Camera Megapixels: This is the maximum number of megapixels of the camera that the NVR supports.
4K HDMI: Some of the newer NVR models have 4K support so that you can enjoy your NVR output in 4K resolution if your TV supports it.
POE ports: Some NVRs have Power-over-Ethernet (POE) network ports.
Hikvision NVR Model Naming Convention
Hikvision has 6 different series of NVRs aimed at different sectors of the market and different types of users – the 9600, 8600, 7600, 9500, 7700, and the 7100 series. The 7600 series is the most affordable one and also the one that is most interesting to DIY home security enthusiasts like us.
The full Hikvision NVR naming convention is: ‘DS-XXXX-NI’ – ‘(I OR E)X’ / ‘X’P where X denotes the numbers 0-9.
Let’s break this down with an example, shall we? Let’s take the DS-7608NI-E2/8P:
A fixed prefix:
‘DS-’, then
4 digits:
The first 2 digits are the first 2 digits of the series number, eg. 76 for the 7600 series.
The next 2 digits indicate the number of channels supported by the NVR, eg. 08 for 8 channels.
A fixed suffix:
‘-NI-’, where the N stands for NVR and I for International markets
The next alphabet of I or E is just an auxilliary letter.
The next digit indicates the number of SATA interfaces supported:
This shows you how many hard drives can be installed in the NVR. In our example, the 2 in E2 shows that 2 hard drives are supported.
If the NVR is PoE enabled, then we have another suffix, starting with a slash ‘/’
The next digit indicates:
The number of PoE ports. In or example, the 8 in 8P shows that this model has 8 PoE ports.
The next alphabet of P, H or N indicate the presence or absence of certain features:
P indicates PoE support.
H indicates Extended HDMI.
N indicates that PoE is not supported, i.e. just a switch interface is present.
Dahua NVR Model Naming Convention
The full Dahua NVR naming convention is: ‘DH-NVR’ – ‘XXYYH’ – ‘P or W or R’ where X denotes numbers 0-9 and YY is the no. of camera channels.
DH – The first two alphabets are always DH for Dahua
NVR – The next three will say NVR for NVRs.
X – The next digit describes the type of chipset solution used in the system:
1=His3520D
2=His3520A
3=ST7108
4=His3535/ST312
5=Ti8167
6=X86 i3/i5
7=ST416
X – The next digit is the maximum number of hard drives that can be installed.
1=1HDD
2=2HDD
4=4HDD
8=8HDD
0=16HDD
YY – The number of channels supported
04=4ch
08=8ch
16=16ch
32=32ch
64=64ch
00=128ch
H if present always means the case is of the type Mini 1U
The last alphabet defines the function:
P=PoE
W=WiFi
R=RAID
Let’s break this down with an example, shall we? Let’s take the DH-NVR1108H-P:
DH = Dahua
NVR = Network Video Recorder
1 = This NVR is based on the His3520D chipset solution