June 2022 Update: The Gmail method for sending email notifications has stopped working, so I have fully updated & revised this article to use the free Outlook.com web mail service instead.
This tutorial will show you how to set up motion detection email alerts for your Hikvision cameras. You can use these settings even if you use the camera with a Hikvision NVR.
[text-blocks id=”earning-disclaimer”]
Ensure your camera’s internet connection is setup correctly
Your camera needs some information so that it can connect to the internet and send the email alert out. If your camera is already set up on your network as per the Hikvision user manual, and you are able to live-view it from the mobile app, you can skip this section.
If you have DHCP ticked (see screenshot below), the camera will have already figured out all the required details. If so leave everything at the default values.
If you do not know your network’s IPv4 details, click here to learn how to obtain these details. I have highlighted the important bits in the screenshot below.

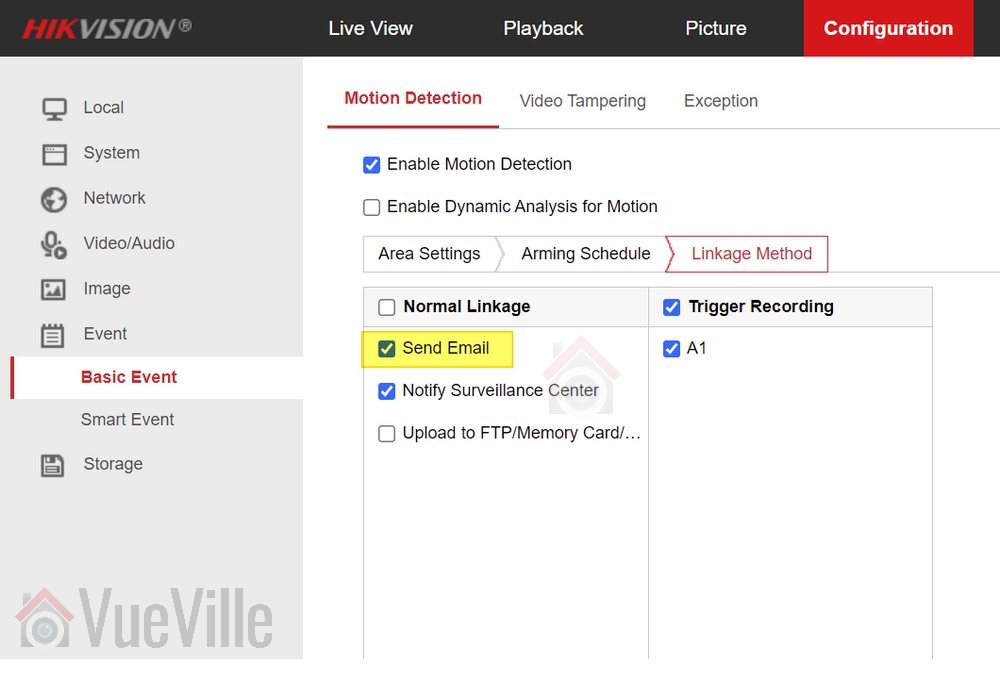
Ensure motion detection is turned on
With your favourite web browser (I recommend Chrome as it works well with Hikvision without installing any plug-ins), login to your camera using its IP address as the URL. Follow this how-to guide to set up your desired motion detection pages in your camera’s web interface.
Turn on email alerts
Step 1: Make sure email alerts are turned on in each of your motion detection settings pages (Motion Detection, Video Tampering, Face Detection, Line Crossing Detection or Intrusion Detection) as shown below:
Configure your email account from which the camera will send email notifications
We will use Microsoft’s free and unlimited Outlook.com as our mail server for the camera to use while sending email notifications.
After signing up for a new free account, follow the steps below to obtain the email server settings that we will need for the next section.
Step 2: Log in to your outlook account and click on the Settings icon (gear wheel) at the top right of the screen

Step 3: In the pane that slides out from the right, click on “View all Outlook settings”

Step 4: Then navigate to Mail >Sync Email and note the SMTP settings highlighted in the screenshot below

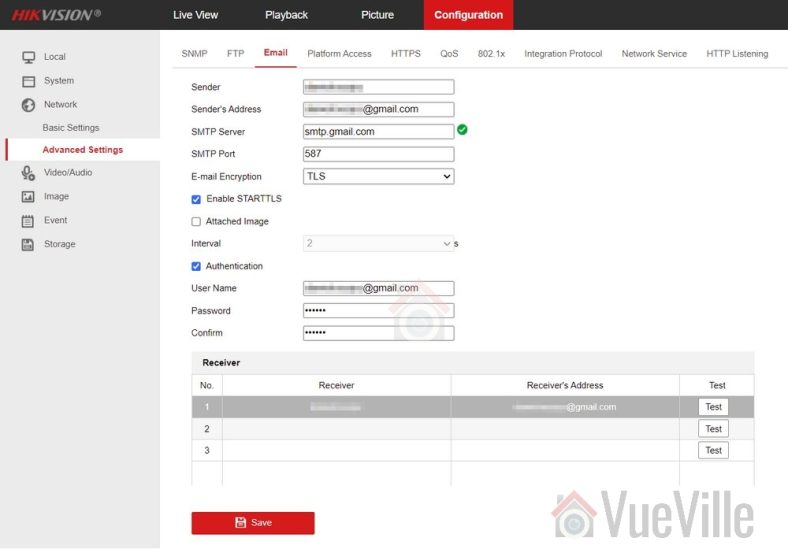
Configure your email settings in the camera
Next we need to configure the camera as the email ‘sender’- it will use the email account you configured above to send the email alert to a ‘receiver’ account. So the ‘sender’ is the camera and the receiver is the email address(es) that you want to receive the alerts on. Follow the steps below to configure your camera:
Step 5: Click on the configuration tab on the top menu bar.

Step 6: Then navigate to Network and click on ‘Advanced Settings‘ (older cameras have a slightly different menu structure but should have the same settings)
Step 7: Choose the email tab
Step 8: Refer to the screenshot above to fill out this section. Enter the login details of your Outlook account – this is the sender account. Enter the ‘receiver’ account details – this is where the email alerts will be received. I am using my personal Yahoo email address in the screenshot above. Tick ‘Attached Image’ if you would like snapshots of the motion detected as well.
Test your settings
Step 9: Click the Test button. You should see the “Testing Succeeded” message and receive a test email at the ‘receiver’ address(es).

If not, you need to ensure that all settings such as TCP/IP and email settings are entered correctly as in the screenshots above.
Save your settings
Step 10: Finally save your settings by clicking the Save button.
Now test your email alerts by intentionally setting off the motion detection of your camera. You should get an email alert within 60 seconds.
Troubleshooting
You may occasionally find that you no longer receive alerts. This could be because of two reasons:
- Most email providers like Gmail/Yahoo may automatically mark the alerts as spam and move these emails to the Junk folder – it will treat the sender address as a suspicious sender due to repeated motion detection email alerts being sent day in and day out. Simply choose the option to treat the ‘sender’ address as a trusted email address and this behaviour should stop.
- A misconfiguration in your motion detection settings could trigger a large burst of notification emails in a very short span of time. While I have not experienced it personally, free email service providers may not like a barrage or incessant stream of notifications, and may temporarily stop accepting email relay requests from your camera. A premium service like Sendinblue that will not throttle or limit email delivery in this manner.
Leave a Reply