Category: Home Automation

  • Review: Z-Wave Eurotronic Spirit Smart Radiator Thermostat

    Review: Z-Wave Eurotronic Spirit Smart Radiator Thermostat

    Smart home heating is all the rage these days. The Nest Smart thermostat kicked it all off in 2011 when it became the first smart heating device to go mainstream and capture the public’s smart home imagination. Now 7 years on, Nest is still around but its far from the only option for us smart home enthusiasts who want automated boiler control and separate independent heating zones.

    Video Review

    This is my first attempt at a proper video review, let me know your feedback!
    https://youtu.be/G_mIe0XKTVc


    Here’s the in-depth review as always.

    [wpsm_titlebox title=”Contents” style=”main”][contents h2][/wpsm_titlebox]

    A quick note: As an Amazon Associate I earn from qualifying purchases. This post contains affiliate link(s). An affiliate link means I may earn advertising or referral fees if you make a purchase through my link, at no extra cost to you.

    Why would you use a smart radiator thermostat?

    The Nest Thermostat is a viable multi-zone option if your home has independent heating circuits. But what if your home has no true zones, has just a single thermostat for the whole house and you still want to set up multiple zones in your home? This is where smart radiator thermostats come in.

    How does a smart radiator thermostat work?

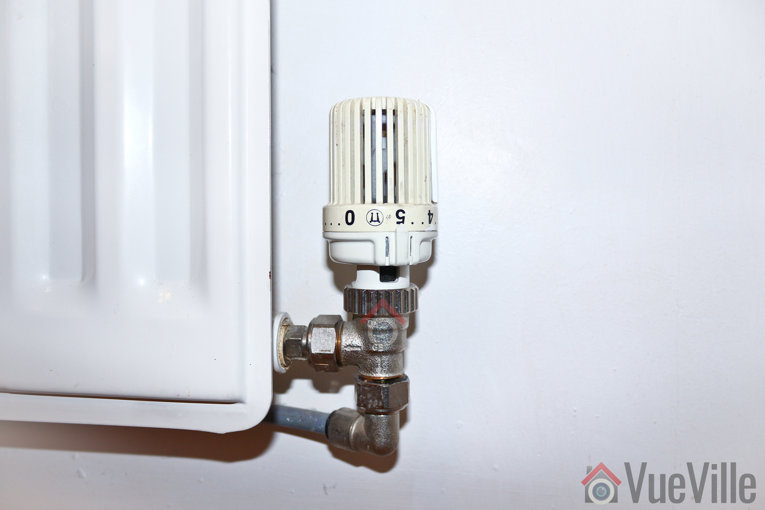
    An electronic radiator thermostat is designed to replace your existing manual radiator thermostat which sits atop your radiator valve. Then the electronic radiator thermostat can directly control the valve by opening or closing it. The flow of hot water from your boiler circuit into the radiator is thus controlled.

    Eurotronic Spirit Smart Radiator Thermostat

    Unboxing

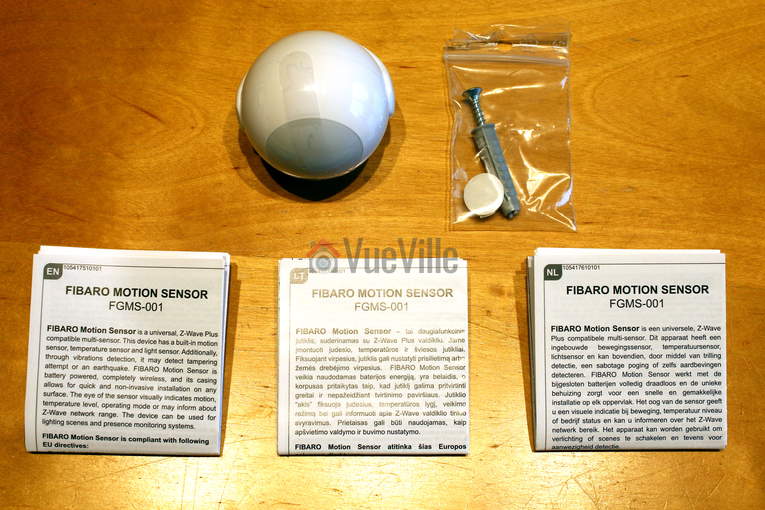
    [wpsm_quick_slider ids=”5828,5829,5830,5831″]

    The Spirit comes in a compact box with attractive packaging. Opening up the box yields the following:

    • Thermostat
    • Adaptors and screws
    • Exchangeable top panel
    • Quickstart guide
    • Installation & operation guide
    • 2x AA Batteries
    • Quality control confirmation note

    Design and Hardware Features

    I am a huge fan of the Z-Wave platform and always try to buy only Z-Wave enabled devices to maximise compatibility and avoid headaches. So when I decided that I want to go from my Vera Plus controlled single zone heating system to the new HomeSeer controlled multi-zone setup, I started looking for Z-Wave smart radiator thermostats. My research identified the following options:

    • Danfoss LC-13 Living Connect,
    • Fibaro Smart Thermostat,
    • Popp Heating Thermostat,
    • Eurotronic StellaZ,
    • Eurotronic Comet, and
    • Eurotronic Spirit

    Of the above, only the Eurotronic Spirit has two features that I was looking for: a built-in temperature sensor and FLIRS (Frequently Listening Receiver Slave) which makes battery powered Z-Wave devices very responsive.

    Eurotronic calls the Spirit an ‘intelligent energy-saving controller for Z-Wave with exchangeable design panels’ and can save up to 30% of heating costs. Using its built-in temperature sensor and its proprietary radiator valve control algorithm, the Spirit automatically decides how much to open the TRV.

    Review - Z-Wave Eurotronic Spirit Smart Radiator Thermostat - Front View

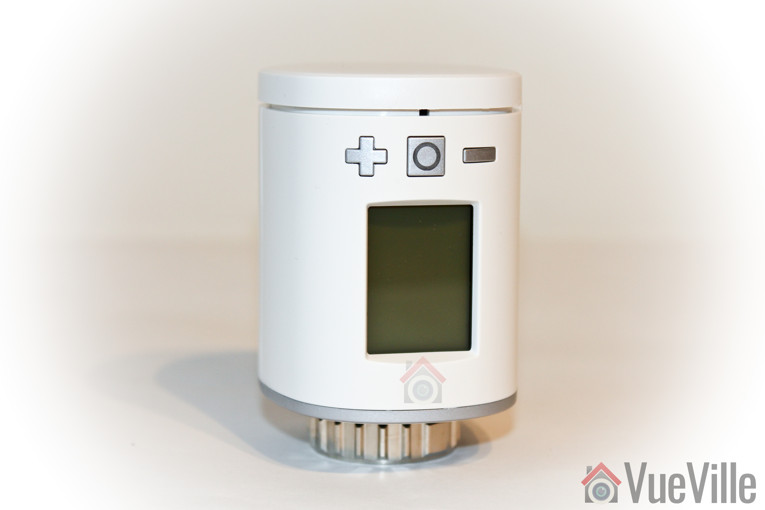
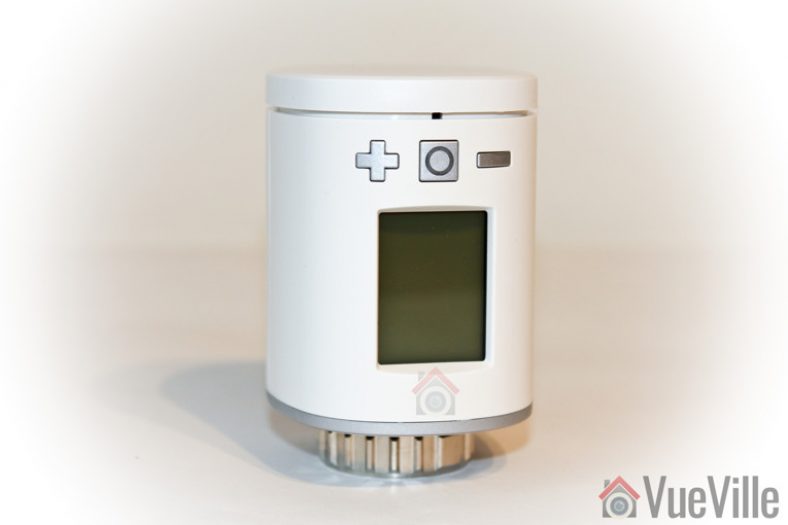
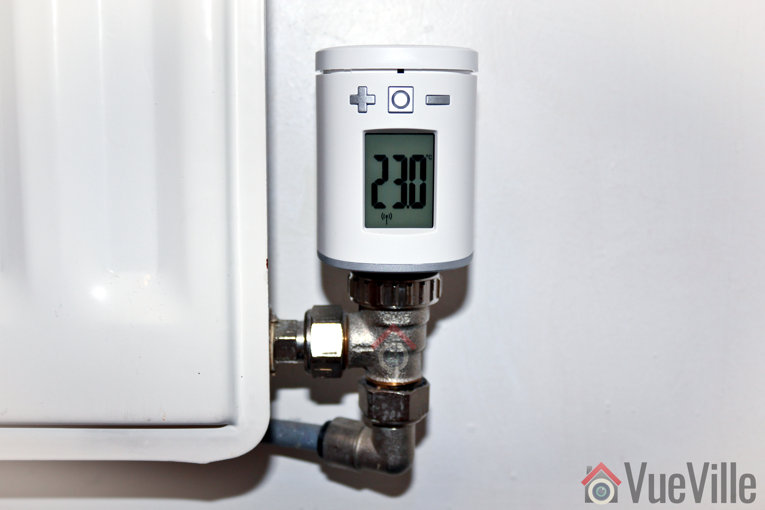
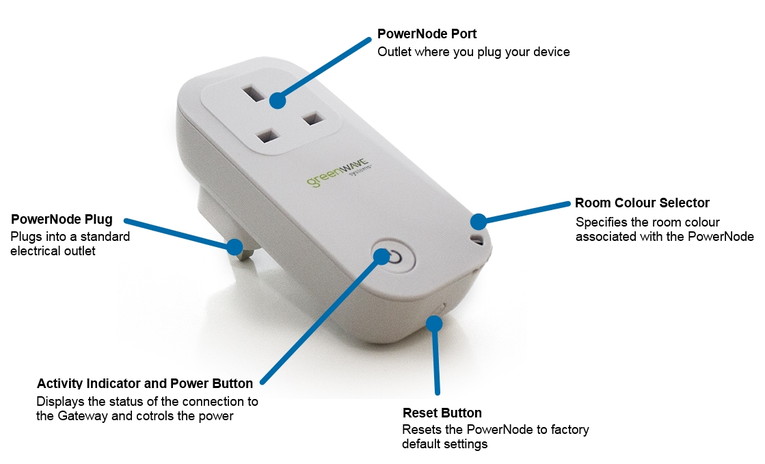
    The thermostat itself is composed of three parts: the top panel that serves as the battery cover, the body itself which houses the LCD screen, the physical control buttons, and the bottom part with a M30 x 1.5mm thread which screws onto the radiator valve.

    Review - Z-Wave Eurotronic Spirit Smart Radiator Thermostat - Bottom View

    The top panel is the part that Eurotronic calls the exchangeable design panel. The default fitted panel is white, but there’s an additional grey panel in the box. You can also buy panels in other colours.

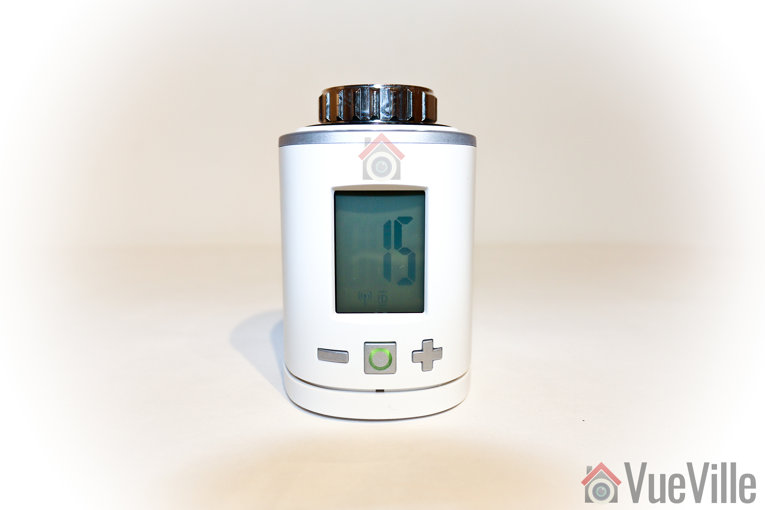
    I really liked the large LCD that is also back-lit. Depending on the mode the thermostat is in (more on that later), the LCD shows you the temperature set-point or the valve opening percentage. There are also indicators for Z-Wave connectivity, child lock status, and low battery.

    The physical set-point plus and minus buttons are not back-lit but have a nice solid action when pressed. The central button is called the Boost button as this is its main purpose in everyday operation. But it also serves a variety of purposes depending on the status of the device and it has a mutli-colour LED ring around it that can flash green or red to inform you of what’s going on.

    The Spirit has a feature that I think all thermostats should have: an on-board temperature sensor that can report unsolicited temperature measurements back to your Z-Wave hub. Your first thought may be that these measurements are useless because of the proximity of the sensor to the radiator. You are right but an additional temperature measurement closer to the floor can be quite useful. It is also an easy way to confirm that your radiator is indeed heating when it should.

    Software Features

    One common issue that you will find on home automation forums is the poor responsiveness of most battery powered Z-Wave thermostats. Intermittently they do not respond to Z-Wave commands which is not what you want for your heating system.

    The Eurotronic Spirit rectifies this by using a technology called FLIRS (Frequently LIstening Receiver Slave). Instead of waking up periodically to check with the Z-Wave hub what the set-point is, the thermostat continuously listens for incoming commands.

    Another interesting feature is the open window detection which will turn off the thermostat for 15 minutes if it thinks a window has been opened. This can be cancelled by a button press and the sensitivity of the detection algorithm can be adjusted through parameter 7.

    The thermostat can operate in 2 main states: default and manufacturer specific mode. Confusingly, Eurotronic clubs the latter together withe the operation modes of the thermostat. To clarify, you can set the following modes of the thermostat that Z-Wave controllers will discover and let you control: Off, Heat, Energy Heat, and Boost or Full Power. All of these modes are automatic in that they use the proprietary Eurotronic algorithm to decide how much to open the radiator valve. You cannot control the valve opening % yourself in these modes. This is possible only in the ‘manufacturer-specific’ state which Eurotronic calls a mode but is not a mode in the Z-Wave sense as it is not something you can control directly or through setting parameters. This is the only disadvantage that I found with the Eurotronic Spirit thermostat.

    That said, you can configure quite a few parameters of the Spirit:

    • Invert the LCD display
    • Adjust the LCD timeout
    • LCD backlight
    • Battery report method and frequency
    • Measured temperature report
    • Valve opening percentage report
    • Window open detection
    • Measured temperature offset

    Installation

    The quick start guide has both German and English sections. The instruction are written in an easy to understand manner and contained illustrations exactly wherever I expected them.

    These are the steps I followed to set up the Spirit and include it in my HomeSeer Z-Wave network:

    1. I inserted the provided batteries and replace the battery cover. This brought the Spirit to life, its Boost button started blinking green and the LCD displayed “Inc” indicating that it is ready to be included into a Z-Wave network. This also meant that it is not currently paired.
      Review - Z-Wave Eurotronic Spirit Smart Radiator Thermostat - Setup - Inclusion
    2. I put HomeSeer into the “Add a node” mode and pressed the boost button. A countdown started from 120 seconds and after 5 seconds, the Spirit had successfully completed inclusion and displayed its node number. On 4 of the 5 Spirit thermostats I installed in my house, only 1 had issues pairing. From trial and error I discovered that doing a factory reset (insert batteries while holding down the + and – buttons) and holding the thermostat within inches of the Z-Wave hub during inclusion resolved the pairing issues.
      Review - Z-Wave Eurotronic Spirit Smart Radiator Thermostat - Setup - Node
    3. It was then ready to be installed on the radiator valve, and the LCD display read “Ins” with a mechanical spanner icon.
      Review - Z-Wave Eurotronic Spirit Smart Radiator Thermostat - Setup - Installation
    4. I set the old manual Honeywell thermostat on the radiator to the full open position, and unscrewed it.
      Review - Z-Wave Eurotronic Spirit Smart Radiator Thermostat - Old Manual Thermostat
    5. I then installed the Spirit onto the radiator valve and pressed the boost button which was blinking green. I didn’t need to use the provided adaptors because the Honeywell had a M30 x 1.5mm thread just like the Spirit. Adaptors are not needed for Heimeier, Junkers Landy + Gyr, MNG, Honeywell, and Braukmann valves. Anything else and you probably need the adaptors.
    6. The thermostat completed the mechanical installation automatically and showed the default heating set-point of 22 degrees C. I increased the set point to 23 degrees C from the Homeseer control panel and the thermostat responded immediately.
      Review - Z-Wave Eurotronic Spirit Smart Radiator Thermostat - Installed

    Performance

    The installation process

    I should really split this into two sections as I had very different experiences with the Vera Plus and Homeseer HS3 using an Everspring SA-413 USB Z-Wave stick. As I was still in the process of migrating from the Vera Plus to HS3, I first tried adding them to the Vera Plus and of the 5, only 1 managed to pair properly. The others either didn’t pair at all, or paired but wouldn’t respond reliably to heating set-point changes. After many hours of factory resets and unpairing and pairing I got all of them to work properly with the Vera Plus.

    I then unpaired the thermostats from the Vera Plus, shut down the Vera Plus, reset all of the thermostats and added them to my Homeseer HS3 Z-Wave network. With the Homeseer, I could see that the thermostats paired successfully as long as they were within a few inches of the Z-Wave USB stick. If it was more than a feet away, it would still pair but in non-secure mode. So the secure mode negotiation was the critical bit. At least with the HS3 I could see the pairing status messages and see what was going on, with the Vera I was just left guessing.

    Review - Z-Wave Eurotronic Spirit Smart Radiator Thermostat - Setup - Homeseer HS3 Inclusion

    On the topic of security, the Spirit supports the latest Z-Wave S2 security standard. Any new device released after April 2, 2017 must support S2 security. However the HS3 Z-Wave plugin with S2 support is still in beta so I haven’t installed it yet.

    Wireless range

    My HS3 laptop and Z-Wave USB stick are at one end of the house, but even the furthest Spirit thermostat has no issues communicating with HS3. A have a generous amount of mains powered Z-Wave smart plugs, so my Z-Wave network is quite strong anyway since they all act as signal repeaters.

    Responsiveness and reliability

    I have been using the 5 thermostats in my home for 3 months now and once I moved them over to Homeseer, they have not skipped a beat. They now form the core of my advanced automatic multi-zone heating system running on HomeSeer HS3. I am glad I moved to Homeseer because as capable as PLEG was on the Vera, creating advanced scenes and events on the HS3 was much easier and quicker. No scripting required either!

    How quiet is it?

    The Spirit is not super-quiet when the motor is in operation opening or closing the valve. Nor is it loud. I’d say it is noticeable up to a few feet away from the radiator.

    The thermostats are super-responsive and I have had no issues with reliability at all.

    Configuring parameters

    My radiators are a bit old so have the valves at the bottom and this meant that the Spirit thermostats had to be positioned upside down (according to the manual, this is not uncommon in British homes). So I set parameter 1 to value 1 and the display inverted itself as expected. To conserve battery life, I also reduced the LCD timeout to 5 seconds (the lowest).

    I was disappointed that direct valve control is not possible unless a command in the basic command class (0xFE) is sent to the thermostat. Neither the Vera Plus nor Homeseer HS3 can do this, so I had to implement a workaround to get the valves to open 100% or close 100% on demand.

    Battery life

    In the 3 months I have had the thermostats, these are the battery stats: the lowest battery level is 80% and the highest is 100%. I am not sure how accurate these self-reported battery lebels are, so we will just have to wait and see.

    Alternatives

    • Danfoss LC-13 Living Connect,
    • Fibaro Smart Thermostat,
    • Popp Heating Thermostat,
    • Eurotronic StellaZ,
    • Eurotronic Comet

    Verdict

    [review]

    Where to buy

    [easyazon_link identifier=”B075X257NC” locale=”UK” tag=”vueville.com-eaz-21″]Check Price on your local Amazon site[/easyazon_link]

    (* = affiliate link / image source: Amazon Associates Program)

  • Best Z-Wave Sensor – My 2024 Recommendations

    Best Z-Wave Sensor – My 2024 Recommendations

    If you are thinking of setting up your own DIY home automation system like I did, you may have already thought of various things it should do.

    For example, light up the corridor in the hall when motion is detected but only if its dark. With conventional Z-Wave sensors, you need a separate light sensor and motion sensor to achieve this. But a single multi sensor like the Aeotec Multisensor 7 that has both light and motion sensors can do this and so much more, at a fraction of the cost.

    6-in-1
    Aeotec Multisensor 7
    Aeotec MultiSensor 7, 6-in-1 Zwave Sensors Contains Monitor Motion, Temperature, Light, Humidity, UV, and Vibration, Z-Wave Plus, Gen7, S2, SmartStart Enabled, Compatible with Zwave Hub Smartthings
    ×
    Product prices and availability are accurate as of the date/time indicated and are subject to change. Any price and availability information displayed on https://www.amazon.com/ at the time of purchase will apply to the purchase of this product.
    6 sensors
    USB / Battery
    Indoor/Outdoor
    4-in-1
    Zooz Multi-Sensor
    Zooz 700 Series Z-Wave Plus 4-in-1 Sensor ZSE40 (Motion/Light/Temperature/Humidity)
    ×
    Product prices and availability are accurate as of the date/time indicated and are subject to change. Any price and availability information displayed on https://www.amazon.com/ at the time of purchase will apply to the purchase of this product.
    4 sensors
    Battery powered
    Indoor only
    3-in-1
    Aeotec TriSensor 3-in-1
    Aeotec ZWA005-C TriSensor, Z-Wave Plus S2 Motion, Temperature, Light Sensor, 4.5 W, 3 V, White, Piccolo
    ×
    Product prices and availability are accurate as of the date/time indicated and are subject to change. Any price and availability information displayed on https://www.amazon.com/ at the time of purchase will apply to the purchase of this product.
    3 sensors
    Battery powered
    Indoor only

    (* = affiliate link / image source: Amazon Associates Program)

    A quick note: As an Amazon Associate I earn from qualifying purchases. This post contains affiliate link(s). An affiliate link means I may earn advertising or referral fees if you make a purchase through my link, at no extra cost to you.


    Best Z-Wave Sensor in 2024 – Recommendation Summary & Comparison

    Click each sensor to scroll to read more about it. You can check the latest Amazon price by clicking on the check price buttons.

    [table id=74 responsive=scroll /]

    (* = affiliate link / image source: Amazon Associates Program)


    Aeotec MultiSensor 7, 6-in-1 Zwave Sensors Contains Monitor Motion, Temperature, Light, Humidity, UV, and Vibration, Z-Wave Plus, Gen7, S2, SmartStart Enabled, Compatible with Zwave Hub Smartthings
    ×
    Product prices and availability are accurate as of the date/time indicated and are subject to change. Any price and availability information displayed on https://www.amazon.com/ at the time of purchase will apply to the purchase of this product.

    Click image to view on Amazon

    Features
    • Motion, Light, Temperature, Vibrations, Humidity, UV
    • Indoor/Outdoor IP20
    • Z-Wave Plus certified
    • AC or 1x CR123A Battery (2 years)
    • Tamper-proof
    • Up to 150m in USB mode
    • Extender/Repeater in USB mode

    Aeotec is the brand name of Aeon Labs, a company founded in 2006 and headquartered in California. They have offices in London and Hong Kong also, plus manufacturing facilities in China. Aeotec makes every Z-Wave device you can think of – power plugs, strips, multi-sensors, flood sensors, water main valve controllers, dimmers, relays, garage door controllers, sirens, touch panels, remotes, doorbells, energy meters, and on and on. Another brand you may come across is Oomi which are white-labelled Aeotec products.

    The Multisensor 7 is the only 6-in-1 multi-sensor in the market and represents great value for money with the motion, temperature, light, humidity, UV and vibration sensors all packed into a tiny cube. All these features haven’t compromised battery life though – Aeotec suggests a 3 year battery life. Indeed, I have been using the previous model (the Aeotec Multisensor 6) for over 5 years now and only had to change the batteries once!

    Of course you can always run it on AC power using the included USB cable – you just need to provide a power adaptor. In AC power mode, the MultiSensor 7 will send measurements to the Z-Wave controller in real-time in addition to working as a Z-Wave network extender/repeater.

    Please refer to my in-depth hands-on review to learn more about this excellent Z-Wave sensor:

    Zooz 700 Series Z-Wave Plus 4-in-1 Sensor ZSE40 (Motion/Light/Temperature/Humidity)
    ×
    Product prices and availability are accurate as of the date/time indicated and are subject to change. Any price and availability information displayed on https://www.amazon.com/ at the time of purchase will apply to the purchase of this product.

    Click image to view on Amazon

    Features
    • Motion, Light, Temperature, Humidity
    • Z-Wave Plus certified
    • Indoor only
    • 1x CR123A Battery
    • Tamper-proof
    • Up to 30 metres

    The Zooz Motion sensor has been around for a long time and the latest version is something that definitely is worth consideration. It has all the common sensors you’ll need – motion, illumination level, temperature and humidity.

    There are 7 levels of motion detection sensitivity. There’s also a multi-colour LED that is very customisable – there are 4 modes you can put it in:

    • Mode 1 = LED indicator is fully turned off (no visual notifications).
    • Mode 2 = temperature is indicated by the LED pulsing and motion indicated by the LED flashing.
    • Mode 3 = temperature and motion indicated by flashing the LED. Flashes every 3 minutes for temperature.
    • Mode 4 = no indication for temperature, motion indicated by flashing the LED.

    Moreover, the LED notification for temperature can be colour-coded based on the detected temperature.

    Aeotec ZWA005-C TriSensor, Z-Wave Plus S2 Motion, Temperature, Light Sensor, 4.5 W, 3 V, White, Piccolo
    ×
    Product prices and availability are accurate as of the date/time indicated and are subject to change. Any price and availability information displayed on https://www.amazon.com/ at the time of purchase will apply to the purchase of this product.

    Click image to view on Amazon

    Features
    • Motion, Light, Temperature
    • Indoor only
    • Z-Wave Plus certified
    • 1x CR123A Battery (up to 3 years life)
    • Up to 100 m range outdoors, 40 m indoors

    If you do not need the Aeotec Multisensor 7 but still prefer the Aeotec brand, here’s another option. This new multi-sensor has can be installed in 4 different ways: in the corner, on a shelf, beam or in the Aeotec Recessor for flush false ceiling installation.

    Apart from looking very stylish, the motion sensor has a very good range of up to 7.5 metres. The light sensor has a range of 0-30000 Lux and can be used to automatically turn on/dim/off lights in your home. So a popular use case is to ramp up lamps as daylight breaks, and dim them as evening sets in.

    The TriSensor multisensor comes pre-installed with a CR123A battery that is rated for 3 years of standard use. As per usual Aeotec standards, the included user guide is detailed, accurate and written in clear English. To add the TriSensor to your Z-Wave, just pull the mylar off the included battery and press the action button to put it in inclusion mode. The device also supports the exclusion, reset and association modes as expected. There are no tamper-proof switches, but the sensor does support Z-Wave S2 security which even the Multisensor 6 doesn’t. Some other interesting features are the OTA (Over The Air) firmware upgrade and the ability to change the action LED’s colour.

    Refer to my in-depth hands-on review to learn more:

    FIBARO Motion Sensor Z-Wave Plus Multisensor-Movement, Temperature, Light Intensity, Accelerometer, FGMS-001, doesn't work with HomeKit
    ×
    Product prices and availability are accurate as of the date/time indicated and are subject to change. Any price and availability information displayed on https://www.amazon.com/ at the time of purchase will apply to the purchase of this product.

    Click image to view on Amazon

    Features
    • Motion, Light, Temperature, Vibrations
    • Indoor only
    • Z-Wave Plus certified
    • 1x CR123A Battery (2 years)
    • Tamper-proof
    • Up to 50 m unobstructed range, 40 m indoors

    The Fibaro Motion sensor is more than what its name suggests. Its actually a multi-sensor that can measure temperature, light intensity, and vibrations in addition to motion. The design element was given strong consideration by Fibaro and can be seen in the unique cat-eye style LED and the round shape of the sensor. The round shape and the brilliant cradle design let you point the sensor precisely and avoid blind spots in the motion detection zone.

    The first Z-Wave sensor I bought was in fact this very Fibaro multi-sensor. I have been using it for more than 2 years and have been impressed with its performance and battery life. I especially like the multi-colour LED that flashes when motion is detected. The colour of the LED depends on the temperature in the room. Too cold and it shines blue, green if its just right and orange if its too warm. So whenever you enter the room, you can immediately see what the temperature is like by observing the colour of the flashing LED.

    Refer to my in-depth hands-on review to learn more:

    Aeotec aërQ Temperature, Humidity, Dew Point Sensor - Wireless, Battery Powered, Z-Wave Hub Required (White)
    ×
    Product prices and availability are accurate as of the date/time indicated and are subject to change. Any price and availability information displayed on https://www.amazon.com/ at the time of purchase will apply to the purchase of this product.

    Click image to view on Amazon

    Features
    • Temperature, Humidity, Dew point
    • Indoor/Outdoor IP20
    • Z-Wave Plus certified
    • 1x CR2477 Battery (2 years)
    • Up to 150 m outdoors range, 50 m indoors

    Sometimes you need a sensor that is very discreet and doesn’t call attention to itself. At just 1.4″, the Aeotec aerQ is the smallest Z-Wave sensor you can find that supports temperature and humidity measurement. It also can measure the dew point which is very useful for climate automations such as underfloor cooling/heating. This is because if you cool an underfloor system below the dew point, condensation may occur which is a safety hazard.

    A long life battery with up to 2 years life makes it a very capable little multi-sensor.

    FIBARO FGDW-002-1 2 Door/Window v2 with Temperature Sensor, Z-Wave Plus, Small, White
    ×
    Product prices and availability are accurate as of the date/time indicated and are subject to change. Any price and availability information displayed on https://www.amazon.com/ at the time of purchase will apply to the purchase of this product.

    Click image to view on Amazon

    Features
    • Open/Close, Temperature
    • Indoor only
    • Z-Wave Plus certified
    • 1x ER14250 ½ AA Battery (up to 2 years life)
    • Tamper-proof
    • Up to 50 m range outdoors, 40 m indoors

    The Fibaro Door/Window Sensor 2 is a wireless, battery powered contact sensor that uses the Hall effect. You may have heard of the common reed switch sensor employed by door and window sensors, but what is a Hall effect sensor? The reed switch is an electrical switch that mechanically closes when a magnetic field is brought near it. A Hall effect sensor is a solid-state transducer that varies its output voltage according to the strength of a magnetic field, meaning it has no moving parts. This means that it is not susceptible to vibration or shock, unlike a reed type sensor.

    The sensor is based on the Z-Wave Plus standard and also supports protected mode with AES-128 encryption. It has tamper detection and an LED indicator with 7 different colours. The temperature measuring range is 0-60°C (32-140°F) with an accuracy of 0.5 deg C. The battery used is a single ER14250 ½ AA battery that should be good for 2 years.


    Why Z-Wave?

    If you want the long answer, check out my Home Automation Guide. If you would like the short answer, Z-Wave is the industry standard for reliable, non-cloud reliant, self sufficient, low-power home automation. I have been using Z-Wave devices from different manufacturers and everything has always just worked. All my sensors are battery powered, and those batteries last a year at least. My home automation controller is the Vera Plus – no ugly cloud subscription or cloud-reliance here, an Internet connection is strictly optional.

    What is a Z-Wave multisensor?

    A Z-Wave multisensor is a small wireless device that typically runs on battery power and can sense motion using a PIR sensor and measure multiple environmental factors such as temperature, humidity, or light levels.

    Which to choose – Single sensor or Multisensor?

    I prefer multisensors because this approach let you place just one device per room and still get all the important readings. It doesn’t hurt that they are great value for money too!

    What to look for in a multisensor?

    The important things to look for are:

    • Types of sensors: More the merrier! You can choose from Motion, Temperature, Light levels, Humidity, UV intensity and Vibrations.
    • Sensitivity: Make sure the sensor covers the range of motion detection (distance and angle) or temperatures you want to monitor.
    • Z-Wave Technology: Look for the latest Z-Wave Plus 500 series enabled devices.
    • Power supply: Most multi-sensors are battery only but they last 1-2 years. To maximise battery life, sensors will usually send an update to the hub or controller only when readings change by a noticeable enough percentage (say 10%). But when powered by mains power (AC), these sensors can not only provide real-time readings but also act as repeaters or extenders. This is great because your Z-Wave network becomes that much stronger and wider.
    • Operating range: Most sensors can easily cover a 30 metre range, the mains powered models can go even higher.
    • Tamper-proof: Some sensors have a tamper switch on the back which can send an alert to the hub or controller if someone tampers with them. This is important if you are using the sensor outdoors under a porch or another area where it can be accessed.

    Conclusion

    I have enjoyed my Z-Wave multi-sensors and the immense array of possibilities they have opened up in monitoring my home and setting up advanced scenes. What have you achieved with your sensors? Let me know in the comments below!

  • Review: Greenwave PowerNode 1-port Z-Wave Smart Plug with Power Monitoring

    Review: Greenwave PowerNode 1-port Z-Wave Smart Plug with Power Monitoring

    It’s all well and good being able to monitor motion and temperatures changes around your house, but your home truly becomes a smart home only when it can then respond to those changes. This can be done by controlling lights, home appliances and other security gadgets in your home.

    After I got my Fibaro and Aeotec motion sensors up and running, I started researching how I could get my existing dumb appliances to work with my smart home network. Let’s take the example of a humidifier. My son occasionally suffers from dry skin, so its very important that I am able to maintain a good humidity level in his nursery. I already have a [easyazon_link identifier=”B01C5UCWH6″ locale=”US” tag=”vueville.com-eaz-20″]non-smart humidifier[/easyazon_link] which is an ultrasonic cool mist humidifier. My Aeotec Multisensor 6 tells me what the humidity is but since the humidifier is not a smart device, I then need to manually switch it on or off. This is not very convenient in the middle of the night – I like my beauty sleep!

    The expensive way of automating the humidification is by getting an expensive smart humidifier like the [easyazon_link identifier=”B01K3KTR9Q” locale=”US” tag=”vueville.com-eaz-20″]Motorola Smart Nursery Humidifier[/easyazon_link]. But there’s an easier and far more cost-effective way of making your existing dumb appliances smart – by using smart power plugs like the Greenwave Powernode 1.

    Greenwave 1-port Powernode - VueVille

    For my first smart plug, I chose the Greenwave Powernode 1 because it is a very reasonably priced Z-Wave wall plug that has power usage monitoring and yet has great reviews.

    [wpsm_titlebox title=”Contents” style=”main”][contents h2][/wpsm_titlebox]

    Greenwave Systems – Who are they?

    Greenwave Systems was formerly known as Greenwave Reality Pte Ltd, a company started in 2008 in Singapore. Greenwave Reality became Greenwave Systems in May 2014. The company caters to both the consumer market through its smart home devices and industry through its disruptive Greenwave360 and AXON solutions.

    Greenwave Powernode Series

    Greenwave- Powernode Series - VueVille
    The Greenwave Powernode Family

    The Greenwave Powernode series consists of everything you need to control electrical appliances and monitor their power usage. Their most popular products are the 1-port wall plug and the power strip.

    Greenwave 1-port Powernode Specifications

    [table id=35 /]

    Design

    The Greenwave 1-port PowerNode is a well-built device with a premium feel to it. The rounded contours and matte plastic exude high-quality which you wouldn’t expect for such an affordable smart plug.

    Greenwave 1-port Powernode -Side View - VueVille

    On the front, there is a manual over-ride switch which also doubles up as a slightly confusing indicator LED array. I say slightly confusing because, it is not a single LED but a ring of LEDs arranged in a circle around and behind the button. The LEDs are used in a dizzying number of patterns to convey different states and operation modes – keep the manual handy.

    Greenwave 1-port Powernode - Pins View - VueVille


    Greenwave 1-port Powernode - Back View - VueVille

    Features

    Greenwave 1-port Powernode - VueVille
    Note that the reset button is also a SYNC button. Image courtesy – Vesternet

    The PowerNode is a first generation Z-Wave device, which means it is not based on the latest 500 series chipset. However I don’t think it matters because for switching and power measurement purposes the increased bandwidth of Z-Wave 500 is not needed. I also found the range of the device very good, so don’t let the 1st gen nature of the device discourage you.

    The PowerNode has both the basic relay function and a power usage monitoring feature. It supports a healthy switching capacity of 2,400W and up to 10A.

    The other main feature if the smart plug is that it can monitor and report the power usage of plugged in devices. I tested it with an LED lamp, a humidifier, a traditional CFL lamp and every time it gave a reading that was in line with the device’s stated power consumption.

    There is a room colour selection wheel at the bottom right, however this feature works only if you use Greenwave’s own Gateway controller. If this is the case, you can assign a colour using the wheel and it will reflect this assignment on the Gateway’s control panel. Frankly it sounds more like a gimmick than anything useful and anyway since I have a Vera Plus I can’t use this feature.

    There is a Reset button on the bottom of the plug, but what the manual doesn’t state clearly is that it is primarily a Sync button. Even the physical symbol on the button is that of SYNC. So its just a multi-purpose button that does different things based on how many times you press it. You will need to know this, otherwise you will spend ages wondering where on earth the sync button is like I did. Greenwave, you need to really sort out your user manual!

    Installation

    I found installation mostly straight forward except for finding the sync button because the manual insists its a reset button.

    The rather confusing user manual is written mainly with the assumption that you will be using the PowerNode with Greenwave’s own Gateway. But I suspect most people will want to use it with their own Z-Wave gateway, so here are the steps for adding it to your Z-Wave network (I used a Vera Plus, but the steps are the same):

    1. Click on the Add Device button
      Greenwave PowerNode 1-port Review - Step 1 - VueVille
    2. Now you need to select the type of device – choose ‘Generic Z-Wave Device’
      Greenwave PowerNode 1-port Review - Step 2 - VueVille
    3. Then you will see this screen, simply click ‘Next’
      Greenwave PowerNode 1-port Review - Step 3 - VueVille
    4. Now plug the PowerNode into an electrical outlet that is close to your Z-Wave controller.
    5. Locate the sync button on the PowerNode. It is a small round button on the side of the device, marked with the sync symbol.
    6. Press and hold the sync button for one second until the PowerNode activity indicator begins to display a clockwise-rotating pattern, which shows that the PowerNode is attempting ‘inclusion’ into your Z-Wave network.
    7. Now press Next on your Vera Plus wizard
      Greenwave PowerNode 1-port Review - Step 4 - VueVille
      You will then see the following screen as the Vera Plus starts looking for any new Z-Wave device in range:
      Greenwave PowerNode 1-port Review - Step 5 - VueVille
    8. After a few seconds, the rotating pattern on the PowerNode LED indicator should stop and all bars turn green for five seconds to indicate successful inclusion. The PowerNode is now part of your Z-Wave network. If the rotating pattern has stopped but the bars rapidly flash green for five seconds, then the PowerNode inclusion process has failed, and you must start over.
    9. Give the device a name and click Finish.
      Greenwave PowerNode 1-port Review - Step 6 - VueVille
    10. You will then see a “Please Wait” message at the top.
    11. When it disappears, your new device will show up in the device list.
      Greenwave PowerNode 1-port Review - Step 7 - VueVille

    Performance

    So when it comes to using it daily, how did it fare? Very well – I have 5 of these smart plugs in service for the last 6 months and they have been simply excellent. It has turned on and off every time as commanded by the Vera Plus. No issues at all with wireless range and they function as signal repeaters, so are great for extending the reach of the network too.

    Power usage monitoring works well and while I am not doing anything with the info presently, its nice to know I can keep an eye on the connected appliance’s power usage.

    There is no noticeable delay between me turning on my living room lamp from Imperihome and the LED lamp actually turning on.

    Greenwave 1-port Powernode Review - Imperihome - VueVille

    If there is one quibble I have, its the PowerNode being quite needy when it comes to receiving a pulse from the Vera Plus. If it does not hear from the Z-Wave controller every couple of minutes, it starts angrily flashing its very bright LEDs. Yes they are enough to make you lose your sleep. The culprit is the default poll time which you can increase to sort out the problem, or you can instruct your controller to send the PowerNode a pulse every minute and keep it happy.

    Verdict

    [review]

  • Hands-on Review: Aeotec Multisensor 6 Z-Wave Gen 5 (ZW100)

    Hands-on Review: Aeotec Multisensor 6 Z-Wave Gen 5 (ZW100)

    As my baby son suffers from a mild case of dry skin, we need to ensure the environment in his nursery is always at optimum levels. The main factor that I need to monitor and control is the humidity. That’s where the Aeotec Multisensor 6 comes in.

    Aeon Labs Aeotec Multisensor 6 Review - VueVille

    You can use the Multisensor 6 with any Z-Wave hub such as my favourite the Vera Plus or the Samsung SmartThings hub.

    I already use the Fibaro Sensor for my living room but it lacks the one sensor type I need for the nursery – humidity. So I looked around and found the Aeotec Multisensor 6 which is the successor of the Aeotec Multisensor 5. Compared to the previous version, the Multisensor 6 is 70% smaller and 50% lighter at 2.6 oz.

    [text-blocks id=”earning-disclaimer”]

    [wpsm_titlebox title=”Contents” style=”main”][contents h2][/wpsm_titlebox]

    Aeotec Multisensor 6 – Specifications

    The Multisensor 6 has, you guessed it, 6 different sensors:

    1. Motion sensor
    2. Temperature sensor
    3. Light (lux) sensor
    4. Humidity sensor
    5. Vibration sensor
    6. Ultraviolet sensor

    In case you were wondering, the Gen 5 in the sensor’s model name refers to the Gen 5 Z-Wave standard it works on.

    Detailed Spec

    [table id=34 /]

    Unboxing the Aeotec Multisensor 6 Z-Wave Sensor

    The Aeotec Multisensor 6 comes in an attractive packaging and comes with an instruction manual and the following:

    • Battery cover
    • Back-mount arm
    • Double sided tape
    • 2x screws
    • Micro USB cable.

    Design

    The Multisensor 6 has a conventional cuboid form which makes it easy to place on flat surfaces. This was one thing that bugged me about the Fibaro motion sensor which likes to keep rolling about because of its spherical shape.

    Aeotec has made the sensor very compact and is just a bit larger than a CR123A battery as can be seen below.

    Aeon Labs Aeotec Multisensor 6 Review - Size Comparison - VueVille

    On the front face, we find the very traditional-looking PIR sensor cover and just two other components – the lux sensor and an indicator LED which flashes green whenever motion is detected.

    Aeon Labs Aeotec Multisensor 6 Review - Back View - VueVille

    On the back side, the battery cover reveals a cover lock slider, the back-arm mount hole, a Z-Wave Action button, and some technical information about the multisensor.

    Aeon Labs Aeotec Multisensor 6 Review - Battery Cover Opened - VueVille

    Taking the battery over off reveals the battery compartment that takes the two CR123A batteries (not supplied), the microUSB port and the rest of the Z-Wave Action button. While the Fibaro motion sensor could be powered only by batteries, the Aeotec Multisensor 6 can use either batteries or the supplied USB cable for power. The advantage of USB power is that you can get real-time sensor data instead of once every few minutes with the batteries.

    Installing and configuring the sensor

    The Z-Wave Action button is a multifunction button that can be used to put the sensor into network inclusion mode (adding the sensor to your Z-Wave network), exclusion mode (removing the sensor from your Z-Wave network), enable/disable the 10 wake-up mode, and reset it to factory defaults.

    I first put my Vera Plus Z-Wave hub into ‘add device’ mode and then put the multisensor into inclusion mode by pressing the action button once. Immediately the Vera Plus detected the Multisensor and added the various sensors to the Vera dashboard.

    Features & Performance

    Let’s look at the various sensors and how they performed in my home Z-Wave network.

    Motion Detection

    The claimed motion detection range of the Multisensor 6 is 120 degrees horizontally with a 5 metres range. I have placed the sensor on the chest of drawers in the nursery and it does indeed have good coverage and a range of at least 5 metres. It is sensitive, reacts instantaneously to motion and has never missed a motion event.

    Thinking of using the Multisensor 6 outdoors? While this is not the intended use of this sensor, you can adjust the sensitivity of the Multisensor 6’s sensor settings. The parameter that controls this setting is Parameter 4 [1 byte]. The various values for this parameter are:

    • 0 = Disable
    • 1 = Very Low Sensitivity
    • 2 = Low Sensitivity
    • 3 = Medium Sensitivity
    • 4 = High Sensitivity
    • 5 = Max Sensitivity

    By default, the sensitivity setting is set to the maximum sensitivity value of 5.

    You can also control the time gap between sensor activations by using Setting Parameter 3 [2 byte]. For example if you set the value to 10, the PIR sensor timeout will become 10 seconds – so for 10 seconds after detecting motion it will ignore all further motion. After that, it will then again be ready to detect motion.

    These two settings can be used to control and reduce false motion alerts.

    Temperature

    I compared the temperature sensor’s readings to the Fibaro’s putting both sensors side by side. The two devices agreed within 0.1% of each other which was quite reassuring. When the temperature in the room changes slightly, I noticed that by default the sensor reports it only once every 10 minutes or so.

    However when there were larger variations in temperature, the Multisensor seemed to inform the Vera Plus quickly – I am happy with this behaviour.

    Light level and humidity sensors

    The light level sensors and humidity sensors work very well. According to Aeotec, the MultiSensor 6 comes with a digital light sensor that’s capable of sensing lighting between 0 lux to 30000 lux in real-time.

    I used the excellent advanced scene control plugin PLEG to create a scene based on the reported humidity level. Whenever the humidity level as reported by the Multisensor goes above 65%, the Vera Plus switches off my humidifier connected to a Greenwave Z-Wave power plug. This way the room does not get too damp.

    Vibration and Ultraviolet sensors

    My Vera Plus firmware did not support these two sensors at the time of writing this article. But as is usually the case, Vera is quick to support new Z-Wave devices and the UV sensor support has already been added in UI7 firmware version 7.0.15.

    Battery Life

    While the Fibaro needs only 1 CR123A battery and has only 1 battery slot, the Aeotec’s battery compartment has two battery compartments. Interestingly the sensor will work off just one battery, but having two of them will double the battery life.

    One niggle I observed was that the sensor initially showed the battery status as 50%, even though the batteries were brand new. 4 months in, the battery level is at 47%. So absolute battery consumption seems to be fine but the battery gauge seems to be a bit off. Now this could be down to the specific batteries I use with the device.

    Wireless range

    The Multisensor 6 has very strong wireless range and was able to stay in touch with the Z-Wave network wherever I took it in the house.

    Verdict

    I love the Aeotec Multisensor 6 and highly recommend it. It has every sensor you will ever need to monitor the environment in your house.
    [review]

    Where to buy

    [easyazon_link identifier=”B0151Z8ZQY” locale=”US” tag=”vueville.com-eaz-20″]Check Price on your local Amazon site[/easyazon_link]

    [text-blocks id=”5527″ slug=”earning-disclaimer”]

  • Hands-on Review: Vera Plus Z-Wave Smart Home Controller

    Hands-on Review: Vera Plus Z-Wave Smart Home Controller

    I have always wanted a smart home. Even back when I was a kid, I dreamt about being able to just say things and then have it happen. A bit like Knight Rider, but with my house. Thanks to the rapid advancement of technology resulting in amazing gadgets like the Vera Plus, that dream is now coming true for me and many other tech geeks.

    I have been writing this post over a few months. I started writing it when I first purchased the Vera Plus. But as I knew very little about home automation back then, I decided I would first use it extensively, see if it could do everything I wanted it to do and then write a detailed review about my experience. And that time has come, 6 months on.

    So what did I want my Vera Plus to do? And how did it do?

    • Zone-based fully automatic thermostat-based smart heating that I can control from anywhere in the world – Check*
    • Report on the motion/temperature/humidity/light levels of various rooms and then take action based on it – Check
    • Turn on and off appliances using smart plugs – Check
    • Be able to interface with my IP cameras and take snapshots, record videos – Check
    • Create fancy scenes for my home theatre at the push of a button – Check
    • Have a tablet on the wall showing the vital stats of my smart home – Check
    • Be able to control everything from my smartphones anywhere in the world – Check
    • Speak to my phone and make things happen around the house – Check 😀
    • Regular updates to support new devices – Check
    • No monthly fees – Check

    *Using additional paid PLEG plugin

    [toc]

    Z-Wave – my Home Automation standard of choice

    As explained in my Home Automation 101 article, never before has there been so much choice if you are looking to make your home ‘smart’. Z-Wave, ZigBee, Wi-Fi, Lightwave RF, WeMo, Apple HomeKit, Amazon Echo (Alexa), and it goes on and on. I will quickly summarize my advice: not all home automation products can talk to each other and work well together. So consider carefully all the systems that you want to automate in your home and choose a HA standard that is:

    • Mature, tried-and-tested, and reliable
    • Wireless so that you don’t need to rip up walls
    • Low power usage so that you don’t need to change batteries often
    • Enjoyes wide industry support
    • Wide variety of affordable products that support it

    Z-Wave is emerging as the industry standard that meets all of the above. The  Vera HA controllers are the best in my opinion because they can communicate over not just Z-Wave but Bluetooth and ZigBee also.

    MiCasaVerde, Vera Control – Who are they?

    MiOS Ltd. is a Hong Kong-based business that owns Vera Control Ltd., the company that owns the Vera brand. It was started in 2008 by co-founders Aaron Bergen and Lewis M. Brown.

    Vera Control Ltd. used to be known as MiCasaVerde and you may find references to this name across the Internet and even on this very blog. Vera got in touch with me after this post was published and commented that three years ago they changed their name to Vera Control.

    What’s in the box

    The Vera Plus comes in an attractive green box packaging that prominently highlights some of its main selling points:

    • No monthly fees
    • Supports 1500+ devices
    • Z-Wave/ZigBee/Bluetooth and Wi-Fi compatibility
    Vera Plus - Box Package - VueVille

    On unboxing, you will find the following contents:

    • Vera Plus Controller
    • Power adaptor
    • RJ-45 Ethernet cable
    • A quick start instruction leaflet
    Vera Plus -Box Contents - VueVille

    Specifications

    [wpsm_comparison_table id=”11″ class=”hover-col1 “]

    Installation & Setup

    Vera Plus

    To start the setup process, I followed the Quick Start Guide, plugged it into my Netgear network switch with the supplied RJ-45 ethernet cable an powered it up. In no time, the Vera Plus booted up and I went to https://home.getvera.com as instructed by the guide.

    I was then presented with the T&Cs which I accepted. I then chose Vera Plus from the list of devices, and it found the Vera automatically on my network. For some reason, it didn’t work the first time for me, so if it fails the first time, just wait for 2-3 minutes and click retry.

    I was then asked to continue setting up my account while the device software was being updated. This is where I hit the first roadblock. I didn’t appreciate being forced to enter not just my full name, email address, and password, but my full street address and mobile number as well! Absolutely unnecessary to require this level of personal information for a home automation controller that claims to protect users’ privacy by not needing the cloud to work. Since the Vera wouldn’t let me continue without entering all this private information, I obliged by entering some fake information. If you force people to part with their privacy to use your product, there’s every chance users enter gibberish. Not only does that mess up a company’s CRM data accuracy, it also undermines the main selling point of the Vera – security conscious people like me choose the Vera because it can work without the cloud, and we don’t want to part with any more data than we need to. There’s no monthly subscription fee, so then why does Vera need my personal details? This is the main reason I didn’t go for Samsung Smart Things, it is crippled without cloud access.

    After about 5 minutes, the software update completed, and a ‘Go to Dashboard’ button appeared at the top right (it is easy to miss!).

    This took me to a dashboard with the Vera listed and a ‘Complete Setup’ button. Clicking this takes you to the UI7 dashboard and asks you to verify your contact details and email address. I skipped the part where it wanted to verify my mobile number by SMS. Then you get to name your Vera, yay!

    Adding devices to your Z-Wave network

    The next step in the wizard is adding devices. In Z-Wave lingo, this is called inclusion. Essentially before you can use a device, it has to be paired with the Vera controller, just like a Bluetooth headset needs to be paired to your phone before you can use it.

    Vera Plus - Add ZWave Device - VueVille

    If you want to remove a device from your Z-Wave network, you will need to ‘exclude’ it. There’s a step-by-step wizard for that too.

    Adding a Fibaro Motion Sensor

    The first sensor I bought to go with the Vera Plus is the Fibaro 4-in-1 multi-sensor (which I reviewed recently), but it was not yet in the list of devices supported by Vera. I could choose to add it as a generic Z-Wave device, but I chose the closest option, a 3-in-1 Fibaro sensor. This meant that the vibration sensor was not detected and added as a Vera sensor, but this was fixed in subsequent software updates. The Z-Wave inclusion process went very smoothly, but I was a bit baffled why the sensors didn’t seem to show any data, but after a minute or two, the temperature showed up, albeit in Fahrenheit. Motion was also detected and reported in the form of a motion icon.

    Another thing I noticed is that the default temperature unit was Fahrenheit even though I had chosen the UK time zone and set my location to UK. I expected the unit to then change to Celsius. I was able to change this in the settings, but the Fibaro temperature was still in Fahrenheit. As I was quickly learning, I just needed to wait for a few minutes again. The F symbol was soon replaced with a C, so my temperature weirdly became 72C. Again, sure enough, in another 2 or 3 minutes, the temperature was reported as 23.2 deg C. Being an absolute newbie to Z-Wave, I realised that some settings don’t immediately take effect, presumably as the sensors touch base with the Vera only every few minutes.

    So all was good, my motion and temperature sensors were up and running. What about the lux sensor of my Fibaro? All this time, there was just nothing there. Blank. After some googling, I found that putting it under a bright source of light helps speed up the calibration process. Sure enough, after around 30 mins, I started getting a lux reading.

    Adding IP Cameras

    Next I added my Hikvision IP cameras. The Vera Plus doesn’t support RTSP streams but it supports only the MJPEG protocol. All the cameras were added successfully but the camera images seemed a bit slow to load. That’s when I got a notification to install the latest firmware. Once that was done, the first thing I did was return to the camera sections and immediately everything worked so much faster.

    Vera Plus - IP Cameras Screen - VueVille

    The Vera Plus can record the camera streams or take snapshots based on rules (scenes) that you can create.

    The Imperihome app I use can pull RTSP streams directly from the cameras instead of pulling MJPEG streams from the Vera Plus. So this is the way to go if you absolutely need RTSP streams.

    Adding non Z-Wave devices

    One of the interesting features of UI7 is that it can send http commands. This means you can control devices on your network that are not Z-Wave based but have the ability to receive http commands. For example, my Panasonic smart TV and my Denon AVR support http commands. So I have integrated them into my smart home network very easily. This is also how it sends voice alerts to my Imperihome tablet announcing that the boiler is being switched on, or that its time to close a door that has been open for too long.

    Features

    UI7

    MCV calls its latest operating system the UI7. This is the software that runs on its Vera devices including the Vera Plus. It is a web-based interface which is very modern and user-friendly. Various options are laid out logically and in a very intuitive manner. The thing with home automation is that once you set up your devices and schedules, you rarely need to go into UI7. You will most likely monitor and operate devices from your smartphone or a wall-mounted tablet.

    You can access the UI7 interface by typing in the IP address if you are inside your network, or remotely through Vera’s cloud servers if you are outside your home network.

    Vera House Modes

    Since the Vera Plus can also be used to either control your existing home alarm system or become your smart alarm system, it naturally supports the arm/disarm feature. This is achieved by having modes that your smart home can be in – by default the system is in Home mode. Which translates to disarmed.

    Arming is achieved by using one of the other modes – Away, Night or Vacation. All your smart devices are aware of the house modes and you can use these in the scene wizard or any of your plugins.

    Vera UI7 Plugins

    Just as most modern platforms, MiOS has a core of supported plugins and a huge number of plugins created by individuals. Since the Vera supports uPnP, plugins are available for almost any device you can think of. For example, my GC-100 Ethernet to Infrared hub is not supported by the Vera but there is a 3rd party plugin that does. So you can use plugins to extend the functionality of your Vera Plus.

    Geo-fencing

    This is a much hyped feature that many people desire. It goes like this – you pull up into your drive and your smart home knows you are near, and will trigger a welcome home scene – turn on the porch light, disarm the alarm system, turn up the heating or cooling based on the time of the year, turn on the coffee machine, you get the idea.

    Vera uses the app on your phone to detect when you are within range of your home network. So the moment your phone logs onto the Wi-Fi at home, the Vera Plus knows you are home. I personally don’t use this feature but its quite cool – I may start doing it soon.

    Programming the Vera Plus

    The primary method of programming the Vera Plus in UI7 to do things is by creating rules or scenes as UI7 calls them. Scenes are basically if-this-then-that type of scenarios where a trigger causes a device or set of devices to perform specific actions. The trigger may be a device in your network and/or a particular time of the day. You can create scenes using the excellent scene creation wizard or write your own LUA code which is the engine that powers Vera’s scenes.

    Vera Plus and sensors

    You can get very creative with a home automation controller like the Vera Plus and sensors. One of the scenes I have created is based on the hallway Fibaro Sensor detecting motion between the hours of 11PM and 6AM in the living room as a trigger. This then fires an action of turning on the hallway light for someone hankering for a midnight snack!

    Since the Vera also knows when it is day and night anyway, I could also just set the time restriction as ‘day time’ or ‘night time’ or ‘1 hour after sunset till 1 hour before sunrise’, and the Vera won’t skip a beat. This sort of functionality is what makes the Vera Plus so easy to use for anybody.

    Vera Plus and IP Cameras

    I haven’t set up any specific scenes for cameras, I added them to the Vera just to quickly see all the streams in one Imperihome page. You can however use the LUA code feature to automate arming and disarming of the cameras, integrate the Surveillance Station of your QNAP NAS, and so on.

    Vera Plus and home heating controls

    One of the main reasons I got the Vera Plus was to add smart heating to my home. I had just replaced my dodgy old boiler with a spanking new one and it seemed to be the right time to go fully smart. Extensive research led me to the Secure SSR302 2-channel Boiler Receiver which has been well received by the Z-Wave community.

    It has two separate channels, so I can control my central heating and hot water channels separately. Installation was plug and play and I was soon on my way creating scenes to schedule hot water and central heating.

    But I soon realized that my vision of an ultra-automated zone-based smart heating system that automatically maintains the set temperature across my home was beyond the reach of Vera’s scene wizard. This is because the scene wizard does not have the ability to program using logical AND operations. This severely limits your ability to create complex scenes.

    Hours of research ensued and culminated in me stumbling across the excellent PLEG plugin. PLEG allows for conditional logic on steroids and transforms the Vera Plus from a capable HA controller to a fire-breathing monster. Mastering PLEG is a steep learning curve but oh the smart heating system that I was able to build with Vera and PLEG was worth the effort. I have since published a post on how I built it with all the logic rules so that you can just copy and paste it into your Vera!

    Mobile Apps

    Although the Vera smartphone app is perfectly adequate, after some research I decided to use the Imperihome app to control my smart home. The Imperihome app has been around for some time and is a visually appealing way to easily build a dashboard to monitor and control your smart devices. Did I say it supports audio alerts through Text to Speech? So you can set up the Vera to push audio notifications to devices around the home! This is very cool and never fails to impress friends and visitors.

    Here are some screenshots of my Imperihome dashboard pages:

    [wpsm_column size=”one-half”]Vera Plus Review - Imperihome - VueVille[/wpsm_column]

    [wpsm_column size=”one-half” position=”last”]Vera Plus Review - Imperihome - VueVille[/wpsm_column]

    [wpsm_divider top=”20px” bottom=”20px” style=”clear”]

    [wpsm_column size=”one-half”]Vera Plus Review - Imperihome Heating - VueVille[/wpsm_column]

    [wpsm_column size=”one-half” position=”last”]Vera Plus Review - Imperihome - IP Cameras - VueVille[/wpsm_column]

    Performance

    As my first Z-Wave controller, I didn’t really know what to expect from the Vera Plus. Having used it over 6 months, I can say that I am very please with the Vera Plus. I have since added many devices to my Z-Wave network: the Fibaro Z-Wave 4-in-1 sensor, an Aeotec MultiSenor 6-in-1, five GreenWave Node smart power plugs to control lamps , three Hikvision cameras, an Amcrest PTZ Wi-Fi camera, the Secure SSR302 2-channel Boiler Receiver and the Global Cache GC-100 Infrared Network Adaptor (to control older units in my home theatre via Infrared).

    The Vera Plus has seamlessly integrated all these devices transforming my home into a truly smart home. Everything has just simply worked with no issues whatsoever. Reliability has been a 100% and any changes I make from the Imperihome app instantaneously take place. For example, there is virtually no delay between pressing the switch to turn the lamp on and the lamp actually turning it on.

    On that note, one of the wonderful things about Z-Wave is that it is always aware of the actual state of a device, or in other words Z-Wave supports 2-way communication or status reporting. So if a lamp is on, it actually shows that the lamp is on and using the GreenWave power plug’s power meter feature, it can measure actual power consumption and do things with it.

    You may think, duh status reporting is a necessary feature to know the state of a device without actually being in front of it to see it. I agree, a big part of home automation depends on knowing the current state of a device! Well my friend, you may be surprised to hear that while all home automation protocols can only send an on/off command, some cannot actually then query the status to see if the command was successfully received. For example Lightwave RF does not support status reporting.

    Remote Access

    What about accessing the Vera Plus from outside the home? By default, the Vera Plus registers itself with MiCasaVerde’s cloud platform. So you can login to your Vera from any where in the world and check on or control your smart home. Since I run my own OpenVPN server at home, I haven’t needed to rely on this but it has worked very well when I tested it remotely.

    Verdict

    I strongly believe that Z-Wave is the best Home Automation protocol and that the Vera Plus is the best Home Automation controller for beginners to home automation. With HA, you want a mature technology that you and your family can depend on day and night. That’s what Vera Control has delivered with the Vera Plus. It is indeed a wonderful time to be alive, where such awesome technology costs just a few hundred dollars!

    I have since moved to the HomeSeer HS3 software as the level of complexity that my smart home has to deal with was difficult to attain with Vera. But the Vera Plus is a lot more accessible if you are new to smart homes and home automation.

    [review]

    Where to buy

    [easyazon_link identifier=”B01BX9P89Y” locale=”US” tag=”vueville.com-eaz-20″]Check Price on your local Amazon site[/easyazon_link]

    The Competition

    Samsung SmartThings vs. Vera Plus

    A smart hub that started out strongly but under Samsung’s watch has become a total mess. The culprit is its reliance on the cloud for processing rules/scenes. Just head over to the Smart Things forum and have a look at what the owners are going through. The poor extremely poor and unreliable cloud platform and utter disregard for existing users is what put me off Samsung SmartThings and I am glad.

    Heck, it doesn’t even have a proper rules/scenes engine after the excellent 3rd party developer of Rules Engine was forced to stop development!

    [wpsm_quote author=”Business Insider” float=”left” width=”100″]
    SmartThings, Samsung’s smart home subsidiary, has had a large number of complaints about glitches with its smart home hub posted on its community message board and Reddit in recent weeks. Users called the system “fatally flawed,” and reported that their devices randomly disconnect from the system or turn on or off without command. One user, Shelley Powers, wrote that the hub repeatedly made her lights switch on and her home alarm system go off for no reason, CNET reported.

    Rule Machine, a smart home app for making smart home devices perform complex tasks, withdrew support for SmartThings last week, citing these technical problems.
    [/wpsm_quote]

    Read more about the reasons I wouldn’t recommend Samsung SmatThings to anybody. There are several questionable bloggers out there pushing the SmartThings hub as the best smart home hub, but as you can see, I beg to differ!

    Vera Plus vs. Fibaro HomeCentre 2

    This is another Z-Wave smart home controller that is often compared to the Vera Plus. Even if performance, features and reliability were comparable (and they are not), the Vera Plus costs a fraction of the HC2. So the Vera Plus is much better value of money.
    [text-blocks id=”4426″]

  • Hands-on Review: Fibaro Z-Wave Motion Sensor Gen5 (FGMS-001)

    Hands-on Review: Fibaro Z-Wave Motion Sensor Gen5 (FGMS-001)

    When I started thinking about getting into home automation and building my smart home, I spent months researching everything ZWave. One name kept popping up again and again, Fibaro. Owned by the Polish Fibar Group, the Fibaro brand is one of the most popular home automation brands around today.

    You would be mistaken for thinking you are getting a bargain with a Fibaro product, it being Polish and all. But no, they are not exactly cheap, just look up their flagship ZWave hub, the Fibaro Home Center. It can easily cost three times as much as the Vera Plus. I don’t think its particularly good value either, but that’s a topic for another day. Question is how will the Fibaro Motion Sensor fare?

    After living with the [easyazon_link identifier=”B01CPR7VX4″ locale=”US” tag=”vueville.com-eaz-20″]Fibaro Z-Wave Motion Sensor Gen5 (FGMS-001)[/easyazon_link] for 3 years, I can say this multi-sensor is quite decent if not exactly great value for money. Its a stylish, well-made, reliable ZWave sensor with very good battery life. Would I get another one? Only if I can find one significantly cheaper than my current favourite, the [easyazon_link identifier=”B0151Z8ZQY” locale=”US” tag=”vueville.com-eaz-20″]Aeotec MultiSensor 6[/easyazon_link].

    [wpsm_titlebox title=”Contents” style=”main”][contents h2][/wpsm_titlebox]

    Z-Wave Sensors

    If you are just starting your Home Automation journey, let me backtrack a bit and explain my approach. I chose to build my home around the ZWave standard. I did so largely because its a mature standard, enjoys wide industry support and there is a huge range of ZWave products to choose from including multi-sensors, door locks, alarm systems etc. For a complete overview of the various choices of Home Automation standards and devices, read my guide here.

    While you can get a simple ZWave motion detector, a multi-sensor like the Fibaro is more interesting and ultimately more useful. When we talk about making a home smart, its about understanding what’s happening inside a particular room and then the house automatically taking action based on predefined steps:

    • On motion being detected in a hallway, my Vera Plus would ask the indoor Amcrest PTZ camera to move to a watch the doorway, take a snapshot, record a clip and email it to me.
    • Or when the temperature falls below a particular point, the temperature sensor in the room would ‘call for heat’ and my Vera Plus hub would respond by turning on the boiler.
    • Or when the light falls below a certain level, I can ask my Vera Plus to turn on my bedside lamp starting at 20% brightness. It could even ramp it up slowly over 30 mins, and then ramp it down later on as I go to bed. If the humidity goes above a certain level, my Vera Plus can turn on the smart plug into which my dumb dehumidifier is plugged in.

    So as you can see, its very nice to have certain sensors in each room of the house – motion, light level, temperature, humidity etc. That’s why manufacturers like Fibaro have made multi-sensors, a single device which can typically monitor a few different environmental factors. All in one convenient small device that can be hidden away anywhere. You can see why I love these cool little devices!

    The Fibaro Motion Sensor also comes in a Bluetooth version (FGBHMS-001) which is compatible with Apple HomeKit.

    Fibaro Motion Sensor Gen5 – Specifications

    [table id=32 responsive=scroll /]

    The Fibaro Motion sensor is a universal ZWave device, so it will work with any ZWave hub such as the Vera Plus, the Vera Edge, or the Samsung SmartThings.

    Unboxing the Fibaro Z-Wave Motion Sensor

    Fibaro ZWave Motion Sensor Multi Sensor Box View - VueVille.com

    The Fibaro Motion Sensor comes in a colourful high quality box.

    Fibaro ZWave Motion Sensor Multi Sensor Box Back View - VueVille.com

    You can see the model number FGMS-001 and the firmware version of the sensor printed outside the box.

    Fibaro ZWave Motion Sensor Multi Sensor Box Contents - VueVille.com

    The box contains the following:

    1. Fibaro Gen5 Motion Sensor
    2. Holder to attach the sensor to the wall
    3. Installation screw and rawl plug
    4. Instruction manuals
    5. One CR123A battery

    Design

    The Fibaro sensor is a tiny round globe with a multi-colour LED inside. I knew it was a compact device but when I first opened the box, I was really surprised to see just how small it was. It measures just 46 mm (1.8 inch) across.

    Fibaro ZWave Motion Sensor Multi-Sensor - VueVille.com

    There is a very distinctive cat-eye shaped LED light behind the Passive InfraRed (PIR), and it lights up whenever it detects motion. The colour of the LED depends on the temperature in the room and the light intensity. So when you walk into a room, it will light up and then you will easily know whether its too cold or too warm. Turn the cover counter-clockwise and the sensor opens to reveal its innards.

    Fibaro ZWave Motion Sensor Multi-Sensor Size - VueVille.com

    A CR123A battery is pre-installed, which is very welcome. A note on the battery: after 3 months of use in our hallway, my Vera Plus reports the battery life at 100%. I am not sure how correct that is but it bodes well for the little Fibaro sensor – Fibaro claims a 2 year battery life. The motion sensor measures the battery level every 24 hours and reports it to the ZWave hub or your Apple device if you are using HomeKit. If the battery level drops below 15%, the sensor will also send a low battery warning.

    Installing and configuring the sensor

    One of Fibaro’s promotional videos shows the sensor being used in an outside porch and the specs mentioning outside range, which makes me wonder whether I can use it outdoors and how water-proof it is. But the manual is clear the Fibaro is intended to be an indoor device and that’s where I am using it. Of course, you can’t really place the Fibaro sensor on a shelf because its round. But its very easy to install with only a single screw needed. The sensor’s range is quite good at 50 metres. I have moved mine all over the house and it has been brilliant. It never once lost the wireless connection to the ZWave network.

    Now the sensor has a few tricks up its sleeve – it can help you scout out the perfect installation location. Clicking the B-button once wakes up the device, but if you hold it, you can access its menu! Yes the sensor has its own little menu which will help you do a ZWave range test or reset the device. The range test is particularly cool as the sensor will indicate the strength of the network using its LED. You can use this feature to troubleshoot other misbehaving devices on your network too.

    The inclusion process into my ZWave network was quick and went off without a hitch. There is a button inside the sensor that Fibaro calls the B-button. After putting your ZWave controller into inclusion mode, press the B-button on the sensor 3 times quickly. Your hub should detect the sensor and add it to the ZWave network.

    My inclusion process was successful but only 3 devices showed up in my Vera control panel: one for each sensor except the accelerometer. I haven’t investigated this further but I am guessing its because the Vera UI7 doesn’t recognise that particular sensor.

    Fibaro ZWave Motion Sensor Multi-Sensor Vera Plus View - VueVille.com

    Features & Performance

    Motion Detection

    The Fibaro Motion Sensor claims to be able to detect motion within a 7m range, but I think this is too optimistic. I have found the Fibaro to be able to detect motion accurately and quickly within a 3-4 metre range which is less than the claimed 7m range but in reality is perfectly adequate for me. I have mine installed at a 2.4m height as recommended in the user manual.

    Temperature and Light level

    Although its primary function is motion detection, the Fibaro is a 4-in-1 sensor. It can monitor ambient temperature between 0 to +40°C with an accuracy of ±0.5°C and the light level between (0 – 32,000 Lux). I found the ambient temperature and light level measurements to be inline with other sensors. There’s even a temperature offset feature which can take care of the difference in temperature between the lower level of the room (where you and I will be at) vs. the higher level where the sensor may be installed.

    However as is common with other battery powered devices, I found that the Fibaro will report a change in temperature or light levels only if it changes by a certain amount (0.5 deg C and 200 lux apparently). This helps conserve the battery but you lose real-time monitoring. If this is a deal-breaker, consider other multi-sensors such as the Aeon MultiSensor 6 which can do real-time monitoring with a USB power option.

    Accelerometer

    The 4th and final sensor is the accelerometer. The accelerometer is useful in case somebody tries to tamper with the sensor. If you physically touch the device, the accelerometer will get activated and flash the LED in all its colours rapidly.

    Other features

    Now this is something I look for in every device – a reset button. The Fibaro motion sensor has one. Surprisingly enough some companies think its fine to make their substandard devices without a reset button (Popp, I am looking at you).

    You may have noticed the Gen5 at the end of the Fibaro’s model name – this refers to the latest generation ZWave 500 chipset (as opposed to 300). This version has improved range and battery life, so is a good feature to look for.

    There are some other features that work only with a Fibaro Home Center hub:

    • People counting if you have more than one Fibaro sensor
    • Inactivity detection

    Fibaro 4-in-1 Motion Sensor vs. Aeon Labs Aeotec Multisensor 6

    One sensor the Fibaro is missing is the humidity sensor. This is very useful for me as we have a little baby and that’s why I ended up getting the Aeon Labs Multisensor 6 for the nursery. They are very similarly priced which makes the Fibaro less value compared to the Aeon Multisensor.

    Verdict

    My main gripe with the Fibaro Motion Sensor is that it is expensive compared to the Aeon Labs Multisensor 6 which has two additional sensors (humidity and UV level).

    [review]

    Where to buy

    [easyazon_link identifier=”B01CPR7VX4″ locale=”UK” tag=”vueville.com-eaz-21″]Check Price on your local Amazon site[/easyazon_link]

    [wpsm_divider top=”20px” bottom=”20px” style=”transparent”]

    [text-blocks id=”5527″ slug=”earning-disclaimer”]