Growing up in the early 2000s, I remember the Wi-Fi in our home being slow, unreliable but most of all extremely spotty. There were some areas of the house that were just dead zones. But after 2 decades, technology has advanced to the point where you can get speedy Wi-Fi that can stream multiple 4K streams simultaneously along with all the other traffic in a typical digital household
Now how reliable that Wi-Fi is across the whole home and whether there are dead spots is another matter altogether. If your home is large or spread across multiple floors, a single Wi-Fi router is just not going to cut it. But your ISP-provided router comes with just 1 Wi-Fi radio.
The answer to this conundrum is a Mesh Wi-Fi network. Ubiquiti have been offering their UniFi line of Wi-Fi access points long before the term mesh wifi became fashionable. All UniFi access points (AP) are mesh devices, because mesh simply means that it supports wireless up-link. Each UniFi AP can wirelessly link to each other, they just need power. Its still recommended to wire each AP to your router wherever possible, because wireless up-link is basically using a wireless back-haul channel which reduces the available data throughput of the AP.
While the likes of TP-Link, Google and Netgear have decent mesh Wi-Fi offerings these days, UniFi WAPs are at a whole different level when used as a part of a UniFi OS/console managed home network. And that’s exactly what we have in the VueVille DIY Smart Home network.
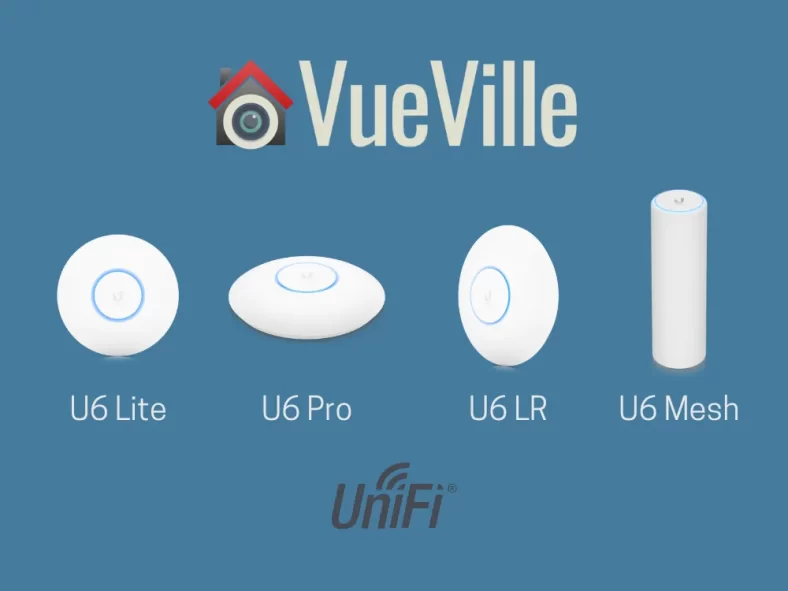
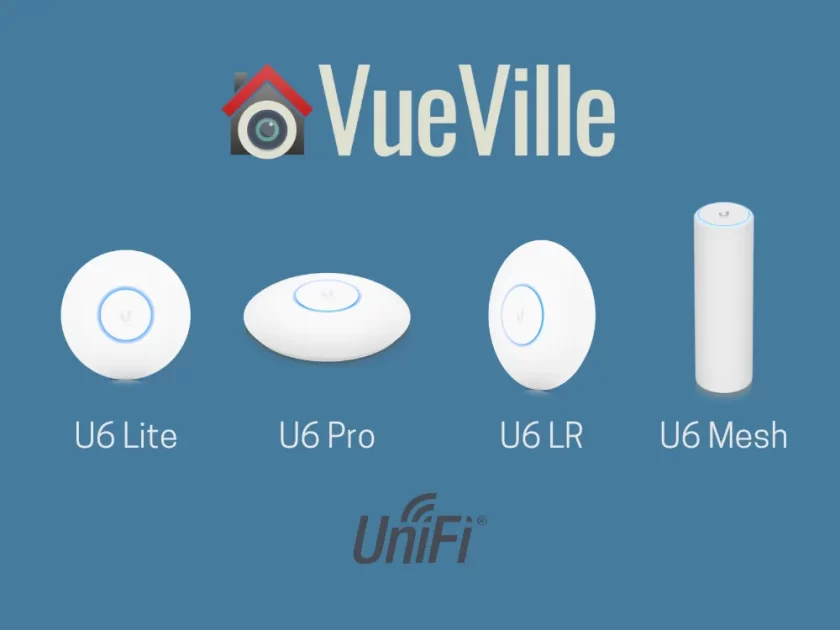
The UniFi line is great but can be a bit confusing for beginners to understand. So I have put together this comparison of their latest Wi-Fi6 compatible access points – the U6 Lite vs. U6 Pro vs. U6 LR (LR = Long Range).
A quick note: As an Amazon Associate I earn from qualifying purchases. This post contains affiliate link(s). An affiliate link means I may earn advertising or referral fees if you make a purchase through my link, at no extra cost to you.
Ubiquiti is a publicly listed American company based in California and was founded in 2003. Ubiquiti had revenues of over $490 million in the last quarter of 2022. Ubiquiti has several different brands such as UniFi, AmpliFi, EdgeMax, UISP, airMAX, airFiber, GigaBeam, and UFiber, aimed at different audiences.
The UniFi brand is the one that interests enthusiasts like me. It is considered a prosumer product line in that it supports features that are found more commonly at the enterprise-level but at a more affordable price.
A prime example of these enterprise-level features is the ability to use a single software interface called the UniFi Controller to manage every single device in your home network – managed switches, unmanaged switches, PoE switches, Wi-Fi access points etc. But let me make it more real for you – imagine you have 3 Wi-Fi access points across 3 levels of your town home and you want to add a new Wi-Fi network (SSID) for your IoT devices. With UniFi, you login to the controller interface and create the SSID. Click save and all 3 WAPs get provisioned immediately and your new SSID is live.
Some other enterprise-level features that the UniFi WAPs provide are multiple SSIDs, VLANs, guest networks, and very high number of concurrent users (300+).
Differences between U6 Lite vs Pro vs LR vs Mesh
The UniFi Access Point (UAP) U6 family consists of 5 models: the U6 Lite, the U6 Pro, U6 Long-Range (LR for short), U6 Enterprise, and the U6 Mesh.
Hold on, what is the U6 Mesh? Are the other U6 models not mesh devices? Of course all UniFi WAPs are mesh devices, as I explained earlier. I think UniFi chose a terrible name for the U6 Mesh and I can only imagine this for marketing purposes. This model is obviously aimed at the Google/Netgear/TP-Link plug-and-play mesh Wi-Fi market who are not very tech-savvy but represent a growing market. Those products typically only support wireless up-link because they do not have Ethernet ports. But the U6 Mesh has an Ethernet port, so it is just as wire-able as the other U6 models. The U6 Mesh should really have been called the U6 Pro Outdoor or something, because it is technically very similar to the U6 Pro, but with an IPX5 waterproof rating.
For our comparison, I have excluded the U6 Enterprise because home users don’t really need the advanced features such as 2.5 GbE, 6 GHz support, 600 simultaneous user support, or the much higher price point. But if you are still interested in it, I will have a U6 Professional vs. U6 Enterprise comparison soon.
Feature Comparison
The biggest differences between the UAP U6 Lite vs Pro vs LR vs Mesh are:
The U6 Mesh can be used outdoors but the others cannot.
The U6 Mesh can be placed on a table, wall-mounted or ceiling-mounted, but the others are designed to be wall or ceiling mounted only. You can of course place the others on a table but coverage may suffer.
The U6 Mesh has a horizontal antenna pattern to maximise coverage on the same level/floor, the others have a forward beam-pattern that is better suited to ceiling-mounting.
The U6 Lite is only dual-band (2.4 GHz and 80 Mhz channel-width), but the others also support the 160 MHz channel-width.
The U6 Lite supports only WiFi4 (802.11ac) on the 2.4 GHz band, but the others support WiFi6 (802.11ax) on the 2.4 GHz band.
The U6 Pro and U6 LR have more powerful processors and more RAM than the others.
The U6 LR is the only one that has4×4 MIMO in the 2.4GHz band.
The U6 Lite is the only one that does not have 4×4 MIMO in the 5 GHz band.
The U6 Lite has a 1.3 Gbps aggregate throughput, the U6 LR has 3.0 Gbps, the U6 Pro and U6 Mesh both have 5.3 Gbps.
Performance Comparison
I have been using the UniFi U6 Lite in my home for many months now and have been impressed by how much it improved Wi-Fi in my home. Range is very good and so are transfer speeds. But how does it compare to the other U6 models?
I studied all the major reviews of the U6 model range and combines with my personal experience, have come to the following conclusions:
The U6 Lite and U6 Mesh have comparable 2.4 GHz performance at various distances, but at 5 GHz the U6 Mesh is faster.
The U6 LR unsurprisingly has the best performance (speed and range) across both 2.4 GHz and 5 GHz bands, thanks to the highest signal strength and 4×4 MIMO on all bands.
Instead of a single U6 LR, you may be better off having two U6 Lite APs to ensure a stronger, consistently fast signal for almost the same cost.
Frequently Asked Questions (FAQ)
Is Mesh faster than Wi-Fi?
Mesh networking simply means that the Wireless Access Points (WAP) can talk to each other instead of a central base station. This allows you to extend your Wi-Fi range considerably because each WAP can simply connect to the nearest WAP. This is called wireless up-link and is the term that UniFi also uses. So mesh networking does not make your Wi-FI faster, it is just a different way of connecting wireless access points together.
Does the UniFi-6 support Mesh?
Yes, all the UniFi 6 Access Points support mesh networking.
Can I use the U6 Pro or U6 LR outdoors?
While these are not rated water-proof, they are IP54 rated. The 5 means that they are dust-resistant, and the 4 means that they can withstand splashes of water. So exposure to some moisture should be OK, but you should really consider the U6 Mesh which is IPX5 rated for withstanding even jets of water.
Product prices and availability are accurate as of the date/time indicated and are subject to change. Any price and availability information displayed on https://www.amazon.com/ at the time of purchase will apply to the purchase of this product.
Product prices and availability are accurate as of the date/time indicated and are subject to change. Any price and availability information displayed on https://www.amazon.com/ at the time of purchase will apply to the purchase of this product.
Product prices and availability are accurate as of the date/time indicated and are subject to change. Any price and availability information displayed on https://www.amazon.com/ at the time of purchase will apply to the purchase of this product.
Product prices and availability are accurate as of the date/time indicated and are subject to change. Any price and availability information displayed on https://www.amazon.com/ at the time of purchase will apply to the purchase of this product.
(* = affiliate link / image source: Amazon Associates Program)
Conclusion
The U6 Pro is the recommended model for most people if you want the fastest possible WiFi6 experience (in most scenarios) on both the 2.4 GHz and 5 GHz bands.
If you are on a budget, the U6 Lite will be more than enough for most people.
If you are looking for an outdoor option that is waterproof, go for the U6 Mesh.
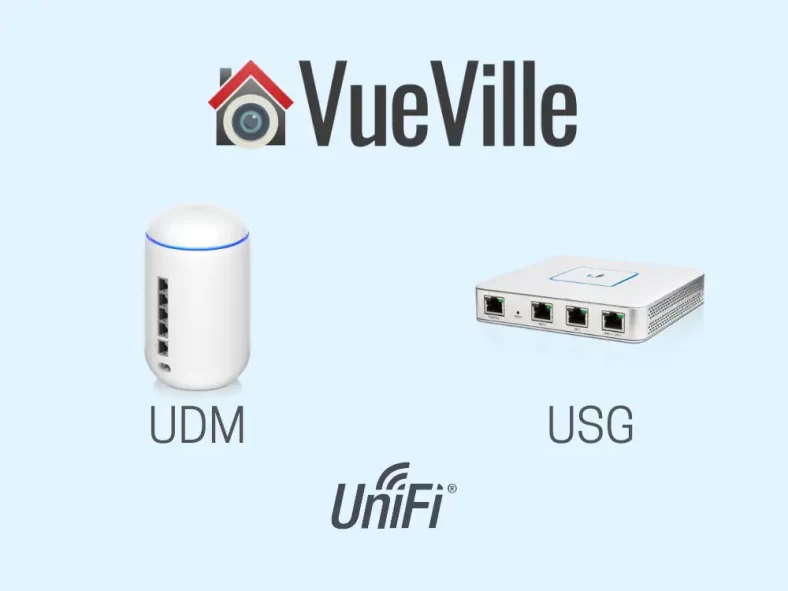
The Unifi Security Gateway (USG) from Ubiquiti has been faithfully serving my family’s home networking needs for over 4 years now. Back when I started building my DIY Home CCTV system and DIY Smart Home network, the USG was the best choice for enthusiasts who wanted to get a high performance router with a good built-in hardware firewall.
Ubiquiti has since launched the Unifi Dream Machine (UDM) range which integrate several different functions into a single device. The UDM is the baby of the range and is basically a straight replacement of a standard WiFi router like the one you get from your ISP, but with way more features that a fast and secure home network needs.
If you are considering upgrading from the USG to the UDM, this article will cover everything you need to know.
A quick note: As an Amazon Associate I earn from qualifying purchases. This post contains affiliate link(s). An affiliate link means I may earn advertising or referral fees if you make a purchase through my link, at no extra cost to you.
The USG was a router meant to be used together with the Unifi Controller Software and the rest of Unifi’s ecosystem to create a complete home or office network. It had features like dual WAN with failover, integrated firewall with advanced threat detection and a maximum 3 Gbps line rate.
What else would you have needed to complete your home network built around the USG? A PC or Unifi Cloud Key to run the Unifi network controller software, a Unifi managed switch, and a Wi-Fi access point. That’s how I built my home network for example.
I refer to the USG in the past tense because its no longer on sale and you could say its been superseded by the Unifi Dream Router (UDR) and the Unifi Dream Machine (UDM).
What is the Unifi Dream Machine
The Unifi Dream Machine is an all-in-one device that combines a Unifi Security Gateway (USG), a Cloud Key that hosts the Unifi Controller software, a 4-port managed Unifi switch and a Unifi Wi-Fi access point that supports Wi-Fi 5 speeds.
Differences between UDM and USG
The biggest difference between the UDM and the USG is that they are from entirely different generations and are based on entirely different philosophies to building a home network.
The UDM is an all-in-one WiFi-router-firewall-combo but the USG is just one component of a functional network.
The UDM is much newer and unofficially replaces the USG-based eco-system (which is efectively discontinued as they are rarely in stock even on the Unifi website).
The UDM has much more powerful hardware than the USG: faster dual-core CPU, 4 times more RAM, and 8 times more storage on-board.
The UDM has 10 times more data throughput with threat detection and prevention on vs. the USG (850 Mbps vs. just 85 Mbps for the USG).
The UDM has a built-in managed 4-port switch, whereas the USG has 2 Ethernet ports that can be used as LAN.
The UDM has a built-in WiFi Access Point (basically a NanoHD), whereas the USG doesn’t.
The UDM has only 1 WAN port, but the USG has 2 and this theoretically enables WAN failover (but is broken in the Unifi GUI and probably will never be fixed as the USG is outdated and obsolete – see this Reddit thread for a workaround).
The UDM supports newer VPN protocols (OpenVPN), whereas the USG does not.
Full Comparison Table – UDM vs. USG
[table id=83 responsive=scroll /]
Frequently Asked Questions (FAQ)
Do I need a Cloud Key to configure and manage the USG?
No, you do not need a Cloud Key. The Unifi Controller software is free and you can install it on any PC to setup the USG or any other Unifi gear. The Unifi Controller software does not need to run 24/7. It is required only for initial setup, for adjusting settings, and for maintenance updates. But you do need the software running 24/7 if you need statistics logging.
Will the USG be enough for a gigabit fibre internet connection?
As long as you don’t need the threat and intrusion detection features, the USG can easily handle a 1 gigabit internet connection. I personally have my USG handling 1 gigabit fibre Internet, a ton of VLANS and numerous firewall rules without breaking a sweat.
If you do need IDS/IPS, the USG will limit your internet connection to just 85 mbps which would be unacceptable. In that case, I recommend the UDM instead which can handle up to 850 mbps with all the security features turned on. If you have a 2 gigabit internet connection, you will need to step up to the UDM-SE or UDM-Pro.
Is the USG discontinued?
Officially it is not discontinued yet, but it is perpetually out of stock, and doesn’t seem to be getting any of the new features that the UDM series is getting. This is not suprising because the USG is outdated and obsolete. So I expect the USG to be officially discontinued in the near future.
Product prices and availability are accurate as of the date/time indicated and are subject to change. Any price and availability information displayed on https://www.amazon.com/ at the time of purchase will apply to the purchase of this product.
Product prices and availability are accurate as of the date/time indicated and are subject to change. Any price and availability information displayed on https://www.amazon.com/ at the time of purchase will apply to the purchase of this product.
(* = affiliate link / image source: Amazon Associates Program)
Conclusion
If you are looking for an all-in-once device, the UDM is the clear choice.
However if the UDM is not powerful enough, or you need the ability to hand-pick the various components of your network, the UDM-SE or UDM-Pro is a better choice.
Let me know what you think and please feel free to ask any questions or doubts you have!
The Unifi Dream Machine SE and Pro versions are great network gateways for most smart home enthusiasts. But what if you want most of this funtionality in a more compact and decor-friendly format? Something that can replace your current all-in-one WIFi router combo but adding far more power and features?
That’s where the Unifi Dream Machine (UDM) comes in as the baby of the trio from Ubiquiti’s UDM product range.
As we saw in our recent UDM-SE vs. UDM-Pro comparison, they are oriented more towards the home server in a rack audience. But the UDM is a simpler affair that will not look out of place in your living room.
So let’s take a deeper look at the Ubiquiti UDM vs. UDM-Pro.
A quick note: As an Amazon Associate I earn from qualifying purchases. This post contains affiliate link(s). An affiliate link means I may earn advertising or referral fees if you make a purchase through my link, at no extra cost to you.
The Unifi Dream Machine essentially combines a Unifi Security Gateway (USG), a Cloud Key, a managed Unifi switch and a Unifi Wi-Fi access point all into one compact and elegant device.
Differences between UDM and UDM-Pro
The main selling point of the UDM series is a network gateway that packages a hardware firewall, a managed switch and a very versatile management software interface. This software ‘controller’ makes it a breeze to add and centrally manage switches and wireless access points across your home or office.
On the hardware front, these are the main differences between the UDM and UDM-Pro:
UDM has a single WAN port, but the UDM-Pro has dual-WAN.
UDM WAN is gigabit ethernet, whereas UDM-Pro WAN has a 10 gigabit SFP port and a 2.5 GbE ethernet port.
UDM has 4 gigabit ports, but the UDM-Pro has 8 such ports.
UDM doesn’t have SFP+ port, UDM-Pro has a 10 gigabit SFP port.
UDM has a built-in Wi-Fi access point, but the UDM-Pro doesn’t.
UDM has 2 GB RAM, but the UDM-Pro has 4 GB RAM.
UDM doesn’t have a hard drive or SSD slot, the UDM-Pro comes with a 128 GB SSD drive.
UDM is not rack-moutable, but the UDM-Pro is.
UDM doesn’t have redundant power supply support, but the UDM-Pro does (Unifi Smart Power).
UDM doesn’t have WAN or LTE fail-over, but the UDM-Pro does.
UDM doesn’t have an LCD display, but the UDM-Pro has a touchscreen LCD display.
On the software features side, this is how the UDM and UDM-Pro differ:
UDM does not have the Unifi Security Console interface, but the UDM-Pro does.
UDM has only 850 mbps throughput when DPI is on with IDS/IPS enabled, but the UDM-Pro can do 3.5 Gbps.
UDM doesn’t have any NVR support, but the UDM-Pro supports Unifi Protect.
UDM doesn’t have honeypot feature, but the UDM-Pro does.
Full Comparison Table – UDM vs. UDM-Pro
[table id=82 responsive=scroll /]
UDM vs. UDM-SE
Here’s a quick summary of what the UDM-SE adds over the UDM-Pro:
UDM-SE has a managed PoE switch whereas the Pro only has a managed switch.
UDM-SE has a 2.5GbE WAN port whereas the Pro only has a 1Gbps WAN port.
UDM-SE has an integrated 128 GB M.2 SSD whereas the Pro doesn’t.
UDM-SE has an RPS indicator light for the Redundant Power Supply (RPS) but Pro doesn’t.
UDM-SE has a physical lock to secure the power cord whereas the Pro doesn’t.
UDM-SE is more expensive than the Pro – check the latest prices below.
So clearly if you want any of the above features, go for the UDM-SE instead of the UDM.
Conclusion
The UDM is a powerful and feature-packed all-in-one Wi-Fi router & security gateway that has advanced features like port isolation, VLANs, and central management of additional Unifi Wi-Fi access points in your home or office. So think of it as a straight replacement for a trafitional Wi-Fi router from your ISP or Asus/Linksys/Netgear etc.
If you dont need the extra hardware and software features of the UDM-Pro or UDM-SE, the standard UDM should be fine.
But do think about the downside of an all-in-one device: the UDM suffers from the risk of the entire unit being useless if one of its sub-components fail.
So wherever possible, I recommend building your system from discrete parts such as the UDM-SE + Unifi 6 Access Points rather than one single device like the UDM that becomes totally useless if one of its key components fail.
Let me know what you think and please feel free to ask any questions or doubts you have!
Product prices and availability are accurate as of the date/time indicated and are subject to change. Any price and availability information displayed on https://www.amazon.com/ at the time of purchase will apply to the purchase of this product.
Product prices and availability are accurate as of the date/time indicated and are subject to change. Any price and availability information displayed on https://www.amazon.com/ at the time of purchase will apply to the purchase of this product.
The Unifi Dream Machine (UDM for short) is a great choice for the heart of your home network. If you are building a DIY Smart Home or DIY CCTV system like me, you are probably interested in this flagship networking device from Unifi.
So what is the Unifi Dream Machine? It is an enterprise-level security gateway lineup from Ubiquiti. It is a very versatile network appliance that can replace your ISP-provided router.
But there are three different versions available – the desk-mounted Unifi Dream Machine (UDM), the rack-mountable Unifi Dream Machine Pro (UDM-Pro) and the latest rack-mountable Unifi Dream Machine Special Edition (UDM-SE).
This article will compare and contrast the two more advanced models UDM-SE and the UDM-Pro, and help you decide which is best for your needs.
A quick note: As an Amazon Associate I earn from qualifying purchases. This post contains affiliate link(s). An affiliate link means I may earn advertising or referral fees if you make a purchase through my link, at no extra cost to you.
Product prices and availability are accurate as of the date/time indicated and are subject to change. Any price and availability information displayed on https://www.amazon.com/ at the time of purchase will apply to the purchase of this product.
Product prices and availability are accurate as of the date/time indicated and are subject to change. Any price and availability information displayed on https://www.amazon.com/ at the time of purchase will apply to the purchase of this product.
(* = affiliate link / image source: Amazon Associates Program)
Unifi UDM-SE
The UDM-SE was launched early 2022 and improved upon the UDM-Pro. The SE increased the bandwidth of the RJ-45 WAN port and added PoE support to the integrated switch.
Product prices and availability are accurate as of the date/time indicated and are subject to change. Any price and availability information displayed on https://www.amazon.com/ at the time of purchase will apply to the purchase of this product.
(* = affiliate link / image source: Amazon Associates Program)
Which UDM is right for you?
If you are looking to power your security cameras or other network devices using Power over Ethernet (PoE), the UDM-SE has you covered. Its built-in managed switch has six 802.3at and two 802.3af PoE ports.
If you don’t need PoE-enabled Ethernet ports at all, the UDM-Pro will probably be fine. But do note that its WAN Ethernet port is limited to 1 Gigabit Ethernet.
Another reason to get the UDM-Pro is if you would rather use a separate PoE switch with more 802.3af ports or a higher wattage.
Both UDM-SE and UDM-Pro support Wireguard VPN now (earlier only the UDM-SE did).
You may choose the UDM Pro because you need more PoE ports than the 8 available on the UDM SE. In this case, consider a managed PoE switch such as the US-8-150W.
Do I need the UDM if I already have the USG?
If you have been with Unifi for a long time, you probably have the USG + Unifi Managed Switch + Cloud Key combo like I do in my smart home network. The UDM-Pro or UDM-SE essentially replace all 3 of those devices. So sure if you need any of the additional features of these newer devices, go ahead. But if you are happy with your current setup, there’s no need to upgrade.
Conclusion
Both the UDM-Pro and UDM-SE are great choices as the heart of your home/office network. By not integrating a Wi-Fi Access Point (WAP), you are free to mix and match any number of WAPs as needed.
Let me know what you think and please feel free to ask any questions or doubts you have!
When was the last time you backed up your data? 66% of us do it just once a year or less! If you are part of this group, this means all your precious data is stored in just one place on this planet. Hard drives are known to fail after all, and flash drives get misplaced, so you are taking a huge risk if you are not regularly backing up your hard drives (read weekly).
Now most people, including me, are quite lazy in our downtime and can’t be bothered to do something so dull as taking backups. This is where a Network Attached Storage (NAS) device comes into the picture – thanks to its redundant storage technology, all your data can be automatically backed up onto a second drive and even uploaded to a cloud storage provider if you so desire. Monthly backups become a breeze, as you just need to plug in an external USB (like my [easyazon_link identifier=”B00F0JXE04″ locale=”US” tag=”vueville.com-eaz-20″]WD Studio[/easyazon_link]) and hit the one-touch USB backup button. A few hours later, you have an offline backup of all your data too! Simply brilliant!
NAS servers have other advantages too. They can fulfil 24/7 file and media server duties reliably without driving up your electricity bills. In fact these little display-less (or headless in computer speak) computers can do a whole lot more, such as: be a CCTV Surveillance NVR, VPN client/servers, DLNA servers, FTP servers, web or mail servers, run virtual machines, take automatic mobile phone and laptop backups, even act as home automation controllers, the possibilities are endless.
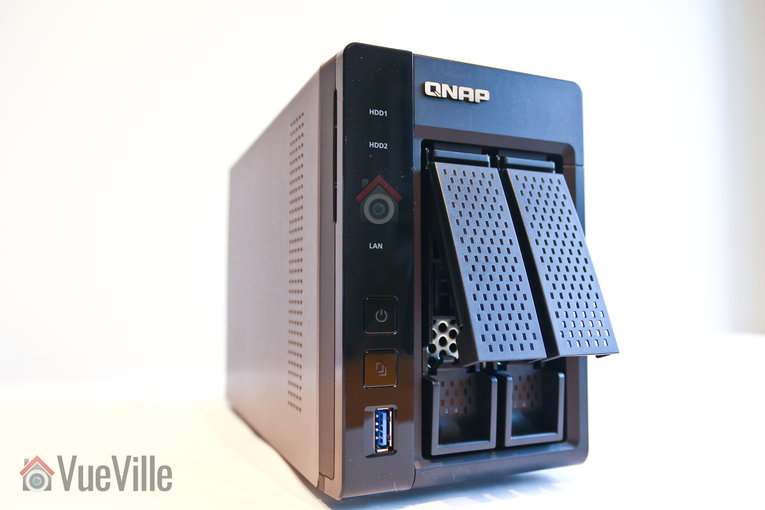
So let’s take a detailed look at the 4GB RAM version of the 2-bay QNAP TS-253A NAS that I purchased recently. QNAP calls it a QTS-Linux Combo NAS that can help you create a private cloud. I will also compare it to my previous NAS, the QNAP TS-231+ it replaced.
A quick note: As an Amazon Associate I earn from qualifying purchases. This post contains affiliate link(s). An affiliate link means I may earn advertising or referral fees if you make a purchase through my link, at no extra cost to you.
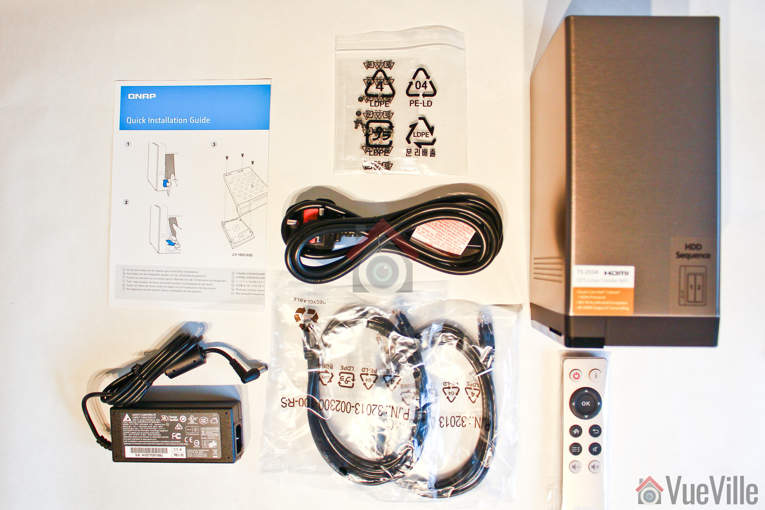
What’s in the box
The TS-253A comes in a fairly unassuming brown retail box with a sticker detailing its features and tech specs.
Opening up the box reveals the following kit:
TS-253A NAS
2x Ethernet Cable
65W AC Adapter (Model SP-2BAY-ADAPTOR)
Power cord
8x Flat head screw (for 3.5″ HDD)
6x Flat head screw (for 2.5″ HDD)
Quick Installation Guide (QIG)
Infrared (IR) Remote Control (Model RM-IR002)
Of course we shouldn’t forget one other thing that QNAP has generously provided with this NAS: 4 IP camera licences whereas the standard at this price point is just 2 if you look at the competition. For those of use looking to use the NAS as an NVR also, this coupled with the 2x HDMI ports is a great addition and increases the value of this NAS.
TS-253A Specifications
The most obvious feature is that the TS-253A is a 2-bay NAS. But it can also work with just 1 hard drive. My previous NAS was powered by a dual-core ARM processor, and so was a bit limited in the range of applications it could run. For example it did not have the power to run virtual machines. Nor did it have an HDMI output. But it did have very low power consumption due to the super-efficient ARM chip. So I decided I wanted an x86 based NAS that had more processing power but was still reasonable when it came to energy needs.
The TS-253A hits the sweet spot with its 14 nm lithography based Intel Celeron N3150 processor. This quad-core chip normally runs at 1.6GHz, but has a burst speed of 2.08 GHz, but needs only a cool 6W of power at 100% load! Just the type of chip you need for a NAS that runs 24/7. The N3150 chip is a 64-bit processor and supports Secure Boot, HD Audio & Intel Virtualization technology. The N3150 chip also supports Intel AES-NI hardware-accelerated encryption which prevents transfer speeds slowing down when dealing with AES 256-bit drive encryption. QNAP claims that the NAS can transfer data at up to 224 MB/s on a drive encrypted in this manner.
Lower spec NAS can perform only offline transcoding but the on-board graphics of the N3150 processor supports real-time 4K (H.264) and 1080p video transcoding. This allows the NAS to store 4K video content that it can convert on-demand in real-time to universal formats for playback on PCs, mobile devices and Smart TVs. The TS-253A comes in two flavours of DDR3L-1600 RAM: 4GB or 8GB. The RAM is user-upgradeable, so you can start with 4GB like I did and expand to 8GB later on.
Here are the full specs of the TS-253A:
[table id=42 responsive=scroll /]
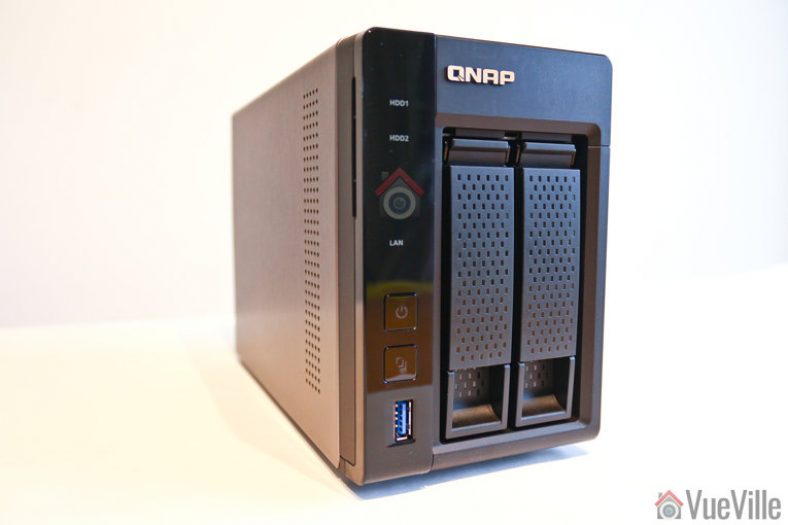
Design
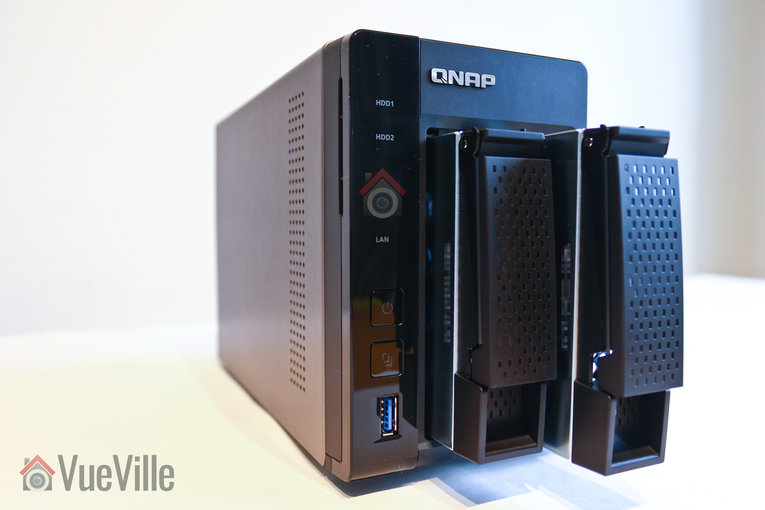
While the lower models in the QNAP portfolio come in an unattractive white, the TS-253A is dressed in a striking glossy and matte black combo. The case is mostly metallic except for the plastic front face that surrounds the drive bays.
The front of the unit houses the two disk bays, LED indicators for each HDD that blink on activity, a LAN activity LED, a power button, the USB one-touch copy button and a front USB 3.0 port. The USB port can be configured to automatically start a copy action to the NAS or a backup from the NAS to an external USB drive such as a WD Studio drive.
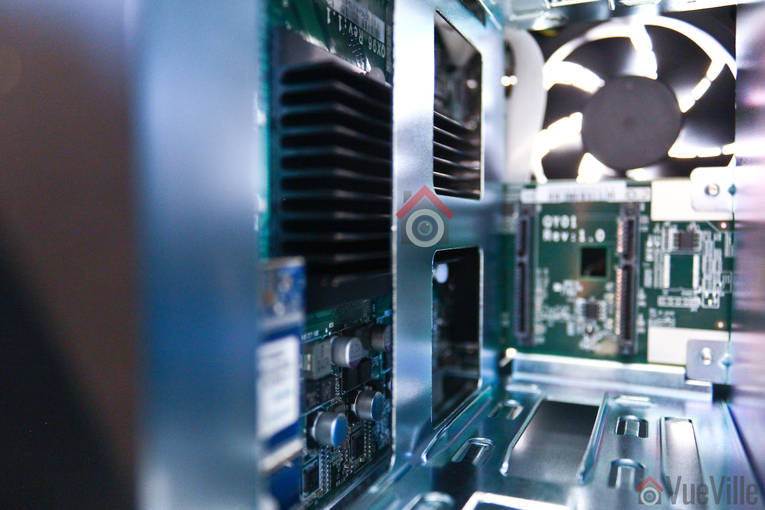
With the hard disk caddies out, you can see the innards of the NAS. The electronics are housed on one side and at the back.
There is a sizable heatsink on the Intel N3150 processor and a 7 inch fan pushing hot air out the back.
The rear of the NAS has the reset button, two HDMI ports, 4 USB 3.0 ports, two Gigabit LAN ports, the power socket, two microphone inputs for the karaoke feature, an audio out, and a Kensington security lock.
The NAS feels well-made and looks to be built to last. The 2-year warranty is also something I appreciate, considering that this is a device that’s going to be running 24/7.
Installation and Setup
The included Quick Installation Guide splits the setup process into two – hardware setup and software setup. Nice and logical, so let’s stick to that structure.
Hardware setup
Installing the hard drives is the first step. Now you don’t have to use 2 drives, you can start with one hard drive and then later on add another hard drive to set up a mirrored RAID system (RAID 1). But I strongly recommend adding another drive at the same time to benefit from redundant storage. Check out my top recommended NAS hard drives here.
The Quick Installation Guide has nice visuals walking you through installing each drive:
Open the drive bay
Pull it out
Place the hard drive in the caddy and use the provided 4 screws (for 3.5″ drives) or 3 screws (for 2.5″ drives) to scure the hard drive
Insert the drive caddy back into the bay
Plug in the power cord and hook up the NAS to your router through one of the LAN ports, and hit the power button.
Software setup
Once the NAS powers on, visit start.qnap.com to continue the setup process and install the latest firmware. This is the best method for beginners but if you are a more advanced user, you can also use the Qfinder app which lets you setup the NAS without an Internet connection.
My previous NAS, the QNAP TS-231+ had a hardware issue and was refunded by QNAP under the standard 2-year warranty as I mentioned in my quick review of the TS-253A. This left me with two 3TB WD RED hard drives that I wanted to use with my new TS-253A. I didn’t think it would be as simple as popping my existing drives into the new NAS and it would all work – I was right. I installed the two drives and turned on the NAS but sadly the QTS operating system did not recognise my hard drives as drives with data on them. So I proceeded with the setup process as if they were brand new empty drives. I chose RAID 1 as my drive volume type – so disk 1 is mirrored on to disk 2 in realtime. If one of the drives should fail, the other one would still have a copy of my data.
There are two steps you should do that the setup process doesn’t tell you to:
Create ‘shares’ or folders on your NAS drive: Have a real deep think about how you want to structure your data. Don’t just start creating hundreds of folders and files in the root folder. I always create a few shares: Documents, Photos, Videos, Backup and CCTV. You can choose to share these ‘shares’ with each user on your network, they just need to map each share to a drive letter on their computers and you have easily accessible network storage that simply works.
Create one user per family member on your NAS, and use the same login details as they do on their computers. This lets their computers seamlessly login to the NAS and reconnect the mapped network drives automatically whenever they turn on their computers. Practically this means the network folders behave like local folders on their computers, and not like a remote folder they have to log into each time they want to access it. This little trick revolutionised my family’s experience of network storage.
Now I said the TS-253A didn’t recognise my hard drives as used drives. So it couldn’t access the data that was already on it. This is where my weekly backups of the NAS to an external USB drive ([easyazon_link identifier=”B00F0JXE04″ locale=”US” tag=”vueville.com-eaz-20″]WD Studio 4TB drive[/easyazon_link]) paid off. Once the setup process was completed, I manually re-created the shares I had on my old NAS and copied over the data one by one into each share. A bit time consuming but my weekly backup schedule was a true life-saver.
QTS Software
Linux is a far superior operating system to Windows. That’s why the majority of web servers (like the one that powers this website) run on Linux. What about supercomputers? Shockingly, the top 500 supercomputers in the world all run on Linux. Yep, every single one of them. Linux is just a beautiful efficient operating system that can scale from a humble Raspeberry Pi to supercomputers. No wonder then, that most NAS manufacturers build their OS on Linux.
QNAP’s customisation of Linux is called QTS and the latest version 4.2.2 is now available for all their current models. QNAP has been continuously improving the QTS OS and it come across as a polished unified interface that effectively hides the tons of features it packs. Let’s look at the main features:
Storage Management and Data Protection
File Station
Local Snapshot and Snapshot Replica
Backup from PC, MAC, mobile to NAS
Backup from NAS to cloud
Storage Manager (SSD/HDD tiered storage)
Network and Virtual Switch – Bridge Ethernet ports or dedicate ports to specific applications for network trunking
User accounts and access limits
Data Security
Connection blacklist/whitelist
Account security and push notifications
VPN server and client
Proxy server
Anti-virus
Data Encryption
Hard drive-level or folder level
App Center – Houses all the apps available for QTS
Virtualization Station – Install any OS in a VM with dedicated CPU cores, RAM, disk storage, dedicated Ethernet port, HDMI output etc.
Container Station – A one-click-install turnkey Linux VM with dedicated CPU cores, RAM, disk storage, dedicated Ethernet port, HDMI output etc.
QIoT Container – helps developers build an IoT environment, integrate sensors, and make use of development kits (Raspberry Pi, etc.) with the NAS’s Ponte (data receiver), Node-RED (data analysis), MongoDB (data storage), Freeboard (data presentation) to construct a comprehensive IoT architecture.
QNAP QvPC – Use your NAS like a PC
Surveillance Station 5.1
QUSBCam2
Multimedia Center
Video Station 2.5
Music Station 4.8
HD Station 3.1
OceanKTV Karaoke
Download Station 4.2
Plex Media Server
Kodi Media Player
Productivity Tools such as NAS management, myQNAPcloud and Notes Station
Signage Station
Okay so which of the above features of QTS do I actually use?
File Station – This is akin to Windows Explorer but a much more powerful way to browse your NAS drive contents and connected hard drives
Anti-virus to keep my NAS and network safe
Surveillance Station 5.1 – One of the main reasons I got the NAS was for the surveillance feature and the 4 included IP camera licences
Container Station – I used this feature to easily set up an Ubuntu virtual machine that I use to primarily test Linux apps
DDNS update – This feature periodically updates my DDNS service with my home network’s IP address
DLNA server (Twonky) – Lets me stream all my media across the home network
USB One-touch backup – I take a weekly backup of my NAS to the WD Studio 4TB
Surveillance Station
Since this is a blog about home security, I think we should take a closer look at Surveillance Station which is one of the apps included with the QTS OS. Here are the features of Surveillance Station:
Live View
Live view of up to 64 channels on a single screen
Monitor on TV via HDMI port
Instant playback feature which rewinds the last few seconds
Supports PTZ cameras
Supports camera audio
Preset positions and auto-cruising
E-map feature which lets you visually show cameras on a layout overlay
Push, E-mail, and SMS notifications
Recording
H.264, MPEG-4, M-JPEG, and MxPEG formats
24/7 recording mode
Event-based recording: 5 types of events (motion detection, alarm input, connection failure, recording failure and user-defined events) that can initiate 7 types of event actions (recording, PTZ Control, alarm output, email notification, SMS notification, buzzer notification, and user-defined actions).
Manual recording
Smart recording which records at a higher bitrate only when the camera alarm is triggered
Playback
Timeline view, synchronised playback of all cameras
Preview recordings by thumbnail
Playback speed control
Digital zoom
Intelligent Video Analytics (IVA) which can scan footage for missing objects
Real-time watermarking
Web-based user interface
QVR Client desktop app
Vmobile – iOS and Android app
3000 IP camera models supported
Up to 32 user accounts
There are two ways you can access the web UI of Surveillance Station – log into the NAS admin and click on the Surveillance Station app or just go directly to the Surveillance Station app URL. In either case, what I dislike is having to log into the app even if I have logged into the NAS admin page. Why don’t I have Single Sign-On in 2018 QNAP?
The QNAP TS-253A is one of the rare 2-bay models on the market that come with 4 IP camera licences. To test the software, I added the following cameras at these resolutions:
Hikvivison DS-2CD2132F-IWS Dome camera
1920×1080 at 15fps, PoE
Hikvision DS-2CD2532FWD-IWS Mini-dome camera
1920×1080 at 15fps, PoE
Reolink RLC 422 Dome camera with motorised zoom
2560×1440 at 15fps, PoE
Reolink C1 Pro
2560×1440 at fps, WiFi
Surveillance Station auto-detected all the cameras either fully along with model number or as ONVIF models in the case of the newer Reolink C1 Pro. Even though the RLC-422 was a 5MP camera, Surveillance Station wouldn’t record higher than 4MP. Check out my detailed how-to article on setting up the QNAP surveillance station app with your cameras.
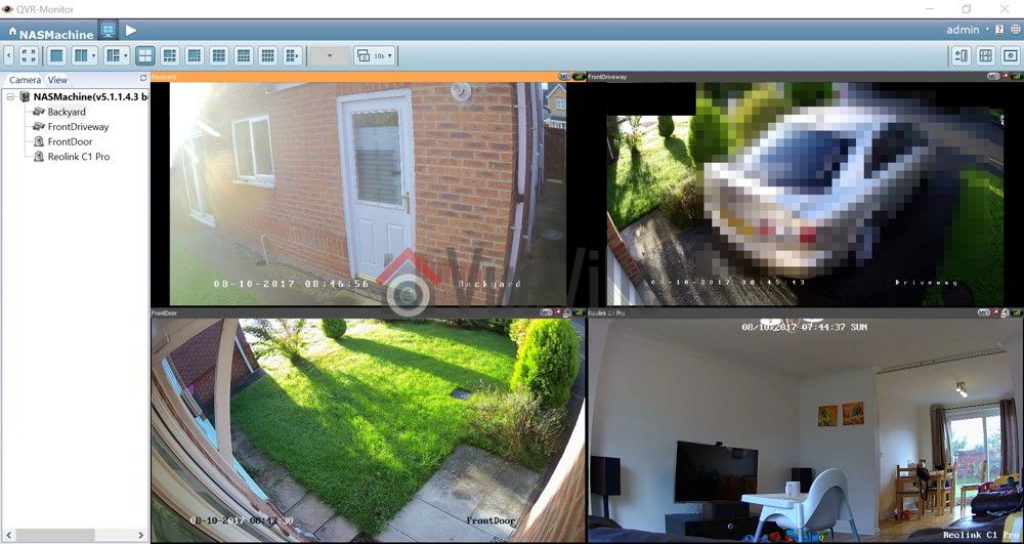
The app’s web-UI is not the new modern HTML5 style but relies on a plugin that has to be installed. For this reason, I prefer to use the far better QVR Client desktop app to monitor live-view and playback recorded video. Here’s a screenshot of the QVR client in action:
Our DIY Home Security System – QNAP QVR Client for Surveillance Station
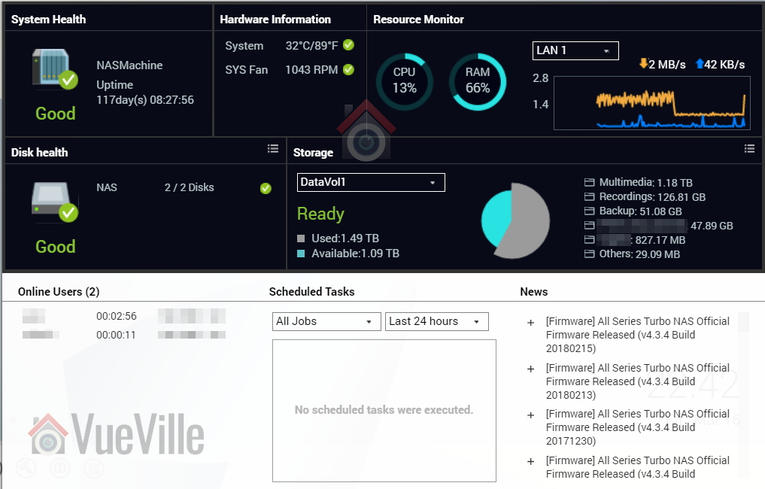
Performance
Okay so how does the NAS deal with recording 4 cameras at these high resolutions along with all the other things I ask of the NAS such as running a full Ubuntu VM? Without breaking a sweat, I am happy to report. CPU load hovered at around 13% and RAM usage was a steady 66%.
Verdict
NAS servers these days are versatile gadgets that can protect not just your data but also your home through its NAS NVR and VPN server features. I am amazed at the incredible level of functionality these devices pack for so little money.
The TS-253A is one of the best value NAS servers you can pick up right now that has an Intel processor, oodles of RAM, can run virtual machines and has 4 IP camera licences. If you have been dithering on getting a NAS for whatever reason, this is one NAS that is worth checking out.
[review]
Where to buy
[easyazon_link identifier=”B017YB4Y1S” locale=”US” tag=”vueville.com-eaz-20″]Check Price on your local Amazon site[/easyazon_link]
(* = affiliate link / image source: Amazon Associates Program)
Are you looking for a managed PoE network switch to complement your existing Ubiquiti kit? Or like me, are you just wondering what all the hype is about Ubiquiti? I have seen Ubiquiti users rave about how good their products are, so I decided to have a look at the Ubiquiti UniFi Switch 8.
The Ubiquiti Unifi Switch 8 is a popular 8-Port Gigabit PoE+ managed switch from Ubiquiti Networks, and it is a perfect entry point into the world of Ubiquiti if you have never tried them before.
[wpsm_toplist]
Ubiquiti Gigabit PoE Switches
The Ubiquiti Unifi Switch 8 is the baby of the Unifi managed PoE switch range which all feature gigabit ethernet, PoE+, and SFP. The same switch is also available in 16, 24 and 48 port versions.
Ubiquiti is unique in that they created their own power over Ethernet standard which operates at 24V instead of the 802.3 af/at standard of 48V. So if you are already invested in the Ubiquiti eco-system but also need a way to power 802.3af or at devices, this switch is definitely worth a look.
Although the lower end of the Ubiquiti network switch product range is primarily aimed at the SOHO market, many prosumers and DIYers have found them to be excellent for reliability and ease of use. The following network topology map shows how the Ubiquiti Unifi Switch 8 integrates with other Ubiquiti products.
More and more devices that have an Ethernet port are sporting the ability to be powered over the RJ-45 Ethernet port. This is incredibly convenient for devices like IP cameras and IP phone because you can carry both data and power over a single network cable. The most important PoE feature that you should look for in a switch is 802.3af compatibility because these devices have the ability to auto-negotiate the voltage that they need from a PoE power source. A maximum of 48V is possible under the standard.
The PoE standard (802.3af) is limited to a max 15.4W per port, whereas the PoE+ standard (802.3at) can provide up to 25.5W. So the only difference between these two standards is how much power they can transmit over a standard CAT network cable. For standard IP cameras such as the Amcrest or Hikvision, 15.4W is plenty enough. But some PTZ cameras may need more power and hence will require a PoE source that is 802.3at compatible. That’s where the Ubiquiti Switch 8 is perfect.
The Ubiquiti Switch 8 obviously supports Ubiquiti’s own proprietary 24V PoE standard, but also supports the standard PoE (802.3 af) and PoE+(802.3 at) implementation:
IEEE 802.3af and 802.3at compliant – auto detects and switches voltage as needed
Supports PoE power up to 34.2W for each PoE port – note this is more than the maximum of the 802.3at standard but is needed for some Ubiquiti-specific products
150W can be provided in total across all 8 PoE ports
What’s in the box
The Ubiquiti Switch 8 packaging consist of the following:
Unifi switch
Power cord
Mounting brackets (2 sets)
Bracket screws (M4, 8 pcs)
Mounting screws (M4, 4 pcs)
Screw anchors (M4, 4 pcs)
Quick start guide
Everything you need to wall mount the switch is included.
Look and Feel
Just like the TP-Link TL-SG1008P PoE switch and the Netgear GS308P, the Ubiquiti Switch 8 has an all-metallic chassis. This together with the fanless design helps it to stay cool even when all 8 PoE ports are drawing the maximum possible 150W. This is a great feature and will make life more comfortable if you are going to share an office room with a network switch.
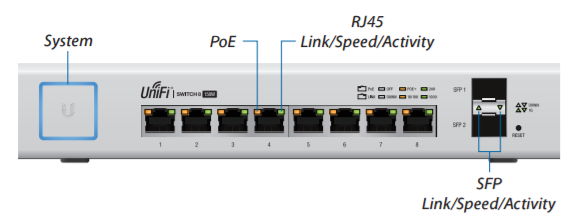
The front panel consists of a prominent on/off power switch, the 8 RJ-45 PoE+ ports, 2 SFP ports for fibre connectivity and a reset button. A legend for the LED activity lights is also thoughtfully provided above the ports (more on that below).
The Ubiquiti Unifi Switch 8 has very prominent ventilation holes all over the back panel and the sides. The only port you will find at the rear is the AC power plug socket.
The above image shows all the lights that the front panel has. Starting with the power switch, it will glow blue when the switch is on. Each network port has an LED indicating PoE status and a separate LED for link, speed and activity (blinks). The SFP ports also have an LED showing the link, speed and activity (blinks).
Installation
The UniFi requires that you have two things before you can install it:
A DHCP server to assign the UniFi an IP address
A UniFi cloud key or management station running the UniFi controller software version 5 or above
While the UniFi is wall mountable, it is not rack-mountable as Ubiquiti claims in the datasheet.
Once it is mounted using the supplied screws, connect the power and all required network cables.
Then install the UniFi controller software.
Ubiquiti devices need to be adopted by a controller before you can configure and starting them. So this is the next step.
The UniFi controller will show a list of devices it detects and with one click you can adopt them. The System LED on the switch will turn blue when this is successful.
You can then configure the PoE ports to to Off, 24V Passive (Ubiquiti’s own standard) or PoE+.That’s it, your new switch is now ready for use.
Operation
The switch is fanless and so totally silent during operation.
Verdict
We hope you enjoyed this review. Let us know your thoughts and experiences. [review]
Where to buy
[easyazon_link identifier=”B01DKXT4CI” locale=”US” tag=”vueville.com-eaz-20″]Check Price on your local Amazon site[/easyazon_link]
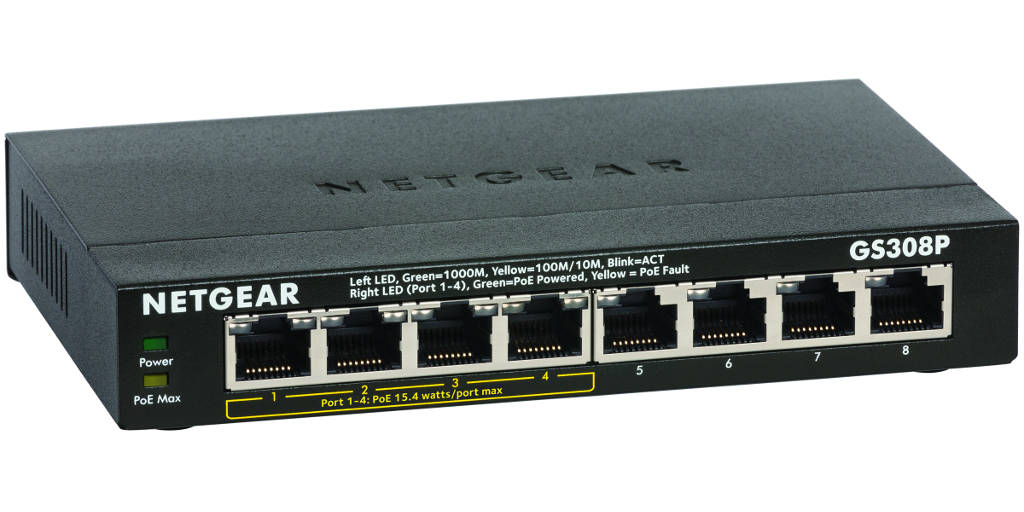
Today we look at the Netgear ProSAFE GS308P 8-Port Gigabit PoE un-managed switch. Belonging to the latest Netgear 300 series of SOHO switches, this is one of the most popular consumer networking switches at the moment.
This little switch is an absolute workhorse, and has served me for over 5 years now
[wpsm_toplist]
[text-blocks id=”5527″]
Netgear Gigabit PoE Switches
Netgear are one of the most widely respected networking companies and for good reason. Their networking products are well-built, reliable and have solid performance.
Netgear even overtook HP as the largest enterprise networking provider with 29% market share world-wide.
For the DIY home automation and security expert, Netgear makes some very attractive PoE (Power over Ethernet) enabled switches – both managed and unmanaged. However the feature-rich product line-up can also be quite confusing! So let’s understand where the GS308P-100NAS sits in Netgear’s product portfolio.
Netgear ProSAFE GS308P-100NAS
This switch belongs to Netgear’s ‘SOHO Ethernet Switch Series’. These switches are aimed at the prosumer and small office end of the market where a strong blend of features and performance are required.
Because they need to be plug-and-play with no setup required, the SOHO switches are of the unmanaged variety. This means that you cannot set up advanced features such as routing and configure networking protocols, as features such as VLANs, QoS, and IGMP Snooping are not available. However, at the DIY level this is usually not an issue.
If you need an 8 port managed PoE gigabit ethernet switch, we recommend the Netgear GS108PE Web Managed (Plus) switch which supports VLANs, QoS, and IGMP Snooping.
The most important PoE feature that you should look for in a switch is 802.3af compatibility. 802.3af compatible devices have the ability to auto-negotiate the voltage that they need from a PoE power source. A maximum of 48V is possible under the standard. The GS308P has the following PoE features:
IEEE 802.3af compliant – auto detects and switches voltage as needed
Supports PoE power up to 15.4W for each PoE port
Supports PoE power up to 53W for all PoE ports
The one feature that the TP-Link has and the Netgear doesn’t is prioritised ports for PoE. Also note that Ubiquiti wifi access points will not work with this switch. This is not Netgear’s fault but rather Ubiquiti’s because their PoE implementation is not standards compliant.
What’s in the box
The GS308P packaging consist of the following:
8-Port Gigabit Ethernet Switch with 4-Port PoE (GS308P)
Power Adapter
Quick Installation Guide
Wall-mount kit
Look and Feel
Just like the TP-Link TL-SG1008P PoE switch, the Netgear GS308P has an all-metallic chassis. This together with the fanless design helps it to stay cool even when all 4 PoE ports are drawing the maximum possible 53W.
Installation
The retail packaging comes with a wall mounting kit and the switch itself is wall-mountable. Again, just like the TP-Link TL-SG1008P, the Netgear is an unmanaged switch and therefore is plug-and-play. If you need a rack mountable switch, you will need to go for the larger 24-port GS324 model.
Operation
The switch is fanless and is silent during operation. The thermal output of 205.20 BTU during maximum utilisation and 0.95 BTU on standby is also very good despite the fanless design. There is an auto power down feature and the standby power consumtion of 0.28W is very good. Note that there is no on/off button on the device itself.
Verdict
Where to buy
[easyazon_link identifier=”B016XIU1HE” locale=”US” tag=”vueville.com-eaz-20″]View on your local Amazon Website[/easyazon_link]